R and RStudio with Config

email me

Installing RStudio can present a couple of challenges.

One: To install RStudio, ‘R’ also has to be installed; RStudio uses R as a core application.
Two: You may want to use a custom config file to store “global” settings.

Step 1

To install R as a prerequisite program, just add the following to your deployment script

R_App_3.3.0.exe” /silent


Step 2

Next, add the silent setup for RStudio with

RStudio_Desktop.exe” /S


Step 3

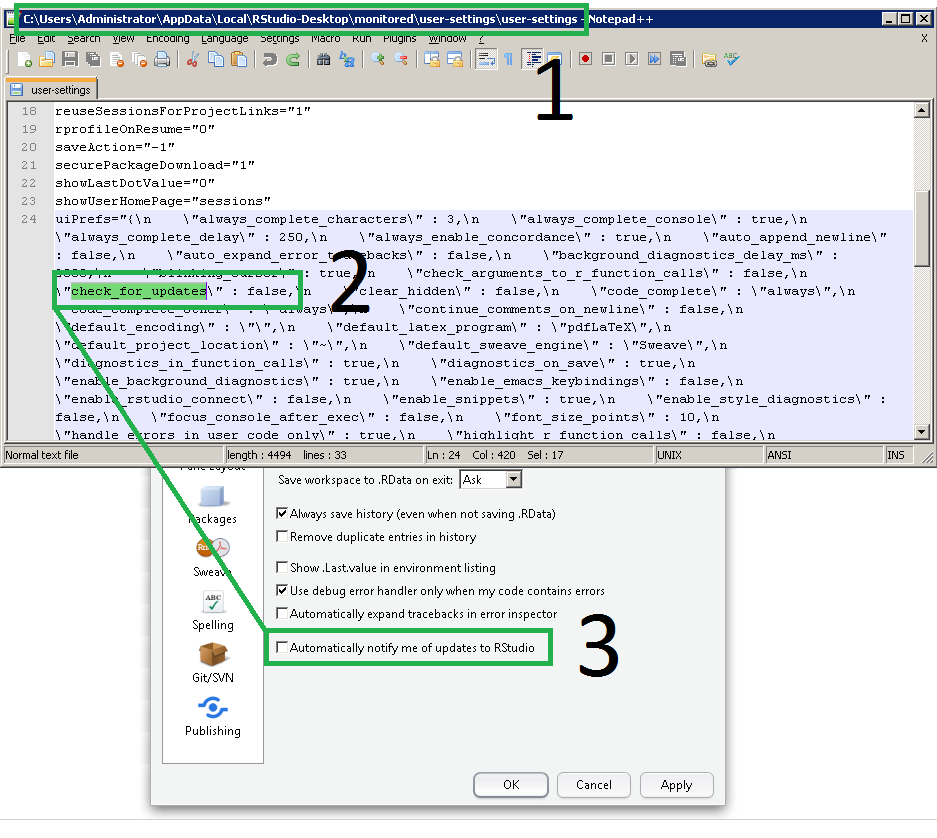
Next, to distribute the global config file, first set all the options you would like distributed to all users; for me, I disabled the automatic updates. I launched RStudio, and deselected the Automatically Notify option.

Then, grab the user-settings file from

%userprofile%\AppData\Local\RStudio-Desktop\monitored\user-settings


Step 4

Use this script to distribute the user-setting file to all user profiles. Just add a line to your deployment script pointing to this VBS.

Distribution Script

on error resume next

Set objShell = CreateObject("Wscript.Shell")
Set objFSO = CreateObject("Scripting.FileSystemObject")

Const HKEY_LOCAL_MACHINE = &H80000002
Const OverwriteExisting = TRUE

'SETS CURRENT DIRECTORY TO VARIABLE
strCurrentDirectory = objShell.CurrentDirectory

'SETS CURRENT COMPUTER NAME
strComputer = "."

Set objWMIService = GetObject("winmgmts:\\" & strComputer & "\root\cimv2")
Set objRegistry=GetObject("winmgmts:\\" & strComputer & "\root\default:StdRegProv")
strKeyPath = "SOFTWARE\Wow6432Node\Microsoft\Windows NT\CurrentVersion\ProfileList"
objRegistry.EnumKey HKEY_LOCAL_MACHINE, strKeyPath, arrSubkeys
For Each objSubkey In arrSubkeys
on error resume next
strValueName = "ProfileImagePath"
strSubPath = strKeyPath & "\" & objSubkey
objRegistry.GetExpandedStringValue HKEY_LOCAL_MACHINE,strSubPath,strValueName,strValue
Const POPUP_TITLE = "User To SID Conversion"
Set objWMIService = GetObject("winmgmts:\\" & strComputer & "\root\cimv2") 
Set objAccount = objWMIService.Get("Win32_SID.SID='" & objSubkey & "'")
strUser = objAccount.AccountName
'strDomain = objAccount.ReferencedDomainName'returns referenced domain

'DISPLAY PROFILE NAME & SID
objSubkey = trim(objSubkey)'trims whitespace
strUser = trim(strUser)'trims whitespace
'msgbox "objSubkey: " & objSubkey'returns SID
'msgbox strUser'returns username

'LOGIC TO DETERMINE IF REGISTRY ACCOUNT IS TO BE LOADED
if strUser = "SYSTEM" then strUser=""
if strUser = "LOCAL SERVICE" then strUser=""
if strUser = "NETWORK SERVICE" then strUser=""
'if strUser = "ADMINISTRATOR" then strUser=""

'COPY CUSTOM CONFIG TO EACH USER PROFILE
if strUser <> "" then
on error resume next
'USED LOW LEVEL COPYING BECAUSE IT WORKS BETTER IN DEPLOYMENTS
objShell.Run "%comspec% /c md " & chr(34) & "C:\users\" & strUser & "\AppData\Local\RStudio-Desktop\monitored\user-settings\" & chr(34),0,true
Wscript.Sleep 1000
objShell.Run "%comspec% /c copy /y " & chr(34) & strCurrentDirectory & "\user-settings" & chr(34) & " " & chr(34) & "C:\users\" & strUser & "\AppData\Local\RStudio-Desktop\monitored\user-settings\" & chr(34),0,true
Wscript.Sleep 1000

end if

Next


This is what the setting looks like.

1 – Where the user-settings file is located
2 – The particular Automatically Notify for Updates setting in the user-settings file
3 – The Automatically Notify for Updates option in the GUI


The full user-settings file

alwaysSaveHistory=”1″
cleanTexi2DviOutput=”1″
cleanupAfterRCmdCheck=”1″
contextIdentifier=”2D6BC5AD”
cranMirrorCountry=”us”
cranMirrorHost=”RStudio”
cranMirrorName=”Global (CDN)”
cranMirrorUrl=”https://cran.rstudio.com/”
enableLaTeXShellEscape=”0″
errorHandlerType=”1″
hideObjectFiles=”1″
initialWorkingDirectory=”~”
lineEndingConversion=”2″
loadRData=”1″
newlineInMakefiles=”1″
removeHistoryDuplicates=”0″
restoreLastProject=”1″
reuseSessionsForProjectLinks=”1″
rprofileOnResume=”0″
saveAction=”-1″
securePackageDownload=”1″
showLastDotValue=”0″
showUserHomePage=”sessions”
uiPrefs=”{\n \”always_complete_characters\” : 3,\n \”always_complete_console\” : true,\n \”always_complete_delay\” : 250,\n \”always_enable_concordance\” : true,\n \”auto_append_newline\” : false,\n \”auto_expand_error_tracebacks\” : false,\n \”background_diagnostics_delay_ms\” : 2000,\n \”blinking_cursor\” : true,\n \”check_arguments_to_r_function_calls\” : false,\n \”check_for_updates\” : false,\n \”clear_hidden\” : false,\n \”code_complete\” : \”always\”,\n \”code_complete_other\” : \”always\”,\n \”continue_comments_on_newline\” : false,\n \”default_encoding\” : \”\”,\n \”default_latex_program\” : \”pdfLaTeX\”,\n \”default_project_location\” : \”~\”,\n \”default_sweave_engine\” : \”Sweave\”,\n \”diagnostics_in_function_calls\” : true,\n \”diagnostics_on_save\” : true,\n \”enable_background_diagnostics\” : true,\n \”enable_emacs_keybindings\” : false,\n \”enable_rstudio_connect\” : false,\n \”enable_snippets\” : true,\n \”enable_style_diagnostics\” : false,\n \”focus_console_after_exec\” : false,\n \”font_size_points\” : 10,\n \”handle_errors_in_user_code_only\” : true,\n \”highlight_r_function_calls\” : false,\n \”highlight_selected_line\” : false,\n \”highlight_selected_word\” : true,\n \”ignore_uppercase_words\” : true,\n \”ignore_words_with_numbers\” : true,\n \”insert_matching\” : true,\n \”insert_numbered_latex_sections\” : false,\n \”insert_parens_after_function_completion\” : true,\n \”insert_spaces_around_equals\” : true,\n \”navigate_to_build_error\” : true,\n \”num_spaces_for_tab\” : 2,\n \”packages_pane_enabled\” : true,\n \”pane_config\” : {\n \”consoleLeftOnTop\” : false,\n \”consoleRightOnTop\” : true,\n \”panes\” : [\n \”Source\”,\n \”Console\”,\n \”TabSet1\”,\n \”TabSet2\”\n ],\n \”tabSet1\” : [\n \”Environment\”,\n \”History\”,\n \”Build\”,\n \”VCS\”,\n \”Presentation\”\n ],\n \”tabSet2\” : [\n \”Files\”,\n \”Plots\”,\n \”Packages\”,\n \”Help\”,\n \”Viewer\”\n ]\n },\n \”pdf_previewer\” : \”desktop-synctex\”,\n \”preferred_document_outline_width\” : 110,\n \”print_margin_column\” : 80,\n \”reindent_on_paste\” : true,\n \”restore_source_documents\” : true,\n \”rmd_preferred_template_path\” : \”\”,\n \”rmd_viewer_type\” : 0,\n \”root_document\” : \”\”,\n \”save_before_sourcing\” : true,\n \”save_files_before_build\” : false,\n \”show_diagnostics_cpp\” : true,\n \”show_diagnostics_other\” : true,\n \”show_diagnostics_r\” : true,\n \”show_doc_outline_rmd\” : false,\n \”show_indent_guides\” : false,\n \”show_inline_toolbar_for_r_code_chunks\” : true,\n \”show_invisibles\” : false,\n \”show_line_numbers\” : true,\n \”show_margin\” : false,\n \”show_publish_ui\” : true,\n \”show_signature_tooltips\” : true,\n \”show_unnamed_chunks_in_document_outline\” : true,\n \”soft_wrap_r_files\” : false,\n \”source_with_echo\” : false,\n \”spelling_dictionary_language\” : \”en_US\”,\n \”strip_trailing_whitespace\” : false,\n \”surround_selection\” : \”quotes_and_brackets\”,\n \”syntax_color_console\” : false,\n \”tab_multiline_completion\” : false,\n \”theme\” : \”TextMate\”,\n \”toolbar_visible\” : true,\n \”use_rcpp_template\” : true,\n \”use_roxygen\” : false,\n \”use_spaces_for_tab\” : true,\n \”use_vim_mode\” : false,\n \”valign_argument_indent\” : true,\n \”warn_if_no_such_variable_in_scope\” : false,\n \”warn_if_variable_defined_but_not_used\” : false\n}”
useDevtools=”1″
useInternet2=”1″
vcsEnabled=”1″
vcsGitExePath=””
vcsSvnExePath=””
vcsTerminalPath=””
vcsUseGitBash=”1″
viewDirAfterRCmdCheck=”0″

What is IE Enterprise Mode?

email me

Enterprise Mode is a compatibility mode that runs in Internet Explorer 11 on Windows 8.1 and Windows 7 devices. This mode allows websites to render web content using a modified browser configuration. It is designed to emulate either Windows Internet Explorer 7 or Windows Internet Explorer 8, avoiding the common compatibility problems associated with web apps written and tested on older versions of Internet Explorer.

Many customers identify web app compatibility as a significant cost to upgrading because web apps need to be tested and upgraded before adopting a new browser. The improved compatibility provided by Enterprise Mode can help give customers confidence to upgrade to the latest version of IE. In particular, IE11 lets customers benefit from modern web standards, increased performance, improved security, and better reliability.

The Enterprise Mode Option


Registry Entries

You will probably want to automate the setting or add it to your imaging process. To do this, simply add the following reg commands to a setup/deployment script. You will of course need to create your own compatibility list using the respective site.xml file.

reg add “hklm\SOFTWARE\Policies\Microsoft\Internet Explorer\Main\EnterpriseMode” /v Enable /f 

reg add “hklm\SOFTWARE\Policies\Microsoft\Internet Explorer\Main\EnterpriseMode” /v SiteList /t REG_SZ /d \\site.xml /f

Note, \\site.xml could be formatted as

http://YourWebSite/site.xml
\\Server\ShareName\site.xml
file://C:/Users/JDoe/site.xml


Sample sitelist.xml

 <site-list version=“205”>
<!— File creation header —>
<created-by> <tool>EnterpriseSitelistManager</tool>
<version>10240</version>
<date-created>20150728.135021</date-created> </created-by>
<!— Begin Site List —>
<site url=“www.MYSite.com”>
<compat-mode>IE8Enterprise</compat-mode>
<open-in>MSEdge</open-in> </site>
<site url=“www.MYSite.com/images”>
<compat-mode>IE7Enterprise</compat-mode>
<open-in>IE11</open-in> </site>
<site url=“contoso.com”> <compat-mode>default</compat-mode>
<open-in>IE11</open-in> </site>
</site-list>


If you do not see enterprise mode, make sure you have installed KB3087038, specifically, KB/3070773. Download the update here.

Update!

On some of our machines, we noticed that Enterprise Mode was not being enabled automatically, even though the reg keys were there, IE11 was installed, and the KBs were there.

This was the solution: KB3185319, https://www.microsoft.com/en-us/download/details.aspx?id=53757

This will upgrade IE11 to 11.0.9600.18449.


Enterprise Mode Features

Enterprise Mode includes the following features:

  • Improved web app and website compatibility. Through improved emulation, Enterprise Mode lets many legacy web apps run unmodified on IE11, supporting a number of site patterns that aren’t currently supported by existing document modes.
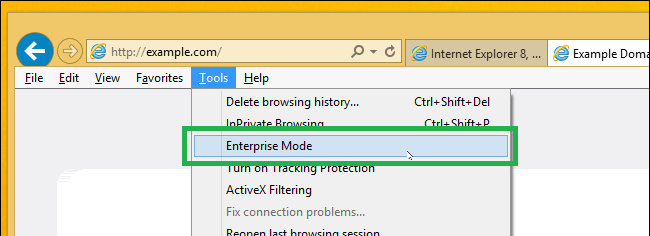
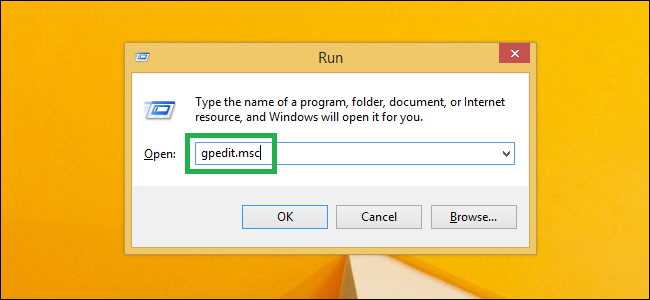
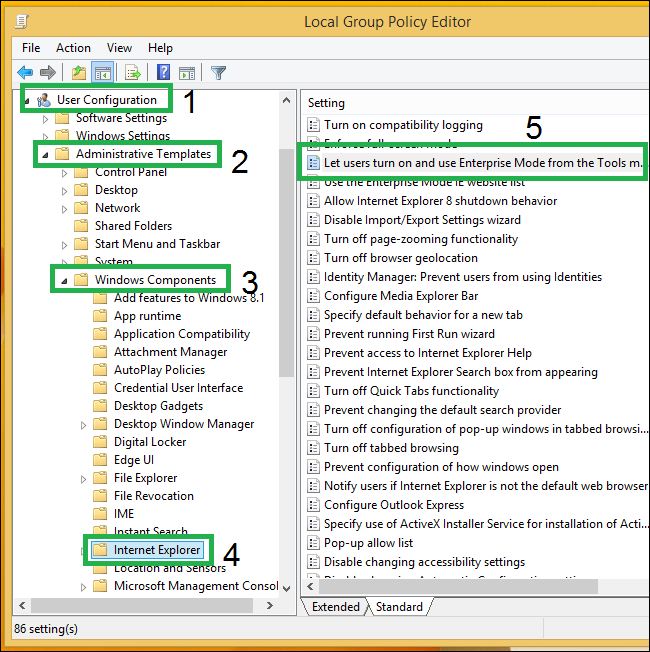
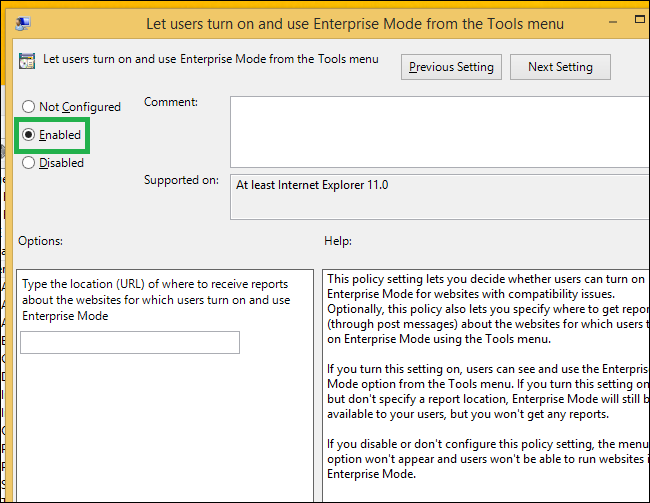
  • Centralized control. You can specify the websites or web apps to interpret using Enterprise Mode, through an XML file on a website or stored locally. Domains and paths within those domains can be treated differently, allowing granular control. Use Group Policy to let users turn Enterprise Mode on or off from the Tools menu and to decide whether the Enterprise browser profile appears on the Emulation tab of the F12 developer tools.

    Important
     
    All centrally-made decisions override any locally-made choices.
  • Integrated browsing. When Enterprise Mode is set up, users can browse the web normally, letting the browser change modes automatically to accommodate Enterprise Mode sites.
  • Data gathering. You can configure Enterprise Mode to collect local override data, posting back to a named server. This lets you “crowd source” compatibility testing from key users; gathering their findings to add to your central site list.


References

https://blogs.windows.com/msedgedev/2015/11/23/windows-10-1511-enterprise-improvements/

https://blogs.msdn.microsoft.com/notime/2015/04/11/ie-enterprise-mode-in-a-nutshell/


Notes

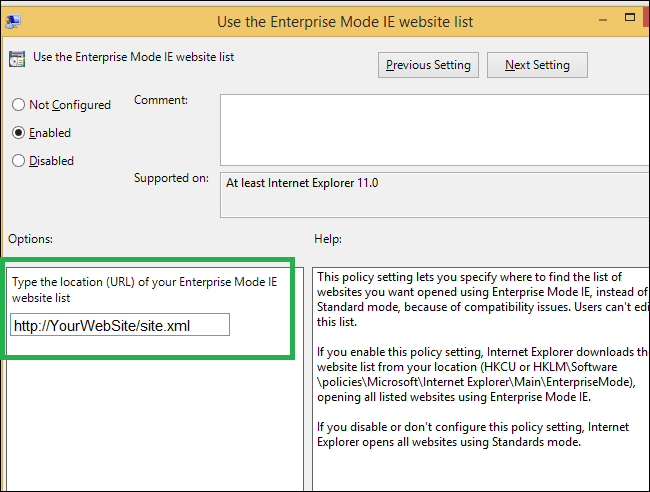
You may actually want to use GP to enforce and manage the site URL, in that case use the following:

You also need to enable the ‘Use the Enterprise Mode IE website list’ option in GP.

Still in the Internet Explorer settings, Select ‘Use the Enterprise Mode IE website list’ option, navigate to the Enable, and add your URL or UNC into the field.

If you want to use the netlogon server-–instead of a web server—you can add the netlogon environmental variable, with a share name as the UNC location in GP.

 %logonserver%\netlogon\SiteList\site.xml 

Adobe Reader DC Customization Tool and Setup

email me

The Tool

If you’re packaging the Adobe Reader DC application, you’ll need the customization tool to create the MST. You can find the tool here:

ftp://ftp.adobe.com/pub/adobe/acrobat/win/AcrobatDC/misc/CustWiz1501620039_en_US_DC.exe

* Updated

http://prodesigntools.com/ardownload/pub/adobe/reader/win/AcrobatDC/1502320053/AcroRdrDC1502320053_en_US.exe


Installation and Setup

Wizard Installation

You must use a Wizard version that is the same as the product version. Thus, DC products can only be customized with Wizard version DC. To install the Wizard:

  1. Download the installer for Windows. There is also a Mac installer.
  2. Run the installer EXE.
  3. At the Welcome screen, choose Next.
  4. Accept the license agreement, and choose Next.
  5. Verify the install location, and choose Next.
  6. Choose Install.
  7. Choose Finish.


Workspace views

The Wizard workspace is made up of five elements:

  • The status bar at the bottom of the workspace displays system information.
  • The top menu bar provides key menu options.
  • The left-hand navigation bar links to configuration panels you use to modify installation settings. Panels are context-sensitive and will not display unless that feature is supported by the product. If you do not see a link in the navigation bar, then the settings are is not available for the installer you’ve loaded.
  • The main work area on the right displays configurable installation settings.
  • The help panel below the main work area contains context-sensitive assistance for optimizing your use of the Customization Wizard.

To show and hide panels:

  1. Choose View.
  2. Select an element to add to or remove from the workspace.

The title bar, menu bar, and main work area cannnot be hidden in the workspace.

Wizard user interface

adobecustomtool.png


Transform (.mst) file basics

When you save a project, the Wizard creates an MST file that contains most of your customizations. As shown in the examples below, you simply chain the the install with any needed updates (.msp) and the transform file (.mst). However, keep in mind the following rules:

  • Once an MST is applied during an install, another MST can’t be used later during an update (say, to change one setting).
  • The way the Windows Installer Technology works is that during an update or repair, the installer references the MST file that the installation used when it was first installed.
  • The only way to use a different MST is to uninstall the product and then reinstall with a new MST file.
  • Acrobat installers support multiple transforms. A semi colon-separated list of transforms can be applied during installation. For details, see the Microsoft documentation.

Expanding EXE packages

The Wizard works with MSI files. If you’ve downloaded an EXE file, expand it as described below to obtain an MSI and other needed files.

  1. Open a command prompt.
  2. Expand the MSI package using the requisite command line switches. The general form of the command to convert a compressed file to an MSI package is:
<path to installer>\<product_name>.exe [<7-zip switches>]

Examples

AcroRdr20151500630032_MUI.exe -sfx_nu /sALL /msi EULA_ACCEPT=YES
<path>\Acrobat_2015_Web_WWMUI.exe -sfx_o"<absolute path\extractDirectory>" -sfx_ne

Note

Nosso was deprecated with 10.x products. Do not use the current directory, and do not leave any spaces after -nos_o or-sfx_o command.

Switches for expanding the installer
7-zip switch Description
-sfx_ne Do not execute any file after installation (overrides the -e switch) This switch should be used to extract the installer contents and not run the installer.
-sfx_nd Do not delete files after installation (overrides the -r switch) The -r switch uses the existing folder and overwrites the extraction files to the same folder without creating an additional extraction folder.
-sfx_o Specifies the name of folder where the contents of the expanded package are to be placed. The folder name should be enclosed in quotation marks. It is best if you do not use an existing folder.
-sfx_va Validates the decompression of the deliverables.


Loading an installer file

Before customizing the installer, archive a version of the downloaded MSI or MSP file and back it up. Do not modify this file. Only modify a copy of the file.

  1. Open the Customization Wizard.
  2. Choose File > Open Package or press CTRL+O.
  3. Browse to locate the product installation directory.
  4. Select the file to modify.
  5. Choose Open.


Open a recent project

If you have recently opened an installer, you can access it quickly from the shortcut on the File menu.

  • Choose Start > Programs > Adobe Customization Wizard.
  • Choose File > Open Package or press CTRL+O, and click the file name from the shortcut list.


Loading a transform file

To apply a transform file associated with another project to your current project:

  1. Choose Transform > Load Transform.
  2. In the Open dialog box, browse to find the file location, and then select the transform file name.
  3. When you are done, choose Open.
  4. To apply the newly loaded installation settings to the open project, choose File > Save or press CTRL+S.

Note

If the transform file is not already located in the same directory as the project file, the Wizard creates a copy of the transform file there when you save the project file.


Saving a project

When you are finished customizing the installer, save your settings by choosing File > Save (or press CTRL+S). The Wizard saves your customizations in a transform (.mst) file and updates the project (.msi) file and setup.ini file in the same directory.

  • If the setup.ini file is not located in the same directory as the project file, you will see an error message when you try to save the file. But if the transform file is not located in the same directory as the project file, the Wizard places a copy in the same directory as the .msi file.
  • If the setup.ini file is not located in the same directory as the project file, you will see a message indicating that you cannot save the project (.msi) file.


Pre deployment file verification

As part of the customization process, the Wizard modifies three files which must be located in the same directory:

  • Project file (.msi): The installer file for your application.
  • Transform file (.mst): Contains your modifications to the installer as well as any separate files. The Wizard creates or updates a transform file every time you save an .msi file.
  • Setup.ini file: Contains initialization data for the installer. Some Adobe and MSI properties are written to this file. You can manually edit this file to add more properties and features. For details, see the Enterprise Administration Guide.

Reset installation settings

To restore an edited package to its default settings:

  1. Choose File > Reset Package to Adobe default.
  2. Choose Yes to confirm.


Multiple installations

If you have multiple installation scenarios in your organization, you can specify multiple sets of installation settings in separate transform files. You do not need to create and store a complete package for each scenario. Instead, you can create a standard package and store multiple transform files in a separate directory. When you are ready to run an installation, open the project file, and load the transform file containing the installation settings you want to use.

Windows – Deleting User Profiles – ProfileList

email me

We all know where the user profiles are stored, but did you also know….Microsoft uses a reference pointer of the profile in the registry? That’s right.

If you happen to delete the C:\Users\UserProfile, but forget to remove the reg key, welcome to a second profile being generated, which causes problems in profile consistency across your network. You don’t want something that looks like Username.DomainName, or Username.Temp.

So, from another account (I use administrator), delete the reg key first

Path: HKEY_LOCAL_MACHINE\SOFTWARE\Microsoft\Windows NT\CurrentVersion\ProfileList
Value: Specific User Profile

* it’s always good practice to first back up the registry before making modifications


And then delete the user profile

C:\Users\UserProfile

* or, a safer route, just rename profile to C:\Users\Username.old


Tag: ProfileList, Delete User Profile

Internet Explorer 11 Upgrade – Suppress Reboot

email me

Going from IE9 to IE11 can be quite an involved process…usually it requires multiple reboots from numerous prerequisites. To suppress the reboots, use DISM to inject the prereqs and IE11 into Windows. After a single reboot, the prereqs will be installed, along with IE11.

Just copy this code into a DeployIE11.cmd file, and then use SCCM, LANDesk, Altiris etc…to deploy the script to your clients. Make sure you include the necessary .cab files as resource files in the deployment.

@ECHO OFF

TITLE IE 11 Deployment

CLS
COLOR 0A

SET CurDir=%CD%

ECHO Installing IE 11 prerequisite: KB2834140
dism /online /add-package /packagepath:"%CurDir%\Windows6.1-KB2834140-v2-x86.cab" /quiet /norestart>nul

ECHO Installing IE 11 prerequisite: KB2670838
dism /online /add-package /packagepath:"%CurDir%\Windows6.1-KB2670838-x86.cab" /quiet /norestart>nul

ECHO Installing IE 11 prerequisite: KB2639308
dism /online /add-package /packagepath:"%CurDir%\Windows6.1-KB2639308-x86.cab" /quiet /norestart>nul

ECHO Installing IE 11 prerequisite: KB2533623
dism /online /add-package /packagepath:"%CurDir%\Windows6.1-KB2533623-x86.cab" /quiet /norestart>nul

ECHO Installing IE 11 prerequisite: KB2731771
dism /online /add-package /packagepath:"%CurDir%\Windows6.1-KB2731771-x86.cab" /quiet /norestart>nul

ECHO Installing IE 11 prerequisite: KB2729094
dism /online /add-package /packagepath:"%CurDir%\Windows6.1-KB2729094-v2-x86.cab" /quiet /norestart>nul

ECHO Installing IE 11 prerequisite: KB2786081
dism /online /add-package /packagepath:"%CurDir%\Windows6.1-KB2786081-x86.cab" /quiet /norestart>nul

ECHO Installing IE 11 prerequisite: KB2888049
dism /online /add-package /packagepath:"%CurDir%\Windows6.1-KB2888049-x86.cab" /quiet /norestart>nul

ECHO Installing IE 11 prerequisite: KB2882822
dism /online /add-package /packagepath:"%CurDir%\Windows6.1-KB2882822-x86.cab" /quiet /norestart>nul

ECHO Installing IE 11 main application
dism /online /add-package /packagepath:"%CurDir%\IE-Win7.cab" /quiet /norestart>nul

ECHO Installing IE-Spelling
dism /online /add-package /packagepath:"%CurDir%\Windows6.3-KB2849696-x86.cab" /quiet /norestart>nul

ECHO Installing IE-Hyphenation
dism /online /add-package /packagepath:"%CurDir%\Windows6.3-KB2849697-x86.cab" /quiet /norestart>nul

ECHO Installing latest IE cumulative security update: KB3038314
dism /online /add-package /packagepath:"%CurDir%\IE11-Windows6.1-KB3038314-x86.cab" /quiet /norestart>nul

ECHO Done!

REM Add IE Reboot Splash Screen

EXIT /B 0


Simple Install

There may be the chance that a simple install will work just fine for you. In that case, use the following code. The source files were extracted from the IE-Win7.CAB file.

@ECHO OFF

SET CurDir=%CD%

CLS
COLOR 0A
“%CurDir%\IE-REDIST.EXE” /quiet /norestart /update-no

REM Add IE Reboot Splash Screen

EXIT /B 0

Windows 10 Experience Index

email me

If you haven’t noticed, the Windows Experience has gone missing in Windows 10. If you want to return your experience score, do this.

From a admin command prompt run:

winsat formal -v -xml c:\winstatresults.xml

After it has completed, open the c:\winstatresults.xml. You will see the scores.

Scripting the Windows 10 Upgrade

email me

These solutions will launch the Windows 10 Upgrade in a zero touch setup. While these will certainly start the upgrade process, I do recommend uninstalling AV, DLP, and other security programs that may interfere with the upgrade. If you’re doing this in an enterprise environment, just make sure you test your security software and settings with the upgrade process.

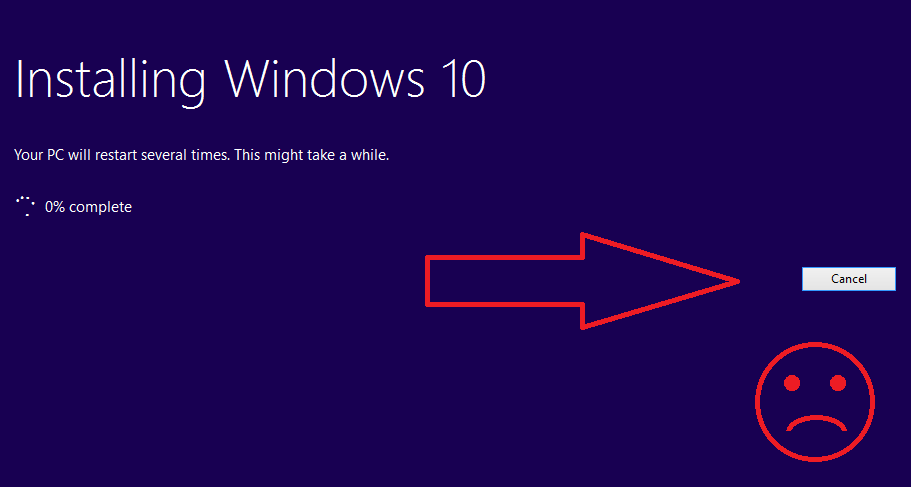
Also, if in an enterprise environment, I suggest disabling power management and screensavers, and creating your own splash screen to cover the initial Microsoft splash (if you’re clever, just create a nice splash with animation and automation…and run the setup.exe with /quiet). The MS splash allows the user to cancel the upgrade; you’ll want to prevent users from doing that.

User can cancel
 

Windows 10 Upgrade Command

This is a single command you can run in your scripts, on SCCM, or LANDesk that will automatically begin the upgrade process—in a zero touch setup.

SCCM

setup.exe /auto upgrade /quiet /copylogs %SystemDrive%\Logs\

setup.exe [/Auto:Upgrade | /Unattend:\\ServerName\ShareName\unattend.xml] /DynamicUpdate Disable /Copylogs %SystemDrive%\Logs\


LANDesk

1.) Download the Win10 ISO, once downloaded extract the contents to your LANDesk file server.

2.) Next you’re going to need the unattend.xml that’s attached. You cannot add or remove anything from this file – only the auto upgrade can be in here. save it to your fileserver in the same location as the extracted setup.exe.

Note – the installer is fully silent with the only UI being the one below. If you wish to change this, edit the .xml to what you require.
3.) Create a distribution task within LANDesk and point to the setup.exe within the windows 10 iso package for your primary file e.g. \\yourlandeskshare\images\Win10Images\Windows 10 OS\setup.exe

Within the Install/Uninstall options, use the following switches /Auto:Upgrade /Unattend:unattend.xml /DynamicUpdate Disable /Copylogs %SystemDrive%\ProgramData\LANDESK\Logs\

4.) Add all of the windows 10 media and unattend.xml as additional files.

5.) Schedule the task and install just as you would any other software. Make sure to use Download and Execute Settings.


Windows 10 PowerShell Script

This is the PowerShell code that does exactly what the single command does.

$scriptPath = split-path -parent $MyInvocation.MyCommand.Definition
$unattend = “””” + $scriptPath + “\unattend.xml” + “”””

$mount = Mount-DiskImage -ImagePath ($scriptpath + “\SW_DVD5_Win_Pro_10.ISO”) -PassThru
$driveLetter = ($mount | Get-Volume).DriveLetter

$setup = $driveLetter + “:\setup.exe”
$param = “/Auto:Upgrade /Unattend:$unattend /DynamicUpdate Disable”

Start-Process -FilePath $setup -WorkingDirectory ($driveLetter + “:\”) -ArgumentList $param


Contents of unattend.xml

You’ll need to point the setup to use this unattend.xml file. Make sure you don’t add anything else to it.

<UpgradeData>
<Upgrade>true</Upgrade>
<WillShowUI>Never</WillShowUI>
</UpgradeData>

Note:  <ProductKey>xxxxx-xxxxx-xxxxx-xxxxx-xxxxx</ProductKey>


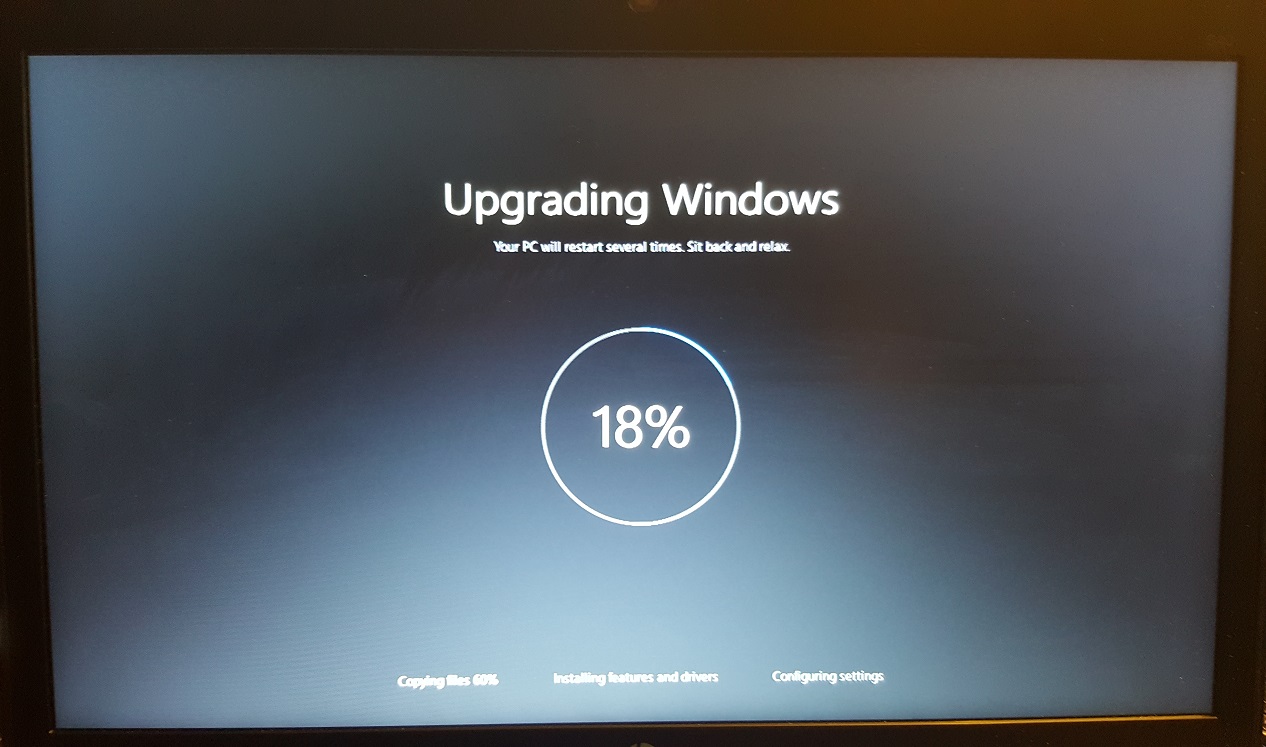
What the Upgrade Looks Like (after auto reboot)
 

The setup.exe command from SCCM

(for my own reference)

SETUP.EXE” /ImageIndex 3 /auto Upgrade /quiet /noreboot /postoobe “C:\Windows\SMSTSPostUpgrade\SetupComplete.cmd” /postrollback “C:\Windows\SMSTSPostUpgrade\SetupRollback.cmd” /DynamicUpdate Disable /pkey AAAAA-BBBBB-CCCCC-DDDDD-EEEEE /compat IgnoreWarning


If There Are Problems

Disable (preferably uninstall) your Antivirus utility before attempting the upgrade.

  • Disable General USB Devices (example – Smart Card Reader).
  • Do a clean boot and try again.
  • If you are upgrading using the .ISO file, disconnect from the Internet during setup, if you are connected by LAN (Ethernet) or Wi-Fi, disable both and attempt setup again.
  • If you are updating through Windows Update, when the download reaches 100% disconnect from the Internet LAN (Ethernet) or Wi-Fi and proceed with the installation.
  • If that does not work, try using the .ISO file to upgrade if possible.
  • If you are connected to a domain, switch to a local account
  • If you have any external devices attached to the machine, disconnect them (example, USB keys, external hard disk, printers, non-essential devices).
  • Remove USB flash drives, discs from the DVD/CD player, and other peripheral devices.

Example of Symantec Issue

If you don’t uninstall the Symantec AV, at least upgrade to 12.1.6.1 with the following command line switches: setup /v”/l*v c:\log.txt MIGRATIONDELAY=1 MAXMIGRATIONDELAY=1″


Reference

https://technet.microsoft.com/en-us/library/cc722011(v=ws.10).aspx
https://community.landesk.com/docs/DOC-39519

https://support.symantec.com/en_US/article.TECH231349.html


Notes

The following command line arguments can be used to modify the behavior of Windows installation:

Switch: /auto
Parameters: Upgrade; DataOnly; Clean

Action: Automate install with migration choice for the installation. The media setup UI and progress screens are shown by default, but are automated. This switch also assumes the following default configurations: EULA acceptance, Dynamic Update is enabled, telemetry collection and upload opt – in, OOBE will be skipped, PBR will be updated or created.

Example: setup.exe /auto upgrade


Switch: /quiet

Parameters : N /A

Action: The quiet flag will suppress any setup UX, including rollback UX

Example: setup.exe /auto upgrade /quiet


Switch: /pkey

Parameters: 5×5 product key

Action: Supplies setup with the specified product key. This parameter is not necessary when upgrading with volume licensed media or media that contains a pid.txt in the sources folder.

Example: setup.exe /auto upgrade /pkey ABC12-DEF34-GHI56-JKL78-MNP90


Switch: /showoobe

Parameters: Full; None

Action: When /showoobe is set to Full, the end user must interactively complete OOBE.
Alternatively, when /showoobe is set to None, OOBE is skipped and components are set to their default settings.

Example: setup.exe /auto upgrade /showoobe full


Switch: /noreboot

Parameters: N /A

Action: Setup will not automatically reboot the PC when it completes down – level OS tasks.
The next time the PC is rebooted, setup will continue.

Example: setup.exe /auto upgrade /noreboot


Switch: /DynamicUpdate

Parameters: Enable; Disable

Action: Specifies whether setup will perform Dynamic Update operations (search, download, and install updates).

Example: setup.exe /auto upgrade /DynamicUpdate disable


Switch: /Postoobe Path\setupcomplete.cmd

Parameters: Local file path or UNC network path to a file named setupcomplete.cmd

Action: Injects setupcomplete.cmd file from the specified location. Setupcomplete.cmd is a customized script to perform tasks after the installation completes but before first user login. It is run with System privileges.

Example: setup.exe /auto upgrade /postoobe c:\script\setupcomplete.cmd


Switch: /Postrollback

Parameters : Local file path or UNC network path to a file named setuprollback.cmd

Action: Injects setuprollback.cmd file from the specified location. Setuprolback.cmd is a customized script to perform tasks after the installation fails and the PC has rolled back to its previous OS. It is run with the same privileges as the user or process that launched setup.

Example: setup.exe /auto upgrade /postrollback \MyShare\script\setuprollback.cmd


Switch: /installfrom

Parameters: Local file path or network path to a specific.wim

Action: Specifies location for installation source media /files

Example: setup.exe /auto clean /installfrom d:\myWim\customwim.wim


Switch: /PBRUpdate

Parameters: Enable; Disable

Action: When /PBRUpdate is set to Enable, setup will update or create the PBR partition.
Conversely, when /PBRUpdate is set to Disable, setup will not update or create the PBR partition

Example: setup.exe /auto upgrade /PBRupdate disable


Switch: /migratealldrivers

Parameters: All; None

Action: When /migratealldrivers is set to All, setup will attempt to migrate all drivers as part of the installation. In contrast, when /migratealldrivers is set to None, setup will not migrate any drivers as part of the installation. NOTE: this switch should only be used in testing and test envoriments.It should not be used in production.

Example: setup.exe /auto upgrade /migratealldrivers none


Switch: /installdrivers

Parameters: Local file path or UNC network path to a folder that contains.inf files

Action: Setup will inject all driver.infs found in the specified location during the installation process. Setup will recursively search through all the subfolders of the specified location.

Example: setup.exe /auto upgrade /installdrivers c:\myUpgrade\drivers


Switch: /Telemetry

Parameters: Enable; Disable

Action: When /Telemetry is set to Enable, setup will collect and upload telemetry generated by the installation. However, when /Telemetry is set to Disable, setup will not collect and upload installation – related telemetry.

Example: setup.exe /auto upgrade /Telemetry enable


Switch: /copylogs

Parameters: Local file paths and UNC network paths

Action: Upon failure, setup will copy or upload compressed logs to the specified location.
Please note that the PC and /or user must have permission and network access to the specified file path. This command runs in the system context so may not have permissions to copy to locations that require user permissions

Example: setup.exe /auto upgrade /copylogs \MyShare\UpgradeLogs

Here are some usage examples.

An admin wants to upgrade the department’s PCs from Windows 7 Enterprise overnight. He does not want the setup user interface to appear, but he does want the end users to manually go through the Out of box experience(known as OOBE) experience.

The following command line can be used to orchestrate the full upgrade to Windows Next, requiring user input only once the machine reaches OOBE:

Setup.exe /auto upgrade /quiet /showoobe full

Alternatively, a deployment engineer may want to collect logs and other diagnostic information from test PCs in the event of a failure.

The following command line instructs setup invoke the setuprollback.cmd script after an installation failure:

Setup.exe /auto upgrade /installdrivers c:\myUpgrade\drivers /postrollback c:\setuprollback.cmd
Stop Ransomware – A Scripted Solution

email me

What is ransomware?

Ransomware stops you from using your PC. It holds your PC or files for ransom.

Some versions of ransomware are called “FBI Moneypak” or the “FBI virus” because they use the FBI’s logos.

What does it look like and how does it work?

There are different types of ransomware. However, all of them will prevent you from using your PC normally, and they will all ask you to do something before you can use your PC.

They can:

  • Prevent you from accessing Windows.
  • Encrypt files so you can’t use them.
  • Stop certain apps from running (like your web browser).

They will demand that you do something to get access to your PC or files. We have seen them:

  • Demand you pay money.
  • Make you complete surveys.

Often the ransomware will claim you have done something illegal with your PC, and that you are being fined by a police force or government agency.

These claims are false. It is a scare tactic designed to make you pay the money without telling anyone who might be able to restore your PC.

There is no guarantee that paying the fine or doing what the ransomware tells you will give access to your PC or files again.


Prevalent ransomware

Locky  and Cerber are two of the most prevalent and dangerous ransomware currently active.

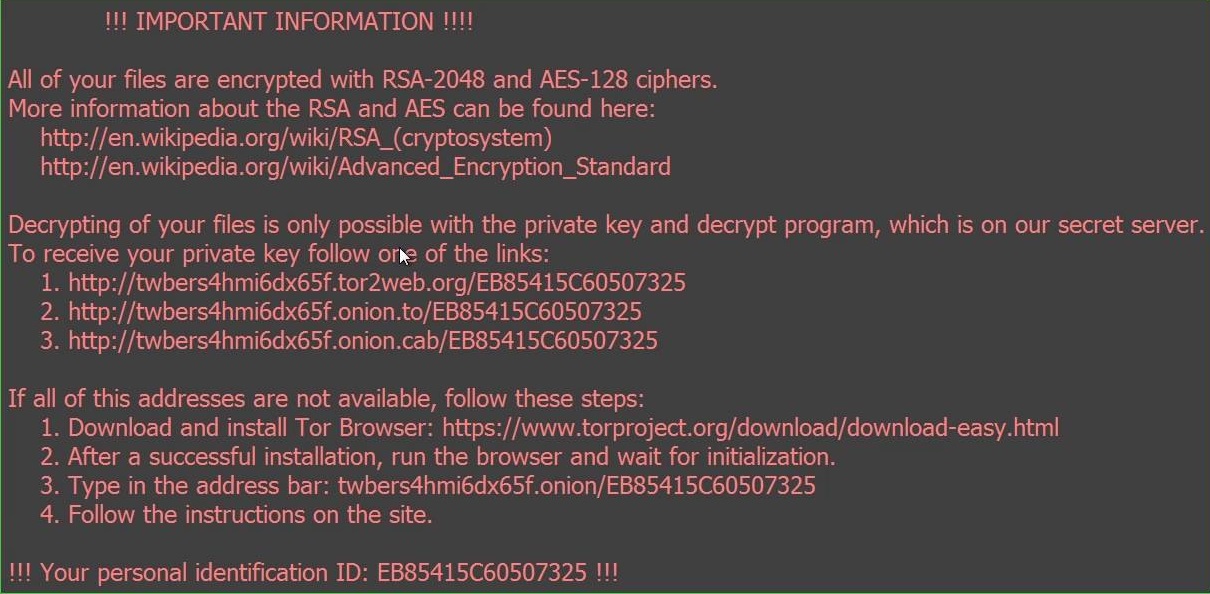
Locky Recovery Notice

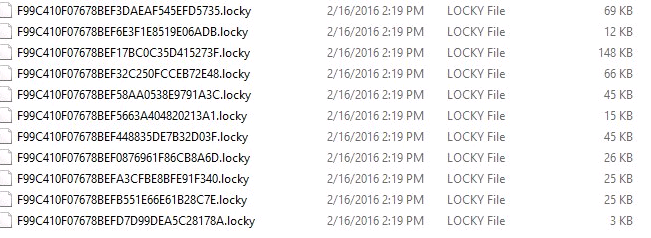
What the Locky encrypted files look like


Detection

So, with Locky on the rise, it got me thinking, what exactly does Locky (and other ransomware) do to your computer? What happens when the ransomware starts processing? Most ransomware—that encrypts files—uses something known as CryptoLocker, which uses a form of AES encryption. Even before Locky starts encrypting files, EXEs are added to folders, and registry keys are added to the registry.

Soo…how do we prevent or at least reduce the impact of ransomware? A simple approach would just be to monitor the computer for ransomwarelike behavior.

Something I came of up with—which is still early in development—is to scan all the known areas that Locky is likely to hit first. This would include common registry keys, EXEs in the user’s Local and Roaming folders, and monitoring ‘marker’ files. A marker file is just a text file in the user’s profile…which has a specific hash number associated with it. If that marker file disappears, is encrypted, or is changed in any way, a script changes from monitoring mode, to alert mode. Likewise, if known ransomware registry keys are detected, a script goes into alert mode. The idea is to create a monitoring script, with low impact to system resources, that will act as a method for early detection. Early detection means less of the files will be encrypted.

This is the start of my script – this would be compiled and ran as a silent process

@echo off
title Ransomware Scanner
color 0a

:: booValean set to false
set booVal=FALSE
:: reg key to check
set regKey=CryptoLocker
:: file marker name
set fileName=DO_NOT_DELETE
:: file extensions to check
set fileType1=.EXE
set fileType2=.exe
set fileType3=.locky
:: md5 to check
set md5=1914255e58188f70feced69533c99aec
Setlocal EnableDelayedExpansion
set timer=timeout /t 10

C:
cd C:\Users\%username%\AAA

:LOOP
:: CHECK FOR CRYPTOLOCKER REG KEY
cls
Echo Scanning computer for ransomware...Checking HKCU\SOFTWARE\Microsoft\Windows\CurrentVersion\Run
FOR /F "tokens=1" %%A IN ('REG QUERY "HKCU\SOFTWARE\Microsoft\Windows\CurrentVersion\Run"') DO (
if %%A==%regKey% set booVal=TRUE
)
%timer%>nul

:: CHECK FOR CRYPTOLOCKER REG KEY
cls
Echo Scanning computer for ransomware...Checking HKCU\SOFTWARE\CryptoLocker
REG QUERY HKCU\SOFTWARE\CryptoLocker
IF %errorlevel%==0 GOTO :END

:: CHECK FOR CRYPTOLOCKER_0388 REG KEY
cls
Echo Scanning computer for ransomware...Checking HKCU\SOFTWARE\CryptoLocker_0388
REG QUERY HKCU\SOFTWARE\CryptoLocker_0388
IF %errorlevel%==0 GOTO :END

:: CHECK FOR CRYPTOLOCKER REG KEY
cls
Echo Scanning computer for ransomware...Checking HKCU\SOFTWARE\Locky
REG QUERY HKCU\SOFTWARE\Locky
IF %errorlevel%==0 GOTO :END

:: CHECK FOR EXE IN THE LOCAL FOLDER
cls
Echo Scanning computer for ransomware...Checking Local Folder
for /F "tokens=*" %%U IN ('dir /b C:\Users\%username%\AppData\Local') do (
if [%%~xU]==[%fileType1%] set booVal=TRUE
if [%%~xU]==[%fileType2%] set booVal=TRUE
)
%timer%>nul
if %booVal% EQU TRUE goto :END

:: CHECK FOR EXE IN THE ROAMING FOLDER
cls
Echo Scanning computer for ransomware...Checking Roaming Folder
for /F "tokens=*" %%V IN ('dir /b C:\Users\%username%\AppData\Roaming') do (
if [%%~xV]==[%fileType1%] set booVal=TRUE
if [%%~xV]==[%fileType2%] set booVal=TRUE
)
%timer%>nul
if %booVal% EQU TRUE goto :END

:: CHECK FOR EXE IN THE DOCUMENT FOLDER
cls
Echo Scanning computer for ransomware...Checking C:\Users\%username%\Documents
for /F "tokens=*" %%W IN ('dir /b C:\Users\%username%\Documents') do (
if [%%~xW]==[%fileType3%] set booVal=TRUE
)
%timer%>nul
if %booVal% EQU TRUE goto :END

:: CHECK FOR EXE IN THE PICTURES FOLDER
cls
Echo Scanning computer for ransomware...Checking C:\Users\%username%\Pictures
for /F "tokens=*" %%X IN ('dir /b C:\Users\%username%\Pictures') do (
if [%%~xX]==[%fileType3%] set booVal=TRUE
)
%timer%>nul
if %booVal% EQU TRUE goto :END

:: CHECK TO SEE IF AAA FILE EXISTS
cls
Echo Scanning computer for ransomware...Checking AAA_%fileName%.txt
if not exist C:\Users\%username%\AAA\AAA_%fileName%.txt set booVal=TRUE
%timer%>nul
if %booVal% EQU TRUE goto :END

:: CHECK TO SEE IF BMP FILE EXISTS
cls
Echo Scanning computer for ransomware...Checking %UserpProfile%\Desktop\_Locky_recover_instructions.bmp
if exist %UserpProfile%\Desktop\_Locky_recover_instructions.bmp set booVal=TRUE
%timer%>nul
if %booVal% EQU TRUE goto :END

:: RETURN AAA FILE CHECKSUM
cls
Echo Scanning computer for ransomware...Checking MD5 on AAA_%fileName%.txt
set count=1
for /F "tokens=* delims=" %%Y IN ('CertUtil -hashfile C:\Users\%username%\AAA\AAA_%fileName%.txt MD5') do (
set var!count!=%%Y
set /a count+=1
)
if %booVal% EQU TRUE goto :END

:: CHECK TO SEE IF MD5 IS THE SAME -- IF NOT EQUAL, SET TRUE
:: removes spaces
set var2=%var2: =%
if %var2% NEQ %md5% set booVal=TRUE
%timer%>nul
if %booVal% EQU TRUE goto :END

CLS
echo Old MD5: %var2%
echo New MD5: %md5%
echo Detect: %booVal%
%timer%>nul
goto :LOOP

:END
CLS
echo Old MD5: %var2%
echo New MD5: %md5%
echo Detect: %booVal%
echo.
echo msgbox "  Ransomware has been detected^!" > "%temp%\popup.vbs"
wscript.exe "%temp%\popup.vbs"
set booVal=FALSE
goto :LOOP


Notes

https://blog.malwarebytes.org/threat-analysis/2016/03/look-into-locky/

http://www.bleepingcomputer.com/virus-removal/cryptolocker-ransomware-information

USB Ports and Devices

email me

Have you wondered how USB devices are powered? Or, how about…can certain USB devices be made portable? I explore these questions.

USB runs at 5v. The max current you can draw is 500ma. Therefore the max load is 5v x 0.5A=2.5. Watts. (W=VxI) If you try and draw more than 500mA, you may overload the port which will cause it to break.

Thus, to power a device off a USB port, it needs to be under 5 volts — as that is how much a USB port gives out:

4 x AAA = Good
4 x AA = Good

Here is a chart that shows batteries and mA

Battery Type Capacity (mAh) Typical Drain (mA)
D 13000 200
C 6000 100
AA 2400 50
AAA 1000 10
N 650 10
9 Volt 500 15
6 Volt Lantern 11000 300


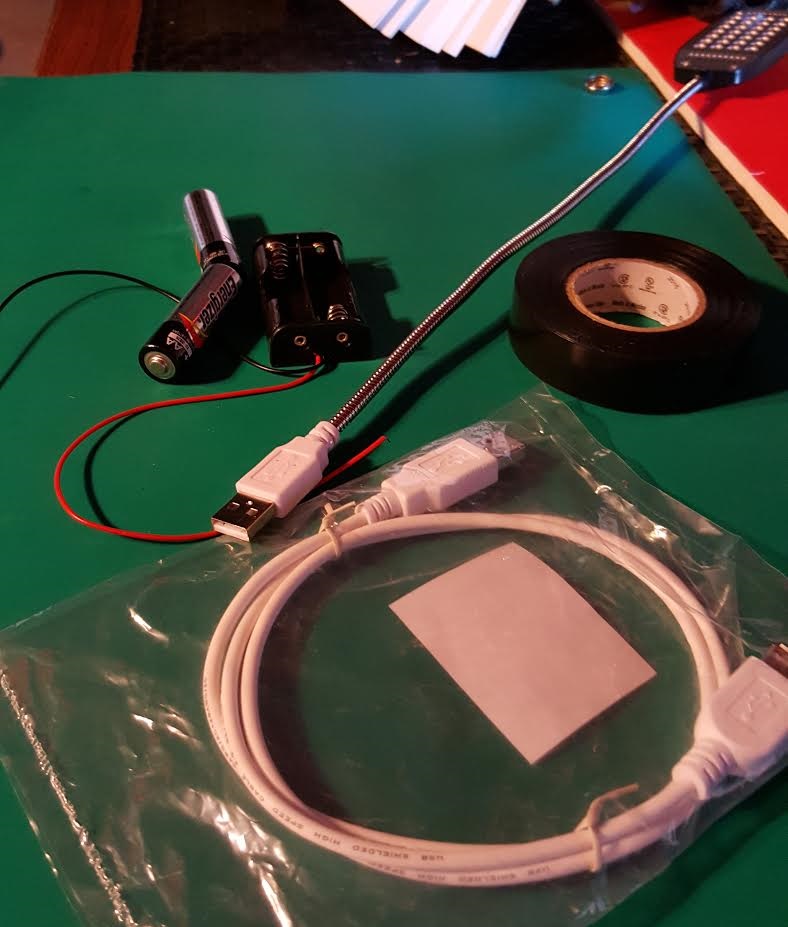
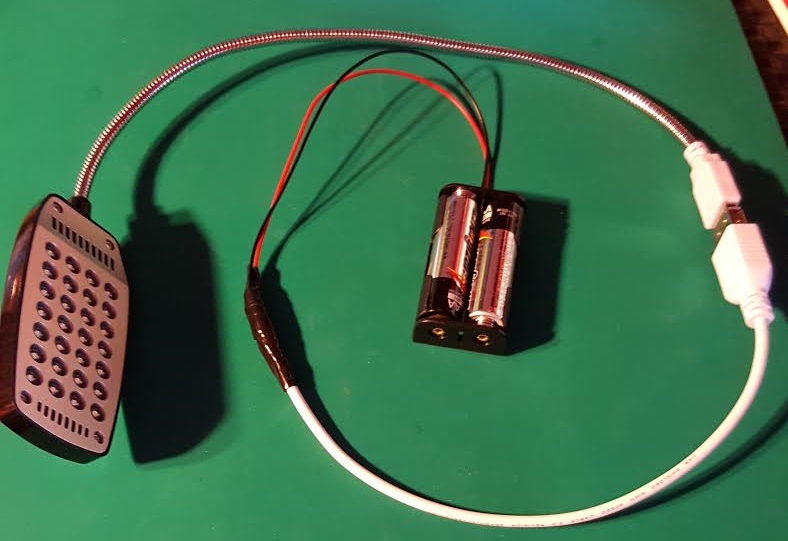
Now, something cool you may not know, many USB devices can be rigged to run off batteries (even rechargeable ones — even solar). For example, I have a pretty nice USB LED light.

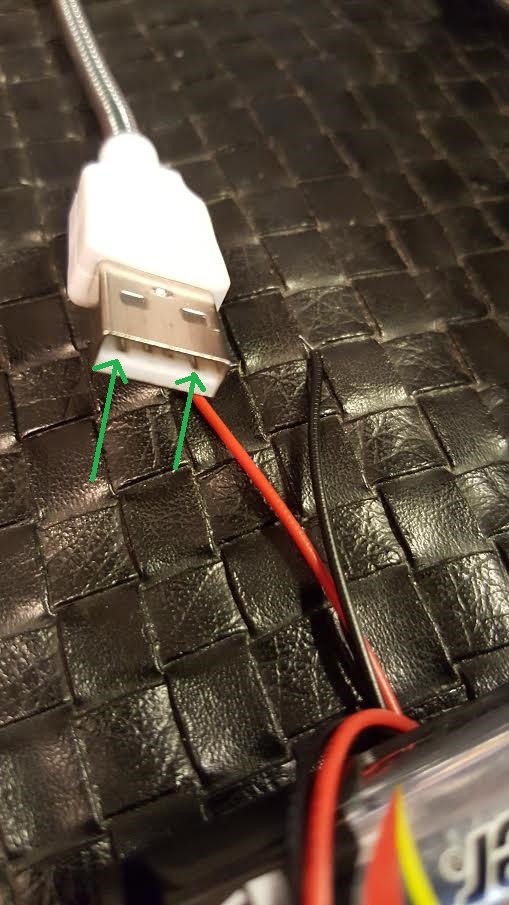
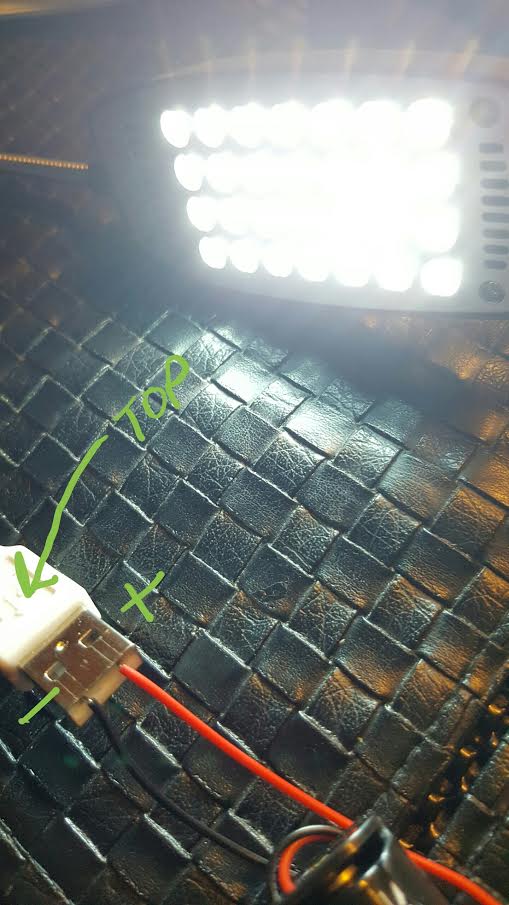
To make it portable, I simply bought an AA battery pack housing (for 2 batteries — for a couple of bucks), and connected the two terminal wires (one black and one red) to the outer pins on the USB LED light. See pictures for pins.

Pins lead to these wires

The pins we’re concerned about

Of course, it does matter which terminal wire goes where, so to demonstrate the working USB light, I have turned the USB connector facing upwards (the way you would plug it in), and have attached the terminal wires to the outer pins. The next step will be to buy a USB female connector, and create a more permanent solution.


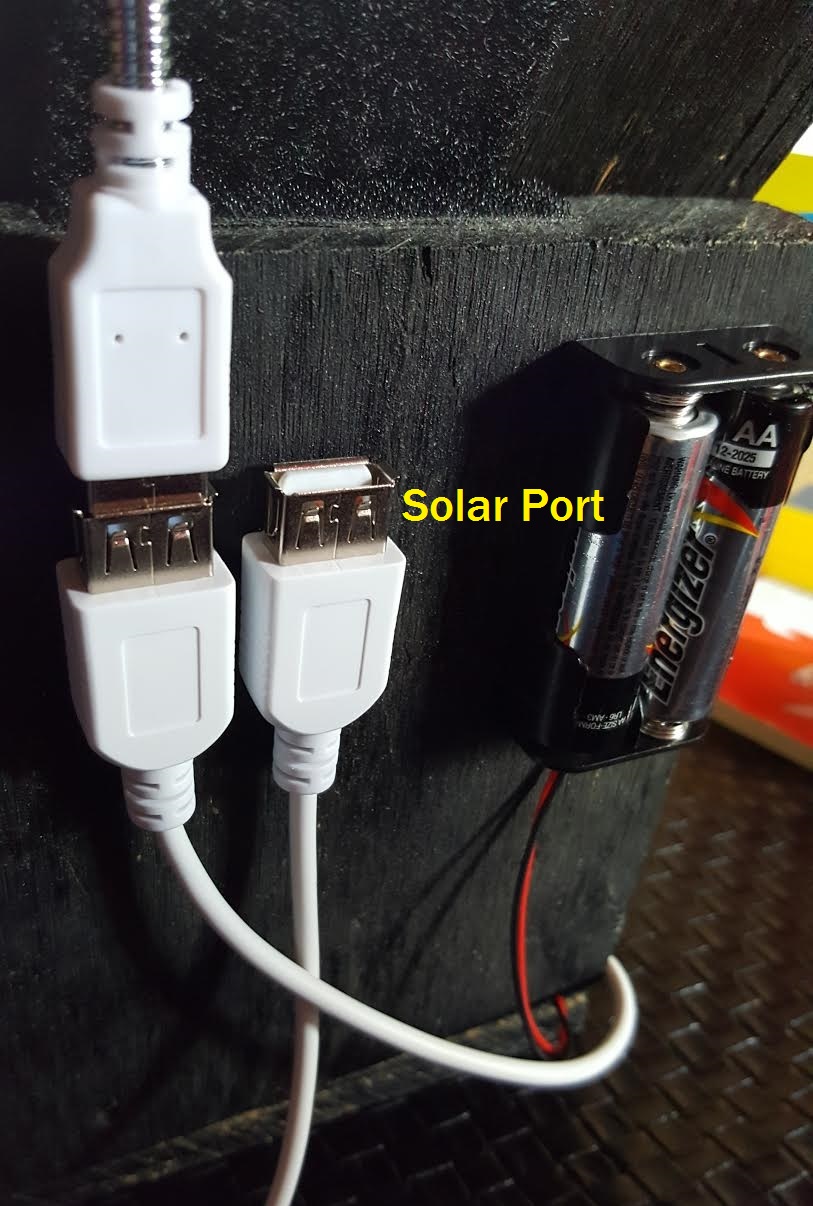
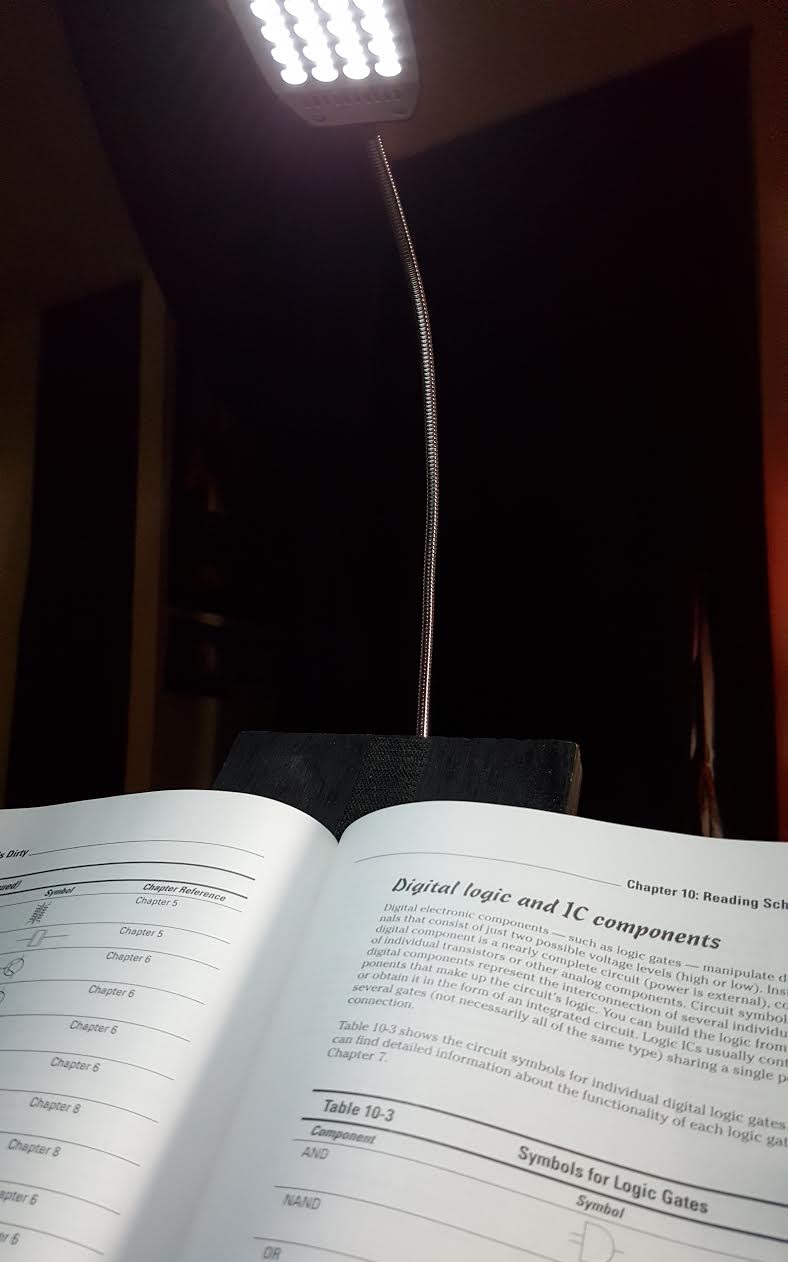
Completed Reading Light Project


Notes

Some things I would like to try: Build a portable charger for cell phones, a solar powered light, a portable dual USB light.

Disable Macros in Office

email me

What is a macro and what is the security risk?

Macros automate frequently-used tasks; many are created with VBA and are written by software developers. However, some macros pose a potential security risk. A person with malicious intent can introduce a destructive macro, in a document or file, which can spread a virus on your computer.

Use these registry keys to disable macros—one machine at a time.


Word

Windows Registry Editor Version 5.00

[HKEY_CURRENT_USER\Software\Microsoft\Office\15.0\Word\Security]
“VBAWarnings”=dword:00000004

[HKEY_CURRENT_USER\Software\Microsoft\Office\15.0\Word\Security\FileBlock]

[HKEY_CURRENT_USER\Software\Microsoft\Office\15.0\Word\Security\FileBlock\OoxmlConverters]
“{A5C79653-FC73-46ee-AD3E-B64C01268DAA}”=dword:00000000


Excel

Windows Registry Editor Version 5.00

[HKEY_CURRENT_USER\Software\Microsoft\Office\15.0\Excel\Security]
“VBAWarnings”=dword:00000004


PowerPoint

Windows Registry Editor Version 5.00

[HKEY_CURRENT_USER\Software\Microsoft\Office\15.0\PowerPoint\Security]
“VBAWarnings”=dword:00000004


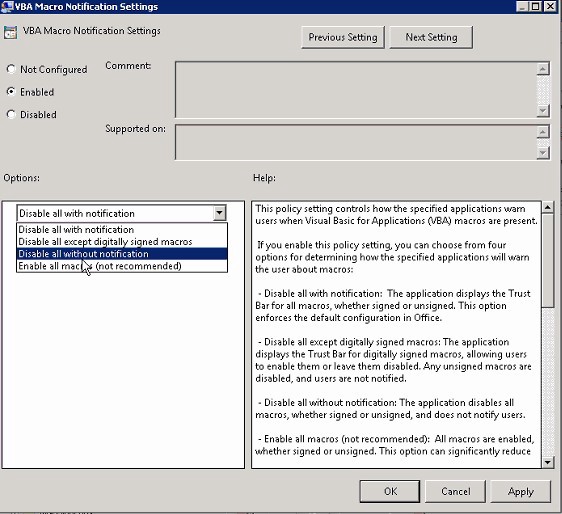
What this setting looks like under File, Options, Trust Center, Trust Center Settings, Macros in the respective app.


Notes

You may of course need to do this for a fleet of computers. The best way to handle that is through Group Policy. See https://www.microsoft.com/en-us/download/details.aspx?id=35554

User Configuration/Administrative Templates/Microsoft Office VERSION 20VERSION/Application Settings/Security/Trust Center/Trusted Locations


As a secondary enterprise solution, you could also deploy a script to disable the macros—cycling through each user reg hive and applying the appropriate reg keys. Note, this will not prevent someone from re-enabling them, but will at least turn them off.

The script I created is below. The magic happens when each user SID is loaded and the reg keys are applied.

on error resume next 

Set objShell = CreateObject("Wscript.Shell")
Set objFSO = CreateObject("Scripting.FileSystemObject")

strComputer = "."

strCurrentDirectory = objShell.CurrentDirectory

Const HKEY_LOCAL_MACHINE = &H80000002
Const OverwriteExisting = TRUE
Const POPUP_TITLE = "User To SID Conversion"

Set objWMIService = GetObject("winmgmts:\\" & strComputer & "\root\cimv2")
Set objRegistry=GetObject("winmgmts:\\" & strComputer & "\root\default:StdRegProv")
strKeyPath = "SOFTWARE\Wow6432Node\Microsoft\Windows NT\CurrentVersion\ProfileList"
objRegistry.EnumKey HKEY_LOCAL_MACHINE, strKeyPath, arrSubkeys
For Each objSubkey In arrSubkeys
 'on error resume next
 strValueName = "ProfileImagePath"
 strSubPath = strKeyPath & "\" & objSubkey
 objRegistry.GetExpandedStringValue HKEY_LOCAL_MACHINE,strSubPath,strValueName,strValue
 
 Set objWMIService = GetObject("winmgmts:\\" & strComputer & "\root\cimv2") 
 Set objAccount = objWMIService.Get("Win32_SID.SID='" & objSubkey & "'")
 strUser = objAccount.AccountName
 'strDomain = objAccount.ReferencedDomainName'returns referenced domain

'DISPLAY PROFILE NAME & SID
 objSubkey = trim(objSubkey)'trims whitespace
 strUser = trim(strUser)'trims whitespace
 'msgbox "objSubkey: " & objSubkey'returns SID
 'msgbox strUser'returns username

'LOGIC TO DETERMINE IF REGISTRY ACCOUNT IS TO BE LOADED
if strUser = "SYSTEM" then strUser=""
if strUser = "LOCAL SERVICE" then strUser=""
if strUser = "NETWORK SERVICE" then strUser=""
'if strUser = "ADMINISTRATOR" then strUser=""

if strUser <> "" then
	on error resume next
	'msgbox objSubkey
	objShell.Run "cmd /c reg.exe add ""HKEY_USERS\" & objSubkey & "\Software\Microsoft\Office\16.0\Word\Security"" /v VBAWarnings /d 00000004 /t REG_DWORD /f /reg:64",0,true
	objShell.Run "cmd /c reg.exe add ""HKEY_USERS\" & objSubkey & "\Software\Microsoft\Office\16.0\Word\Security\FileBlock\OoxmlConverters"" /v {A5C79653-FC73-46ee-AD3E-B64C01268DAA} /d 00000000 /t REG_DWORD /f /reg:64",0,true
	objShell.Run "cmd /c reg.exe add ""HKEY_USERS\" & objSubkey & "\Software\Microsoft\Office\16.0\Excel\Security"" /v VBAWarnings /d 00000004 /t REG_DWORD /f /reg:64",0,true
	objShell.Run "cmd /c reg.exe add ""HKEY_USERS\" & objSubkey & "\Software\Microsoft\Office\16.0\PowerPoint\Security"" /v VBAWarnings /d 00000004 /t REG_DWORD /f /reg:64",0,true
	
	objShell.Run "cmd /c reg.exe add ""HKEY_USERS\" & objSubkey & "\Software\Microsoft\Office\15.0\Word\Security"" /v VBAWarnings /d 00000004 /t REG_DWORD /f /reg:64",0,true
	objShell.Run "cmd /c reg.exe add ""HKEY_USERS\" & objSubkey & "\Software\Microsoft\Office\15.0\Word\Security\FileBlock"" /v {A5C79653-FC73-46ee-AD3E-B64C01268DAA} /d 00000000 /t REG_DWORD /f /reg:64",0,true
	objShell.Run "cmd /c reg.exe add ""HKEY_USERS\" & objSubkey & "\Software\Microsoft\Office\15.0\Excel\Security"" /v VBAWarnings /d 00000004 /t REG_DWORD /f /reg:64",0,true
	objShell.Run "cmd /c reg.exe add ""HKEY_USERS\" & objSubkey & "\Software\Microsoft\Office\15.0\PowerPoint\Security"" /v VBAWarnings /d 00000004 /t REG_DWORD /f /reg:64",0,true
	
	objShell.Run "cmd /c reg.exe add ""HKEY_USERS\" & objSubkey & "\Software\Microsoft\Office\14.0\Word\Security"" /v VBAWarnings /d 00000004 /t REG_DWORD /f",0,true
	objShell.Run "cmd /c reg.exe add ""HKEY_USERS\" & objSubkey & "\Software\Microsoft\Office\14.0\Word\Security\FileBlock"" /v {A5C79653-FC73-46ee-AD3E-B64C01268DAA} /d 00000000 /t REG_DWORD /f",0,true
	objShell.Run "cmd /c reg.exe add ""HKEY_USERS\" & objSubkey & "\Software\Microsoft\Office\14.0\Excel\Security"" /v VBAWarnings /d 00000004 /t REG_DWORD /f",0,true
	objShell.Run "cmd /c reg.exe add ""HKEY_USERS\" & objSubkey & "\Software\Microsoft\Office\14.0\PowerPoint\Security"" /v VBAWarnings /d 00000004 /t REG_DWORD /f",0,true
end if

Next


Reference

https://support.office.com/en-us/article/Enable-or-disable-macros-in-Office-documents-7b4fdd2e-174f-47e2-9611-9efe4f860b12?ui=en-US&rs=en-US&ad=US&fromAR=1

https://support.office.com/en-us/article/Enable-or-disable-macros-in-Office-files-12b036fd-d140-4e74-b45e-16fed1a7e5c6

QuickTime: Remove App using Display Name

email me

This will retrieve a GUID using the Display name you see in Programs and Features, and then uninstall that application using msiexec. What’s great about this ‘scan’ and ‘uninstall’ method is that the GUID doesn’t need to be known and hardcoded into your scripts. This allows for a much more dynamic approach to removing different versions of an application in an automated fashion.

Script 1

$appname = "QuickTime"
 
$32bit = get-itemproperty 'HKLM:\Software\Microsoft\Windows\CurrentVersion\Uninstall\*' | Select-Object DisplayName, UninstallString | Where-Object { $_.DisplayName -match "$appname"}
$64bit = get-itemproperty 'HKLM:\Software\Wow6432Node\Microsoft\Windows\CurrentVersion\Uninstall\*' | Select-Object DisplayName, UninstallString | Where-Object { $_.DisplayName -match "$appname"}

$GUID32 = ($32bit.UninstallString -replace 'msiexec.exe /i','' )
$GUID64 = ($64bit.UninstallString -replace 'msiexec.exe /i','' )

cmd /c ("msiexec /qn /x $GUID32")
cmd /c ("msiexec /qn /x $GUID64")

Script 2


$appname = "QuickTime"

$32bit = get-itemproperty 'HKLM:\Software\Microsoft\Windows\CurrentVersion\Uninstall\*' | Select-Object DisplayName, DisplayVersion, UninstallString, PSChildName | Where-Object { $_.DisplayName -match "^*$appname*"}
$64bit = get-itemproperty 'HKLM:\Software\Wow6432Node\Microsoft\Windows\CurrentVersion\Uninstall\*' | Select-Object DisplayName, DisplayVersion, UninstallString, PSChildName | Where-Object { $_.DisplayName -match "^*$appname*"}


if ($64bit -eq "" -or $64bit.count -eq 0) {

switch ($32bit.DisplayName.count) {
1 {
if ($32bit -match "msiexec.exe") {
$GUID = ($32bit.UninstallString -replace 'msiexec.exe /i','' )
cmd /c ("msiexec /qn /x")$GUID
}
}
}
}

else {

switch ($64bit.DisplayName.count) {
1 {
if ($64bit -match "msiexec.exe") {
$GUID = ($64bit.UninstallString -replace 'msiexec.exe /i','' )
cmd /c ("msiexec /qn /x")$GUID
}
}
}
}


Notes

msiexec /x{B67BAFBA-4C9F-48FA-9496-933E3B255044} /qn /norestart
msiexec /x{8A8505BC-E098-431E-A912-4468C95E110F} /qn /norestart
msiexec /x{929408E6-D265-4174-805F-81D1D914E2A4} /qn /norestart
msiexec /x{08094E03-AFE4-4853-9D31-6D0743DF5328} /qn /norestart
msiexec /x{50D8FFDD-90CD-4859-841F-AA1961C7767A} /qn /norestart
msiexec /x{F07B861C-72B9-40A4-8B1A-AAED4C06A7E8} /qn /norestart
msiexec /x{55BF0E5F-EA8E-4C13-A8B4-9E4857F5A2DE} /qn /norestart
msiexec /x{3868A8EE-5051-4DB0-8DF6-4F4B8A98D083} /qn /norestart
msiexec /x{C21D5524-A970-42FA-AC8A-59B8C7CDCA31} /qn /norestart
msiexec /x{5E863175-E85D-44A6-8968-82507D34AE7F} /qn /norestart