CIM from Microsoft

email me

I’m learning about CIM (in PowerShell), so I’d thought I’d post what I’m reading…

CIM – Common Information Model. It is a set of standards that describes how information is structured and represented at the heart of the system. It was created by the DMTF (Distributed Management Task Force), a working group to which Microsoft belongs.


CIM * from the MS site

The Common Information Model (CIM) is an extensible, object-oriented data model that contains information about different parts of an enterprise. The CIM is a cross-platform standard maintained by the Desktop Management Task Force (DMTF). Through WMI, a developer can use the CIM to create classes that represent hard disk drives, applications, network routers, or even user-defined technologies, such as a networked air conditioner. By viewing and making changes to a CIM class, a manager can control different aspects of the enterprise. For example, a manager could query a CIM class instance representing a desktop workstation. The manager could then run a script to modify the CIM workstation instance. WMI would translate any change to the workstation CIM class instance into a change to the actual workstation.

The CIM is a language-independent programming model that uses object-oriented techniques to describe an enterprise. Using three levels of parent/child inheritance, the CIM can describe both general and specific aspects of an enterprise. The CIM also uses a technique called “association” to link different parts of the enterprise model together, and uses schemas to distinguish different management environments.

The CIM is designed to present a consistent view of logical and physical objects in a management environment. The CIM represents managed objects using an object-oriented construct called a “class.” Like a C++ or COM class, a CIM class can include properties to describe data and methods to describe behavior. Like a set of COM classes, the CIM is not tied to any platform. However, WMI includes an extension to the CIM that describes the Microsoft Windows operating system platforms.

The CIM defines three levels of classes:

  • CoreCore classes represent managed objects that apply to all areas of management. These classes provide a basic vocabulary for analyzing and describing managed systems. The __Parameters and __SystemSecurity classes are examples of core classes.
  • CommonCommon classes represent managed objects that apply to specific management areas. However, common classes are independent from a particular implementation or technology. Common classes are an extension of the core classes. The CIM_UnitaryComputerSystem class is an example of a common class.
  • ExtendedExtended classes represent managed objects that are technology-specific additions to the common classes. An extended class typically applies to a specific platform, such as UNIX or the Microsoft Win32 environment. The Win32_ComputerSystem class is an example of an extended class.

A developer can derive a class from another class. A derived class represents a special case of the parent class, and inherits all of the properties and methods of the parent. For example, Win32_ComputerSystem inherits from CIM_UnitaryComputerSystem. Inheritance relationships may be determined using the system properties __Derivation, __Dynasty, and __SuperClass. The __Derivation system property is an array of strings listing the entire chain of inheritance up to and including the root class, which is also included in __Dynasty. The __SuperClass system property shows the immediate parent of the current class.

WMI also supports associations. An association is a relationship between two or more different WMI classes. For example, a running workstation usually has a processor. The WMI association class Win32_ComputerSystemProcessor associates the workstation class Win32_ComputerSystem with the processor class Win32_Processor. However, an association class does not have to tie two dependent classes together. In fact, the primary purpose of an association class is to show relationships between classes that are not necessarily dependent on each other. For more information, see Declaring an Association Class.

Finally, WMI supports the concept of schemas. In the context of WMI, a schema is a group of classes that describe a particular management environment. The Microsoft Windows Software Development Kit (SDK) uses two schemas: the CIM schema and the Win32 schema. The CIM schema class names begin with CIM_, and the Win32 schema class names begin with Win32_. The CIM schema contains the definitions for the core and common classes, while the Win32 schema contains the definitions for the extended classes that are common to the Win32 environment. However, a third-party vendor can create their own schemas to describe vendor-specific requirements. Because schemas are designed to be infinitely extensible, a developer can always add new classes to describe new managed objects in an existing environment. For simplicity, however, most vendors choose to create schemas that inherit properties from the CIM or Win32 schemas.


Notes
CmdLets
Introduction to CIM CmdLets

PowerShell – Auto Login

email me

New-ItemProperty -Path 'HKLM:\SOFTWARE\Microsoft\Windows NT\CurrentVersion\Winlogon' -Name AutoAdminLogon -Value 1 -force

New-ItemProperty -Path 'HKLM:\SOFTWARE\Microsoft\Windows NT\CurrentVersion\Winlogon' -Name DefaultUserName -Value "TheLoginUsername" -force

New-ItemProperty -Path 'HKLM:\SOFTWARE\Microsoft\Windows NT\CurrentVersion\Winlogon' -Name DefaultPassword -Value 'Th3P@55W0rd' -force

Clearing an IE Session

email me

This is how you perform a cleanup of cached files and cookies.

‘To clear offline favorites and download history
objShell.run “RunDll32.exe InetCpl.cpl,ClearMyTracksByProcess 8”,0,true

‘To clear browsing cookies
objShell.run “RunDll32.exe InetCpl.cpl,ClearMyTracksByProcess 2”,0,true

‘To clear browsing history
objShell.run “RunDll32.exe InetCpl.cpl,ClearMyTracksByProcess 1”,0,true


Notes

// This magic value is the combination of the following bitflags:
// #define CLEAR_HISTORY         0x0001 // Clears history
// #define CLEAR_COOKIES         0x0002 // Clears cookies
// #define CLEAR_CACHE           0x0004 // Clears Temporary Internet Files folder
// #define CLEAR_CACHE_ALL       0x0008 // Clears offline favorites and download history
// #define CLEAR_FORM_DATA       0x0010 // Clears saved form data for form auto-fill-in
// #define CLEAR_PASSWORDS       0x0020 // Clears passwords saved for websites
// #define CLEAR_PHISHING_FILTER 0x0040 // Clears phishing filter data
// #define CLEAR_RECOVERY_DATA   0x0080 // Clears webpage recovery data
// #define CLEAR_PRIVACY_ADVISOR 0x0800 // Clears tracking data
// #define CLEAR_SHOW_NO_GUI     0x0100 // Do not show a GUI when running the cache clearing
//
// Bitflags available but not used in this magic value are as follows:
// #define CLEAR_USE_NO_THREAD      0x0200 // Do not use multithreading for deletion
// #define CLEAR_PRIVATE_CACHE      0x0400 // Valid only when browser is in private browsing mode
// #define CLEAR_DELETE_ALL         0x1000 // Deletes data stored by add-ons
// #define CLEAR_PRESERVE_FAVORITES 0x2000 // Preserves cached data for "favorite" websites

Enable Remote Desktop

email me

This was used in a VB script to enable Remote Desktop

* snippet from one of my scripts

strKeyPath = “SYSTEM\CurrentControlSet\Control\Terminal Server”
strValueName = “fDenyTSConnections”
regValue = 0

HKEY_LOCAL_MACHINE,strKeyPath,strValueName,regValue


Notes

regValue =1 would be used to ‘disable’ remote desktop

I  deployed via desktop management software, so I could remote into a locked down machine.

To make this even more powerful, Disable Firewall could also be added

netsh advfirewall set AllProfiles state off

…as well as Enable Admin Share: link


Mac – Create a Bootable Mac Drive

email me

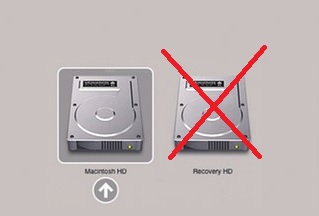
It is possible that a Mac may be missing the Recovery Partition. In this scenario, follow the steps below to access Recovery Mode. You will need a USB drive (at least 8 GB) and a copy of El Capitan (or latest OS X).

A missing Recovery Partition (the drive with the red X would not be there)

Step 1

Download the OS X El Capitan (or the current MacOS) from the Mac App Store.

Step 2

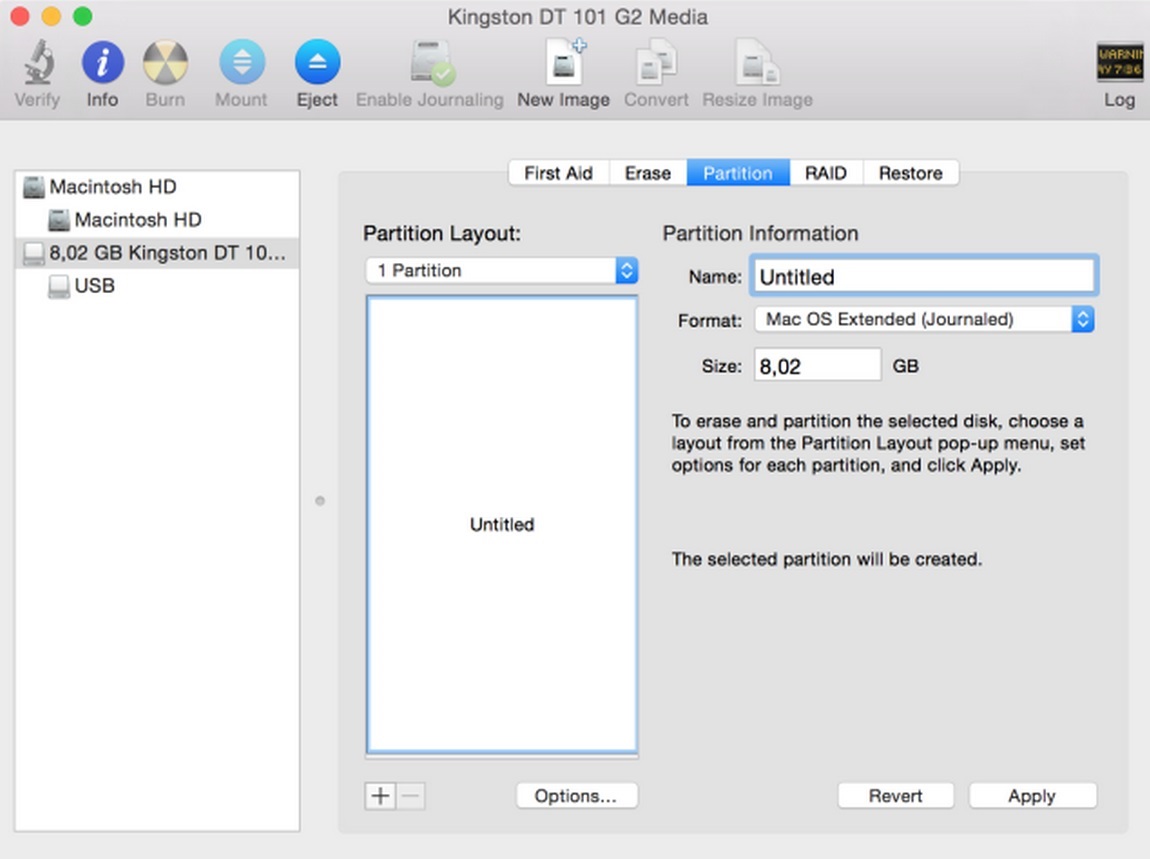
Next, format the USB flash drive to get it into a state where it can accept the payload for the installation of El Capitan. Plug the USB flash drive into an available USB port and launch the Disk Utility application. Make sure that the USB flash drive is selected within the left sidebar, and then select the Erase tab from the main window interface.

Step 3

In the main window, ensure that the Format dropdown box is set to Mac OS Extended (journaled), and the Name is set to Untitled. Click on the Erase button on the interface.

Step 4

Now, in the same window select the Partition tab. From within the Partition Layout dropdown, make sure that 1 Partition is selected. Click the Options button at the bottom of the window and ensure that GUID Partition Table is selected as the chosen partition scheme. Check the name of the partition and clarify that it’s set to Untitled and not Untitled 1 or anything. Click on Apply.

Step 5

Launch the Terminal application. Type the following command and hit Enter:

sudo /Applications/Install\ OS\ X\ El\ Capitan.app/Contents/Resources/createinstallmedia –volume /Volumes/Untitled –applicationpath /Applications/Install\ OS\ X\ El\ Capitan.app –nointeraction

Type your administrator password and then hit Enter.

Step 6

The Mac will now install the OS X El Capitan installer onto the connected USB flash drive and then turn it into a bootable drive. Wait until you see Done.

Step 7

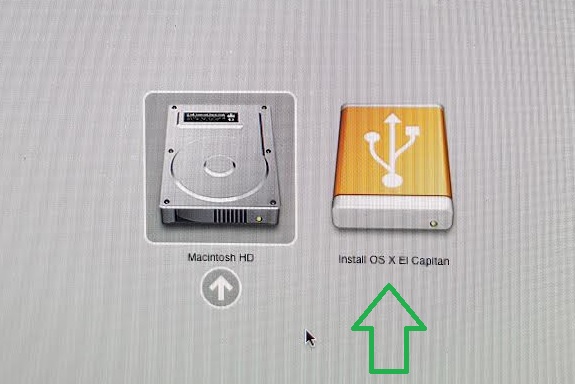
Once it has completed, plug the USB drive into the Mac that is missing the Recovery Partition, hold down the Option key until you see the Macintosh HD and Install OS X El Capitan. Select the El Capitan drive. The Mac will ask for the language, select Use English for the main language, click the arrow, and Recovery Mode will load.

Enable/Disable Admin Share

email me

By modifying the reg key AutoShareWks key (1 or 0), you can enable or disable the admin share.

Note, this does not require a reboot.

The reg key

HKEY_LOCAL_MACHINE\SYSTEM\CurrentControlSet\Services\LanManServer\Parameters
Name: AutoShareWks
Data Type: REG_DWORD
Value: 1


A script (to enable the admin share)

@echo on

reg delete "HKEY_LOCAL_MACHINE\SYSTEM\CurrentControlSet\Services\LanManServer\Parameters" /v AutoShareWks /f
ping -n 2 127.0.0.1>nul
reg add "HKEY_LOCAL_MACHINE\SYSTEM\CurrentControlSet\Services\LanManServer\Parameters" /v AutoShareWks /t REG_DWORD /d 1 /f
exit /b 0


Notes

reg add HKEY_LOCAL_MACHINE\SOFTWARE\Microsoft\Windows\CurrentVersion\Policies\System /v LocalAccountTokenFilterPolicy /t REG_DWORD /d 1 /f

OSSEC Install

email me

This is how to install the OSSEC Agent using a simple batch script.

set CurDir=%CD%
"%CurDir%\ossec.exe" /S
if exist "C:\Program Files (x86)\ossec-agent\" (
copy /y "%CurDir%\ossec.conf" "C:\Program Files (x86)\ossec-agent\ossec.conf"
)
if exist "C:\Program Files\ossec-agent\" (
copy /y "%CurDir%\ossec.conf" "C:\Program Files\ossec-agent\ossec.conf"
)
exit /b 0

Remove – Modify the Utility Text in TwentyTwelve Theme

email me

Have you ever noticed the Created Date and Categories just below your post? Well, let’s say you didn’t want to show ‘Categories’ anymore. How would you remove it?

To modify what is known as utility text, open the functions.php file, and change the utility code section to your liking.

Before


	// Translators: 1 is category, 2 is tag, 3 is the date and 4 is the author's name.
	if ( $tag_list ) {
		$utility_text = __( 'This entry was posted in %1$s and tagged %2$s on %3$s<span class="by-author"> by %4$s</span>.', 'twentytwelve' );
	} elseif ( $categories_list ) {
		$utility_text = __( 'This entry was posted in %1$s on %3$s<span class="by-author"> by %4$s</span>.', 'twentytwelve' );
	} else {
		$utility_text = __( 'This entry was posted on %3$s<span class="by-author"> by %4$s</span>.', 'twentytwelve' );
	}


After


// Translators: 1 is category, 2 is tag, 3 is the date and 4 is the author's name.
	if ( $tag_list ) {
		$utility_text = __( 'Posted by Eddie Jackson on %3$s<span class="by-author"> by %4$s</span>.', 'twentytwelve' );
	} elseif ( $categories_list ) {
		$utility_text = __( 'Posted by Eddie Jackson on %3$s<span class="by-author"> by %4$s</span>.', 'twentytwelve' );
	} else {
		$utility_text = __( 'Posted by Eddie Jackson on %3$s<span class="by-author"> by %4$s</span>.', 'twentytwelve' );
	}

Adjust Sidebar Size in TwentyTwelve Theme

email me

If you would like to shrink (or expand) the size of the sidebar, access the sidebar.php in the theme, and just add width.

Before

	<?php if ( is_active_sidebar( 'sidebar-1' ) ) : ?>


<div id="secondary" class="widget-area" role="complementary">
		
			<?php dynamic_sidebar( 'sidebar-1' ); ?>
			</div>


<!-- #secondary -->
	<?php endif; ?>


After

	<?php if ( is_active_sidebar( 'sidebar-1' ) ) : ?>


<div id="secondary" class="widget-area" role="complementary" style="width: 179px">
		
			<?php dynamic_sidebar( 'sidebar-1' ); ?>
			</div>


<!-- #secondary -->
	<?php endif; ?>


Note

You could add other code here that would create new features, add pictures, links, etc., which would be visible on all your posts and pages.

For instance, you could add an email link here.

Modify Syntaxhighlighter Font Size and Width

email me

To change the syntaxhighlighter settings, access the shCore.css from ftp. Change font-size and width from there.


Before

.syntaxhighlighter {
width: 100% !important;
margin: 1em 0 1em 0 !important;
position: relative !important;
overflow: auto !important;
overflow-y: hidden !important;
font-size: 1em !important;


After

.syntaxhighlighter {
width: 115% !important;
margin: 1em 0 1em 0 !important;
position: relative !important;
overflow: auto !important;
overflow-y: hidden !important;
font-size: 12px !important;

Make Your Scripts Speak using PowerShell

email me

# Speech method 1 - Single phrase
Add-Type -AssemblyName System.speech
$speechObject = New-Object System.Speech.Synthesis.SpeechSynthesizer
$speechObject.Speak('Hello, my name is Eddie!')
exit

# Speech method 2 - An array of messages
Add-Type -AssemblyName System.speech
$speechObject = New-Object System.Speech.Synthesis.SpeechSynthesizer

$strMessage = @("Hello, this is your computer talking.",
"I am the ghost in the machine",
"I'm sorry, I can't let you do that $env:USERNAME") | Get-Random
$speechObject.Speak($strMessage)
exit

# Speech method 3 - Speech from a file
Add-Type -AssemblyName System.speech
$speechObject = New-Object System.Speech.Synthesis.SpeechSynthesizer

$speechFile = "C:\Speech.csv"
$strMessage = (Get-Content $speechFile) | Get-Random
$speechObject.Speak($strMessage)