SCCM – Link Two Packages, Run in Two Security Contexts

email me

This is how you would link two SCCM packages that have different security contexts (Admin and Current User), allowing you to create an installation process that works in admin mode, but also can access the Current User environmental variables.

This is not an uncommon scenario. I just don’t think everyone realizes they can tackle this problem using SCCM’s built-in features. Thank you, Microsoft, for this option.


Steps

Step 1

Create Package #1 with Current User security context


Step 2

Create Package #2 with Admin (System Account) security context


Step 3

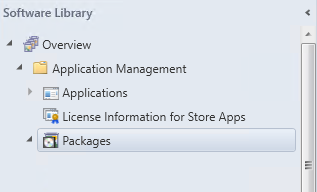
Navigate to CM Console > Overview > Application Management > Packages


Step 4

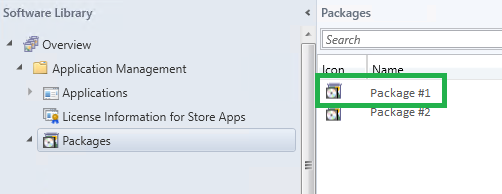
Select Package #1 (in most cases, the first package will be the Current User security context)


Step 5

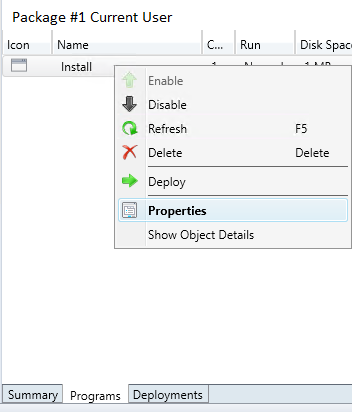
In the lower pane, select the Programs tab, and then Program and its Properties


Step 6

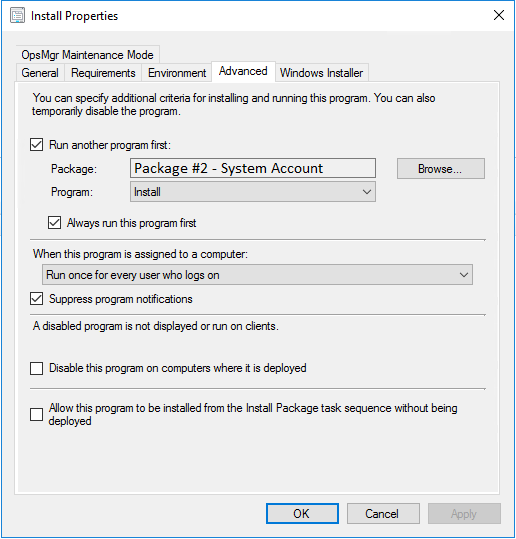
Select the Advanced tab.

Check Run another program first. Browse to Package #2.

Check Always run this program first. Click OK.


Step 7

Deploy Package #1, just like you would any other package.


On the Workstation

Now, two components will download and install on the workstation—each in the specified security context.


tags: SCCM automation, security context, system account, packaging, MrNetTek

Batch – Return Current User

email me

@echo off

for /f "TOKENS=1,2,*" %%a in ('tasklist /FI "IMAGENAME eq explorer.exe" /FO LIST /V') do if /i "%%a %%b"=="User Name:" set domainuser=%%c

for /f "TOKENS=1,2 DELIMS=\" %%a in ("%domainuser%") do set domain=%%a & set user=%%b

echo %user%
pause


tags: Windows current user, command line, MrNetTek

Windows – Set a Default Logon Profile on Welcome Screen

email me

This is how you would set a default logon profile on the Welcome Screen, overriding the last logged on user, and always showing the specified username (this means the end-user will only have to enter their password to log into the computer).

Useful if you want a particular profile name to always appear, no matter who the last user was. This process is not the same as the SpecialAccounts method, which hides a specific user account (where you still have to enter the username). I’m using the Default Logon method to set an Azure account — it works the same for on site domains and local accounts.


Step 1

Log on as user you want to set as default


Step 2

Create a Folder

C:\logon


Step 3

Export Reg Path to c:\logon\SetLastUser.reg

HKEY_LOCAL_MACHINE\SOFTWARE\Microsoft\Windows\CurrentVersion\Authentication\LogonUI


Step 4

Remove everything but these values in c:\logon\SetLastUser.reg

Windows Registry Editor Version 5.00

[HKEY_LOCAL_MACHINE\SOFTWARE\Microsoft\Windows\CurrentVersion\Authentication\LogonUI]
“ShowTabletKeyboard”=dword:00000000
“LastLoggedOnDisplayName”=”ADUsername”
“LastLoggedOnProvider”=”{60B78E88-AAE8-345C-9CFD-0B78F74EA6CD}”
“LastLoggedOnSAMUser”=”AzureAD\\ADUsername”
“LastLoggedOnUser”=”AzureAD\\ADUsername”
“LastLoggedOnUserSID”=”S-1-12-1-224575417-1149358337-4055547620-126828111”
“SelectedUserSID”=”S-1-12-1-224575417-1149358337-4055547620-126828111”
“IdleTime”=dword:01b15e71


Step 5

Save the below command into c:\logon\SetLastUser.cmd

regedit /s c:\logon\SetLastUser.reg


Step 6

Modify Group Policy using GPEdit.msc

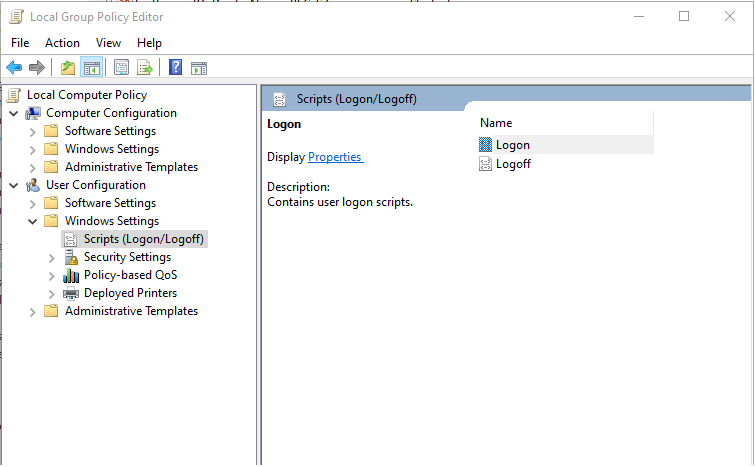
Select User Configuration > Windows Settings > Scripts (Logon/Logoff) > Logon


 Step 7

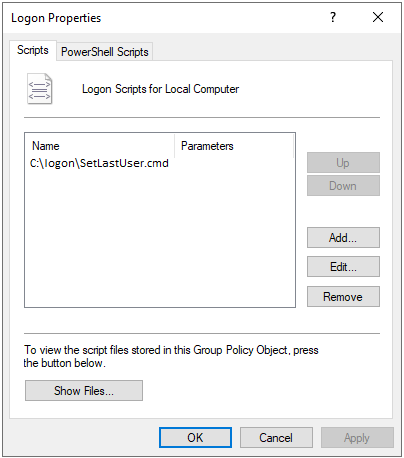
Add Path to Your Script

C:\logon\SetLastUser.cmd


Step 8

Run gpudpate


Step 9

Log in as a different user. Log out. Only the Default User from the registry keys should be visible.


Notes

If this is going to be deployed to the enterprise, it would be better if you compiled the CMD and REG into a single EXE file.


tags: MrNetTek

C# – Return Area and Circumference of Circle

email me

using System;

class Program
{
public static void Main()
{
double r_cir, per_cir, PI, area_cir;

Console.Write("Enter radius of circle: ");

r_cir = Convert.ToDouble(Console.ReadLine());

PI = Math.Pow(Math.PI, 1);
area_cir = Math.Round(PI * Math.Pow(r_cir, 2), 2);
per_cir = Math.Round(2 * PI * r_cir, 2);

Console.WriteLine("\nCircumference of circle: {0}", per_cir);
Console.WriteLine("Area of circle: {0}", area_cir);

Console.Read();
}
}


Output


Notes

Convert.ToDouble

Math.PI

Math.Pow


tags: circumference, radius, mathematics, MrNetTek

VLC Player – Download Videos from YouTube

email me

1. Launch VLC Player.

2. Click on Media > Open Network stream.

3. Paste the YouTube URL and click the Play button in the player.

4. VLC Media Player starts streaming the video. Click Tools > Codec Information > at the bottom of the window you will see a Location box.

5. Copy the long URL in the box and paste this into your browser’s address bar.

Example of URL:

https://r4—sn-5uaeznyz.googlevideo.com/videoplayback?expire=1568074774&ei=tpd2XfjIH8We4QT3j7uwAg&ip=72.188.108.238&id=o-AHJZ1PtCQz4VOBMiy4MooOa6fKp4rQ9mxki0YwsqAXjJ&itag=18&source=youtube&requiressl=yes&mm=31%2C29&mn=sn-5uaeznyz%2Csn-5ualdn76&ms=au%2Crdu&mv=m&mvi=3&pl=15&initcwndbps=2063750&mime=video%2Fmp4&gir=yes&clen=309506003&ratebypass=yes&dur=6226.407&lmt=1567589273653307&mt=1568053083&fvip=4&beids=23806813&c=WEB&txp=5431432&sparams=expire%2Cei%2Cip%2Cid%2Citag%2Csource%2Crequiressl%2Cmime%2Cgir%2Cclen%2Cratebypass%2Cdur%2Clmt&lsparams=mm%2Cmn%2Cms%2Cmv%2Cmvi%2Cpl%2Cinitcwndbps&lsig=AHylml4wRAIgJlzg4X9ldLS52xNEIz4bQWdYlBG2xwOhamYD7ZVW4IACIDVcvQTMmWkZtXNrFoxzrf4hA5jEuty1w1Kr6L3lHA7Q&sig=ALgxI2wwRQIhAKNytxULHA9QGrkyibq-99omwWibtfq80pnLFMVJcaUtAiBgdZJQeaw0foeofHrZZ0vffiVe3adzM2g9Y_j7-m3dmg%3D%3D

The browser will now start playing the video file.

6. You can download the video file to your desktop by doing a Save video as with a right-click on the video.


tags: MrNetTek

Azure – Create Virtual Network (Portal)

email me

Create a Virtual Network (Portal)

On the upper-left side of the screen, select Create a resource > Networking > Virtual network.

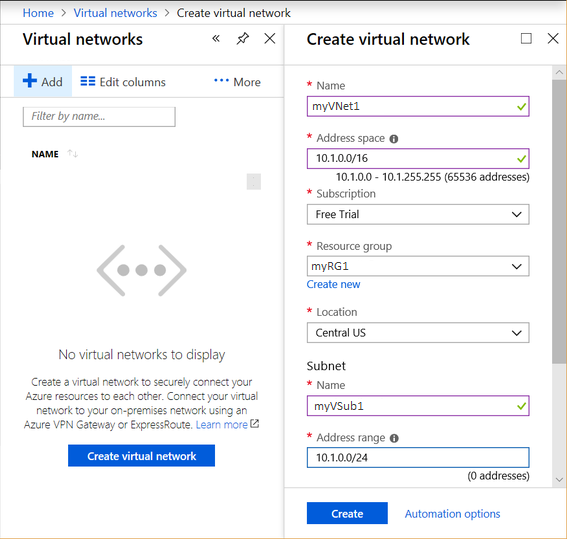
In Create virtual network, enter or select this information:

  1. On the upper-left side of the screen, select Create a resource > Networking > Virtual network.
  2. In Create virtual network, enter or select this information:
    Setting Value
    Name Enter myVNet1
    Address space Enter 10.1.0.0/16
    Subscription Select appropriate subscription from drop down menu, Free Trial
    Resource group Select Create new (unless you have a RG), enter myRG1, then select OK
    Location Select location from drop down menu East US
    Subnet – Name Enter myVSub1
    Subnet – Address range Enter 10.1.0.0/24
  3. Leave the rest as default and select Create.


Screenshot


Notes

Create a VNet using PowerShell


Azure Portal


tags: MrNetTek

Azure – Create Virtual Machine (Portal)

email me

Create Virtual Machine (Portal)

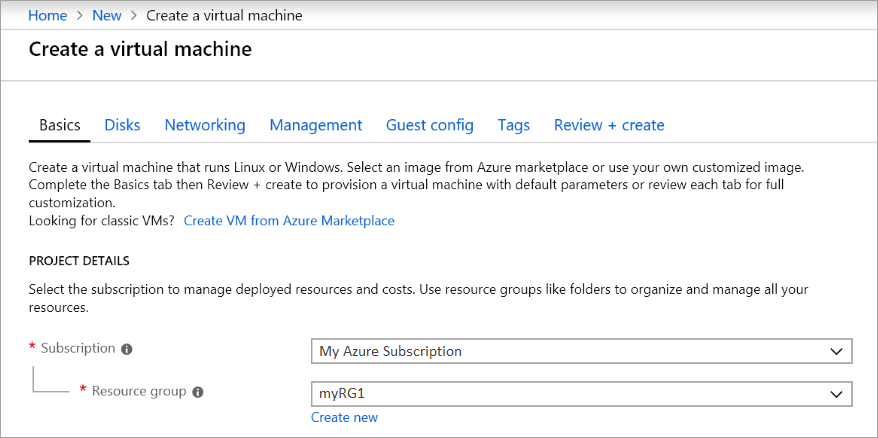
  1. Choose + Create a resource in the upper left-hand corner of the Azure portal.
  2. In the New page, under Popular, select Windows Server 2016 Datacenter.
  3. In the Basics tab, under Project details, make sure the correct Subscription is selected.
  4. Choose to Create new resource group, unless you already have a resource group. Type myRG1 for the name.
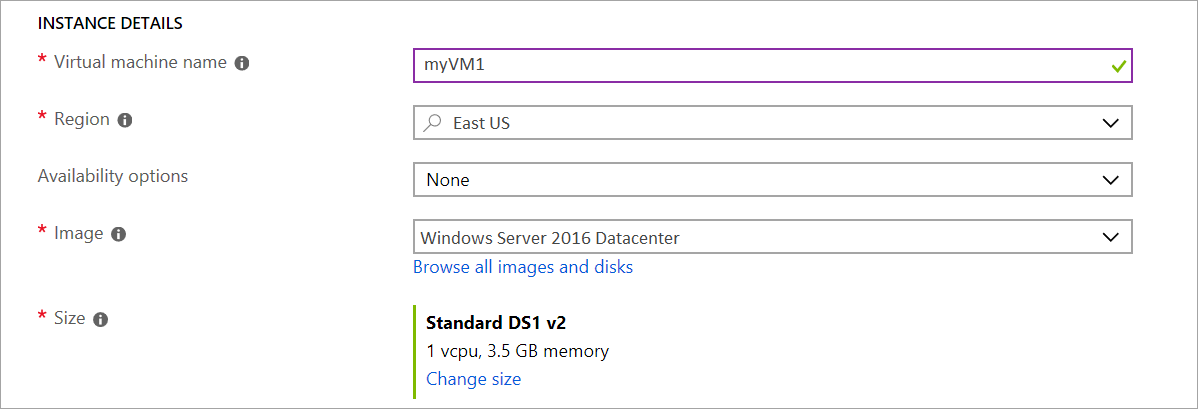
  5. Under Instance details, type myVM1 for the Virtual machine name.
  6. Choose East US for your Location. Leave the other defaults, Image=Windows Server 2016 Datacenter, Size=Standard DS1 v2.
  7. Under Administrator account, provide a username and password.
  8. Under Inbound port rules, choose Allow selected ports and then select RDP (3389) and HTTP from the drop-down.
  9. Leave the remaining defaults and then select the Review + create button at the bottom of the page.


Screenshots


Notes

Create VM using PowerShell

Do it in a Sim Lab


tags: MrNetTek

Azure – Create Availability Set (Portal)

email me

Create an Availability Set (Portal)

– In Azure, search for Availability sets
– Select + Add in the Availability sets blade
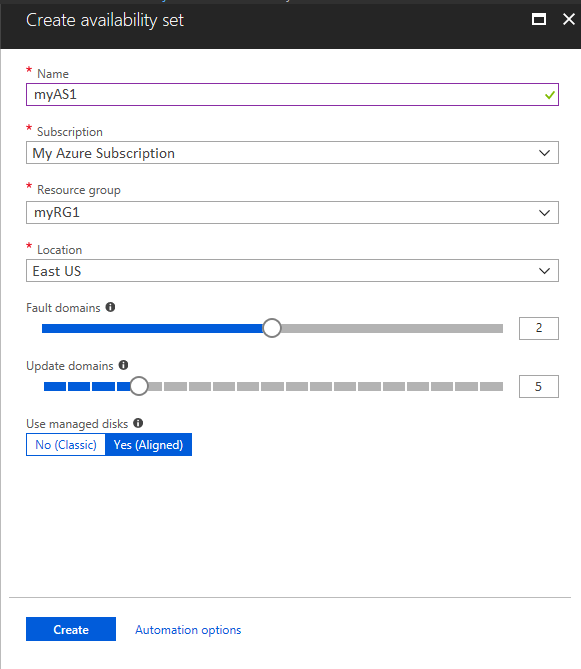
– Enter Name of Availability Set: myAS1
– Select appropriate Subscription: My Azure Subscription
– Create a new/or select existing Resource group: myRG1
– Select Location: East US
– On Fault domains, select 2 on the slider.
– On Update domains, select 5 on the slider.
– Use managed disks, select Yes (Aligned) button
– Click the Create button


Screenshots


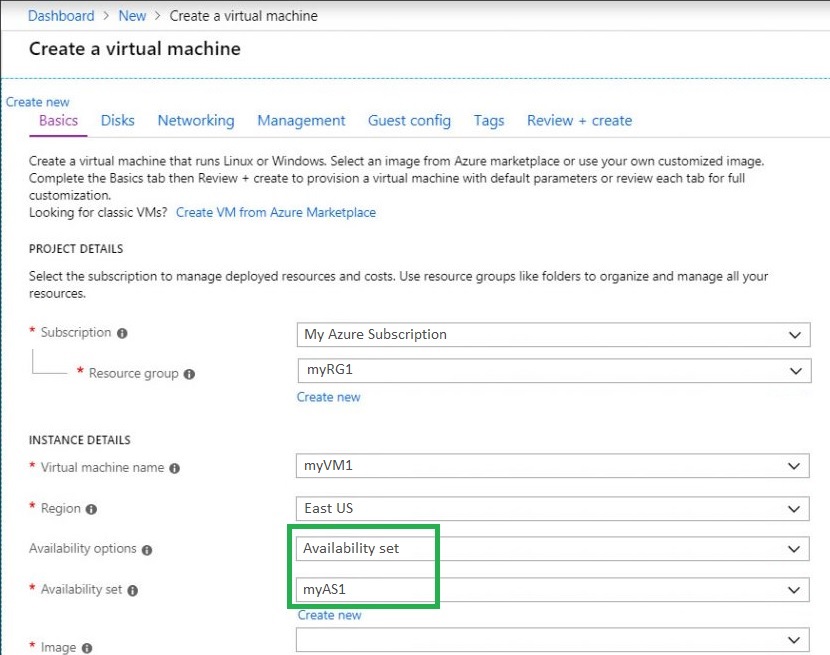
When you create the VM, select Availability options > Availability set > myAS1


more to be added…


Notes


tags: Azure availability sets, Azure admin, Azure configuration, MrNetTek

Mac – Bash – SCCM Agent – Uninstall

email me

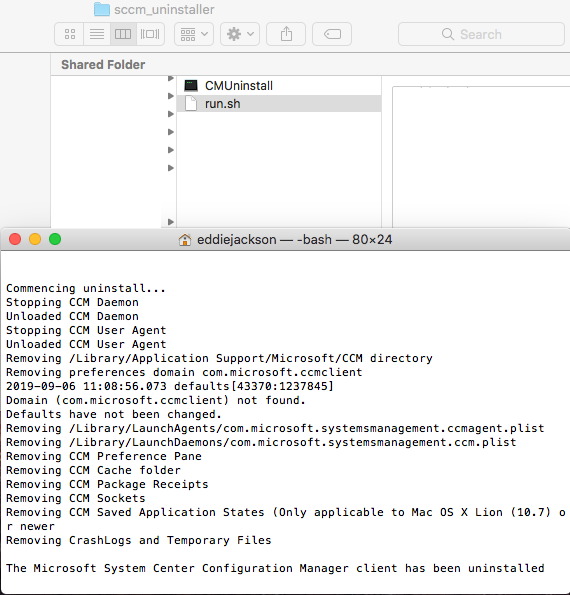
Automatically remove the SCCM Agent using the CMUninstall, which can be found in the Mac SCCM Agent.

Normally, the uninstall requires user intervention:


This method does not require user intervention:


Step 1

Navigate to Tools > CMUninstall


Step 2

I recommend copying the CMUninstall into a dev or setup folder. I used Users > Shared > sccm_uninstaller


Step 3

Create a bash script, save as run.sh

#!/bin/bash

cd /Volumes
cd Mac*/Users/Shared/sccm_uninstaller
echo Y|./CMUninstall -c


Test Script

Open Terminal > drag script to Terminal > hit Return > script will run


Packaging

Now, if required, this bash script can easily be turned into a package, and then either manually ran, or deployed using SCCM (using a CMMac file) — Just remember to include the CMUninstall and the run.sh script in the package.


Notes

cd /Volumes
cd Mac*/Users/Shared/sccm_uninstaller

chmod o+x ./CMUninstall

DIR=”$( cd “$( dirname “${BASH_SOURCE[0]}” )” && pwd )”
cd ${DIR}


tags: Mac packaging, Mac automation, MrNetTek

Amazon Workspaces Client – 2.5.10.0

email me

Description

Amazon WorkSpaces enables you to provision virtual, cloud-based Microsoft Windows or Amazon Linux desktops for your users, known as WorkSpaces. Amazon WorkSpaces eliminates the need to procure and deploy hardware or install complex software. You can quickly add or remove users as your needs change. Users can access their virtual desktops from multiple devices or web browsers. Access your personal Windows environment from your computer using the Amazon Workspaces Client. more…


Download

New Amazon Workspaces is available here:

https://d2td7dqidlhjx7.cloudfront.net/prod/global/windows/Amazon+WorkSpaces.msi  mirror


Size

41.1 MB


Silent Install

setup.msi /quiet /norestart


Install Location (10 folders, 115 files, 99.2 MB on disk)

C:\Program Files (x86)\Amazon Web Services, Inc\Amazon WorkSpaces\

view contents: installed files


Silent Uninstall

msiexec /x{F7348BC1-8A0B-4509-9E39-B1EF226B64DC} /qn /norestart


Registry

Windows Registry Editor Version 5.00

[HKEY_LOCAL_MACHINE\SOFTWARE\WOW6432Node\Microsoft\Windows\CurrentVersion\Uninstall\{F7348BC1-8A0B-4509-9E39-B1EF226B64DC}]
“AuthorizedCDFPrefix”=””
“Comments”=””
“Contact”=””
“DisplayVersion”=”2.5.10”
“HelpLink”=””
“HelpTelephone”=””
“InstallDate”=”20190905”
“InstallLocation”=””
“InstallSource”=”C:\\Users\\Demo99\\Downloads\\”
“ModifyPath”=hex(2):4d,00,73,00,69,00,45,00,78,00,65,00,63,00,2e,00,65,00,78,\
00,65,00,20,00,2f,00,58,00,7b,00,46,00,37,00,33,00,34,00,38,00,42,00,43,00,\
31,00,2d,00,38,00,41,00,30,00,42,00,2d,00,34,00,35,00,30,00,39,00,2d,00,39,\
00,45,00,33,00,39,00,2d,00,42,00,31,00,45,00,46,00,32,00,32,00,36,00,42,00,\
36,00,34,00,44,00,43,00,7d,00,00,00
“NoModify”=dword:00000001
“Publisher”=”Amazon Web Services, Inc”
“Readme”=””
“Size”=””
“EstimatedSize”=dword:00018ce3
“UninstallString”=hex(2):4d,00,73,00,69,00,45,00,78,00,65,00,63,00,2e,00,65,00,\
78,00,65,00,20,00,2f,00,58,00,7b,00,46,00,37,00,33,00,34,00,38,00,42,00,43,\
00,31,00,2d,00,38,00,41,00,30,00,42,00,2d,00,34,00,35,00,30,00,39,00,2d,00,\
39,00,45,00,33,00,39,00,2d,00,42,00,31,00,45,00,46,00,32,00,32,00,36,00,42,\
00,36,00,34,00,44,00,43,00,7d,00,00,00
“URLInfoAbout”=””
“URLUpdateInfo”=””
“VersionMajor”=dword:00000002
“VersionMinor”=dword:00000005
“WindowsInstaller”=dword:00000001
“Version”=dword:0205000a
“Language”=dword:00000409
“DisplayName”=”Amazon WorkSpaces”


App GUID

{F7348BC1-8A0B-4509-9E39-B1EF226B64DC}


MSI Property Table

UpgradeCode                              {CB7B8EA8-3D5A-4233-A9CB-31A692E24E62}
WixUIRMOption                           UseRM
WixAppFolder                              WixPerMachineFolder
WIXUI_INSTALLDIR                      APPLICATIONFOLDER
ALLUSERS                                     2
ARPNOMODIFY                           1
ARPPRODUCTICON                    WORKSPACESICON.ICO
ApplicationFolderName            Amazon Web Services, Inc\Amazon WorkSpaces
DISABLEADVTSHORTCUTS       1
REINSTALLMODE                       amus
MSIINSTALLPERUSER                {}
INSTALL_USB                              1
Manufacturer                             Amazon Web Services, Inc
ProductCode                              {F7348BC1-8A0B-4509-9E39-B1EF226B64DC}
ProductLanguage                      1033
ProductName                            Amazon WorkSpaces
ProductVersion                         2.5.10
DefaultUIFont                            WixUI_Font_Normal
WixUI_Mode                              Advanced
ErrorDialog                                ErrorDlg
SecureCustomProperties ALLUSERS;MSIINSTALLPERUSER;WIX_DOWNGRADE_DETECTED;WIX_UPGRADE_DETECTED


Notes

Download Amazon Workspaces Client for Mac

All Clients


What’s in the MSI?

* viewed using 7zip

_2XLOADING_LARGE.GIF
_2XSTATUS_AVAILABLE.PNG
_2XSTATUS_IN_PROGRESS.GIF
_2XSTATUS_INACCESSABLE.PNG
_2XSTATUS_LIMITED.PNG
_2XSTATUS_UNKNOWN.PNG
_2XSUMMARY_AVAILABLE.PNG
_2XSUMMARY_INACCESSIBLE.PNG
_2XSUMMARY_LIMITED.PNG
A2SSIGNALING.DLL
A2STUNNELING.DLL
BROKER_CLIENT.DLL
BROKER_CLIENT_TOOLS.DLL
BROKER_CLIENT_UTILS.DLL
BROKER_HTTPS_XML_CLIENT.DLL
BROKER_PCOIP_CLIENT.DLL
CROSS.PNG
D3DCOMPILER_47.DLL
DE_DE.QM
DEFAULTICON.ICO
WORKSPACES.ICO
EN_US.QM
FR_FR.QM
ICUDT53.DLL
ICUIN53.DLL
ICUUC53.DLL
InstallUserLevelCertificate.bat
JA_JP.QM
KO_KR
LIBEAY32.DLL
LIBEGL.DLL
LIBGLESV2.DLL
LOADING_LARGE.GIF
MSVCP120.DLL
MSVCP140.DLL
MSVCR120.DLL
PCOIP_CLIENT_USB_INSTALLER.EXE
PCOIP_CORE.DLL
PCOIP_DE.QM
PCOIP_ES.QM
PCOIP_FR.QM
PCOIP_IT.QM
PCOIP_JA.QM
PCOIP_KO.QM
PCOIP_PT.QM
PCOIP_PT_BR.QM
PCOIP_RU.QM
PCOIP_TR.QM
PCOIP_VCHAN_CLIPBOARD.DLL
PCOIP_VCHAN_REMOTEPRINTCLIENT.DLL
PCOIP_VERSION.DLL
PCOIP_ZH_CN.QM
PCOIP_ZH_TW.QM
PROXY.CFG
PT_BR.QM
PTHREADVC2.DLL
QGIF.DLL
QICO.DLL
QJPEG.DLL
QMNG.DLL
QSVG.DLL
QT_DE.QM
QT_ES.QM
QT_FR.QM
QT_IT.QM
QT_JA.QM
QT_KO.QM
QT_PT.QM
QT_RU.QM
QT_TR.QM
QT_ZH_CN.QM
QT_ZH_TW.QM
QT5CORE.DLL
QT5DECLARATIVE.DLL
QT5GUI.DLL
QT5MULTIMEDIA.DLL
QT5MULTIMEDIAWIDGETS.DLL
QT5NETWORK.DLL
QT5OPENGL.DLL
QT5POSITIONING.DLL
QT5PRINTSUPPORT.DLL
QT5QML.DLL
QT5QUICK.DLL
QT5SCRIPT.DLL
QT5SENSORS.DLL
QT5SQL.DLL
QT5SVG.DLL
QT5WEBCHANNEL.DLL
QT5WEBKIT.DLL
QT5WEBKITWIDGETS.DLL
QT5WIDGETS.DLL
QT5XMLPATTERNS.DLL
QTGA.DLL
QTIFF.DLL
QWINDOWS.DLL
SSLEAY32.DLL
StarfieldServicesRootCAG2.cer
StarfieldServicesRootCAG2.inf
STATUS_AVAILABLE.PNG
STATUS_IN_PROGRESS.GIF
STATUS_INACCESSABLE.PNG
STATUS_LIMITED.PNG
STATUS_UNKNOWN.PNG
SUMMARY_AVAILABLE.PNG
SUMMARY_INACCESSIBLE.PNG
SUMMARY_LIMITED.PNG
URI.DLL
VCCORLIB120.DLL
VCRUNTIME.DLL
WINSPARKLE.DLL
WORKSPACES.EXE
WORKSPACES_LOGO.BMP
WORKSPACES_LOGO.JPG
WORKSPACES_LOGO.PNG
ZH_CN.QM


tags: Amazon Workspaces Client, AWS automation, MrNetTek

Firefox – 69.0

email me

Description

Mozilla Firefox, or simply Firefox, is a free and open-source web browser developed by the Mozilla Foundation and its subsidiary, Mozilla Corporation. more…


Download

New Firefox is available here:

https://ftp.mozilla.org/pub/firefox/releases/69.0/win64/en-US/  all


Size

47.2 MB


Silent Install

setup.exe -ms


Install Location (9 Folders, 88 Files, 186 MB)

C:\Program Files\Mozilla Firefox


Silent Uninstall

“C:\Program Files\Mozilla Firefox\uninstall\helper.exe” /s


Registry

Windows Registry Editor Version 5.00

[HKEY_LOCAL_MACHINE\SOFTWARE\Microsoft\Windows\CurrentVersion\Uninstall\Mozilla Firefox 69.0 (x64 en-US)]
“Comments”=”Mozilla Firefox 69.0 (x64 en-US)”
“DisplayIcon”=”C:\\Program Files\\Mozilla Firefox\\firefox.exe,0”
“DisplayName”=”Mozilla Firefox 69.0 (x64 en-US)”
“DisplayVersion”=”69.0”
“HelpLink”=”https://support.mozilla.org”
“InstallLocation”=”C:\\Program Files\\Mozilla Firefox”
“Publisher”=”Mozilla”
“UninstallString”=”\”C:\\Program Files\\Mozilla Firefox\\uninstall\\helper.exe\””
“URLUpdateInfo”=”https://www.mozilla.org/firefox/69.0/releasenotes”
“URLInfoAbout”=”https://www.mozilla.org”
“NoModify”=dword:00000001
“NoRepair”=dword:00000001
“EstimatedSize”=dword:0002e82d


Notes

Download Firefox for Mac

Version 69.0, first offered to Release channel users on September 3, 2019

Security vulnerabilities fixed in Firefox 69

Advisories


MSI Property Table


tags: MrNetTek

Google Drive File Stream – PowerShell – Uninstaller

email me

$GDriveFS = Get-ItemProperty 'HKLM:\Software\Microsoft\Windows\CurrentVersion\Uninstall\*' | `
Select-Object DisplayName, DisplayVersion, UninstallString, PSChildName | `
Where-Object { $_.DisplayName -match "Google Drive File Stream"}

if ($GDriveFS) {
$DisplayNameString = $GDriveFS.DisplayName
$DisplayVersion = $GDriveFS.DisplayVersion
$UninstallString1 = $GDriveFS.PSChildName
$UninstallString2 = $GDriveFS.UninstallString

$SilentUninstall1 = "C:\Windows\system32\msiexec.exe /x $UninstallString1" + " /qn /norestart"
$SilentUninstall2 = """$UninstallString2""" + " --silent --force_stop"

clear-host
Write-Host "`nApplication: $DisplayNameString"
Write-Host "Version: $DisplayVersion"
Write-Host "Silent Uninstall1: $SilentUninstall1"
Write-Host "Silent Uninstall2: $SilentUninstall2`n"

cmd /c $SilentUninstall1
Start-Sleep 10
cmd /c $SilentUninstall2
}

[Environment]::Exit(0)


tags: MrNetTek