Disable DES-CBC3-SHA

email me

Scripting

reg add “HKEY_LOCAL_MACHINE\SYSTEM\CurrentControlSet\Control\SecurityProviders\SCHANNEL\Ciphers\Triple DES 168” /v “Enabled” /t REG_DWORD /d 0 /f

reg add “HKEY_LOCAL_MACHINE\SYSTEM\CurrentControlSet\Control\SecurityProviders\SCHANNEL\Ciphers\DES 56/56” /v “Enabled” /t REG_DWORD /d 0 /f

reg add “HKEY_LOCAL_MACHINE\SYSTEM\CurrentControlSet\Control\SecurityProviders\SCHANNEL\Ciphers\NULL” /v “Enabled” /t REG_DWORD /d 0 /f


Save as reg file

Windows Registry Editor Version 5.00

[HKEY_LOCAL_MACHINE\SYSTEM\CurrentControlSet\Control\SecurityProviders\SCHANNEL\Ciphers]

[HKEY_LOCAL_MACHINE\SYSTEM\CurrentControlSet\Control\SecurityProviders\SCHANNEL\Ciphers\DES 56/56]
“Enabled”=dword:00000000

[HKEY_LOCAL_MACHINE\SYSTEM\CurrentControlSet\Control\SecurityProviders\SCHANNEL\Ciphers\NULL]
“Enabled”=dword:00000000

[HKEY_LOCAL_MACHINE\SYSTEM\CurrentControlSet\Control\SecurityProviders\SCHANNEL\Ciphers\Triple DES 168]
“Enabled”=dword:00000000

Disable 3DES

email me

Scripting

reg.exe add “HKEY_LOCAL_MACHINE\SYSTEM\CurrentControlSet\Control\SecurityProviders\SCHANNEL\Ciphers\Triple DES 168” /v “Enabled” /t REG_DWORD /d 0 /f


Save as reg file

Windows Registry Editor Version 5.00

[HKEY_LOCAL_MACHINE\SYSTEM\CurrentControlSet\Control\SecurityProviders\SCHANNEL\Ciphers\Triple DES 168]
“Enabled”=dword:00000000


Notes

20160826 – Sweet32 attack

Disable TLS 1.0

email me

TLS 1.0 is disabled by default in Windows 10 build 1709. See notes for more info.


Scripting

reg add “HKEY_LOCAL_MACHINE\SYSTEM\CurrentControlSet\Control\SecurityProviders\SCHANNEL\Protocols\TLS 1.0\Client” /v “DisabledByDefault” /t REG_DWORD /d 1 /f

reg add “HKEY_LOCAL_MACHINE\SYSTEM\CurrentControlSet\Control\SecurityProviders\SCHANNEL\Protocols\TLS 1.0\Client” /v “Enabled” /t REG_DWORD /d 0 /f

reg add “HKEY_LOCAL_MACHINE\SYSTEM\CurrentControlSet\Control\SecurityProviders\SCHANNEL\Protocols\TLS 1.0\Server” /v “DisabledByDefault” /t REG_DWORD /d 1 /f

reg add “HKEY_LOCAL_MACHINE\SYSTEM\CurrentControlSet\Control\SecurityProviders\SCHANNEL\Protocols\TLS 1.0\Server” /v “Enabled” /t REG_DWORD /d 0 /f


Save as reg file

Windows Registry Editor Version 5.00

[HKEY_LOCAL_MACHINE\SYSTEM\CurrentControlSet\Control\SecurityProviders\SCHANNEL\Protocols\TLS 1.0]

[HKEY_LOCAL_MACHINE\SYSTEM\CurrentControlSet\Control\SecurityProviders\SCHANNEL\Protocols\TLS 1.0\Client]
“DisabledByDefault”=dword:00000001
“Enabled”=dword:00000000

[HKEY_LOCAL_MACHINE\SYSTEM\CurrentControlSet\Control\SecurityProviders\SCHANNEL\Protocols\TLS 1.0\Server]
“DisabledByDefault”=dword:00000001
“Enabled”=dword:00000000


Notes

see SSL and TLS 1.0 No Longer Acceptable for PCI Compliance

Added support for the following cipher suites:

TLS_ECDHE_RSA_WITH_AES_128_GCM_SHA256 (RFC 5289) in Windows 10, version 1507
TLS_ECDHE_RSA_WITH_AES_256_GCM_SHA384 (RFC 5289) in Windows 10, version 1507


DisabledByDefault change for the following cipher suites:

TLS_DHE_DSS_WITH_AES_256_CBC_SHA256 (RFC 5246) in Windows 10, version 1703
TLS_DHE_DSS_WITH_AES_128_CBC_SHA256 (RFC 5246) in Windows 10, version 1703
TLS_DHE_DSS_WITH_AES_256_CBC_SHA (RFC 5246) in Windows 10, version 1703
TLS_DHE_DSS_WITH_AES_128_CBC_SHA (RFC 5246) in Windows 10, version 1703
TLS_DHE_DSS_WITH_3DES_EDE_CBC_SHA (RFC 5246) in Windows 10, version 1703
TLS_RSA_WITH_RC4_128_SHA in Windows 10, version 1709
TLS_RSA_WITH_RC4_128_MD5 in Windows 10, version 1709

Disable RC4

email me

RC4 was designed in 1987 by Ron Rivest and is one of the most widely software stream cipher and used in popular protocols, such as SSL (protect Internet traffic), WEP (secure wireless networks) and PDF. It’s considered to be fast and simple in terms of software.

RC4 generates a pseudo-random stream of bits (a key-stream). As with any stream cipher, these can be used for encryption by combining it with the plaintext using bit-wise exclusive-or. Decryption is performed the same way (since exclusive-or is a symmetric operation). The reason many software vendors are dropping support for RC4 is due to the growing attack space and available exploits online. Because of these security concerns, Microsoft has also removed browser support for RC4 in IE11 and Edge.

To disable RC4 in your enterprise, create a script that will toggle these reg keys from 1 to 0 (you could use reg.exe to do this).

 
Scripting

reg add “HKEY_LOCAL_MACHINE\SYSTEM\CurrentControlSet\Control\SecurityProviders\SCHANNEL\Ciphers\RC4 128/128” /v “Enabled” /t REG_DWORD /d 0 /f

reg add “HKEY_LOCAL_MACHINE\SYSTEM\CurrentControlSet\Control\SecurityProviders\SCHANNEL\Ciphers\RC4 40/128” /v “Enabled” /t REG_DWORD /d 0 /f

reg add “HKEY_LOCAL_MACHINE\SYSTEM\CurrentControlSet\Control\SecurityProviders\SCHANNEL\Ciphers\RC4 56/128” /v “Enabled” /t REG_DWORD /d 0 /f


Save as reg file

Windows Registry Editor Version 5.00

[HKEY_LOCAL_MACHINE\SYSTEM\CurrentControlSet\Control\SecurityProviders\SCHANNEL\Ciphers\RC4 128/128]
“Enabled”=dword:00000000

[HKEY_LOCAL_MACHINE\SYSTEM\CurrentControlSet\Control\SecurityProviders\SCHANNEL\Ciphers\RC4 40/128]
“Enabled”=dword:00000000

[HKEY_LOCAL_MACHINE\SYSTEM\CurrentControlSet\Control\SecurityProviders\SCHANNEL\Ciphers\RC4 56/128]
“Enabled”=dword:00000000


Reference

RC4 will no longer be supported in Microsoft Edge and IE11 [Updated]

How to restrict the use of certain cryptographic algorithms and protocols in Schannel.dll

Killing RC4: The Long Goodbye

Windows – Updating Specific Elements in the Computer Description

email me

This is a script I created to run in SCCM during a Windows 7 to Windows 10 upgrade. In this scenario, WIN7 was a part of the computer description on the local machine. I wanted to update only the part that said WIN7—as there was other text in the description I wanted to keep.

To do this, I used a simple batch file with reg query to get the current key info. Then I scanned it as a string. If WIN7 existed, replace it with WIN10. Once it was replaced in that string, I used reg add to just import the updated OS into the computer description (easy). I added some extra output, just to make sure everything was working. This eventually was compiled into an EXE and added to a SCCM task sequence.

The reason I like using batch scripting sometimes?

Run time: 2 seconds
Memory used: 680 KB
Compiled file size: 158 KB


Script

@echo off
title Update Computer description
setlocal enabledelayedexpansion

cls

:: original description ABC WIN7 BITLOCKER 10-26-17
:: new description ABC WIN10 BITLOCKER 10-26-17

set rKey1=
set rKey2=
set RegData=
set RegPath=
set RegValue=
set model=
set bValue=FALSE

 
:: REG PATH TO SCAN
set RegPath=HKEY_LOCAL_MACHINE\SYSTEM\CurrentControlSet\services\LanmanServer\Parameters
set RegValue=srvcomment

:: returns model
call :pcmodel

:: CHECK REG FOR W7
call :scan
call :rKey1
set bValue=FALSE

:: SCAN AND UPDATE OS IN STRING
SET _tmp=%RegData%
SET _newData=%_tmp:WIN7=WIN10%
::SET _newData=%_tmp:WIN7=WIN10% %model%

:: APPLY REG UPDATE
Echo Update Reg Key…
reg add “%RegPath%” /v “%RegValue%” /t REG_SZ /d “%_newData%” /f /reg:64
echo.

:: CHECK REG FOR W10
call :scan
call :rKey2
set bValue=FALSE

:: CLEAR SESSION
set rKey1=
set rKey2=
set RegData=
set bValue=
set RegPath=
pause

exit

:: ————————————

:rKey1
echo %RegData% | FIND “WIN7” && set bValue=FOUND_WIN7
if %bValue%==FALSE exit
echo.
goto :EOF

:rKey2
echo %RegData% | FIND “WIN10” && set bValue=FOUND_WIN10
echo %bValue%
echo.
goto :done
:scan
FOR /F “tokens=2*” %%a IN (‘REG.EXE QUERY “%RegPath%” /V “%RegValue%”‘) DO SET RegData=%%b
goto :EOF

:pcmodel
:: a little something extra I’ve thrown in
FOR /F “tokens=2 delims==” %%m IN (‘WMIC csproduct GET Name /VALUE ^| FIND /I “Name=”‘) do set model=%%m
goto :EOF

:done
exit /b 0

Windows 7 – Clear Frequently Used Apps

email me

There are two methods to clear the Frequently used applications on the Start Menu.

#1

One is by using group policy.

User Configuration > Administrative Templates > Start Menu and Taskbar > Remove frequent programs list from the Start Menu.

#2

The second one is by deleting the reg key that holds the shortcut data. Note, this data is encrypted using ROT-13 (yeah, I know…Microsoft strikes again). You may have to kill explorer.exe and reload it for it to take effect (or just reboot).

Screenshot of the reg keys

Frequent Apps


Reg Key

HKEY_CURRENT_USER\Software\Microsoft\Windows\CurrentVersion\Explorer\UserAssist\{F4E57C4B-2036-45F0-A9AB-443BCFE33D9F}\Count

If you’re managing an enterprise—where computers have more than one user—the reg key must be deleted from each user’s reg hive. To scan through the respective registry hives, I created this script to do the scan and the reg key delete.


Script

This can run as System Account or Administrator.

Option Explicit

Dim objShell, strComputer, objWMIService, objRegistry, strKeyPath, strValueName, strSubPath

Dim objAccount, objSubkey, arrSubkeys, strValue, strUser

on error resume next

Set objShell = CreateObject("Wscript.Shell")

Const HKEY_LOCAL_MACHINE = &H80000002

Const OverwriteExisting = TRUE

strComputer = "."

Set objWMIService = GetObject("winmgmts:\\" & strComputer & "\root\cimv2")

Set objRegistry = GetObject("winmgmts:\\" & strComputer & "\root\default:StdRegProv")

strKeyPath = "SOFTWARE\Wow6432Node\Microsoft\Windows NT\CurrentVersion\ProfileList"

objRegistry.EnumKey HKEY_LOCAL_MACHINE, strKeyPath, arrSubkeys

For Each objSubkey In arrSubkeys

on error resume next

strValueName = "ProfileImagePath"

strSubPath = strKeyPath & "\" & objSubkey

objRegistry.GetExpandedStringValue HKEY_LOCAL_MACHINE,strSubPath,strValueName,strValue

Set objWMIService = GetObject("winmgmts:\\" & strComputer & "\root\cimv2")

Set objAccount = objWMIService.Get("Win32_SID.SID='" & objSubkey & "'")

strUser = objAccount.AccountName

objSubkey = trim(objSubkey)'trims whitespace

strUser = trim(strUser)'trims whitespace

'LOGIC TO DETERMINE IF REGISTRY HIVE IS TO BE ACCESSED

if strUser = "SYSTEM" then strUser=""

if strUser = "LOCAL SERVICE" then strUser=""

if strUser = "NETWORK SERVICE" then strUser=""

'if strUser = "ADMINISTRATOR" then strUser=""

if strUser <> "" then

on error resume next

objShell.Run "%comspec% /c reg delete HKU\" & objSubkey &  "\Software\Microsoft\Windows\CurrentVersion\Explorer\UserAssist\{F4E57C4B-2036-45F0-A9AB-443BCFE33D9F}\Count" & " /f",0,true

Wscript.Sleep 1000

end if

Next

' Clear Session

objShell = ""
strComputer = ""
objWMIService = ""
objRegistry = ""
strKeyPath = ""
strValueName = ""
strSubPath = ""
objAccount = ""
objSubkey = ""
arrSubkeys = ""
strValue = ""
strUser = ""

WScript.Quit(0)

Pascal, C++, JavaScript, PowerShell, C# – Return Prime Numbers

email me

Return prime numbers from 1-100 in different programming languages. All written and tested by me.

Prime Numbers

2 3 5 7 11 13 17 19 23 29 31 37 41 43 47 53 59 61 67 71 73 79 83 89 97


Pascal

program OptimusPrime;

{set our constant--this is max number}
const
maxNumber=100;

{set variables--both are integers}
var
x, y:integer;

{set number range to scan}
begin
for x := 2 to maxNumber do
begin
for y := 2 to x do
if (x mod y)=0 then
{break if not prime}
break;
{display prime}
if(y = x) then
write(x, ' ');
end;
end.

Online Pascal compiler


C++

#include <iostream>
#include <string>
#include <vector>

int main()
{
// max number to extract primes
int maxNumber = 100;

//set up array
std::vector<int> OptimusPrime = { 2 };
// start number, then increment
for (int x = 2; x <= maxNumber; ++x) 
for (int y = 2; y < x; ++y) {
if (x % y == 0)
break;
if (y == x - 1)
// move to new element
OptimusPrime.push_back(x);
}

// outputs prime num with space
for (int z: OptimusPrime)
std::cout << z << ' ';
return 0;
}

Online C++ compiler


JavaScript

var maxNumber = 100;

// run function
OptimusPrime(maxNumber);

// interates through specified number
function OptimusPrime(number) {
var array = [2];
for ( var i = 3; i < number; i+=2 ) {
if ( CheckPrime(i) ) {
//push element
array.push(i);
}
}
// output whole array
document.write(array);
}

// checks if input is prime
function CheckPrime(input) {
for ( var i = 2; i < input; i++ ) {
if ( input % i === 0 ) {
return false;
}
}
return true;
}

Online JavaScript editor


PowerShell

Clear-Host
 
$maxNumber = 100
$counter = 0
$intInput = ''
$intDivisor = ''
$boolPrime = ''

# cycle through range 
2..$maxNumber | foreach {
 
    # set input to number in range
    $intInput = $_

    # perform calculation for divisor
    $intDivisor = [math]::Sqrt($intInput)
    $boolPrime = $true
 
    # compare divisor with zero
    2..$intDivisor | foreach {        
        
        if ($intInput % $_ -eq 0) {
        
            $boolPrime = $false
        }
    }
 
    # if prime true, output to screen
    If ($boolPrime) {
        
        Write-Host -NoNewline  $intInput.ToString().PadLeft(3)
        
        # step counter
        $counter++
        
        If ($counter % 10 -eq 0) {            
        }
    }
 
}
 
# clear session
 
$maxNumber = ''
$counter = ''
$intInput = ''
$intDivisor = ''
$boolPrime = ''
 
Write-Host ""
Write-Host ""

Online PowerShell editor


C#

// created in Visual Studio 2017, 15.3.2

using System;

namespace Primes
{
    class OptimusPrime
    {
        static void Main(string[] args)
        {
            // set max value
            int maxNumber = 100;

            // default value
            bool Prime = true;            

            for (int x = 2; x <= maxNumber; x++)
            {
                Prime = true;

                for (int y = 2; y <= maxNumber; y++)
                {
                    // Perform calculation for divisor and compare with zero
                    if (x != y && x % y == 0)
                    {
                        Prime = false;
                        break;
                    }
                }
                
                // if prime true, output to console
                if (Prime)                {
                    
                    Console.Write("  " + x);
                }                
            }

            // wait for key press
            Console.ReadKey();
        }
    }
}

Online C# compiler


Fortran

see http://eddiejackson.net/wp/?p=20363

Online Fortran compiler


JAVA

see: http://eddiejackson.net/wp/?p=18617


Notes

Learn more, Pascal language

Learn more, Fortran language

Windows 10 – Wake Timers – Wake on LAN – WoL

email me

Enable or Disable Allow Wake Timers

Wake on LAN not working after a Windows upgrade? Windows 10 broke your WOL solution?

Try this

powercfg /SETACVALUEINDEX SCHEME_CURRENT 238c9fa8-0aad-41ed-83f4-97be242c8f20 bd3b718a-0680-4d9d-8ab2-e1d2b4ac806d 1

That changes the Allow wake timers from Important Wake Timers Only to Enabled. Thanks, Microsoft, for that challenge.


All Wake Timers

On battery: Disabled
powercfg /SETDCVALUEINDEX SCHEME_CURRENT 238c9fa8-0aad-41ed-83f4-97be242c8f20 bd3b718a-0680-4d9d-8ab2-e1d2b4ac806d 0

On battery: Enabled – default
powercfg /SETDCVALUEINDEX SCHEME_CURRENT 238c9fa8-0aad-41ed-83f4-97be242c8f20 bd3b718a-0680-4d9d-8ab2-e1d2b4ac806d 1

On battery: Important Wake Timers Only
powercfg /SETDCVALUEINDEX SCHEME_CURRENT 238c9fa8-0aad-41ed-83f4-97be242c8f20 bd3b718a-0680-4d9d-8ab2-e1d2b4ac806d 2

Plugged in: Disabled
powercfg /SETACVALUEINDEX SCHEME_CURRENT 238c9fa8-0aad-41ed-83f4-97be242c8f20 bd3b718a-0680-4d9d-8ab2-e1d2b4ac806d 0

Plugged in: Enabled – default
powercfg /SETACVALUEINDEX SCHEME_CURRENT 238c9fa8-0aad-41ed-83f4-97be242c8f20 bd3b718a-0680-4d9d-8ab2-e1d2b4ac806d 1

Plugged in: Important Wake Timers Only
powercfg /SETACVALUEINDEX SCHEME_CURRENT 238c9fa8-0aad-41ed-83f4-97be242c8f20 bd3b718a-0680-4d9d-8ab2-e1d2b4ac806d 2


Notes

Pay attention to the Turn on fast startup as well. You may need to uncheck this.

HKEY_LOCAL_MACHINE\SYSTEM\CurrentControlSet\Control\Session Manager\Power\HiberbootEnabled 0

powercfg -h off

PowerShell – Encoding a Password

email me

Simple Encoding

Clear-Host
write-host ""

[string]$Password = "LetMeIn99$"
 
$EncodedPassword = [Convert]::ToBase64String([System.Text.Encoding]::UTF8.GetBytes($Password))
 
write-host "Encoded Password: " $EncodedPassword

write-host ""


Simple Decoding

$DecodedPassword = [System.Text.Encoding]::UTF8.GetString([System.Convert]::FromBase64String($EncodedPassword))
 
write-host "Decoded Password: " $DecodedPassword
write-host ""
write-host ""


More Advanced Example

Clear-Host

# PART1
# THIS WORKS TO CREATE UNIQUENESS TO THE SECURESTRING
# IT IS CRITICAL THE KEY IS STORED IN A SECURE LOCATION OR
# COMPILED IN A MANNER THAT IS SECURE
# https://docs.microsoft.com/en-us/azure/storage/common/customer-managed-keys-configure-key-vault
[Byte[]] $Key = (2, 1, 5, 3, 2, 8, 4, 1, 7, 16, 9, 2, 13, 3, 12, 15)

$EncryptedPassword = "LetMeIntoTheComputer777$" | ConvertTo-SecureString -AsPlainText -Force

# PART2
$Password = "76492d1116743f0423413b16050a5345MgB8ADQAVgBzADQAdABCAEYAKwBlAHEAcgBqAE4AMQB2AGoAYQB0AHYAWgBOAGcAPQA9AHwAYwBiAGMAOABkADAAMQAxAGUAMgA5ADkAZABmAGQANAA4AGEAMgA4AGUAYwA2ADYAOQA3ADgAMwA0AD
gAMQAxADgAZgBhADEAOAA2ADIANgAwADUAOABiAGYAOQBiADEANwAyADMAYgAxAGYAYQA4ADkAYwAyADgAOAA5ADEAYgA5ADUAYgBmAGQAYQAxAGYAOQAxAGEANABhAGYAMwAyADYAZgA4ADQAYgA3AGQAYQAyAGMAZQBiADIAYQBmAGYANgA5
ADkAMgBkAGEAZAAzADAAZgA1AGQAYQAxADQANwBlAGEAZgA3ADEAZABjADYAOQA3ADEANQAyADQAMgAyAA=="

$SecurePassword = ConvertTo-SecureString $Password -key $Key

$SecurePassword | ConvertFrom-SecureString -key $Key

$UserAccount = Get-LocalUser -Name "Administrator"

$UserAccount | Set-LocalUser -Password $SecurePassword

IDT Audio Silent Uninstall

email me

The Command

“C:\Program Files (x86)\InstallShield Installation Information\{E3A5A8AB-58F6-45FF-AFCB-C9AE18C05001}\setup.exe” -s -remove -f1c:\windows\setup.iss


The Setup.iss file

[InstallShield Silent]
Version=v7.00
File=Response File
[File Transfer]
OverwrittenReadOnly=NoToAll
[{E3A5A8AB-58F6-45FF-AFCB-C9AE18C05001}-DlgOrder]
Dlg0={E3A5A8AB-58F6-45FF-AFCB-C9AE18C05001}-SprintfBox-0
Count=2
Dlg1={E3A5A8AB-58F6-45FF-AFCB-C9AE18C05001}-SdFinishReboot-0
[{E3A5A8AB-58F6-45FF-AFCB-C9AE18C05001}-SprintfBox-0]
Result=1
[Application]
Name=IDT Audio
Version=1.0.6433.0
Company=IDT
Lang=0009
[{E3A5A8AB-58F6-45FF-AFCB-C9AE18C05001}-SdFinishReboot-0]
Result=1
BootOption=0


Notes

If you want to add this to a SCCM Task Sequence,

#1 Create a self-extracting EXE using WinRAR, extracting to C:\Windows—-the EXE will contain the setup.iss.

#2 Add the self-extracting EXE from above to the Task Sequence. Create the EXE as a package in Software, then in the TS, point to the package.

#3 Add a Run Command in the Task Sequence: cmd /c “C:\Program Files (x86)\InstallShield Installation Information\{E3A5A8AB-58F6-45FF-AFCB-C9AE18C05001}\setup.exe” -s -remove -f1c:\windows\setup.iss


WinRAR Usage


SCCM – Windows 10 Upgrade – SetupComplete.cmd

email me

WARNING: This is experimental

For any of those interested, this is the SetupComplete CMD file Microsoft uses to complete the Task Sequence during a Windows 7-8 upgrade to Windows 10.

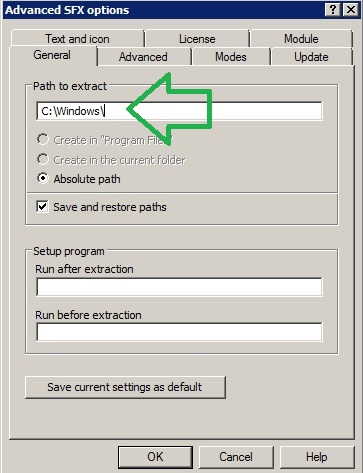
It is located here: C:\Windows\SMSTSPostUpgrade

The importance of this file is that it manages whether or not a rollback will happen (failures in the task sequence), along with controlling some bootstrap tasks. You could add to this—-at the very end of the file—if you wanted to accomplish something post—post setup.

You can append to the file using  three methods:

#1 Just create a package that runs and overwrites the file (a copy command sorta thing).

#2 Add a Run Command into the Task Sequence and echo to the SetupComplete file; remember to use ‘>>’ and not just ‘>’

Example

echo DO THIS >> C:\Windows\SMSTSPostUpgrade\SetupComplete.cmd

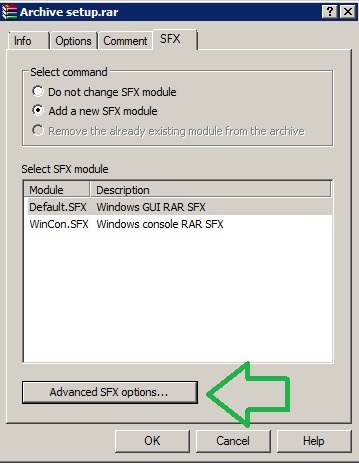
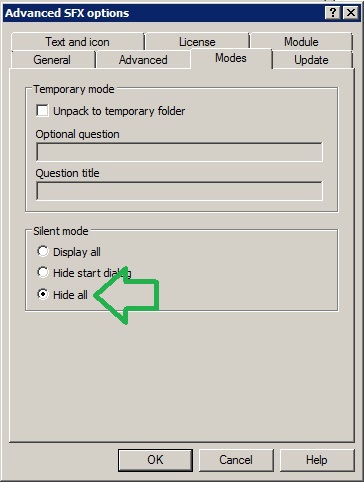
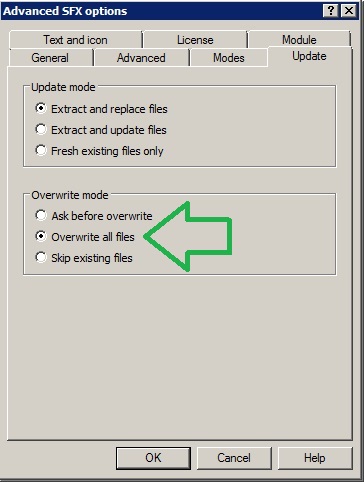
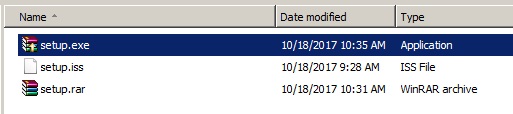
#3 Create a self-extracting EXE (I like using WINRAR) to just overwrite the file (no copy command needed).


The Script

@ECHO OFF

REM SCCMClientPath should be set before we get here

REM This script is written by ConfigMgr Task Sequence Upgrade Operating System action
REM SetupComplete.cmd — Upgrade Complete, calling TSMBootstrap to resume task sequence
echo %DATE%-%TIME% Entering setupcomplete.cmd >> C:\Windows\setupcomplete.log

echo %DATE%-%TIME% Setting env var _SMSTSSetupRollback=FALSE >> C:\Windows\setupcomplete.log
set _SMSTSSetupRollback=FALSE

echo %DATE%-%TIME% Setting registry to resume task sequence after reboot >> C:\Windows\setupcomplete.log
reg add “HKEY_LOCAL_MACHINE\SYSTEM\Setup” /v SetupType /t REG_DWORD /d 2 /f
reg add “HKEY_LOCAL_MACHINE\SYSTEM\Setup” /v CmdLine /t REG_SZ /d “C:\Windows\SMSTSPostUpgrade\setupcomplete.cmd” /f

echo %DATE%-%TIME% Running C:\Windows\CCM\\TSMBootstrap.exe to resume task sequence >> C:\Windows\setupcomplete.log
C:\Windows\CCM\\TSMBootstrap.exe /env:Gina /configpath:C:\_SMSTaskSequence /bootcount:2

IF %ERRORLEVEL% EQU -2147021886 (
echo %DATE%-%TIME% ERRORLEVEL = %ERRORLEVEL% >> C:\Windows\setupcomplete.log
echo %DATE%-%TIME% TSMBootstrap requested reboot >> C:\Windows\setupcomplete.log
echo %DATE%-%TIME% Rebooting now >> C:\Windows\setupcomplete.log
reg add “HKEY_LOCAL_MACHINE\SYSTEM\Setup” /v SetupShutdownRequired /t REG_DWORD /d 1 /f
) else (
echo %DATE%-%TIME% ERRORLEVEL = %ERRORLEVEL% >> C:\Windows\setupcomplete.log
echo %DATE%-%TIME% TSMBootstrap did not request reboot, resetting registry >> C:\Windows\setupcomplete.log
reg add “HKEY_LOCAL_MACHINE\SYSTEM\Setup” /v SetupType /t REG_DWORD /d 0 /f
reg add “HKEY_LOCAL_MACHINE\SYSTEM\Setup” /v CmdLine /t REG_SZ /d “” /f
)
echo %DATE%-%TIME% Exiting setupcomplete.cmd >> C:\Windows\setupcomplete.log

set SCCMClientPath=


Notes

To understand more about these files, look in the C:\Windows\CCM folder. There are file templates in there which are used to generate these setup cmds (SetupCompleteTemplate.cmd
SetupRollbackTemplate.cmd).

What the SetupRollback.cmd looks like (located in the same place as the SetupComplete.cmd)

@ECHO OFF

REM SCCMClientPath should be set before we get here

REM This script is written by ConfigMgr Task Sequence Upgrade Operating System action
REM SetupRollback.cmd — Upgrade Rolled back, calling TSMBootstrap to resume task sequence
echo %DATE%-%TIME% Entering setuprollback.cmd >> C:\Windows\setuprollback.log

echo %DATE%-%TIME% Setting env var _SMSTSSetupRollback=TRUE >> C:\Windows\setuprollback.log
set _SMSTSSetupRollback=TRUE

echo %DATE%-%TIME% Setting registry to resume task sequence after reboot >> C:\Windows\setuprollback.log
reg add “HKEY_LOCAL_MACHINE\SYSTEM\Setup” /v SetupType /t REG_DWORD /d 2 /f
reg add “HKEY_LOCAL_MACHINE\SYSTEM\Setup” /v CmdLine /t REG_SZ /d “C:\Windows\SMSTSPostUpgrade\setuprollback.cmd” /f

echo %DATE%-%TIME% Running C:\Windows\CCM\\TSMBootstrap.exe to resume task sequence >> C:\Windows\setuprollback.log
C:\Windows\CCM\\TSMBootstrap.exe /env:Gina /configpath:C:\_SMSTaskSequence /bootcount:2

IF %ERRORLEVEL% EQU -2147021886 (
echo %DATE%-%TIME% ERRORLEVEL = %ERRORLEVEL% >> C:\Windows\setuprollback.log
echo %DATE%-%TIME% TSMBootstrap requested reboot >> C:\Windows\setuprollback.log
echo %DATE%-%TIME% Rebooting now >> C:\Windows\setuprollback.log
reg add “HKEY_LOCAL_MACHINE\SYSTEM\Setup” /v SetupShutdownRequired /t REG_DWORD /d 1 /f
) else (
echo %DATE%-%TIME% ERRORLEVEL = %ERRORLEVEL% >> C:\Windows\setuprollback.log
echo %DATE%-%TIME% TSMBootstrap did not request reboot, resetting registry >> C:\Windows\setuprollback.log
reg add “HKEY_LOCAL_MACHINE\SYSTEM\Setup” /v SetupType /t REG_DWORD /d 0 /f
reg add “HKEY_LOCAL_MACHINE\SYSTEM\Setup” /v CmdLine /t REG_SZ /d “” /f
)
echo %DATE%-%TIME% Exiting setuprollback.cmd >> C:\Windows\setuprollback.log

set SCCMClientPath=