What is Teredo?

email me

Teredo is an IPv6 transition technology that provides address assignment and host-to-host automatic tunneling for unicast IPv6 traffic when IPv6/IPv4 hosts are located behind one or multiple IPv4 network address translators (NATs). To traverse IPv4 NATs, IPv6 packets are sent as IPv4-based User Datagram Protocol (UDP) messages.


Disable and enable Teredo using the command line

netsh int ipv6 isatap set state disabled
netsh int ipv6 6to4 set state disabled
netsh interface teredo set state disable

netsh int ipv6 set teredo client
netsh interface teredo set state client

check status

netsh Int teredo show stat

more…


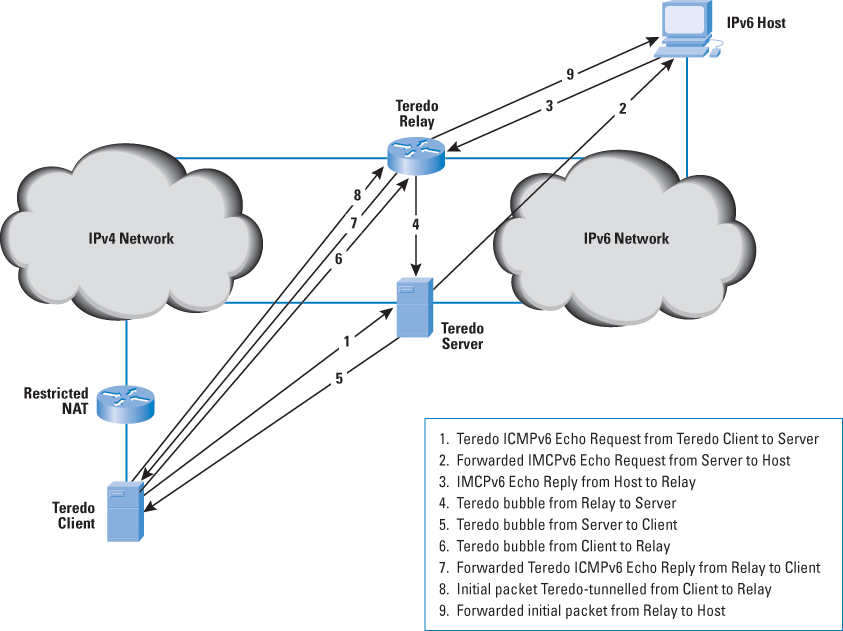
The package exchange process, useful when troubleshooting

  • Initial configuration for Teredo clients
  • Maintaining the NAT mapping
  • Initial communication between Teredo clients on the same link
  • Initial communication between Teredo clients in different sites
  • Initial communication from a Teredo client to a Teredo host-specific relay
  • Initial communication from a Teredo host-specific relay to a Teredo client
  • Initial communication from a Teredo client to an IPv6-only host
  • Initial communication from an IPv6-only host to a Teredo client


General Information

Teredo is an address assignment and automatic tunneling technology that provides unicast IPv6 connectivity across the IPv4 Internet. 6to4 is another automatic tunneling technology that provides unicast IPv6 connectivity across the IPv4 Internet. However, 6to4 works well when a 6to4 router exists at the edge of the site. The 6to4 router uses a public IPv4 address to construct the 6to4 prefix and acts as an IPv6 advertising and forwarding router. The 6to4 router encapsulates and decapsulates IPv6 traffic sent to and from site nodes.

6to4 relies on the configuration of a public IPv4 address and the implementation of 6to4 routing functionality in the edge device. Many small office/home office (SOHO) configurations use an IPv4 network address translator (NAT) for Internet connectivity. For more information about how network address translation works, see “Overview of Network Address Translators (NATs)” in this article. In most NAT configurations, the device providing NAT functionality is not capable of acting as a 6to4 router. Even if 6to4 was universally supported in Internet edge devices, there are some Internet connectivity configurations that contain multiple levels of NATs. A 6to4-capable edge device cannot use 6to4 if it is not assigned a public IPv4 address.

Teredo solves the issues of the lack of 6to4 functionality in modern-day Internet edge devices and multi-layered NAT configurations by tunneling IPv6 packets between the hosts within the sites. In contrast, 6to4 tunnels IPv6 packets between the edge devices. Tunneling from the hosts presents another issue for NATs: IPv6 packets that are encapsulated with IPv4 have the Protocol field in the IPv4 header set to 41. Most NATs only translate TCP or UDP traffic and must either be manually configured to translate other protocols or have NAT editors installed that handle the translation. Because Protocol 41 translation is not a common feature of NATs, IPv4-encapsulated IPv6 traffic will not flow through typical NATs. Therefore, to allow IPv6 traffic to flow through one or multiple NATs, Teredo encapsulates the IPv6 packet as an IPv4 UDP message, containing both an IPv4 and UDP header. UDP messages can be translated universally by NATs and can traverse multiple layers of NATs.

To summarize, Teredo is an IPv6 transition technology that allows automatic IPv6 tunneling between hosts that are located across one or more IPv4 NATs. IPv6 traffic from Teredo hosts can flow across NATs because it is sent as an IPv4 UDP message. If the NAT supports UDP port translation, then the NAT supports Teredo. The exception is a symmetric NAT, which is described in “Types of NATs” in this article.

Teredo is designed as a last resort transition technology for IPv6 connectivity. If native IPv6, 6to4, or Intrasite Automatic Tunnel Addressing Protocol (ISATAP) connectivity is present, the host does not act as a Teredo client. As more IPv4 edge devices are upgraded to support 6to4 and IPv6 connectivity becomes ubiquitous, Teredo will be used less and less until finally it is not used at all.

Benefits of Using Teredo

Teredo is a NAT traversal technology for IPv6 traffic. IPv6 traffic tunneled using Teredo can cross one or multiple NATs and allow a Teredo client to access the hosts on the IPv6 Internet (through a Teredo relay) and other Teredo clients on the IPv4 Internet. The ability to connect to other Teredo clients that are connected to the IPv4 Internet enables communication between applications that would otherwise have problems communicating over a NAT. With Teredo, IPv6-enabled applications can successfully communicate more frequently over the IPv4 Internet than IPv4-only applications.

Some types of IPv4-only server or peer applications have problems communicating when running on a computer that is behind a NAT. For more information, see Problems with Using Network Address Translators. These types of applications either require manual configuration of the NAT (to allow unsolicited incoming traffic to the server or peer computer on the private network) or the application must provide its own solution for NAT traversal.

If the application is IPv6-capable, it can use Teredo. There is no need to either configure the NAT or modify the application to perform its own NAT traversal. Therefore, rather than spending development time modifying applications for a custom NAT traversal solution, application vendors should update their applications to be IPv6-capable. If the application is already IPv6-capable, it can use Teredo, the NAT traversal solution for Windows.


Notes

Fixing Broken IPv6

netsh interface ipv6 delete route ::/0 interface=14
netsh interface ipv6 add route ::/0 interface=14

Announcing the .NET Framework 4.7.1

email me

Microsoft has announced the release of the .NET Framework 4.7.1. It’s included in the Windows 10 Fall Creators Update. .NET Framework 4.7.1 is also available on Windows 7+ and Windows Server 2008 R2+.  They have added support for targeting the .NET Framework 4.7.1 in Visual Studio 2017 15.5.

The .NET Framework 4.7.1 includes improvements in several areas:

  • Accessibility improvements in narration, high contrast and focus control areas
  • .NET Framework support for .NET Standard 2.0 and compiler features
  • More secure SHA-2 support in ASP.NET and System.Messaging
  • Configuration builders
  • ASP.NET Execution step feature
  • ASP.NET HttpCookie parsing
  • Enhancements in Visual Tree for WPF applications
  • Performance and reliability improvements

You can download the .NET Framework 4.7.1

For building applications targeting .NET 4.7.1 download the Developer Pack. You can see the complete list of improvements in the .NET Framework 4.7.1 release notes. .NET Framework 4.7.1 reference sources are available on the GitHub .NET Reference source read-only repository. .NET Framework 4.7.1 will be available on Windows Update in the near future. Docker images will be made available for this release and we will update this post when available.

more…

Windows 10 – Cannot Connect to Wireless

email me

1 – Delete subkeys in TLS 1.0, Client and Server

HKEY_LOCAL_MACHINE\SYSTEM\CurrentControlSet\Control\SecurityProviders\SCHANNEL\Protocols\TLS 1.0

2 – From an Admin Prompt, Run

IPCONFIG /FLUSHDNS
NBTSTAT -R
NBTSTAT -RR
NETSH INT IP RESET
NETSH INT IPV4 RESET
NETSH INT IPV6 RESET

NETSH WINSOCK RESET

3 – Restart computer or disable/reenable WLAN.


But why? 

Why does this happen? Most likely, your computer is using an authentication protocol based on TLS 1.0 (example, PEAP-MSCHAPv2 or EAP-TLS); this could be back-end or front-end protocols or configs. Something else to point out, TLS protocols can be dependent of specific .NET frameworks, making securing your computer or network even more complex, especially if you use apps based on certain frameworks. Specificity will be key to providing the best security, while understanding what you can and can’t disable.

Some general notes on the frameworks and supported TLS

  1. .NET 4.6 and above. You don’t need to do any additional work to support TLS 1.2; it’s supported by default. TLS 1.1 is supported. TLS 1.0 is supported.
  2. .NET 4.5. TLS 1.2 is supported, but it’s not a default protocol. You need to opt-in to use it. TLS 1.1 is supported. TLS 1.0 is supported.
  3. .NET 4.0. TLS 1.2 is not supported, but if you have .NET 4.5, or later, installed on the computer, then you still can opt in for TLS 1.2, even if your application framework doesn’t support it. TLS 1.0 is supported.
  4. .NET 3.5 or below. TLS 1.2 is not supported and there is no workaround. Upgrade your application to more recent version of the framework. TLS 1.0 is supported.

more from Microsoft on TLS…   on frameworks…


Notes

If that doesn’t work, take a look at disabling the power management on the Wi-Fi adapter

1 – On the network adapter, go to the power management tab.

2 – Uncheck the Allow this computer to turn off this device to save power. Click on OK.

3 – Restart computer


Edit or Create Group Policy via Registry Editor

1 – Navigate to the following path in Registry Editor

HKLM\Software\Policies\Microsoft\Windows\WcmSvc\

2 – Create a GroupPolicy subkey

3 – Inside of HKLM\Software\Policies\Microsoft\Windows\WcmSvc\GroupPolicy, right-click in the right pane and select New > DWORD. Name it fMinimizeConnections

4 – Restart computer


Other

1 – Within the device manager, under VIEW, choose Show hidden devices
2 – Disabled the Microsoft wifi direct virtual adapter
3 – Disable the Microsoft hosted network virtual adapter
4 – Restart computer

Update to enable TLS 1.1 and TLS 1.2 as a default secure protocols in WinHTTP in Windows

.NET Framework version history


SCCM – Windows 10 Upgrade – Task Sequence failed with error code 0xc1900204

email me

What is 0xc1900204 error?

The 0xc1900204 error code are used by windows operating systems to alert programmers and system users to a problem. There are thousands of different error codes, found in hundreds of places throughout a computer. They often need a deep IT background to decode and to fix, but many can be repaired through simple, step-by-step solutions either found online or with the help of support personnel.

The error code show up on your computer screen as numbers or number/letter combinations that correspond to the particular error or type of error occurring. Many of the common Windows Errors can be resolved with a quick search, but more complex or obscure errors need help from someone who is well trained in the Windows operating system. Windows error codes do not provide precise, actionable information, but are general codes provided to offer a starting point for a solution. With proper examination and testing, Windows error codes direct a troubleshooter to the problem.

What causes 0xc1900204 error?

The 0xc1900204 error may be caused by windows system files damage. The corrupted system files entries can be a real threat to the well being of your computer.

There can be many events which may have resulted in the system files errors. An incomplete installation, an incomplete uninstall, improper deletion of applications or hardware. It can also be caused if your computer is recovered from a virus or adware/spyware attack or by an improper shutdown of the computer. All the above actives may result in the deletion or corruption of the entries in the windows system files. This corrupted system file will lead to the missing and wrongly linked information and files needed for the proper working of the application.


Troubleshooting

First, clear the ccmcache folder using the Control Panel CM applet and try again.

Second, try disjoining from the domain and running the setup.exe manually. Does it work?

Third, look in the hidden folder C:\$WINDOWS.~BT\Sources\Panther to view the setuperr.log file for more information. Search for the hex return code found which will give you more information. Also search for setupact.log for more detailed information. Once you’ve done some research and tried a few things, move the whole setup folder to _Backup, and try again.

Fourth, see Repair Windows Updates

Fifth, see Rebuild WMI

Sixth, verify there are no unnecessary user accounts in C:\Users and ProfileList in the registry.

Determine Security Privileges an Account Has

email me

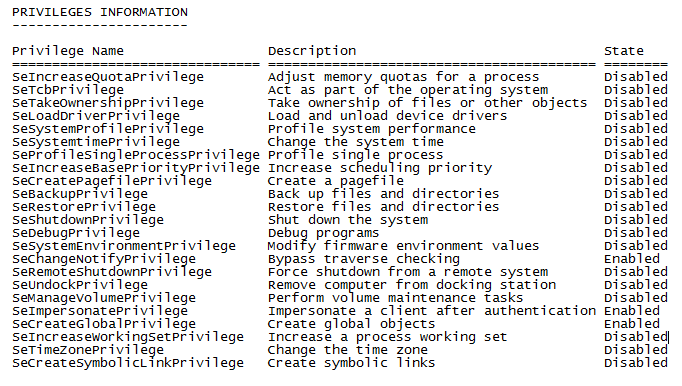
To determine privileges held by a user account, run whoami. This is especially useful when installing SQL, which does an account check.
Command

whoami /priv


Output


Notes

If you’re trying to install SQL,  but the account check is failing, you’ll need to either grant domain level privileges or local security privileges to Backup files and directoriesDebug Programs, and Manage auditing and security log. I recommend creating a new user account to be utilized as a SQL access account. If there is a domain policy overriding your changes, add the machine’s computer account into an OU that is blocking policy. Then, run gpupdate /force. Check the Local Security Settings on the computer. You should be able to make changes now. Once the changes have been made, run the SQL setup again.

Snapshot of what needs to be updated


Some other random notes

[HKEY_LOCAL_MACHINE\SYSTEM\CurrentControlSet\Control\SecurityProviders\SCHANNEL\Protocols\TLS 1.2]

[HKEY_LOCAL_MACHINE\SYSTEM\CurrentControlSet\Control\SecurityProviders\SCHANNEL\Protocols\TLS 1.2\Client]
“DisabledByDefault”=dword:00000000
“Enabled”=dword:00000001

[HKEY_LOCAL_MACHINE\SYSTEM\CurrentControlSet\Control\SecurityProviders\SCHANNEL\Protocols\TLS 1.2\Server]
“DisabledByDefault”=dword:00000000
“Enabled”=dword:00000001


The SQL error when TLS  1.0 is disabled

A connection was successfully established with the server, but then an error occurred
during the login process. (provider: Shared Memory Provider, error: 0 – No process is
on the other end of the pipe.)

(Microsoft SQL Server, Error: 233)


SCHANNEL registry status

SSL 2.0: Client: DisabledByDefault = 1 Enabled = 0 Server: DisabledByDefault = 1 Enabled = 0
SSL 3.0: Client: DisabledByDefault = 1 Enabled = 0 Server: DisabledByDefault = 1 Enabled = 0
TLS 1.0: Client: DisabledByDefault = 0 Enabled = 1 Server: DisabledByDefault = 0 Enabled = 1
TLS 1.1: Client: DisabledByDefault = 0 Enabled = 1 Server: DisabledByDefault = 0 Enabled = 1
TLS 1.2: Client: DisabledByDefault = 0 Enabled = 1 Server: DisabledByDefault = 0 Enabled = 1

SCCM – Distribution Point Selection Steps

email me

This is how a client computer determines which distribution point (DP) to use.

 Step From Action
 1 Client Sends a content location request to its Management Point (MP)
 2 MP The search for Distribution Points (DP’s), with the content, starts in the client’s current site. This can be the client’s assigned site, secondary site attached to it, or a site to which the client is roamed. When the content is not available here, the search goes to the assigned site.
 3 MP The list of Distribution Points will be sorted. When a protected DP is found, where the client’s boundary is included, only it will be returned. If there is no protected DP found, the MP will return a list of non-protected DP’s that host downloadable content.
 4 MP The remaining Distribution Points on the list will be marked as local, or remote, depending on the associated boundary.
 5 MP The Distribution Point list is sent back to the client.
 6 Client The client receives the Distribution Point list and then attempts to connect to DP’s in this order: local DP’s and then remote DP’s; same IP subnet, same AD site, and then the remaining DP’s. In every category, the client prefers DP’s with BITS enabled.


Content source priority

When a client needs content, it makes a content location request to the management point. The management point returns a list of source locations that are valid for the requested content. This list varies depending upon the specific scenario, technologies in use, site design, boundary groups, and deployment settings. The following list contains all of the possible content source locations that a client can use, in the order in which it prioritizes them:

  1. The distribution point on the same computer as the client
  2. A peer source in the same network subnet
  3. A distribution point in the same network subnet
  4. A peer source in the same boundary group
  5. A distribution point in the current boundary group
  6. A distribution point in a neighbor boundary group configured for fallback
  7. A distribution point in the default site boundary group
  8. The Windows Update cloud service
  9. An internet-facing distribution point
  10. A cloud distribution point in Azure


Notes

https://docs.microsoft.com/en-us/sccm/core/plan-design/hierarchy/understand-how-clients-find-site-resources-and-services

https://docs.microsoft.com/en-us/sccm/core/plan-design/hierarchy/fundamental-concepts-for-content-management

https://docs.microsoft.com/en-us/sccm/core/plan-design/hierarchy/package-transfer-manager

https://docs.microsoft.com/en-us/sccm/core/plan-design/hierarchy/client-peer-cache

SCCM – Windows 10 Upgrade – Boot Loop

email me

This is concerning a strange action…where after a Windows 10 upgrade using a SCCM task sequence, the state of the computer is thrown into a boot loop. Not exactly fun. In some cases, the last step in the task sequence, usually Install Windows Updates, will leave the computer in a bad state—this has to do with a KB not properly installing ( 1  2 ), or cleanly installing properly (though, there are other causes of this bad state). When this happens, two reg keys that would normally be modified, are left unchanged. These reg keys leave the machine state in ‘upgrade’ mode—not something you want.

The specific reg keys

HKLM\SYSTEM\Setup /v CmdLine

HKLM\SYSTEM\Setup /v SetupType


During the upgrade process, they look like this

HKLM\SYSTEM\Setup /v CmdLine /t REG_SZ /d “C:\Windows\SMSTSPostUpgrade\setupcomplete.cmd”

HKLM\SYSTEM\Setup /v SetupType /t REG_DWORD /d 2

The problem is, when the upgrade falls into limbo, the setupcomplete.cmd no longer exists—however the computer is trying to access the CMD file—thus a boot loop.


What you want the keys to look like

HKLM\SYSTEM\Setup /v CmdLine /t REG_SZ /d “”

HKLM\SYSTEM\Setup /v SetupType /t REG_DWORD /d 0


The Fix

To fix this boot loop, you’ll need to access the registry on the boot loop hard drive and make the modifications manually. This can be done by using the Win 10 DVD, dropping out to the command prompt, and running regedit, OR….just by slaving or cradling the drive. Here are the steps once you have access to the folder structure on the boot loop drive.

Open Regedit

Select HKLM

Select File from menu

Select Load Hive from menu

Navigate to E:\Windows\System32\config (E: being the 2nd drive)

Select SYSTEM file

Name ‘test’

Select ‘HKLM\test’ in regedit

Navigate to Setup

Remove contents of the CmdLine key

Change SetupType to 0

Try the drive in the main computer again. Boot loop should be gone.

Enable SMB Signing

email me

Scripting

reg add “HKEY_LOCAL_MACHINE\System\CurrentControlSet\Services\LanmanWorkStation\Parameters” /v “RequireSecuritySignature” /t REG_DWORD /d 1 /f

reg add “HKEY_LOCAL_MACHINE\System\CurrentControlSet\Services\LanmanWorkStation\Parameters” /v “EnableSecuritySignature” /t REG_DWORD /d 1 /f

reg add “HKEY_LOCAL_MACHINE\System\CurrentControlSet\Services\LanmanServer\Parameters” /v “RequireSecuritySignature” /t REG_DWORD /d 1 /f

reg add “HKEY_LOCAL_MACHINE\System\CurrentControlSet\Services\LanmanServer\Parameters” /v “EnableSecuritySignature” /t REG_DWORD /d 1 /f


Return the current state of  SMB
Get-SmbServerConfiguration | Select EnableSMB1Protocol, EnableSMB2Protocol

Disables the SMBv1 on the SMB server by running the below command
Set-SmbServerConfiguration -EnableSMB1Protocol $false

Disables the SMBv2 and SMBv3 on the SMB server by running the below command
Set-SmbServerConfiguration -EnableSMB2Protocol $false

Enables the SMBv1 on the SMB server by running the below command
Set-SmbServerConfiguration -EnableSMB1Protocol $true

Enables the SMBv2 and SMBv3 on the SMB server by running the below command
Set-SmbServerConfiguration -EnableSMB2Protocol $true


Using Windows PowerShell 2.0 or later version

Disables the SMBv1 on the SMB server by running the below command
Set-ItemProperty -Path “HKLM:\SYSTEM\CurrentControlSet\Services\LanmanServer\Parameters” SMB1 -Value 0 –Force

Disables the SMBv2 and SMBv3 on the SMB server by running the below command
Set-ItemProperty –Path “HKLM:\SYSTEM\CurrentControlSet\Services\LanmanServer\Parameters” SMB2 –Value 0 –Force

Enables the SMBv1 on the SMB server by running the below command
Set-ItemProperty –Path “HKLM:\SYSTEM\CurrentControlSet\Services\LanmanServer\Parameters” SMB1 –Value 1 –Force

Enables the SMBv2 and SMBv3 on the SMB server by running the below command
Set-ItemProperty -Path “HKLM:\SYSTEM\CurrentControlSet\Services\LanmanServer\Parameters” SMB2 -Value 1 -Force

Batch – Manage Windows Updates by Script

email me

Manage Windows Update via a script.

@echo off

set sysPath=C:\Windows\system32

:: STOP SERVICE
%sysPath%\net stop wuauserv

:: REMOVE KEYS
%sysPath%\reg DELETE “HKLM\Software\Microsoft\Windows\CurrentVersion\WindowsUpdate\Auto Update” /v “LastWaitTimeout” /reg:64 /f

%sysPath%\reg DELETE “HKLM\Software\Microsoft\Windows\CurrentVersion\WindowsUpdate\Auto Update” /v “DetectionStartTime” /reg:64 /f


%sysPath%\reg DELETE “HKLM\Software\Microsoft\Windows\CurrentVersion\WindowsUpdate\Auto Update” /v “NextDetectionTime” /reg:64 /f

:: ADD REG KEYS

:: AUTO UPDATE IS ENABLED
%sysPath%\reg ADD “HKLM\SOFTWARE\Policies\Microsoft\Windows\WindowsUpdate\AU” /v “NoAutoUpdate” /t REG_DWORD /d “0” /reg:64 /f

:: DOWNLOAD AND INSTALL
%sysPath%\reg ADD “HKLM\SOFTWARE\Policies\Microsoft\Windows\WindowsUpdate\AU” /v “AUOptions” /t REG_DWORD /d “3” /reg:64 /f

:: 0 IS SET TO EVERY DAY
:: but we could schedule time and day
%sysPath%\reg ADD “HKLM\SOFTWARE\Policies\Microsoft\Windows\WindowsUpdate\AU” /v “ScheduledInstallDay” /t REG_DWORD /d “0” /reg:64 /f

:: ADD 2400 TIME HERE BY HOUR

%sysPath%\reg ADD “HKLM\SOFTWARE\Policies\Microsoft\Windows\WindowsUpdate\AU” /v “ScheduledInstallTime” /t REG_DWORD /d “19” /reg:64 /f

:: USE AUTO REBOOT WHILE LOGGED IN
%sysPath%\reg ADD “HKLM\SOFTWARE\Policies\Microsoft\Windows\WindowsUpdate\AU” /v “NoAutoRebootWithLoggedOnUsers” /t REG_DWORD /d “0” /reg:64 /f

:: YES INSTALL MINOR UPDATES
%sysPath%\reg ADD “HKLM\SOFTWARE\Policies\Microsoft\Windows\WindowsUpdate\AU” /v “AutoInstallMinorUpdates” /t REG_DWORD /d “1” /reg:64 /f

:: PROMPT FOR REBOOT IS ENABLED AND SET FOR 60 MINUTES – WARN USER EVERY HOUR
%sysPath%\reg ADD “HKLM\SOFTWARE\Policies\Microsoft\Windows\WindowsUpdate\AU” /v “RebootRelaunchTimeoutEnabled” /t REG_DWORD /d “00000001” /reg:64 /f
%sysPath%\reg ADD “HKLM\SOFTWARE\Policies\Microsoft\Windows\WindowsUpdate\AU” /v “RebootRelaunchTimeout” /t REG_DWORD /d “60” /reg:64 /f

:: FOR A SCHEDULED INSTALL, RETRY A MISSED INSTALL EVERY 15 MINUTES 
%sysPath%\reg ADD “HKLM\SOFTWARE\Policies\Microsoft\Windows\WindowsUpdate\AU” /v “RescheduleWaitTimeEnabled” /t REG_DWORD /d “00000001” /reg:64 /f
%sysPath%\reg ADD “HKLM\SOFTWARE\Policies\Microsoft\Windows\WindowsUpdate\AU” /v “RescheduleWaitTime” /t REG_DWORD /d “15” /reg:64 /f

:: CHECK FOR UPDATES EVERY 22 HOURS – WHICH IS THE DEFAULT IF ENABLED
%sysPath%\reg ADD “HKLM\SOFTWARE\Policies\Microsoft\Windows\WindowsUpdate\AU” /v “DetectionFrequencyEnabled” /t REG_DWORD /d “1” /reg:64 /f

:: FOR A SCHEDULED REBOOT, IT IS ENABLED AND SET FOR 8 HOURS TO WAIT BEFORE PROCEEDING WITH A SCHEDULED RESTART
%sysPath%\reg ADD “HKLM\SOFTWARE\Policies\Microsoft\Windows\WindowsUpdate\AU” /v “RebootWarningTimeoutEnabled” /t REG_DWORD /d “1” /reg:64 /f
%sysPath%\reg ADD “HKLM\SOFTWARE\Policies\Microsoft\Windows\WindowsUpdate\AU” /v “RebootWarningTimeout” /t REG_DWORD /d “480” /reg:64 /f

:: USE WSUS IS DISABLED
%sysPath%\reg ADD “HKLM\SOFTWARE\Policies\Microsoft\Windows\WindowsUpdate\AU” /v “UseWUServer” /t REG_DWORD /d “0” /reg:64 /f

:: ALLOW SHUTDOWN IS ENABLED
%sysPath%\reg ADD “HKLM\SOFTWARE\Policies\Microsoft\Windows\WindowsUpdate\AU” /v “NoAUShutdownOption” /t REG_DWORD /d “0” /reg:64 /f

:: REGISTER COMPONENTS
%sysPath%\regsvr32 wuaueng.dll /s
%sysPath%\regsvr32 wuauserv.dll /s
%sysPath%\regsvr32 wucltui.dll /s
%sysPath%\regsvr32 wups.dll /s
%sysPath%\regsvr32 wuweb.dll /s
%sysPath%\regsvr32 iuengine.dll /s

%sysPath%\wuauclt /resetauthorization /detectnow

:: START SERVICE
%sysPath%\net start wuauserv

%sysPath%\wuauclt /ReportNow /DetectNow
:: %sysPath%\wuauclt /UpdateNow

:: not used
::%sysPath%\wuauclt /ShowWU

::NOTES

::NoAutoUpdate: Reg_DWORD
:: 0: Automatic Updates is enabled
:: 1: Automatic Updates is disabled

:: AUOptions: Reg_DWORD
:: 1: Keep my computer up to date has been disabled in Automatic Updates
:: 2: Notify of download and installation
:: 3: Automatically download and notify of installation
:: 4: Automatically download and scheduled installation

:: ScheduledInstallDay: Reg_DWORD
:: 0: Every day
:: 1 through 7: The days of the week from Sunday (1) to Saturday (7)

:: ScheduledInstallTime: Reg_DWORD
:: n equals the time of day in a 24-hour format (0-23).

:: UseWUServer: Reg_DWORD
:: 0 = disabled
:: 1 = enable, to configure a WSUS

:: RescheduleWaitTime: Reg_DWORD
:: 1-60 minutes wait time

:: NoAutoRebootWithLoggedOnUsers: Reg_DWORD
:: 0 = true
:: 1 = false

:: AutoInstallMinorUpdates: Reg_DWORD
:: 0 = false
:: 1 = true