SCCM – PowerShell – SQL Query

email me

This is a SQL query written in PowerShell. It connects to the SCCM DB and returns Custom_Data for C and D drives.

#import-module sqlps
#Install-Module -Name SqlServer -AllowClobber
#Update-Module -Name SqlServer

Clear-Host

[string] $Server= "SCCM_Server\SQL_Instance"
[string] $Database = "CM_SITENAME"

# C Drive Query
[string] $SQLQuery1 = $("SELECT [Bitlocker_C_Drive00] FROM [dbo].[Custom_Custom_DATA] WHERE MachineID='$ResourceID'")

# D Drive Query
[string] $SQLQuery2 = $("SELECT [Bitlocker_D_Drive00] FROM [dbo].[Custom_Custom_DATA] WHERE MachineID='$ResourceID'")

# Not used at this time - no need to use this if connecting in authorized security context
#[string] $user = "username"
#[string] $pwd = "LetMeIn99$"

$Connection = New-Object System.Data.SQLClient.SQLConnection
$dt = new-object "System.Data.DataTable"

$Connection.ConnectionString = "server='$Server';database='$Database';trusted_connection=true;"
#$Connection.ConnectionString = "server='$Server';uid=$user;pwd=$pwd;database='$Database';trusted_connection=true;"
$Connection.Open()

# C Drive
$cmd1 = $Connection.CreateCommand()
$cmd1.CommandText = $SQLQuery1
$data1 = $cmd1.ExecuteReader()
$dt.Load($data1)
$CDrive = $dt | foreach { $_.Bitlocker_C_Drive00 }
$CDrive

# D Drive
$cmd2 = $Connection.CreateCommand()
$cmd2.CommandText = $SQLQuery2
$data2 = $cmd2.ExecuteReader()
$dt.Load($data2)
$DDrive = $dt | foreach { $_.Bitlocker_D_Drive00 }
$DDrive

# Close Connection
$Connection.Close()

Windows – Change Roaming Aggressiveness

email me

Batch

:: created to change the wireless roaming to medium-high

:: the class - not used, because it may change from model to model
:: {4d36e972-e325-11ce-bfc1-08002be10318}

:: setup
setlocal enabledelayedexpansion
set /a count=1

:: uses dynamic reg scanning to find the right class and subkey
for /f "tokens=1-4 delims= " %%a in ('reg query HKLM\SYSTEM\CurrentControlSet\Control\Class /v RoamAggressiveness /s') do (
:: sets the returned reg key 
if !count!==1 set var1=%%a
set /a count+=1
)

:: applies reg change
reg add "%var1%" /v RoamAggressiveness /t REG_SZ /d 3 /f

exit /b 0


PowerShell

Set-NetAdapterAdvancedProperty -Name "Wi-Fi" -DisplayName "Roaming Aggressiveness" -DisplayValue "4. Medium-High"

Batch – Google Chrome Uninstall-Scrubber

email me

Methods for uninstalling Chrome


EXE (good)

"C:\Program Files (x86)\Google\Chrome\Application\64.0.3282.140\Installer\setup.exe" --uninstall --multi-install --chrome --system-level --force-uninstall


WMI (meh)

wmic product where “name like ‘Google Chrome'” call uninstall /nointeractive


GUID

MSIEXEC.EXE /X{FE64921C-E29D-39EC-9DD9-C567C6E5A0C6} /qn /norestart

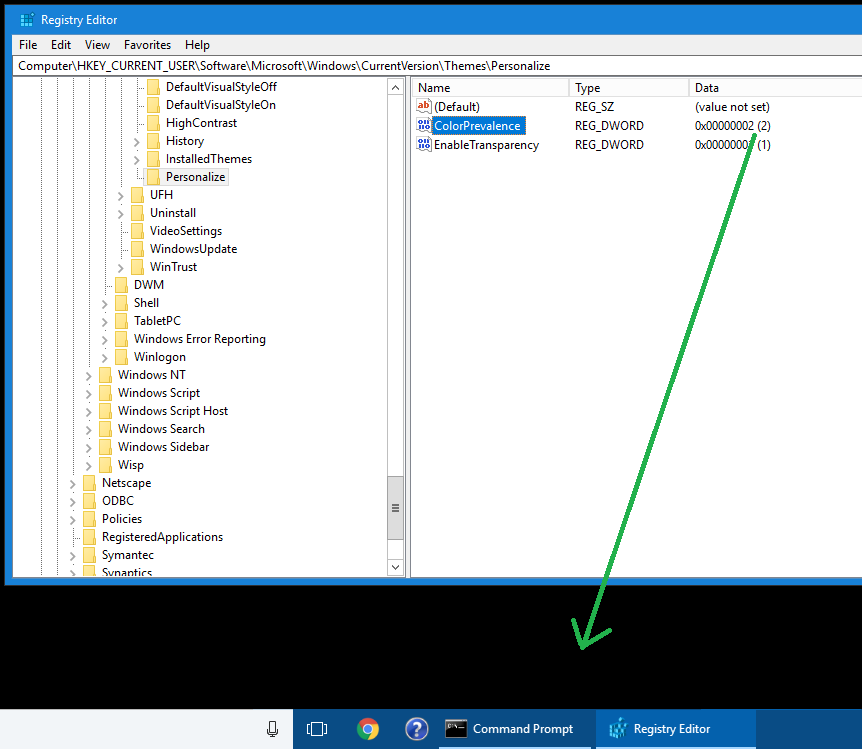
Note, GUIDs can be found

“HKEY_LOCAL_MACHINE\SOFTWARE\Microsoft\Windows\CurrentVersion\Uninstall\”

“HKEY_LOCAL_MACHINE\SOFTWARE\WOW6432Node\Microsoft\Windows\CurrentVersion\Uninstall\”


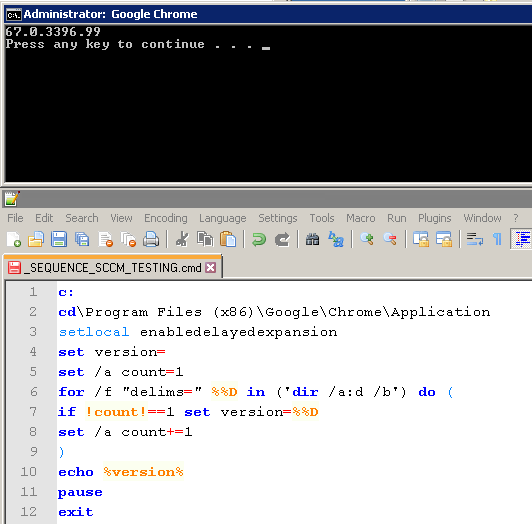
Return any version number (better)

c:
cd\Program Files (x86)\Google\Chrome\Application

:: return version number
setlocal enabledelayedexpansion
set version=
set /a count=1
for /f “delims=” %%V in (‘dir “C:\Program Files (x86)\Google\Chrome\Application\” /a:d /b’) do (
if !count!==1 set version=%%V
set /a count+=1
)

“C:\Program Files (x86)\Google\Chrome\Application\%version%\Installer\setup.exe” –uninstall –multi-install –chrome –system-level –force-uninstall

:: those are are two hyphens in front of each parameter


Snapshot

As you see, this returns the version. Once you have that, it’s simple to plug that into the command to uninstall Chrome.


Notes

:: DEFAULT BROWSERS
“C:\Program Files (x86)\Google\Chrome\Application\63.0.3282.118\Installer\setup.exe” –uninstall –multi-install –chrome –system-level –force-uninstall

“C:\Program Files (x86)\Google\Chrome\Application\63.0.3282.132\Installer\setup.exe” –uninstall –multi-install –chrome –system-level –force-uninstall

“C:\Program Files (x86)\Google\Chrome\Application\64.0.3282.119\Installer\setup.exe” –uninstall –multi-install –chrome –system-level –force-uninstall

“C:\Program Files (x86)\Google\Chrome\Application\64.0.3282.140\Installer\setup.exe” –uninstall –multi-install –chrome –system-level –force-uninstall

“C:\Program Files (x86)\Google\Chrome\Application\64.0.3282.167\Installer\setup.exe” –uninstall –multi-install –chrome –system-level –force-uninstall

“C:\Program Files (x86)\Google\Chrome\Application\64.0.3282.168\Installer\setup.exe” –uninstall –multi-install –chrome –system-level –force-uninstall

“C:\Program Files (x86)\Google\Chrome\Application\64.0.3282.186\Installer\setup.exe” –uninstall –multi-install –chrome –system-level –force-uninstall


MsiExec.exe /X{141A8DCA-ECB5-3217-B35B-B7F562D65385} /qn /norestart

MsiExec.exe /X{D8BAA38A-97E1-3BD9-A877-673E81553618} /qn /norestart

reg delete “HKEY_LOCAL_MACHINE\SOFTWARE\Microsoft\Windows\CurrentVersion\Uninstall\{D8BAA38A-97E1-3BD9-A877-673E81553618}” /f

reg delete “HKEY_LOCAL_MACHINE\SOFTWARE\Microsoft\Windows\CurrentVersion\Uninstall\{141A8DCA-ECB5-3217-B35B-B7F562D65385}” /f

reg delete “HKEY_LOCAL_MACHINE\SOFTWARE\Microsoft\Windows\CurrentVersion\Uninstall\{FE64921C-E29D-39EC-9DD9-C567C6E5A0C6}” /f

reg delete “HKEY_LOCAL_MACHINE\SOFTWARE\WOW6432Node\Microsoft\Windows\CurrentVersion\Uninstall\{D8BAA38A-97E1-3BD9-A877-673E81553618}” /f

reg delete “HKEY_LOCAL_MACHINE\SOFTWARE\WOW6432Node\Microsoft\Windows\CurrentVersion\Uninstall\{141A8DCA-ECB5-3217-B35B-B7F562D65385}” /f

reg delete “HKEY_LOCAL_MACHINE\SOFTWARE\WOW6432Node\Microsoft\Windows\CurrentVersion\Uninstall\{FE64921C-E29D-39EC-9DD9-C567C6E5A0C6}” /f

reg delete “HKEY_LOCAL_MACHINE\SOFTWARE\Wow6432Node\Microsoft\Windows\CurrentVersion\Uninstall\Google Chrome” /f

reg delete “HKEY_LOCAL_MACHINE\SOFTWARE\Microsoft\Windows\CurrentVersion\Uninstall\Google Chrome” /f

reg delete “HKEY_LOCAL_MACHINE\SOFTWARE\Wow6432Node\Policies\Google\Update” /f
reg delete “HKEY_LOCAL_MACHINE\SOFTWARE\Policies\Google\Update” /f

:: 63.0.3239.132
:: {141A8DCA-ECB5-3217-B35B-B7F562D65385}

:: 64.0.3239.140
{D8BAA38A-97E1-3BD9-A877-673E81553618}

:: 64.0.3239.119
{FE64921C-E29D-39EC-9DD9-C567C6E5A0C6}

————————————————————————-

:: 57 . 0 . 2987 . 133
:: {8AC8E2E9-87E7-30CA-8308-E737B3911CE5}

:: 58 . 0 . 3029 . 81
:: {A967B385-DA3A-32DD-B6F3-D169E888E661}

:: 58 . 0 . 3029 . 96
:: {A4690197-328E-3732-A460-124D6900D9C5}

:: 58 . 0 . 3029 . 110
:: {ED4B0482-0731-311E-80BB-7D1A87FDF296}

:: 59 . 0 . 3071 . 86
:: {98305915-759E-39B2-A385-5818CDBB9F5B}

:: 59 . 0 . 3071 . 104
:: {BDFAC210-BE15-32E6-BC3D-3CF0E7F4E430}

:: 59 . 0 . 3071 . 115
:: {715E251E-9134-3D1D-BE19-1C6EE18F8D24}

:: 60 . 0 . 3112 . 78
:: {3369F76A-F628-300A-8CC7-53CF96F12C56}

:: 60 . 0 . 3112 . 90
::{3369F76A-F628-300A-8CC7-53CF96F12C56}

:: 60 . 0 . 3112 . 101
:: {60C02A0E-51D2-3127-B4F1-2B92404692AF}

:: 60 . 0 . 3112 . 113
:: {4EC552DD-5454-3B12-A15F-D84ED8DD24D7}

:: 61 . 0 . 3163 . 91
:: {2170A876-572E-31E6-8E5E-157B5EEF508D}

Windows 10 – Application Settings Randomly Popping Up

email me

You’ll sometimes notice after upgrading to Windows 10, the settings, the enhanced application settings boxes, will just randomly appear. This is how you disable that odd behavior.

Run these commands from an admin command prompt, or add to a script:

net stop SysMain

sc config SysMain start= disabled

reg add “HKEY_LOCAL_MACHINE\SYSTEM\CurrentControlSet\Control\Session Manager\Memory Management\PrefetchParameters” /v “EnableSuperfetch” /t REG_DWORD /d 0 /f

PowerShell – Basic Form

email me

Snapshot

The form…with dropdown selection, buttons, a label, an icon, and transparency.

 
Code

Clear-Host

# Using
[void] [System.Reflection.Assembly]::LoadWithPartialName("System.Drawing")
[void][System.Reflection.Assembly]::LoadWithPartialName("System.Windows.Forms")
[void][System.Windows.Forms.Application]::EnableVisualStyles()

# Create Form
$Form = New-Object system.Windows.Forms.Form 
$Form.Size = New-Object System.Drawing.Size(400,300) 
#$Form.Width = 400 
#$Form.Height = 300 
$Form.MaximizeBox = $false 
$Form.StartPosition = "CenterScreen" 
$Form.FormBorderStyle = 'Fixed3D' 
$Form.Text = "My Application" 

$Form.AutoSizeMode = "GrowAndShrink"    # or GrowOnly
$Form.MinimizeBox = $False
$Form.MaximizeBox = $False
$Form.WindowState = "Normal"            # Maximized, Minimized, Normal
$Form.SizeGripStyle = "Hide"            # Auto, Hide, Show
$Form.ShowInTaskbar = $True
$Form.Opacity = 0.7                     # 1.0 is fully opaque; 0.0 is invisible
$Form.StartPosition = "CenterScreen"    # CenterScreen, Manual, WindowsDefaultLocation, WindowsDefaultBounds, CenterParent


# Icon
$Icon = New-Object system.drawing.icon ("C:\Program Files (x86)\Microsoft Office\Office15\Groove\ToolIcons\COMPUTER.ICO")
$Form.Icon = $Icon

# Label
$Label = New-Object System.Windows.Forms.Label
$Label.Text = "This form is very simple."
$Label.AutoSize = $True
$Label.Location = New-Object System.Drawing.Size(120,50) 
$Font = New-Object System.Drawing.Font("Calibri",10,[System.Drawing.FontStyle]::Regular) 
$Form.Font = $Font
$Form.Controls.Add($Label)


# Drop Down Selection

# Create datatable to bind a combobox
$datatable = New-Object system.Data.DataTable

# Define Columns
$col1 = New-Object system.Data.DataColumn "Value",([string])
$col2 = New-Object system.Data.DataColumn "Text",([string])


# Add columns to Datatable
$datatable.columns.add($col1)
$datatable.columns.add($col2)
		
# 1 Create Row
$datarow1 = $datatable.NewRow()

# Enter data in row
$datarow1.Value = "Value 1"
$datarow1.Text = "Text 1"

# Add row to datatable
$datatable.Rows.Add($datarow1)


# 2 Create Row
$datarow2 = $datatable.NewRow()

#Enter data in the row
$datarow2.Value = "Value 2"
$datarow2.Text = "Text 2"

# Add the row to the datatable
$datatable.Rows.Add($datarow2)


# 3 Create Row
$datarow3 = $datatable.NewRow()

# Enter Data in row
$datarow3.Value = "Value 3"
$datarow3.Text = "Text 3"

# Add Row to datatable
$datatable.Rows.Add($datarow3)

# Create combobox
$combobox = New-Object System.Windows.Forms.ComboBox		
$combobox.Add_SelectedIndexChanged({
		#output the selected value and text
		write-host $combobox.SelectedItem["Value"] $combobox.SelectedItem["Text"]
})

# Clear Combo before bind
$combobox.Items.Clear()

# Bind Combobox to datatable
$combobox.ValueMember = "Value"
$combobox.DisplayMember = "Text"
$combobox.Datasource = $datatable

# Add Combobox to form
$form.Controls.Add($combobox)	


# Button 1
$Okbutton1 = New-Object System.Windows.Forms.Button 
$Okbutton1.Location = New-Object System.Drawing.Size(80,80)
$Okbutton1.Size = New-Object System.Drawing.Size(100,30)
$Okbutton1.Text = "OK1"
$Okbutton1.Add_Click({$Form.Close()
# do this with button
Write-Host "OK Button 1"}) 
$Form.Controls.Add($Okbutton1)

# Button 2
$Okbutton2 = New-Object System.Windows.Forms.Button 
$Okbutton2.Location = New-Object System.Drawing.Size(200,80)
$Okbutton2.Size = New-Object System.Drawing.Size(100,30)
$Okbutton2.Text = "OK2"
$Okbutton2.Add_Click({$Form.Close() 
# do this with button
Write-Host "OK Button 2"}) 
$Form.Controls.Add($Okbutton2)

# Show form
[void]$form.showdialog()

SCCM – Stamp Registry in Task Sequence

email me

To stamp the registry in a Task Sequence, create two Run Commands in the Post Setup group (I add these as the final steps):

To set the field where Model is normally at

#1
cmd /c reg add “HKEY_LOCAL_MACHINE\SOFTWARE\Microsoft\Windows\CurrentVersion\OEMInformation” /v Model /t REG_SZ /d “ABC WIN10 1.0” /f /reg:64

#2
cmd /c reg add “HKEY_LOCAL_MACHINE\SOFTWARE\Microsoft\Windows\CurrentVersion\OEMInformation” /v BuildDate /t REG_SZ /d “%DATE% %TIME%” /f /reg:64


You may also use this to set Computer Description

cmd /c reg add “HKEY_LOCAL_MACHINE\SYSTEM\CurrentControlSet\Services\lanmanserver\parameters” /v svrcomment /t REG_SZ /d “ABC WIN10 1.0” /f 

SCCM – Activate Office 2016 in Task Sequence

email me

To activate Office 2016 in a Task Sequence, create two Run Commands in the Post Setup group:


32 Bit

#1
cmd /c cscript.exe “C:\Program Files (x86)\Microsoft Office\Office16\ospp.vbs” /inpkey:SSSSS-DDDDD-WWWWW-TTTTT-GGGGG

#2
cmd /c cscript.exe “C:\Program Files (x86)\Microsoft Office\Office16\ospp.vbs” /act


64 Bit

#1
cmd /c cscript.exe “C:\Program Files\Microsoft Office\Office16\ospp.vbs” /inpkey:SSSSS-DDDDD-WWWWW-TTTTT-GGGGG

#2
cmd /c cscript.exe “C:\Program Files\Microsoft Office\Office16\ospp.vbs” /act


* Note, this is for Office 32 bit.

SCCM – Task Sequence Variables

email me

Task Sequence Built-in Variable List

The following list describes the built-in variables that are available in Configuration Manager:

Built-in Variable Name Description
_SMSTSAdvertID Stores the current running task sequence deployment unique ID. It uses the same format as a Configuration Manager software distribution deployment ID. If the task sequence is running from stand-alone media, this variable is undefined.

Example:

ABC20001

_TSAppInstallStatus For System Center 2012 R2 Configuration Manager and later:

The task sequence sets the _TSAppInstallStatus variable with the installation status for the application during the Install Application task sequence step. The task sequence sets the variable with one of the following values:

  1. Undefined: Set when the Install Application task sequence step has not been run.
  2. Error: Set when at least one application failed because of an error during the Install Application task sequence step.
  3. Warning: Set when no errors occur during the Install Application task sequence step, but one or more applications, or a required dependency, did not install because a requirement was not met.
  4. Success: Set when there are no errors or warning detected during the Install Application task sequence step.
_SMSTSBootImageID Stores the Configuration Manager boot image package ID if a boot image package is associated with the current running task sequence. The variable will not be set if no Configuration Manager boot image package is associated.

Example:

ABC00001

_SMSTSBootUEFI For System Center 2012 Configuration Manager SP1 and later:

The task sequence sets the SMSTSBootUEFI variable when it detects a computer that is in UEFI mode.

_SMSTSClientGUID Stores the value of Configuration Manager client GUID. This variable is not set if the task sequence is running from stand-alone media.

Example:

0a1a9a4b-fc56-44f6-b7cd-c3f8ee37c04c

_SMSTSCurrentActionName Specifies the name of the currently running task sequence step. This variable is set before the task sequence manager runs each individual step.

Example:

run command line

_SMSTSDownloadOnDemand Set to true if the current task sequence is running in download-on-demand mode, which means the task sequence manager downloads content locally only when it must access the content.
_SMSTSInWinPE This variable is set to true when the current task sequence step is running in the Windows PE environment, and it is set to false if not. You can test this task sequence variable to determine the current operating system environment.
_SMSTSLastActionRetCode Stores the return code that was returned by the last action that was run. This variable can be used as a condition to determine if the next step is run.

Example:

0

_SMSTSLastActionSucceeded The variable is set to true if the last action succeeded and to false if the last action failed. If the last action was skipped because the step was disabled or the associated condition evaluated to false, this variable is not reset, which means it still holds the value for the previous action.
_SMSTSLaunchMode Specifies the task sequence launch method. The task sequence can have the following values:

  • SMS – specifies that the task sequence is started by using the Configuration Manager client.
  • UFD – specifies that the task sequence is started by using USB media and that the USB media was created in Windows XP/2003.
  • UFD+FORMAT – specifies that the task sequence is started by using USB media and that the USB media was created in Windows Vista or later.
  • CD – specifies that the task sequence is started by using a CD.
  • DVD – specifies that the task sequence is started by using a DVD.
  • PXE – specifies that the task sequence is started from PXE.
  • HD – specifies that the task sequence was started from a hard disk (prestaged media only).
_SMSTSLogPath Stores the full path of the log directory. This can be used to determine where actions are logged. This value is not set when a hard drive is not available.
_SMSTSMachineName Stores and specifies the computer name. Stores the name of the computer that the task sequence will use to log all status messages. To change the computer name in the new operating system, use the OSDComputerName variable.

Example:

ABC

_SMSTSMDataPath Specifies the path defined by the SMSTSLocalDataDrive variable. When you define SMSTSLocalDataDrive before the task sequence starts, such as by setting a collection variable, Configuration Manager then defines the _SMSTSMDataPath variable once the Task Sequence starts.
_SMSTSMediaType Specifies the type of media that is used to initiate the installation. Examples of types of media are Boot Media, Full Media, PXE, and Prestaged Media.
_SMSTSMP Stores the name or IP address of a Configuration Manager management point.
_SMSTSMPPort Stores the management point port number of a Configuration Manager management point.

Example:

80

_SMSTSOrgName Stores the branding title name that is displayed in a task sequence progress user interface dialog box.

Example:

XYZ Organization

_SMSTSPackageID Stores the current running task sequence ID. This ID uses the same format as a Configuration Manager software package ID.

Example:

HJT00001

_SMSTSPackageName Stores the current running task sequence name specified by the Configuration Manager administrator when the task sequence is created.

Example:

Deploy Windows 7 task sequence

_SMSTSRunFromDP Set to true if the current task sequence is running in run-from-distribution-point mode, which means the task sequence manager obtains required package shares from distribution point.
_SMSTSSiteCode Stores the site code of the Configuration Manager site.

Example:

ABC

_SMSTSType Specifies the type of the current running task sequence. It can have the following values:

1 – indicates a generic task sequence.

2 – indicates an operating system deployment task sequence.

_SMSTSTimezone The _SMSTSTimezone variable stores the time zone information in the following format (without spaces):

Bias, StandardBias, DaylightBias, StandardDate.wYear, wMonth, wDayOfWeek, wDay, wHour, wMinute, wSecond, wMilliseconds, DaylightDate.wYear, wMonth, wDayOfWeek, wDay, wHour, wMinute, wSecond, wMilliseconds, StandardName, DaylightName

Example:

For the Eastern Time U.S. and Canada, the value would be 300,0,-60,0,11,0,1,2,0,0,0,0,3,0,2,2,0,0,0,Eastern Standard Time,Eastern Daylight Time

_SMSTSUseCRL Specifies whether the task sequence uses the certificate revocation list when it uses a Secure Socket Layer (SSL) certificate to communicate with the management point.
_SMSTSUserStarted Specifies whether a task sequence is started by a user. This variable is set only if the task sequence is started from the Software Center. For example, if _SMSTSLaunchMode is set to SMS. The variable can have the following values:

  • true – specifies that the task sequence is manually started by a user from the Software Center.
  • false – specifies that the task sequence is initiated automatically by the Configuration Manager scheduler.
_SMSTSUseSSL Specifies whether the task sequence uses SSL to communicate with the Configuration Manager management point. If your site is running in native mode, the value is set to true.
_SMSTSWTG For System Center 2012 Configuration Manager SP1 and later:

Specifies if the computer is running as a Windows To Go device.

SMSTSAssignmentsDownloadInterval For System Center 2012 Configuration Manager SP1 and later:

Use this variable to specify the number of seconds to wait before the client will attempt to download the policy since the last attempt (which returned no policies). By default, the client will wait 0 seconds before retrying.

You can set this variable by using a prestart command from media or PXE.

SMSTSAssignmentsDownloadRetry For System Center 2012 Configuration Manager SP1 and later:

Use this variable to specify the number of times a client will attempt to download the policy after no policies are found on the first attempt. By default, the client will retry 0 times.

You can set this variable by using a prestart command from media or PXE.

SMSTSAssignUsersMode Specifies how a task sequence associates users with the destination computer. Set the variable to one of the following values.

  • Auto: The task sequence creates a relationship between the specified users and destination computer when it deploys the operating system to the destination computer.
  • Pending: The task sequence creates a relationship between the specified users and the destination computer, but waits for approval from the administrative user before the relationship is set.
  • Disabled: The task sequence does not associate users with the destination computer when it deploys the operating system.
SMSTSDownloadProgram For System Center 2012 Configuration Manager SP1 and later:

Use this variable to specify an Alternate Content Provider, a downloader program that is used to download content instead of the default Configuration Manager downloader, for the task sequence. As part of the content download process, the task sequence checks the variable for a specified downloader program. If specified, the task sequence runs the program to perform the download.

SMSTSDownloadRetryCount For System Center 2012 R2 Configuration Manager and later:

Use this variable to specify the number of times that Configuration Manager attempts to download content from a distribution point. By default, the client will retry 2 times.

SMSTSDownloadRetryDelay For System Center 2012 R2 Configuration Manager and later:

Use this variable to specify the number of seconds that Configuration Manager waits before it retries to download content from a distribution point. By default, the client will wait 15 seconds before retrying.

SMSTSErrorDialogTimeout When an error occurs in a task sequence, a dialog box is displayed that is automatically dismissed after a number of seconds specified by this variable. By default, the dialog box is automatically dismissed after 900 seconds (15 minutes)..
TSErrorOnWarning For System Center 2012 R2 Configuration Manager and later:

Use this variable to specify whether the task sequence engine considers a detected warning as an error during the Application Installation task sequence step. The task sequence sets the _TSAppInstallStatus variable to Warning when one or more applications, or a required dependency, did not install because a requirement was not met. When you set the TSErrorOnWarning variable to True and the _TSAppInstallStatus variable is set to Warning, it is treated as an error. A value of False is the default behavior.

SMSTSLanguageFolder For System Center 2012 Configuration Manager SP1 and later:

Use this variable to change the display language of a language neutral boot image.

SMSTSLocalDataDrive Specifies where temporary files are stored on the destination computer while the task sequence is running.

This variable must be set before the task sequence starts, such as by setting a collection variable. Once the task sequence starts, Configuration Manager defines the _SMSTSMDataPath variable once the Task Sequence starts.

SMSTSMPListRequestTimeout For System Center 2012 R2 Configuration Manager and later:

Use this variable to specify how many milliseconds a task sequence waits before it retries to install an application after it fails to retrieve the management point list from location services. By default, the task sequence waits 60,000 milliseconds (60 seconds) before it retries the step, and retries up to three times. This variable is applicable only to the Install Application task sequence step.

SMSTSPersistContent For System Center 2012 Configuration Manager SP1 and later:

Use this variable to temporarily persist content in the task sequence cache.

SMSTSPostAction For System Center 2012 Configuration Manager SP1 and later:

Specifies a command that is run after the task sequence completes. For example, you can use this variable to specify a script that enables write filters on embedded devices after the task sequence deploys an operating system to the device.

SMSTSPreferredAdvertID Forces a specific targeted deployment on the destination computer to be run. This can be set through a prestart command from media or PXE. If this variable is set, the task sequence overrides any required deployments.
OSDPreserveDriveLetter For System Center 2012 Configuration Manager SP1 and later:

This variable determines whether or not the task sequence uses the drive letter captured in the operating system image WIM file when applying that image to a destination computer. In Configuration Manager with no service pack, the drive letter captured in the WIM file is used when applying the operating system image WIM file. In Configuration Manager SP1, you can set the value for this variable to False to use the location that you specify for the Destination setting in the Apply Operating System task sequence step. For more information about the Apply Operating System task sequence step, see the Apply Operating System Image section in the Task Sequence Steps in Configuration Manager topic.

SMSTSRebootDelay Specifies how many seconds to wait before the computer restarts. The task sequence manager will display a notification dialog before reboot if this variable is not set to 0.

Examples:

0

30

SMSTSRebootMessage Specifies the message to display in the shutdown dialog box when a restart is requested. If this variable is not set, a default message will appear.

Example:

This computer is being restarted by the task sequence manager.

SMSTSRebootRequested Indicates that a restart is requested after the current task sequence step is completed. If a restart is required, just set this variable to true, and the task sequence manager will restart the computer after this task sequence step. The task sequence step must set this task sequence variable if it requires the restart to complete the task sequence step. After the computer is restarted, the task sequence will continue to run from the next task sequence step.
SMSTSRetryRequested Requests a retry after the current task sequence step is completed. If this task sequence variable is set, the SMSTSRebootRequested must also be set to true. After the computer is restarted, the task sequence manager will rerun the same task sequence step.
SMSTSUDAUsers Specifies the primary user of the destination computer. Specify the users by using the following format. Separate multiple users by using a comma (,).

Example:

domain\user1, domain\user2, domain\user3

For more information about associating users with the destination computer, see How to Associate Users with a Destination Computer.

SCCM – PowerShell, VBScript – Name Computer in Task Sequence

email me

This is how you automate the process of naming computers during OSD.

PowerShell Method

First, create an application package, but choose Do not create a program, instead of Standard for the program type.


OSDComputerName.ps1

$SerialNumber = (Get-WmiObject -Class Win32_BIOS | Select-Object SerialNumber).SerialNumber
$OSDComputerName = "ABC-" + $SerialNumber
$TSEnv = New-Object -COMObject Microsoft.SMS.TSEnvironment
#$TSEnv.Value("$env:computername") = "$OSDComputerName"
$TSEnv.Value("OSDComputerName") = "$OSDComputerName"

#Rename-Computer -ComputerName "$env:computername" -NewName "$OSDComputerName"
#Rename-Computer -ComputerName "OSDComputerName" -NewName "$OSDComputerName"


Next, in the Task Sequence, create three Run Commands:

#1
powershell.exe -noprofile -command “Set-ExecutionPolicy Bypass LocalMachine” -force

#2
powershell.exe -noprofile -file OSDComputerName.ps1
* make sure you link an empty package (an application package with no program) to the OSDComputername.ps1

#3
powershell.exe -noprofile -command “Set-ExecutionPolicy RemoteSigned LocalMachine” -force

* Note, this method does require that PowerShell be enabled in the boot.wim


VBScript Method

Make an item in Post Setup pointing to this script. Add a SCCM Restart.

on error resume next

Dim computername

strComputer = "."

Set objWMIservice = GetObject("winmgmts:\\" & strComputer & "\root\cimv2")

set colitems = objWMIservice.ExecQuery("Select * from Win32_BIOS",,48)

For each objitem in colitems
'Wscript.echo "Dell Service Tag: " & objitem.serialnumber
computername = objitem.serialnumber

Next

'returns machine model number only
'PRIMARY MODEL DETECTION
Set objWMI = GetObject("winmgmts:")
Set colSettings = objWMI.ExecQuery("Select * from Win32_ComputerSystem")

For Each objComputer in colSettings
LaptopModel = Trim(objComputer.Model)
Next

Select Case LaptopModel

Case "HP EliteBook 840 G3"
strModel = "8403"

Case "HP EliteBook 840 G2"
strModel = "8402"

Case "HP EliteBook 840 G1"
strModel = "8401"

Case "HP EliteBook Folio 9480m"
strModel = "9480"

Case "HP EliteBook Folio 9470m"
strModel = "9470"

Case "HP EliteBook Folio 9460m"
strModel = "9460"

Case "HP EliteBook 8470p"
strModel = "8470"

Case "HP EliteBook 8460p"
strModel = "8460"

Case "HP EliteBook 8450p"
strModel = "8450"

Case "HP EliteBook 8440p"
strModel = "8440"

Case "HP EliteBook 6930p"
strModel = "6930"

Case "HP EliteBook 2530p"
strModel = "2530"

Case "HP EliteBook 2540p"
strModel = "2540"

Case "HP Compaq dc7900 Small Form Factor"
strModel = "7900"

Case "HP Compaq 8000 Elite SFF PC"
strModel = "8000"

Case "HP Compaq 8200 Elite SFF PC"
strModel = "8200"

Case "OptiPlex 755"
strModel = "755"

Case "OptiPlex 745"
strModel = "745"

Case "Latitude D630"
strModel = "630"

Case "Latitude D620"
strModel = "620"

Case "Latitude D430"
strModel = "430"

End Select

'SECONDARY MODEL DETECTION
'used for models not explicitly defined
if strModel = "" then
'msgbox "no model was detected"
myLength = Len(LaptopModel)

For i = 1 To myLength
If Asc(Mid(LaptopModel, i, 1)) <> 32 Then
If Asc(Mid(LaptopModel, i, 1)) >= 48 And Asc(Mid(LaptopModel, i, 1)) <= 57 Then
myNumber = myNumber & Mid(LaptopModel, i, 1)
End If
Else
'msgbox("no numeric")
End If
Next
'msgbox(myNumber)
strModel = myNumber
end if

'testing only
'msgbox strModel

'renames machine with model number - service tag
Set objWMIService = GetObject("winmgmts:" & "{impersonationLevel=impersonate}!\\" & strComputer & "\root\cimv2")

Set colComputers = objWMIService.ExecQuery ("Select * from Win32_ComputerSystem")

For Each objComputer in colComputers

err = objComputer.Rename(strModel & "-" & computername)

Next

WScript.Quit(0)


Notes

Command Line

netdom renamecomputer member /newname:member1.contoso.com /userd:administrator


PowerShell

Rename-Computer -ComputerName “$env:computername” -NewName “NewComputerName”

Rename-Computer -ComputerName “OSDComputerName” -NewName “NewComputerName”


Remotely Rename

$TargetComp=Read-Host -Prompt “Enter the Name of the Computer you want to change the name of “
$Credential=Get-Credential
$computerName = GWMI Win32_ComputerSystem -computername $TargetComp -Authentication 6
Write-host “Current Computer Name is ” $computerName
$name = Read-Host -Prompt “Please Enter the ComputerName you want to use.”
Write-host “New Computer Name ” $Name
$Go=Read-Host -prompt “Proceed with computer name change? (Y / N)”
If(($Go-eq”Y”)-or($Go-eq”y”))
{
$computername.Rename($name,$credential.GetNetworkCredential().Password,$credential.Username)
}
$Reboot=Read-host -Prompt “Do you want to restart the computer? (Y / N)”
If(($Reboot-eq”Y”)-or($Reboot-eq”y”))
{
restart-computer -computername $TargetComp
}

Citrix Receiver – Disable Add Account Pop up

email me

Screenshot


Single User

REG ADD “HKCU\Software\Citrix\Receiver” /f /v “HideAddAccountOnRestart” /t REG_DWORD /d “1”

 
For your image

1. Load the Default profile registry hive.

a. Open regedit.

b. Select HKEY_USERS, then click File > Load Hive

c. In the File name type: C:\Users\Default\ntuser.dat and click Open.

d. Type DefaultUser as the Key Name and click OK.

2. Navigate to HKEY_USERS > DefaultUser > Software > Citrix > Receiver

3. Create a new DWORD (32-bit) Value and name it HideAddAccountOnRestart.

4. Set the value data to 1.

5. Unload the Default User hive by selecting DefaultUser, the click File > Unload Hive.


Notes

REG ADD “HKLM\Software\Policies\Citrix” /f /v “EnableX1FTU” /t REG_DWORD /d “0”

https://support.citrix.com/article/CTX135438.?_ga=2.137409657.835403622.1516202909-1506665665.1515700878


Java Client – Disable Auto Updates

email me

Tested under Windows 7 & 10

reg delete “HKEY_LOCAL_MACHINE\SOFTWARE\Microsoft\Windows\CurrentVersion\Run” /v “SunJavaUpdateSched” /f /reg:64

reg add “HKEY_LOCAL_MACHINE\SOFTWARE\JavaSoft\Java Update\Policy” /v EnableAutoUpdateCheck /t REG_DWORD /d 0 /f /reg:64

reg add “HKEY_LOCAL_MACHINE\SOFTWARE\JavaSoft\Java Update\Policy” /v EnableJavaUpdate /t REG_DWORD /d 0 /f /reg:64

reg add “HKEY_LOCAL_MACHINE\SOFTWARE\JavaSoft\Java Update\Policy” /v NotifyDownload /t REG_DWORD /d 0 /f /reg:64

reg delete “HKEY_LOCAL_MACHINE\SOFTWARE\Microsoft\Windows\CurrentVersion\Run” /v “SunJavaUpdateSched” /f /reg:32

reg add “HKEY_LOCAL_MACHINE\SOFTWARE\JavaSoft\Java Update\Policy” /v EnableAutoUpdateCheck /t REG_DWORD /d 0 /f /reg:32

reg add “HKEY_LOCAL_MACHINE\SOFTWARE\JavaSoft\Java Update\Policy” /v EnableJavaUpdate /t REG_DWORD /d 0 /f /reg:32

reg add “HKEY_LOCAL_MACHINE\SOFTWARE\JavaSoft\Java Update\Policy” /v NotifyDownload /t REG_DWORD /d 0 /f /reg:32