SCCM – Link AD Users/Groups to Collections

email me

You’re going to find out…a little extra work is required to link AD groups to SCCM packages (why, Microsoft? Just, why?). Assuming you have set up the Group Discovery properly, all you need to do now is to create two collections with queries. One collection will be in User Collections; the other in Device Collections.

#1 Under User Collections, create a collection with a query rule, with the below query. This returns the members of the specified AD group.

select SMS_R_USER.ResourceID,SMS_R_USER.ResourceType, SMS_R_USER.Name,SMS_R_USER.UniqueUserName, SMS_R_USER.WindowsNTDomain from SMS_R_User where SMS_R_User.UserGroupName = “YourDomain\\The_AD_Group_Skype

Once created, make sure to note the Collection ID of the collection you just created. Let’s say it’s ABC00A1 in our example.

#2 Now, under Device Collections, create another collection as the name of the App. For example, Skype. Add a query rule with the following code….don’t forget the Collection ID from above.

select SMS_R_SYSTEM.ResourceID,SMS_R_SYSTEM.ResourceType,SMS_R_SYSTEM.Name,SMS_R_SYSTEM.SMSUniqueIdentifier,SMS_R_SYSTEM.ResourceDomainORWorkgroup,SMS_R_SYSTEM.Client from SMS_R_System  join SMS_G_SYSTEM_COMPUTER_SYSTEM on SMS_G_SYSTEM_COMPUTER_SYSTEM.ResourceID = SMS_R_SYSTEM.ResourceID  join SMS_G_system_SYSTEM_CONSOLE_USAGE on SMS_G_SYSTEM_COMPUTER_SYSTEM.ResourceID = SMS_G_system_SYSTEM_CONSOLE_USAGE.ResourceID  join SMS_R_User on SMS_G_system_SYSTEM_CONSOLE_USAGE.TopConsoleUser = SMS_R_User.UniqueUserName  join SMS_FullCollectionMembership on SMS_FullCollectionMembership.Name = SMS_R_User.Name  where SMS_FullCollectionMembership.collectionID = ‘ABC00A1

Now, just deploy the app as you normally would, selecting the device collection you created under Device Collections. Done!

Of course, there is a caveat…this method isn’t perfect. For some reason, even if a computer is a user’s primary device, it may not always be seen as TopConsoleUser. This has to be a bug on the Microsoft end, or at the very least, a design flaw. If a user only has one computer, the success rate is high. I will research further. So, stay tuned.


Update

After a little more research and testing…I now have a full list of user devices.

To return a single user’s actual primary devices:

select SMS_R_System.name, SMS_R_User.UniqueUserName
from SMS_R_System inner join SMS_UserMachineRelationship on SMS_UserMachineRelationship.ResourceId = SMS_R_System.ResourceId
join SMS_R_User on SMS_UserMachineRelationship.UniqueUserName = SMS_R_User.UniqueUserName where SMS_UserMachineRelationship.Types = 1 and SMS_R_User.UniqueUserName like ‘%YourDomain\\TheUserName%’

Now, if you want to add this to SCCM (so it will work for multiple users), copy the query as a second query into the Skype device collection you originally created (So, you will have Query1 and Query2 on the device collection):

select SMS_R_SYSTEM.ResourceID, SMS_R_SYSTEM.ResourceType,SMS_R_SYSTEM.Name, SMS_R_SYSTEM.SMSUniqueIdentifier, SMS_R_SYSTEM.ResourceDomainORWorkgroup, SMS_R_SYSTEM.Client from SMS_R_System inner join SMS_UserMachineRelationship on SMS_UserMachineRelationship.ResourceId = SMS_R_System.ResourceId join SMS_R_User on SMS_UserMachineRelationship.UniqueUserName =  SMS_R_User.UniqueUserName  join SMS_FullCollectionMembership on SMS_FullCollectionMembership.Name = SMS_R_User.Name where SMS_UserMachineRelationship.Types = 1 and SMS_FullCollectionMembership.collectionID = ‘ABC00A1

The reason you’re doing this…is to expand the available devices, but you’re still using the User Collection ID as a filter for the AD Group usernames.

Now, when you run the Device Collection query right from the device collection, you’ll now have all the computers associated with the specified AD group. You’re ready to deploy apps.


Notes

Select SMS_R_SYSTEM.ResourceID,SMS_R_SYSTEM.ResourceType,SMS_R_SYSTEM.Name,SMS_R_SYSTEM.SMSUniqueIdentifier,SMS_R_SYSTEM.ResourceDomainORWorkgroup,SMS_R_SYSTEM.Client FROM SMS_R_System JOIN SMS_UserMachineRelationship ON SMS_R_System.Name=SMS_UserMachineRelationship.ResourceName JOIN SMS_R_User ON SMS_UserMachineRelationship.UniqueUserName=SMS_R_User.UniqueUserName WHERE SMS_UserMachineRelationship.Types=1 AND SMS_R_User.UserGroupName=”Domain\\AD_Group”


### Linking an AD security group to a SCCM collection

Add-PSSnapin Quest.ActiveRoles.ADManagement

#Set Collection Type
$CollectionType = Read-Host “Is this a computer or user collection?”

if ($CollectionType -eq “Computer”)
{$CollectionType = “2”}

if ($CollectionType -eq “User”)
{$CollectionType = “1”}

#Build Collection Name and Description
$CollectionName = Read-Host “What is the name of the Application group? EX: APP_Adobe Flash Player”
$Description = $CollectionName

#Configuration Block for SCCM
$Sitename = “GC1”
$Domain = “Test.local”
$GroupOU = “OU=Software Distribution,DC=Test,DC=LOCAL”

$Namespace = “Root\SMS\Site_” + $Sitename

#Create Collection Block
Function Create-Collection($CollectionName)
{
$CollectionArgs = @{
Name = $CollectionName;
CollectionType = “1”; # User Collection Type
LimitToCollectionID = “SMS00002” # All Users Collection
}
Set-WmiInstance -Class SMS_Collection -Arguments $CollectionArgs -Namespace $Namespace | Out-Null
}

#Update Query Block
Function Update-Query($CollectionName) {

$QueryExperssion = ‘select * from SMS_R_User where SMS_R_User.UserGroupName = “‘ + $Domain + ‘\\’ + $CollectionName + ‘”‘
$Collection = Get-WmiObject -Namespace $Namespace -Class SMS_Collection -Filter “Name=’$CollectionName’ and CollectionType = ‘$CollectionType'”

#Validate Query syntax
$ValidateQuery = Invoke-WmiMethod -Namespace $Namespace -Class SMS_CollectionRuleQuery -Name ValidateQuery -ArgumentList $QueryExperssion

If($ValidateQuery){
$Collection.Get()

#Create new rule
$NewRule = ([WMIClass]”\\Localhost\$Namespace`:SMS_CollectionRuleQuery”).CreateInstance()
$NewRule.QueryExpression = $QueryExperssion
$NewRule.RuleName = $CollectionName

#Commit changes and initiate the collection evaluator
$Collection.CollectionRules += $NewRule.psobject.baseobject
$Collection.RefreshType = 6 # Enables Incremental updates
$Collection.Put()
$Collection.RequestRefresh()
}
}

#The WorkHorse

Create-Collection $CollectionName
Update-Query $CollectionName
New-QADGroup -Name $CollectionName -ParentContainer $GroupOU -groupScope Global -Description $Description

SCCM – Command Line Options for Setup

email me

Command-line options for setup

/DEINSTALL
Uninstalls the site. Run setup from the site server computer.

/DONTSTARTSITECOMP
Installs a site, but prevents the Site Component Manager service from starting. Until the Site Component Manager service starts, the site is not active. The Site Component Manager is responsible for installing and starting the SMS_Executive service, and for additional processes at the site. After the site install is finished, when you start the Site Component Manager service, it installs the SMS_Executive service and additional processes that are necessary for the site to operate.

/HIDDEN
Hides the user interface during setup. Use this option only in conjunction with the /SCRIPT option. The unattended script file must provide all required options or setup fails.

/NOUSERINPUT
Disables user input during setup, but displays the setup wizard. Use this option only in conjunction with the /SCRIPT option. The unattended script file must provide all required options or setup fails.

/RESETSITE
Performs a site reset that resets the database and service accounts for the site. Run setup from <Configuration Manager installation path>\BIN\X64 on the site server. For more information about the site reset.

/TESTDBUPGRADE <Instance name>\<Database name>
Performs a test on a backup of the site database to ensure that the database is capable of an upgrade. Provide the instance name and database name for the site database. If you specify only the database name, setup uses the default instance name.

Important

Do not run this command-line option on your production site database. Running this command-line option on your production site database upgrades the site database and could render your site inoperable.

/UPGRADE
Runs an unattended upgrade of a site. When you use /UPGRADE, you must specify the product key, including the dashes (-). Also, you must specify the path to the previously downloaded setup prerequisite files.

Example: setupwpf.exe /UPGRADE xxxxx-xxxxx-xxxxx-xxxxx-xxxxx <path to external component files>

/SCRIPT <setup script path>
Performs unattended installations. A setup initialization file is required when you use the /SCRIPT option.

/SDKINST <SMS Provider FQDN>
Installs the SMS Provider on the specified computer. Provide the fully qualified domain name (FQDN) for the SMS Provider computer. For more information about the SMS Provider.

/SDKDEINST <SMS Provider FQDN>
Uninstalls the SMS Provider on the specified computer. Provide the FQDN for the SMS Provider computer.

/MANAGELANGS <Language script path>
Manages the languages that are installed at a previously installed site. To use this option, run setup from <Configuration Manager installation path>\BIN\X64 on the site server. Provide the location for the language script file that contains the language settings. Command-line options to manage languages

Server 2016 – Run ‘slui.exe 0x2a 0xC004F069’ to display the error text

email me

I ran into this issue…when trying to activate an expired evaluation copy of Server 2016. It wouldn’t let me update the product key.

Error

“Error: 0xC004F069 On a computer running Microsoft Windows non-core edition, run ‘slui.exe 0x2a 0xC004F069’ to display the error text”


Solution

Find available target editions

DISM.exe /Online /Get-TargetEditions


Change your target edition

DISM /online /Set-Edition:ServerStandard /ProductKey:XXXXX-XXXXX-XXXXX-XXXXX-XXXXX /AcceptEula


Windows – PsPing

email me

From Troubleshooting with the Windows Sysinternals Tools. Get your copy here

PSPing Server mode

After determining that you can connect to a TCP port, your next question might be, “How long does it take to send a megabyte of data? Or download a hundred megabytes? How much data can I upload in a minute?” To perform tests like these, the server has to cooperate. You can’t send lots of data to a server unless the program on the other end is willing to accept that data, nor expect a server to send you arbitrary quantities of data in a way that lets you obtain reliable performance measurements. In particular, the program on the server has to be focused on network communications and can’t spend its time performing large amounts of file I/O, for example.

PsPing

To meet that need, PsPing offers a server mode that’s designed to interoperate with the PsPing
client. A single instance of the PsPing server supports both the PsPing latency and bandwidth tests described later in this chapter—TCP or UDP, upload, or download—and remains active until you exit.

It can also create temporary firewall rules enabling PsPing to listen for inbound connections from remote systems.

Use the –s option to run PsPing in server mode. The complete server-mode, command-line syntax is

psping [-6|-4] [-f] -s
address:port


 address The IPv4 or IPv6 address of the listening interface. If you specify an IPv6 address, you must enclose it in square brackets. The address can also be a local server name, in which case PsPing will pick an available IPv4 or IPv6 interface.
port The TCP port number that PsPing opens for inbound connections. For UDP tests, the PsPing client will first establish a TCP connection to this port and send instructions to the PsPing server. The PsPing server will then open an inbound UDP port with the same port number.
–6
–4
When you are specifying the address as a server name that has both IPv4 and IPv6
interfaces,
–6 forces using the IPv6 interface, and –4 forces using the IPv4 interface.
–f Creates temporary firewall rules allowing PsPing.exe to open and listen on the specified inbound TCP and UDP ports. This option requires administrative rights. These firewall rules are deleted when you press Ctrl+C to exit PsPing server mode. 

To end PsPing server mode, press Ctrl+C. Before it exits, PsPing deletes any firewall rules that it
created. Note that if PsPing is terminated in another manner, it will not be able to clean up and the firewall rules will remain in place.

TCP/UDP latency test

PsPing latency testing consists of repeatedly sending a fixed amount of data to a server and
measuring the time it takes from the beginning of each transmission until the client receives the
server’s acknowledgement that it has received the data. You can specify whether to send TCP or UDP, and whether to test uploading from the client to the server or downloading from the server to the client. All the data is sent in a single connection from a single thread: PsPing does not open a new connection for each iteration. Note that an instance of PsPing running in server mode must be listening at the target destination and port.

The command-line syntax for PsPing’s latency testing is

psping -l
requestsize[k|m] -n count[s] [-r] [-u] [-w count] [-f] [-h [buckets|val1,val2,…]]
[-6|-4]
destination:
port

–l requestsize[k|m]
–n
count[s]
–r
–u
–w
count
–f
Specifies the amount of data to send in each test. Append “k” for kilobytes or “m” for
megabytes. Note that the maximum with UDP is slightly less than 64k.
Without “s”, specifies how many times to send the requested data. With “s” appended, it performs testing for count seconds. For example, this command sends 8 kilobytes of data
10 times:
psping –l 8k –n 10 192.168.1.123:1001
This command sends 8 kilobytes of data repeatedly for 10 seconds:
psping –l 8k –n 10s 192.168.1.123:1001
The count begins after all warmup operations have completed.
Requested data is sent from the server to the client instead of from the client to the server. Tests UDP latency instead of TCP. Data is sent over UDP instead of TCP. Warmup: starts by sending the requested data count times but does not include measurements in the results. If this option is not specified, PsPing performs five warmup operations. Creates a temporary outbound firewall rule allowing PsPing to connect to a remote server. This should rarely be needed. Requires administrative rights.
–h
–h
buckets
–h val1,val2,…
–6
–4
destination:port
Outputs the results as a histogram, with a default of 20 evenly-spaced buckets. PsPing
histograms are described later in this chapter.
When you are specifying the destination as a name rather than as an IP address,
–6 forces using IPv6 and –4 forces using IPv4.
The host and TCP port number with which to communicate. The destination can be
specified as an IPv4 address, an IPv6 address, or a resolvable server name. An IPv6 address must be specified within square brackets to distinguish the address from the port number—for example:
psping –l 8k –n 10 [fe80::b0ef:4695:cb8e:feb4]:1001
The destination and port must be an instance of PsPing running in server mode.

To read more, see the book.

C, C++ Windows, Linux – Shutdown Computer

email me

Windows

#include <stdio.h>
#include <stdlib.h>

int main()
{
system("c:\\windows\\system32\\shutdown /s");
return 0;
}


Linux

#include <stdio.h>
#include <stdlib.h>
 
int main()
{ 
   system("shutdown -P now");
   
   return 0;
}


Notes

Shutdown
system(“c:\\windows\\system32\\shutdown /s”);

Restart
system(“c:\\windows\\system32\\shutdown /r”);

Logoff
system(“c:\\windows\\system32\\shutdown /l”);

Windows – Global Audit Policy

email me

From Windows Internals Part 1, 7th edition. Get your copy here

You can use a command to enable global audit policy.

1. If you didn’t already do so in the previous experiment, open the Local Security Policy editor, navigate to the Audit Policy settings, double-click Audit Object Access, and enable auditing for both success and failure. On most systems, SACLs specifying object access auditing are uncommon, so few if any object-access audit records will be produced at this point.

2. In an elevated command prompt window, enter the following command. This will produce a summary of the commands for setting and querying global audit policy.

auditpol /resourceSACL

Output 

Usage: AuditPol /resourceSACL
[/set /type:<resource> [/success] [/failure] /user:<user>
[/access:<access flags>] [/condition:<expression>]]
[/remove /type:<resource> /user:<user> [/type:<resource>]]
[/clear [/type:<resource>]]
[/view [/user:<user>] [/type:<resource>]]

This command configures settings for global object access auditing. The
corresponding object access subcategory needs to be enabled for the events
to be generated by the system. Type auditpol /set /? for more information.

Commands

/? Displays Help for the command.
/set Adds a new entry to or updates an existing entry in the
resource system access control list for the resource type specified.
/remove Removes all entries for the given user from the global
object access auditing list specified by the resource type.
/clear Removes all entries from the global object access auditing
list for the specified resource type.
/view Lists the global object access auditing entries for the
specified resource type and user. Specifying a user is
optional.

Arguments

/type The resource for which object access auditing is being
configured. The supported argument values are File and
Key. Note that these values are case sensitive.
File: Directories and files.
Key: Registry keys.
/success Specifies success auditing.
/failure Specifies failure auditing.
/user Specifies a user in one of the following forms:
– DomainName\Account (such as DOM\Administrators)
– StandaloneServer\Group
– Account (see LookupAccountName API)
– {S-1-x-x-x-x}. x is expressed in decimal, and the entire
SID must be enclosed in curly braces.
For example: {S-1-5-21-5624481-130208933-164394174-1001}
Warning: If SID form is used, no check is done to verify the existence of this account.
/access Specifies a permission mask that can be specified in one of two forms:
– A sequence of simple rights:
Generic access rights:
GA – GENERIC ALL
GR – GENERIC READ
GW – GENERIC WRITE
GX – GENERIC EXECUTE
Access rights for files:
FA – FILE ALL ACCESS
FR – FILE GENERIC READ
FW – FILE GENERIC WRITE
FX – FILE GENERIC EXECUTE
Access rights for registry keys:
KA – KEY ALL ACCESS
KR – KEY READ
KW – KEY WRITE
KX – KEY EXECUTE
For example: ‘/access:FRFW’ will enable audit events
for read and write operations.
– A hex value representing the access mask (such as 0x1200a9).
This is useful when using resource-specific bit masks
that are not part of the SDDL standard. If omitted,
Full access is used.
/condition Appends an attribute based expression like the following:
Document sensitivity is HBI (“High”)
“(@Resource.Sensitivity == \”High\”)”

Examples

auditpol /resourceSACL /set /type:Key /user:MYDOMAIN\myuser /success
auditpol /resourceSACL /set /type:File /user:MYDOMAIN\myuser /success
/failure /access:FRFW
auditpol /resourceSACL /set /type:File /user:everyone /success
/failure /access:FRFW /condition:”(@Resource.Sensitivity == \”High\”)”
auditpol /resourceSACL /type:File /clear
auditpol /resourceSACL /remove /type:File
/user:{S-1-5-21-56248481-1302087933-1644394174-1001}
auditpol /resourceSACL /type:File /view
auditpol /resourceSACL /type:File /view /user:MYDOMAIN\myuser

3. In the same elevated command prompt window, enter the following commands. On a typical system, each of these commands will report that no global SACL exists for the respective resource type. (Note that the and keywords are case-sensitive.)

auditpol /resourceSACL /type:File /view
auditpol /resourceSACL /type:Key /view

4. In the same elevated command prompt window, enter the following command. This will set a global audit policy such that all attempts to open files for write access (FW) by the indicated user will result in audit records, whether the open attempts succeed or fail. The user name can be a specific user name on the system, a group such as Everyone, a domain-qualified user name such as domainname\username, or a SID.

auditpol /resourceSACL  /set /type:File /user:yourusername /success /failure /access:FW

While running under the user name indicated, use Explorer or other tools to open a file. Then look at the security log in the system event log to find the audit records.

6. At the end of the experiment, use the command to remove the global SACL you created in step 4, as follows:

auditpol /resourceSACL  /remove /type:File /user:yourusername

The global audit policy is stored in the registry as a pair of system access control lists in HKLM\SECURITY\Policy\GlobalSaclNameFile and HKLM\SECURITY\Policy\GlobalSaclNameKey. You can examine these keys by running Regedit.exe under the System account, as described in the “Security system components” section earlier in this chapter. These keys will not exist
until the corresponding global SACLs have been set at least once. The global audit policy cannot be overridden by SACLs on objects, but object-specific SACLs can allow for additional auditing. For example, global audit policy could require auditing of read access by all users to all files, but
SACLs on individual files could add auditing of write access to those files by specific users or by more specific user groups.

To read more, see the book.

SCCM – SQL – Return Computers and IP Addresses

email me

SELECT 
A.Name0,c.IPAddress0 as "IP ADDRESS",E.UserName0 as "Lastlogged user"
FROM 
v_R_System A inner join
v_FullCollectionMembership B ON
A.ResourceID=B.ResourceID
INNER JOIN v_GS_NETWORK_ADAPTER_CONFIGUR C ON
A.ResourceID=C.ResourceID
INNER JOIN v_GS_COMPUTER_SYSTEM E ON A.ResourceID=E.ResourceID
WHERE 
C.IPEnabled0='1' AND c.ipaddress0 !='0.0.0.0'
/*WHERE CollectionID=@COLLID and C.IPEnabled0='1' AND c.ipaddress0 !='0.0.0.0'*/
GROUP BY 
A.Name0,c.IPAddress0 ,E.UserName0

Windows 10 – Install SQL Server 2005

email me

Error

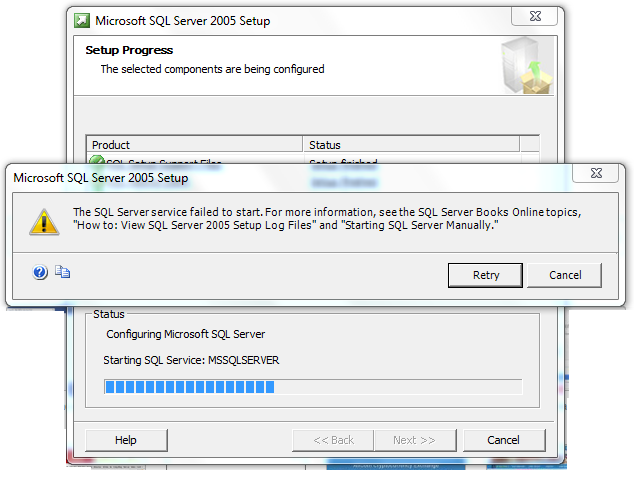
The SQL Server service failed to start. For more information, see the SQL Server Books Online topics, “How to: View SQL Server 2005 Setup Log Files” and “Starting SQL Server Manually.”

Snapshot of the problem


Solution

Step 1 – Download SQL Server 2005 Express  mirror (do not use an existing vendor copy)

Step 2 – Once downloaded, double-click the EXE.

Step 3 – Follow the prompts…until you see the error above.

Step 4 – Download and extract compatible SQL files (files from a working machine)

Step 5 – Copy the contents to the relative bit version of Program Files > Microsoft SQL Server > MSSQL.1 > MSSQL

* When I say MSSQL.1, I assume you have one instance. A subsequent instance will be MSSQL.2 or MSSQL.3, etc.

Step 6 – Click retry

Step 7 – Complete the setup


Snapshot of SQL 2005 working on Windows 10


What does Microsoft say about this?

Extended support for SQL Server 2005 ended on April 12, 2016

If you are still running SQL Server 2005, you will no longer receive security updates and technical support. We recommend upgrading to SQL Server 2014 and Azure SQL Database to achieve breakthrough performance, maintain security and compliance, and optimize your data platform infrastructure.

Reference

A wrong solution proposed by MS (at least, I have yet to see this work)

SCCM – SQL – Return Logged in Computers for a User

email me

Run this query on the CM_DB to return users of machines:

SELECT CS.UserName0, SYS.Netbios_Name0,
Operating_System_Name_and0, SYS.Resource_Domain_OR_Workgr0
FROM v_GS_COMPUTER_SYSTEM CS
JOIN v_R_System SYS on SYS.ResourceID = CS.ResourceID
WHERE CS.UserName0 LIKE '%PartofUserName%' OR CS.Name0 LIKE '%PartofUserName%'

Or,

Select distinct
v_R_System.Netbios_Name0 AS "Computer Name",
v_GS_SYSTEM_CONSOLE_USER.SystemConsoleUser0 AS "Console User",
v_GS_SYSTEM_CONSOLE_USER.NumberOfConsoleLogons0 AS "Console Logons",
v_GS_SYSTEM_CONSOLE_USER.TotalUserConsoleMinutes0 AS "Total Minutes on Console",
v_GS_SYSTEM_CONSOLE_USER.LastConsoleUse0 AS "Last Console Use"
from v_R_System INNER JOIN
(SELECT
ResourceID,
SystemConsoleUser0,
NumberOfConsoleLogons0,
TotalUserConsoleMinutes0,
LastConsoleUse0,
ROW_NUMBER() OVER(PARTITION BY ResourceID ORDER BY LastConsoleUse0 DESC) AS Point
FROM
v_GS_SYSTEM_CONSOLE_USER) v_GS_SYSTEM_CONSOLE_USER
ON v_GS_SYSTEM_CONSOLE_USER.ResourceID = v_R_System.ResourceID
AND v_GS_SYSTEM_CONSOLE_USER.Point = 1
WHERE v_GS_SYSTEM_CONSOLE_USER.SystemConsoleUser0 LIKE '%PartOfUserName%'


If you’d like more of a report style, run this:

Select distinct 
v_R_System.Netbios_Name0 AS "Computer Name",
v_GS_SYSTEM_CONSOLE_USER.SystemConsoleUser0 AS "Console User",
v_GS_SYSTEM_CONSOLE_USER.NumberOfConsoleLogons0 AS "Console Logons",
v_GS_SYSTEM_CONSOLE_USER.TotalUserConsoleMinutes0 AS "Total Minutes on Console",
v_GS_SYSTEM_CONSOLE_USER.LastConsoleUse0 AS "Last Console Use"
from v_R_System INNER JOIN
(SELECT
ResourceID,
SystemConsoleUser0,
NumberOfConsoleLogons0,
TotalUserConsoleMinutes0,
LastConsoleUse0,
ROW_NUMBER() OVER(PARTITION BY ResourceID ORDER BY LastConsoleUse0 DESC) AS Point
FROM
v_GS_SYSTEM_CONSOLE_USER) v_GS_SYSTEM_CONSOLE_USER
ON v_GS_SYSTEM_CONSOLE_USER.ResourceID = v_R_System.ResourceID
AND v_GS_SYSTEM_CONSOLE_USER.Point = 1
Order by v_R_System.Netbios_Name0


Windows 10 – Disable UAC for Remote Assistance/Google Remote Desktop/QuickAssist

email me

When remoting into a machine to support it, you’ll notice in Windows 10…once the UAC prompt appears, you cannot see the screen—or, more specifically, you cannot see the UAC dialog box. This setting allows you to manage that behavior.


UAC on the Client Machine


Disable Prompt

reg add HKEY_LOCAL_MACHINE\SOFTWARE\Microsoft\Windows\CurrentVersion\Policies\System /v EnableSecureUIAPaths /t REG_DWORD /d 1  /reg:64 /f

reg add HKEY_LOCAL_MACHINE\SOFTWARE\Microsoft\Windows\CurrentVersion\Policies\System /v PromptOnSecureDesktop /t REG_DWORD /d 0  /reg:64 /f


Enable Prompt

reg add HKEY_LOCAL_MACHINE\SOFTWARE\Microsoft\Windows\CurrentVersion\Policies\System /v EnableSecureUIAPaths /t REG_DWORD /d 0 /reg:64 /f

reg add HKEY_LOCAL_MACHINE\SOFTWARE\Microsoft\Windows\CurrentVersion\Policies\System /v PromptOnSecureDesktop /t REG_DWORD /d 1 /reg:64 /f


Notes

netsh advfirewall firewall set rule group=”remote assistance” new enable=Yes

reg add “HKLM\System\CurrentControlSet\Control\Remote Assistance” /v fAllowToGetHelp /t REG_DWORD /d 1 /f

reg add “HKLM\SYSTEM\CurrentControlSet\Control\Terminal Server” /v fDenyTSConnection /t REG_DWORD /d 0 /f

Google File Stream – A partially deleted previous installation

email me

Can’t download and install Google File Stream, even after a reboot. If after a reboot, you receive the error, try the solution listed here. It’s what worked for me.


Error

“A partially deleted previous installation was detected. You must reboot your machine before you can install this product.”


Solution

#1 – In C:\Program Files or C:\Program Files (x86), search and delete folders that have “DriveFS” or “Drive File Stream” in the name.

#2 – Do the same at this location: %USERPROFILE%\AppData\Local\Google\

#3 – Delete reg key contents in HKEY_LOCAL_MACHINE\SYSTEM\ControlSet001\Control\Session Manager value: PendingFileRenameOperations

#4 – Delete HKEY_LOCAL_MACHINE\SOFTWARE\WOW6432Node\Google\Update\ClientState\{6BBAE539-2232-434A-A4E5-9A33560C6283}

#5 – Search and delete registry keys for googledrivefs (googledrivefs2713 in my case)
* This is to remove references to the fs drivers.

#6 – Search and remove these files from your computer:
– googledrivefs2713.cat
– googledrivefs2713.inf
– googledrivefs2713.sys

* You may need to reboot after all deletions have been completed


Notes

Silent Uninstall

C:\Program Files\Google\Drive File Stream\31.0.13.0\uninstall –silent –force_stop
* requires reboot : adds deleteonreboot to C:\Program Files\Google\Drive File Stream


Registry

HKEY_LOCAL_MACHINE\SOFTWARE\Microsoft\Windows\CurrentVersion\Uninstall\{6BBAE539-2232-434A-A4E5-9A33560C6283}


Logs

C:\Users\%username%\AppData\Local\Google\DriveFS\Logs\
C:\Users\%username%\AppData\Local\Temp\


Install Location (7 Folders, 189 Files, 247 MB)

C:\Program Files\Google\Drive File Stream


Launch command from the setup

START “No Title” /b “C:\Program Files\Google\Drive File Stream\31.0.13.0\GoogleDriveFS.exe” –options=yAIA


Reg keys and drivers that get applied during setup

19-09-04T16:29:32 I install.cc(267): Set registry key successfully: Software\Classes\CLSID\{CFE8B367-77A7-41D7-9C90-75D16D7DC6B6}, , GoogleDrivePinnedOverlayIconHandler

19-09-04T16:29:32 I install.cc(267): Set registry key successfully: Software\Classes\CLSID\{CFE8B367-77A7-41D7-9C90-75D16D7DC6B6}\TypeLib, , {E27EC053-3263-4908-8ECD-5AFDFB754728}

19-09-04T16:29:32 I install.cc(267): Set registry key successfully: Software\Classes\CLSID\{CFE8B367-77A7-41D7-9C90-75D16D7DC6B6}\Version, , 1.0

19-09-04T16:29:32 I install.cc(267): Set registry key successfully: Software\Classes\CLSID\{CFE8B367-77A7-41D7-9C90-75D16D7DC6B6}\InProcServer32, , C:\Program Files\Google\Drive File Stream\31.0.13.0\drivefsext.dll

19-09-04T16:29:32 I install.cc(267): Set registry key successfully: Software\Classes\CLSID\{CFE8B367-77A7-41D7-9C90-75D16D7DC6B6}\InProcServer32, ThreadingModel, Apartment

19-09-04T16:29:32 I install.cc(267): Set registry key successfully: Software\Classes\CLSID\{A8E52322-8734-481D-A7E2-27B309EF8D56}, , GoogleDriveCloudOverlayIconHandler

19-09-04T16:29:32 I install.cc(267): Set registry key successfully: Software\Classes\CLSID\{A8E52322-8734-481D-A7E2-27B309EF8D56}\TypeLib, , {E27EC053-3263-4908-8ECD-5AFDFB754728}

19-09-04T16:29:32 I install.cc(267): Set registry key successfully: Software\Classes\CLSID\{A8E52322-8734-481D-A7E2-27B309EF8D56}\Version, , 1.0

19-09-04T16:29:32 I install.cc(267): Set registry key successfully: Software\Classes\CLSID\{A8E52322-8734-481D-A7E2-27B309EF8D56}\InProcServer32, , C:\Program Files\Google\Drive File Stream\31.0.13.0\drivefsext.dll

19-09-04T16:29:32 I install.cc(267): Set registry key successfully: Software\Classes\CLSID\{A8E52322-8734-481D-A7E2-27B309EF8D56}\InProcServer32, ThreadingModel, Apartment

19-09-04T16:29:32 I install.cc(267): Set registry key successfully: Software\Classes\CLSID\{C973DA94-CBDF-4E77-81D1-E5B794FBD146}, , GoogleDriveProgressOverlayIconHandler

19-09-04T16:29:32 I install.cc(267): Set registry key successfully: Software\Classes\CLSID\{C973DA94-CBDF-4E77-81D1-E5B794FBD146}\TypeLib, , {E27EC053-3263-4908-8ECD-5AFDFB754728}

19-09-04T16:29:32 I install.cc(267): Set registry key successfully: Software\Classes\CLSID\{C973DA94-CBDF-4E77-81D1-E5B794FBD146}\Version, , 1.0

19-09-04T16:29:32 I install.cc(267): Set registry key successfully: Software\Classes\CLSID\{C973DA94-CBDF-4E77-81D1-E5B794FBD146}\InProcServer32, , C:\Program Files\Google\Drive File Stream\31.0.13.0\drivefsext.dll

19-09-04T16:29:32 I install.cc(267): Set registry key successfully: Software\Classes\CLSID\{C973DA94-CBDF-4E77-81D1-E5B794FBD146}\InProcServer32, ThreadingModel, Apartment

19-09-04T16:29:32 I install.cc(267): Set registry key successfully: Software\Classes\CLSID\{EE15C2BD-CECB-49F8-A113-CA1BFC528F5B}, , DriveFS ContextMenu Handler

19-09-04T16:29:32 I install.cc(267): Set registry key successfully: Software\Classes\CLSID\{EE15C2BD-CECB-49F8-A113-CA1BFC528F5B}\TypeLib, , {E27EC053-3263-4908-8ECD-5AFDFB754728}

19-09-04T16:29:32 I install.cc(267): Set registry key successfully: Software\Classes\CLSID\{EE15C2BD-CECB-49F8-A113-CA1BFC528F5B}\Version, , 1.0

19-09-04T16:29:32 I install.cc(267): Set registry key successfully: Software\Classes\CLSID\{EE15C2BD-CECB-49F8-A113-CA1BFC528F5B}\InProcServer32, , C:\Program Files\Google\Drive File Stream\31.0.13.0\drivefsext.dll

19-09-04T16:29:32 I install.cc(267): Set registry key successfully: Software\Classes\CLSID\{EE15C2BD-CECB-49F8-A113-CA1BFC528F5B}\InProcServer32, ThreadingModel, Apartment

19-09-04T16:29:32 I install.cc(267): Set registry key successfully: Software\Classes\CLSID\{8AD5CECD-DF0D-41C3-BA21-1E22114CC73C}, , DriveFS Thumbnail Provider

19-09-04T16:29:32 I install.cc(267): Set registry key successfully: Software\Classes\CLSID\{8AD5CECD-DF0D-41C3-BA21-1E22114CC73C}\TypeLib, , {E27EC053-3263-4908-8ECD-5AFDFB754728}

19-09-04T16:29:32 I install.cc(267): Set registry key successfully: Software\Classes\CLSID\{8AD5CECD-DF0D-41C3-BA21-1E22114CC73C}\Version, , 1.0

19-09-04T16:29:32 I install.cc(267): Set registry key successfully: Software\Classes\CLSID\{8AD5CECD-DF0D-41C3-BA21-1E22114CC73C}\InProcServer32, , C:\Program Files\Google\Drive File Stream\31.0.13.0\drivefsext.dll

19-09-04T16:29:32 I install.cc(267): Set registry key successfully: Software\Classes\CLSID\{8AD5CECD-DF0D-41C3-BA21-1E22114CC73C}\InProcServer32, ThreadingModel, Apartment

19-09-04T16:29:32 I install.cc(280): Set registry key successfully: Software\Classes\CLSID\{8AD5CECD-DF0D-41C3-BA21-1E22114CC73C}, DisableProcessIsolation, 1

19-09-04T16:29:32 I install.cc(267): Set registry key successfully: SOFTWARE\Microsoft\Windows\CurrentVersion\Explorer\ShellIconOverlayIdentifiers\ GoogleDrivePinnedOverlayIconHandler, , {CFE8B367-77A7-41D7-9C90-75D16D7DC6B6}

19-09-04T16:29:32 I install.cc(267): Set registry key successfully: SOFTWARE\Microsoft\Windows\CurrentVersion\Explorer\ShellIconOverlayIdentifiers\ GoogleDriveCloudOverlayIconHandler, , {A8E52322-8734-481D-A7E2-27B309EF8D56}

19-09-04T16:29:32 I install.cc(267): Set registry key successfully: SOFTWARE\Microsoft\Windows\CurrentVersion\Explorer\ShellIconOverlayIdentifiers\ GoogleDriveProgressOverlayIconHandler, , {C973DA94-CBDF-4E77-81D1-E5B794FBD146}

19-09-04T16:29:32 I install.cc(267): Set registry key successfully: Software\Classes\*\shellex\ContextMenuHandlers\DriveFS 28 or later, , {EE15C2BD-CECB-49F8-A113-CA1BFC528F5B}

19-09-04T16:29:32 I install.cc(267): Set registry key successfully: Software\Classes\Directory\shellex\ContextMenuHandlers\DriveFS 28 or later, , {EE15C2BD-CECB-49F8-A113-CA1BFC528F5B}

19-09-04T16:29:32 I install.cc(267): Set registry key successfully: Software\Classes\Directory\Background\shellex\ContextMenuHandlers\DriveFS 28 or later, , {EE15C2BD-CECB-49F8-A113-CA1BFC528F5B}

19-09-04T16:29:32 I install.cc(267): Set registry key successfully: Software\Classes\DriveFSExtensionLib.Connect.1, , Drive Outlook Add-in Provider

19-09-04T16:29:32 I install.cc(267): Set registry key successfully: Software\Classes\DriveFSExtensionLib.Connect.1\CLSID, , {F1196F08-BAFE-4C9C-AEE7-71C69DA5B818}

19-09-04T16:29:32 I install.cc(267): Set registry key successfully: Software\Classes\DriveFSExtensionLib.Connect, , Drive Outlook Add-in Provider

19-09-04T16:29:32 I install.cc(267): Set registry key successfully: Software\Classes\DriveFSExtensionLib.Connect\CurVer, , DriveFSExtensionLib.Connect.1

19-09-04T16:29:32 I install.cc(299): Set registry key successfully for 64 bit: Software\Classes\CLSID\{F1196F08-BAFE-4C9C-AEE7-71C69DA5B818}, , Drive Outlook Add-in Provider

19-09-04T16:29:32 I install.cc(305): Set registry key successfully for 32 bit: Software\Classes\CLSID\{F1196F08-BAFE-4C9C-AEE7-71C69DA5B818}, , Drive Outlook Add-in Provider

19-09-04T16:29:32 I install.cc(299): Set registry key successfully for 64 bit: Software\Classes\CLSID\{F1196F08-BAFE-4C9C-AEE7-71C69DA5B818}\TypeLib, , {E27EC053-3263-4908-8ECD-5AFDFB754728}

19-09-04T16:29:32 I install.cc(305): Set registry key successfully for 32 bit: Software\Classes\CLSID\{F1196F08-BAFE-4C9C-AEE7-71C69DA5B818}\TypeLib, , {E27EC053-3263-4908-8ECD-5AFDFB754728}

19-09-04T16:29:32 I install.cc(299): Set registry key successfully for 64 bit: Software\Classes\CLSID\{F1196F08-BAFE-4C9C-AEE7-71C69DA5B818}\Version, , 1.0

19-09-04T16:29:32 I install.cc(305): Set registry key successfully for 32 bit: Software\Classes\CLSID\{F1196F08-BAFE-4C9C-AEE7-71C69DA5B818}\Version, , 1.0

19-09-04T16:29:32 I install.cc(299): Set registry key successfully for 64 bit: Software\Classes\CLSID\{F1196F08-BAFE-4C9C-AEE7-71C69DA5B818}\InProcServer32, ThreadingModel, Apartment

19-09-04T16:29:32 I install.cc(305): Set registry key successfully for 32 bit: Software\Classes\CLSID\{F1196F08-BAFE-4C9C-AEE7-71C69DA5B818}\InProcServer32, ThreadingModel, Apartment

19-09-04T16:29:32 I install.cc(267): Set registry key successfully: Software\Classes\CLSID\{F1196F08-BAFE-4C9C-AEE7-71C69DA5B818}\InProcServer32, , C:\Program Files\Google\Drive File Stream\31.0.13.0\drivefsext.dll

19-09-04T16:29:32 I install.cc(299): Set registry key successfully for 64 bit: Software\Classes\CLSID\{F1196F08-BAFE-4C9C-AEE7-71C69DA5B818}\ProgId, , DriveFSExtensionLib.Connect.1

19-09-04T16:29:32 I install.cc(305): Set registry key successfully for 32 bit: Software\Classes\CLSID\{F1196F08-BAFE-4C9C-AEE7-71C69DA5B818}\ProgId, , DriveFSExtensionLib.Connect.1

19-09-04T16:29:32 I install.cc(299): Set registry key successfully for 64 bit: Software\Classes\CLSID\{F1196F08-BAFE-4C9C-AEE7-71C69DA5B818}\VersionIndependentProgId, , DriveFSExtensionLib.Connect

19-09-04T16:29:32 I install.cc(305): Set registry key successfully for 32 bit: Software\Classes\CLSID\{F1196F08-BAFE-4C9C-AEE7-71C69DA5B818}\VersionIndependentProgId, , DriveFSExtensionLib.Connect

19-09-04T16:29:32 I install.cc(280): Set registry key successfully: Software\Google\DriveFS\IsFirstRunOfNewVersion, , 1

19-09-04T16:29:32 I install.cc(267): Set registry key successfully: Software\Classes\TypeLib\{E27EC053-3263-4908-8ECD-5AFDFB754728}\1.0\, , DriveFSExtensionLib

19-09-04T16:29:32 I install.cc(267): Set registry key successfully: Software\Classes\TypeLib\{E27EC053-3263-4908-8ECD-5AFDFB754728}\1.0\FLAGS, , 0

19-09-04T16:29:32 I install.cc(267): Set registry key successfully: Software\Classes\TypeLib\{E27EC053-3263-4908-8ECD-5AFDFB754728}\1.0\HELPDIR, , C:\Program Files\Google\Drive File Stream\31.0.13.0

19-09-04T16:29:32 I install.cc(267): Set registry key successfully: Software\Classes\TypeLib\{E27EC053-3263-4908-8ECD-5AFDFB754728}\1.0\0\win64\, , C:\Program Files\Google\Drive File Stream\31.0.13.0\drivefsext.dll

19-09-04T16:29:32 I util.cc(466): Could not read registry value SOFTWARE\Google\DriveFS,DriverVersion: 2

19-09-04T16:29:32 I util.cc(294): Created directory C:\Program Files\Google\Drive File Stream\Drivers

19-09-04T16:29:32 I util.cc(294): Created directory C:\Program Files\Google\Drive File Stream\Drivers\2713

19-09-04T16:29:32 I install.cc(513): Extracting driver version 2.713.1612.0 to C:\Program Files\Google\Drive File Stream\Drivers\2713

19-09-04T16:29:32 I install.cc(84): Finding resource 207

19-09-04T16:29:32 I install.cc(190): Cabinet written to C:\Users\%username%\AppData\Local\Temp\GoogleDFSSetup_190904122932_9368.cab

19-09-04T16:29:32 I install.cc(195): Cabinet destination path is: C:\Program Files\Google\Drive File Stream\Drivers\2713

19-09-04T16:29:32 I install.cc(176): Cabinit info skipped.

19-09-04T16:29:32 I install.cc(160): Extracting cabinet file: googledrivefs2713.cat (10705) to
C:\Program Files\Google\Drive File Stream\Drivers\2713\googledrivefs2713.cat

19-09-04T16:29:32 I install.cc(174): Successfully extracted.

19-09-04T16:29:32 I install.cc(160): Extracting cabinet file: googledrivefs2713.inf (1556) to
C:\Program Files\Google\Drive File Stream\Drivers\2713\googledrivefs2713.inf

19-09-04T16:29:32 I install.cc(174): Successfully extracted.

19-09-04T16:29:32 I install.cc(160): Extracting cabinet file: googledrivefs2713.sys (123736) to
C:\Program Files\Google\Drive File Stream\Drivers\2713\googledrivefs2713.sys

19-09-04T16:29:32 I install.cc(174): Successfully extracted.

19-09-04T16:29:32 I driver_install.cc(318): Prepping to install driver googledrivefs2713 from C:\Program Files\Google\Drive File Stream\Drivers\2713\googledrivefs2713.inf

19-09-04T16:29:32 I driver_install.cc(32): Sys file for driver googledrivefs2713 is in place.

19-09-04T16:29:32 I driver_install.cc(337): Driver .sys file is already present.

19-09-04T16:29:32 I driver_install.cc(341): Driver service does not exist. Creating service.

19-09-04T16:29:32 I driver_install.cc(343): Service created.

19-09-04T16:29:32 I driver_install.cc(353): Service is not yet running. Starting service.

19-09-04T16:29:32 I install.cc(72): Created shortcut link at C:\ProgramData\Microsoft\Windows\Start Menu\Programs\Drive File Stream.lnk

19-09-04T16:29:32 I install.cc(72): Created shortcut link at C:\Users\%username%\Desktop\Google Docs.lnk

19-09-04T16:29:32 I install.cc(72): Created shortcut link at C:\Users\%username%\Desktop\Google Sheets.lnk

19-09-04T16:29:32 I install.cc(72): Created shortcut link at C:\Users\%username%\Desktop\Google Slides.lnk

19-09-04T16:29:32 I setup.cc(332): Setup successfully completed.

19-09-04T16:29:32 I util.cc(466): Could not read registry value .DEFAULT\Software\Microsoft\Windows\CurrentVersion\Run,GoogleDriveFS: 2

19-09-04T16:29:32 I install.cc(626): Did not find an autolaunch entry to update for user .DEFAULT

19-09-04T16:29:32 I util.cc(466): Could not read registry value S-1-5-19\Software\Microsoft\Windows\CurrentVersion\Run,GoogleDriveFS: 2

19-09-04T16:29:32 I install.cc(626): Did not find an autolaunch entry to update for user S-1-5-19

19-09-04T16:29:32 I util.cc(466): Could not read registry value S-1-5-20\Software\Microsoft\Windows\CurrentVersion\Run,GoogleDriveFS: 2

19-09-04T16:29:32 I install.cc(626): Did not find an autolaunch entry to update for user S-1-5-20

19-09-04T16:29:32 I util.cc(466): Could not read registry value S-1-5-21-729355473-1286879909-800860556-5703585\Software\Microsoft\Windows\CurrentVersion\Run,GoogleDriveFS: 2

19-09-04T16:29:32 I install.cc(626): Did not find an autolaunch entry to update for user S-1-5-21-729355473-1286879909-800860556-5703585

19-09-04T16:29:32 I util.cc(466): Could not read registry value S-1-5-21-729355473-1286879909-800860556-5703585_Classes\Software\Microsoft\Windows\CurrentVersion\Run,GoogleDriveFS: 2

19-09-04T16:29:32 I install.cc(626): Did not find an autolaunch entry to update for user S-1-5-21-729355473-1286879909-800860556-5703585_Classes

19-09-04T16:29:32 I util.cc(466): Could not read registry value S-1-5-18\Software\Microsoft\Windows\CurrentVersion\Run,GoogleDriveFS: 2

19-09-04T16:29:32 I install.cc(626): Did not find an autolaunch entry to update for user S-1-5-18

19-09-04T16:29:32 I setup.cc(224): Notify Event Global\GoogleDriveFSSafeRestart

19-09-04T16:29:32 I uninstall.cc(846): Cleaning old versions.

19-09-04T16:29:32 I uninstall.cc(849): Removed deprecated registry keys.

19-09-04T16:29:32 I uninstall_driver.cc(368): Dokan DLL found: C:\Program Files\Google\Drive File Stream\31.0.13.0\dokan2713.dll

19-09-04T16:29:32 I uninstall_driver.cc(368): Dokan DLL found: C:\Program Files\Google\Drive File Stream\31.0.13.0\dokancc2713.dll

19-09-04T16:29:32 I uninstall_driver.cc(389): Driver found: C:\Program Files\Google\Drive File Stream\Drivers\2713\googledrivefs2713.sys

19-09-04T16:29:32 I uninstall_driver.cc(398): C:\Program Files\Google\Drive File Stream\Drivers\2713\googledrivefs2713.sys is being used.

19-09-04T16:29:32 I uninstall.cc(907): Removed all unused drivers.

19-09-04T16:29:32 I driver_install.cc(363): Uninstalling driver googledrivefs205without INF.

19-09-04T16:29:32 I driver_install.cc(34): Sys file for driver googledrivefs205 not in place.

19-09-04T16:29:32 I driver_install.cc(367): Driver is already uninstalled.

19-09-04T16:29:32 I uninstall.cc(913): Removed deprecated drivers.

19-09-04T16:29:32 I util.cc(466): Could not read registry value SOFTWARE\Google\Update\ClientState\{6BBAE539-2232-434A-A4E5-9A33560C6283},ap: 2

19-09-04T16:29:32 I omaha.cc(128): No channel

Windows – ProcMon – Monitor Boot Time

email me

This is how you use Process Monitor to record boot time data. Then you can review this information to determine where bottlenecks are happening.


Steps

Install ProcMon

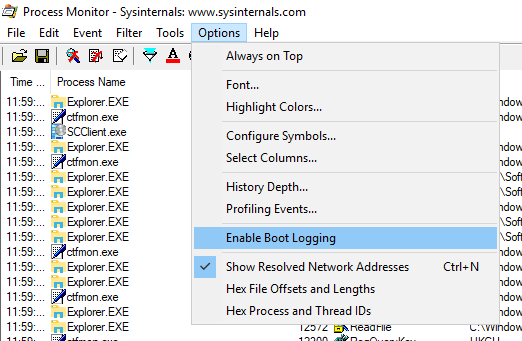
Enable Boot Logging

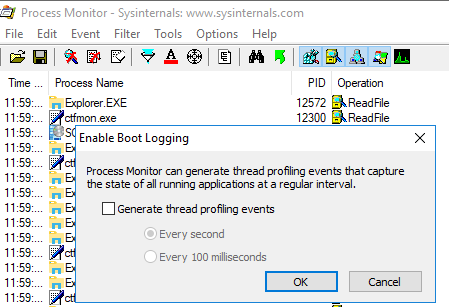
Select Generate threat profiling events

Reboot

Log in

Launch ProcMon

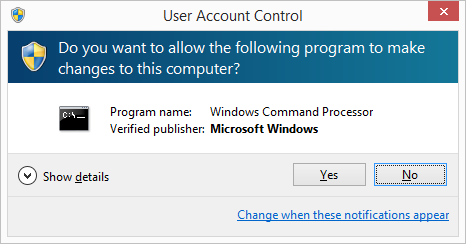
Select Yes to save collected data

Review data


Overview of Process Monitor Capabilities

Process Monitor includes powerful monitoring and filtering capabilities, including:

  • More data captured for operation input and output parameters
  • Non-destructive filters allow you to set filters without losing data
  • Capture of thread stacks for each operation make it possible in many cases to identify the root cause of an operation
  • Reliable capture of process details, including image path, command line, user and session ID
  • Configurable and moveable columns for any event property
  • Filters can be set for any data field, including fields not configured as columns
  • Advanced logging architecture scales to tens of millions of captured events and gigabytes of log data
  • Process tree tool shows relationship of all processes referenced in a trace
  • Native log format preserves all data for loading in a different Process Monitor instance
  • Process tooltip for easy viewing of process image information
  • Detail tooltip allows convenient access to formatted data that doesn’t fit in the column
  • Cancellable search
  • Boot time logging of all operations

Video


Notes