Windows 10 – Useful Registry Paths for Apps & Settings

see Windows Category
 

Note, these may change from build version to build version. Make sure you’re using the correct Name and/or App ID.


Cortana displays history

HKCU\SOFTWARE\Microsoft\Windows\CurrentVersion\Search\HistoryViewEnabled

Type: REG_DWORD, Length: 4, Data: 0


Cortana can use my device history

HKCU\SOFTWARE\Microsoft\Windows\CurrentVersion\Search\DeviceHistoryEnabled

Type: REG_DWORD, Length: 4, Data: 0


Disable Location

HKCU\SOFTWARE\Microsoft\Windows\CurrentVersion\DeviceAccess\Global\{BFA794E4-F964-4FDB-90F6-51056BFE4B44}\Value

Type: REG_SZ, Length: 10, Data: Deny

HKCU\SOFTWARE\Microsoft\Windows\CurrentVersion\DeviceAccess\Global\{E6AD100E-5F4E-44CD-BE0F-2265D88D14F5}\Value

Type: REG_SZ, Length: 10, Data: Deny

HKCU\SOFTWARE\Microsoft\Windows NT\CurrentVersion\Sensor\Permissions\{BFA794E4-F964-4FDB-90F6-51056BFE4B44}\SensorPermissionState

Type: REG_DWORD, Length: 4, Data: 0


Advertising ID

HKCU\SOFTWARE\Microsoft\Windows\CurrentVersion\AdvertisingInfo\Enabled

Type: REG_DWORD, Length: 4, Data: 0 


Smartscreen

HKCU\SOFTWARE\Microsoft\Windows\CurrentVersion\AppHost\EnableWebContentEvaluation

Type: REG_DWORD, Length: 4, Data: 0 


Send typing info to Microsoft

HKCU\SOFTWARE\Microsoft\Input\TIPC\Enabled

Type: REG_DWORD, Length: 4, Data: 0


Let websites provide local content by accessing language list

HKCU\SOFTWARE\Microsoft\Internet Explorer\International\AcceptLanguage

Type: REG_SZ, Length: 30, Data: en-US,en;q=0.5

HKCU\Control Panel\International\User Profile\HttpAcceptLanguageOptOut

Type: REG_DWORD, Length: 4, Data: 1


Smartglass; let apps on other devices open apps on this device

HKLM\SOFTWARE\Microsoft\Windows\CurrentVersion\SmartGlass\UserAuthPolicy

Type: REG_DWORD, Length: 4, Data: 0


Let apps use camera

HKCU\SOFTWARE\Microsoft\Windows\CurrentVersion\DeviceAccess\Global\{E5323777-F976-4f5b-9B55-B94699C46E44}\Value

Type: REG_SZ, Length: 10, Data: Deny


Let apps use Mic

HKCU\SOFTWARE\Microsoft\Windows\CurrentVersion\DeviceAccess\Global\{2EEF81BE-33FA-4800-9670-1CD474972C3F}\Value

Type: REG_SZ, Length: 10, Data: Deny


Let apps access notifications

HKCU\SOFTWARE\Microsoft\Windows\CurrentVersion\DeviceAccess\Global\{52079E78-A92B-413F-B213-E8FE35712E72}\Value

Type: REG_SZ, Length: 10, Data: Deny


Get to know my typing

HKCU\SOFTWARE\Microsoft\Personalization\Settings\AcceptedPrivacyPolicy

Type: REG_DWORD, Length: 4, Data: 0

HKCU\SOFTWARE\Microsoft\Windows\CurrentVersion\SettingSync\Groups\Language\Enabled

Type: REG_DWORD, Length: 4, Data: 0

HKCU\SOFTWARE\Microsoft\InputPersonalization\RestrictImplicitTextCollection

Type: REG_DWORD, Length: 4, Data: 1

HKCU\SOFTWARE\Microsoft\InputPersonalization\RestrictImplicitInkCollection

Type: REG_DWORD, Length: 4, Data: 1

HKCU\SOFTWARE\Microsoft\InputPersonalization\TrainedDataStore\HarvestContacts

Type: REG_DWORD, Length: 4, Data: 0


Let apps access my account info

HKCU\SOFTWARE\Microsoft\Windows\CurrentVersion\DeviceAccess\Global\{C1D23ACC-752B-43E5-8448-8D0E519CD6D6}\Value

Type: REG_SZ, Length: 10, Data: Deny


Let apps access my contacts

HKCU\SOFTWARE\Microsoft\Windows\CurrentVersion\DeviceAccess\Global\{7D7E8402-7C54-4821-A34E-AEEFD62DED93}\Value

Type: REG_SZ, Length: 10, Data: Deny


Let apps access my calendar

HKCU\SOFTWARE\Microsoft\Windows\CurrentVersion\DeviceAccess\Global\{D89823BA-7180-4B81-B50C-7E471E6121A3}\Value

Type: REG_SZ, Length: 10, Data: Deny


Let apps access my call history

HKCU\SOFTWARE\Microsoft\Windows\CurrentVersion\DeviceAccess\Global\{8BC668CF-7728-45BD-93F8-CF2B3B41D7AB}\Value

Type: REG_SZ, Length: 10, Data: Deny


Let apps access my email

HKCU\SOFTWARE\Microsoft\Windows\CurrentVersion\DeviceAccess\Global\{9231CB4C-BF57-4AF3-8C55-FDA7BFCC04C5}\Value

Type: REG_SZ, Length: 10, Data: Deny


Let apps access text/mms

HKCU\SOFTWARE\Microsoft\Windows\CurrentVersion\DeviceAccess\Global\{992AFA70-6F47-4148-B3E9-3003349C1548}\Value

Type: REG_SZ, Length: 10, Data: Deny

HKCU\SOFTWARE\Microsoft\Windows\CurrentVersion\DeviceAccess\Global\{21157C1F-2651-4CC1-90CA-1F28B02263F6}\Value

Type: REG_SZ, Length: 10, Data: Deny


Let apps access radios

HKCU\SOFTWARE\Microsoft\Windows\CurrentVersion\DeviceAccess\Global\{A8804298-2D5F-42E3-9531-9C8C39EB29CE}\Value

Type: REG_SZ, Length: 10, Data: Deny


Let apps share and sync non-explicitly paired wireless devices over uPnP

HKCU\SOFTWARE\Microsoft\Windows\CurrentVersion\DeviceAccess\Global\LooselyCoupled\Value

Type: REG_SZ, Length: 10, Data: Deny


Set telemetry to basic (can disable via service Diagtrack and DmwApPushSvc)

HKLM\SOFTWARE\Microsoft\Windows\CurrentVersion\Policies\DataCollection\AllowTelemetry

Type: REG_DWORD, Length: 4, Data: 1


Never ask for feedback

HKCU\SOFTWARE\Microsoft\Siuf\Rules\NumberOfSIUFInPeriod

Type: REG_DWORD, Length: 4, Data: 0


Use my sign in info to automatically finish setting up after an update

HKLM\SOFTWARE\Microsoft\Windows NT\CurrentVersion\Winlogon\ARSOUserConsent

Type: REG_DWORD, Length: 4, Data: 2


Delivery optimization, disabled

HKCU\SOFTWARE\Microsoft\Windows\CurrentVersion\DeliveryOptimization\SystemSettingsDownloadMode

Type: REG_DWORD, Length: 4, Data: 3

HKLM\SOFTWARE\Microsoft\Windows\CurrentVersion\DeliveryOptimization\Config\DODownloadMode

Type: REG_DWORD, Length: 4, Data: 0


Disable cloud Defender protection (love the key name)

HKLM\SOFTWARE\Microsoft\Windows Defender\Spynet\SpyNetReporting

Type: REG_DWORD, Length: 4, Data: 2

Services:

DiagTrack and Dmwappushsvc – Parts of telemetry
DoSvc – Delivery “optimization”
DcpSvc – Allows first party apps to upload data to the cloud (Data collection and publishing)
lfsvc – Geolocation
XblAuthManager, XblGameSave, XboxNetApiSvc – xBox services
 

< Windows 10 Category

Windows 10 – Set Default Lock Screen Wallpaper – Image

email me

Personalization

reg add “HKEY_LOCAL_MACHINE\SOFTWARE\Policies\Microsoft\Windows\Personalization” /v “LockScreenImage” /t REG_SZ /d “C:\Windows\BackgroundDefault.jpg” /f


or via CSP

Windows Registry Editor Version 5.00

[HKEY_LOCAL_MACHINE\SOFTWARE\Microsoft\Windows\CurrentVersion\PersonalizationCSP]
“LockScreenImageStatus”=dword:00000001
“LockScreenImagePath”=”C:\\Windows\\wallpaper.png”
“LockScreenImageUrl”=”C:\\Windows\\wallpaper.png”

Windows 10 – Disable Screen Rotation

email me

Use this reg key to disable the rotation feature

reg add “HKEY_LOCAL_MACHINE\SOFTWARE\Microsoft\Windows\CurrentVersion\AutoRotation” /v “SensorPresent” /t REG_DWORD /d 0 /f


Set option to off

reg add “HKEY_LOCAL_MACHINE\SOFTWARE\Microsoft\Windows\CurrentVersion\AutoRotation” /v “Enable” /t REG_DWORD /d 0 /f


Notes

SlateEnable = 0

Windows 10 – Auto-Tuning Disable it or not?

email me

Window Auto-Tuning feature is said to improve the performance for programs that receive TCP data over a network. It is nothing new. It was introduced in Windows Vista and is present in Windows 10 too. In today’s Internet, the range of latencies & throughput speeds is just too large to manage statically. It needs to be adjusted dynamically. Windows 10 will dynamically adjust the receive buffer size to the throughput and latency of the link, using this feature.

Programs like Automatic Updates, Windows Update, Remote Desktop Connection, Windows Explorer for network file copy, etc, use WinHTTP or Windows HTTP Services.

Window Auto-Tuning feature is enabled by default in Windows 10 and makes data transfers over networks more efficient. But if your network uses an old router or your firewall software does not support this feature, then you may experience slow data transfers or even loss of connectivity.

To check the status of Auto-Tuning feature on your system, in an elevated command prompt windows, type the following and hit Enter:

netsh interface tcp show global

If you see ‘normal’ written against Receive Window Auto-Tuning Level, it means that the feature is enabled and it is working fine.

To disable Windows AutoTuning, run the following command:

netsh int tcp set global autotuninglevel=disabled

To enable Windows AutoTuning, run the following command:

netsh int tcp set global autotuninglevel=normal

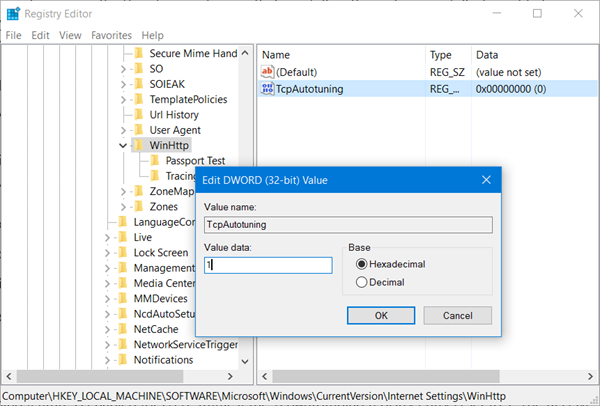
You can also tweak the Windows Registry, says KB947239. To enable the Receive Window Auto-Tuning feature for HTTP traffic, Run regedit and navigate to the following registry subkey:

HKEY_LOCAL_MACHINE\Software\Microsoft\Windows\CurrentVersion\Internet Settings\WinHttp

Right-click on it > New > DWORD Value. Type TcpAutotuning and give it a vale of 1.

Click OK and exit.

To disable Receive Window Auto-Tuning feature for HTTP traffic, give it a value of 0 or delete the created TcpAutotuning DWORD.

The Receive Window Auto-Tuning feature lets the operating system continually monitor routing conditions such as bandwidth, network delay, and application delay. Therefore, the operating system can configure connections by scaling the TCP receive window to maximize the network performance. To determine the optimal receive window size, the Receive Window Auto-Tuning feature measures the products that delay bandwidth and the application retrieve rates. Then, the Receive Window Auto-Tuning feature adapts the receive window size of the ongoing transmission to take advantage of any unused bandwidth.

Let the default settings of Window Auto-Tuning feature be enabled. If your network uses an old router or your firewall software does not support this feature, and you are experiencing poor or no connectivity issues, only then may you disable this feature and see if it works in your favor.

Windows 10 – Default Printer Not Available

email me

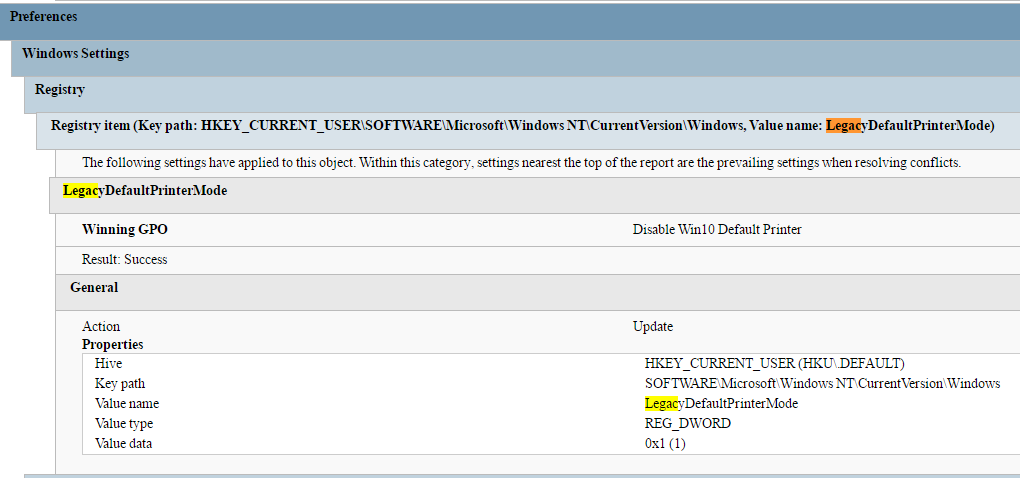
This is how you restore the Default printer or Legacy printer setting (these uncheck “Let Windows manage my default printer”):

Registry

REG ADD “HKEY_CURRENT_USER\Software\Microsoft\Windows NT\CurrentVersion\Windows” /v “LegacyDefaultPrinterMode” /t REG_DWORD /d 1 /f


Group Policy

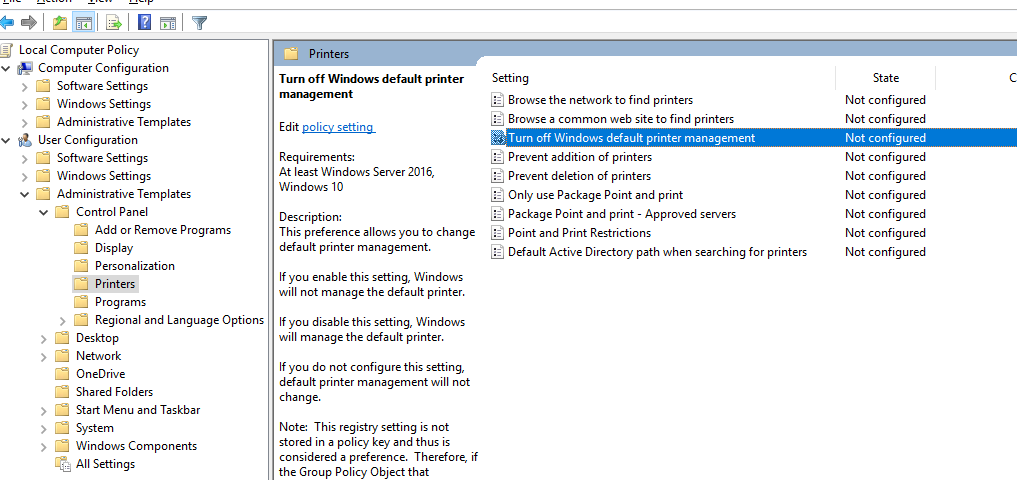
Enable “Turn off Windows default printer management”

User Configuration > Administrative Templates > Control Panel > Printers


Notes

Step-By-Step: Managing Windows 10 with Administrative templates

Windows 10 – Randomly Disconnecting Mapped Drives

email me

When you upgrade from Windows 7 to Windows 10, you may notice that the network/mapped drives are randomly disappearing. A logoff/login will fix it temporarily, but what a pain. This is how you permanently fix the vanishing drives.

Group Policy Method

User Configuration > Preferences > Windows Settings > Drive Maps

Change the drive to “Update” in group policy


Registry Method

You cannot use this method to turn off the autodisconnect feature of the Server service. You can only use this method to change the default time-out period for the autodisconnect feature.

  1. Click Start, click Run, type regedit, and then click OK.
  2. Locate and then click the following key in the registry:
    HKEY_LOCAL_MACHINE\SYSTEM\CurrentControlSet\Services\lanmanserver\parameters
  3. In the right pane, click the autodisconnect value, and then on the Edit menu, click Modify. If the autodisconnectvalue does not exist, follow these steps:
    1. On the Edit menu, point to New, and then click REG_DWORD.
    2. Type autodisconnect, and then press ENTER.
  4. On the Edit menu, click Modify.
  5. Click Hexadecimal.
  6. In the Value data box, type ffffffff, and then click OK.

The client-side session is automatically disconnected when the idling time lasts more than the duration that is set in KeepConn. Therefore, the session is disconnected according to the shorter set duration value between AutoDisConnect and KeepConn. To change the time-out duration in the client-side during a UNC connection, specify the arbitrary time in KeepConn.

Locate and then click the following key in the registry:

HKEY_LOCAL_MACHINE\SYSTEM\CurrentControlSet\Services\lanmanworkstation\parameters 

Value: KeepConn
Data type : REG_DWORD
Range : 1 to 65535 (sec)
Default value: 600 sec = 10 mins


Command Line Method

If you use this method, you may turn off the auto-tuning feature for the Server service.

To change the default time-out period for the autodisconnect feature of the Server service, open a command prompt, type the following line, and then press ENTER

net config server /autodisconnect:number

…where number is the number of minutes that you want the server to wait before it disconnects a mapped network drive. The maximum value for this command is 65,535.

If you set the autodisconnect value to 0 (zero), the autodisconnect feature is not turned off, and the Server service disconnects mapped network drives after only a few seconds of idle time.

To turn off the autodisconnect feature, open a command prompt, type the following line, and then press ENTER:

net config server /autodisconnect:-1


Failsafe

If all else fails, and the drives are still disconnecting, create a Scheduled Task, pointing to a batch script that checks and reconnects the drive. Add the following code into a netmap.cmd file (copy it to system32), create a Schedule Task, and point to the netmap.cmd file.

@echo off
dir X:\SomeFile.txt
IF %ERRORLEVEL%==1 GOTO MapDrive
exit /b 0

:MapDrive
net use X: /Delete
net use X: \\ShareName\ShareFolder  /persistent:yes

:: command line testing
:: dir C:\testss.cmd && echo do not map || echo map drive


Reference

https://www.mcbsys.com/blog/2016/08/windows-10-repeatedly-disconnects-network-drives/

Windows 10 – DPI Scaling Causing Blurred Fonts

email me

Apply these keys in a startup script or in post set for imaging to fix blurry fonts.

REG ADD “HKCU\Control Panel\Desktop” /v DpiScalingVer /t REG_DWORD /d 0x00001018 /f

REG ADD “HKCU\Control Panel\Desktop” /v Win8DpiScaling /t REG_DWORD /d 0x00000001 /f

REG ADD “HKCU\Control Panel\Desktop” /v LogPixels /t REG_DWORD /d 0x00000078 /f


Notes

DPI—>Scale Factor

96—>100
120—>125
144—>150
192—>200

Every 25% of the scale factor corresponds to a difference of 24 dpi (120-96). So, in theory, if you set in registry key 72, you should have in Scale Factor 75%.

See http://windows10_dpi_blurry_fix.xpexplorer.com/


Blurred Desktop Icons

taskkill /IM explorer.exe /F
taskkill /IM rundll32.exe /F
taskkill /IM snagit32.exe /F
del /A /Q “%iconcache%”
del /A /F /Q “%localappdata%\Microsoft\Windows\Explorer\iconcache*”
start “” explorer.exe


Do the walk-through with the ClearText tuner (run cttune.exe).
Update the video card driver.


Other

REG ADD “HKLM\Software\Microsoft\Windows NT\CurrentVersion\AppCompatFlags\Layers” /V “C:\Program Files(x86)\folder\app.exe” /T REG_SZ /D “~ DPIUNAWARE” /F

“~ HIGHDPIAWARE” = Override high DPI scaling behavior (Application)

“~ DPIUNAWARE” = Override high DPI scaling behavior (System)

“~ GDIDPISCALING DPIUNAWARE” = Override high DPI scaling behavior (System Enhanced)

Reference

https://deploymentbunny.com/2018/01/19/nice-to-know-fix-high-dpi-resolution-issues-in-windows-10/