Windows 10 – Cannot Connect to Wireless

email me

1 – Delete subkeys in TLS 1.0, Client and Server

HKEY_LOCAL_MACHINE\SYSTEM\CurrentControlSet\Control\SecurityProviders\SCHANNEL\Protocols\TLS 1.0

2 – From an Admin Prompt, Run

IPCONFIG /FLUSHDNS
NBTSTAT -R
NBTSTAT -RR
NETSH INT IP RESET
NETSH INT IPV4 RESET
NETSH INT IPV6 RESET

NETSH WINSOCK RESET

3 – Restart computer or disable/reenable WLAN.


But why? 

Why does this happen? Most likely, your computer is using an authentication protocol based on TLS 1.0 (example, PEAP-MSCHAPv2 or EAP-TLS); this could be back-end or front-end protocols or configs. Something else to point out, TLS protocols can be dependent of specific .NET frameworks, making securing your computer or network even more complex, especially if you use apps based on certain frameworks. Specificity will be key to providing the best security, while understanding what you can and can’t disable.

Some general notes on the frameworks and supported TLS

  1. .NET 4.6 and above. You don’t need to do any additional work to support TLS 1.2; it’s supported by default. TLS 1.1 is supported. TLS 1.0 is supported.
  2. .NET 4.5. TLS 1.2 is supported, but it’s not a default protocol. You need to opt-in to use it. TLS 1.1 is supported. TLS 1.0 is supported.
  3. .NET 4.0. TLS 1.2 is not supported, but if you have .NET 4.5, or later, installed on the computer, then you still can opt in for TLS 1.2, even if your application framework doesn’t support it. TLS 1.0 is supported.
  4. .NET 3.5 or below. TLS 1.2 is not supported and there is no workaround. Upgrade your application to more recent version of the framework. TLS 1.0 is supported.

more from Microsoft on TLS…   on frameworks…


Notes

If that doesn’t work, take a look at disabling the power management on the Wi-Fi adapter

1 – On the network adapter, go to the power management tab.

2 – Uncheck the Allow this computer to turn off this device to save power. Click on OK.

3 – Restart computer


Edit or Create Group Policy via Registry Editor

1 – Navigate to the following path in Registry Editor

HKLM\Software\Policies\Microsoft\Windows\WcmSvc\

2 – Create a GroupPolicy subkey

3 – Inside of HKLM\Software\Policies\Microsoft\Windows\WcmSvc\GroupPolicy, right-click in the right pane and select New > DWORD. Name it fMinimizeConnections

4 – Restart computer


Other

1 – Within the device manager, under VIEW, choose Show hidden devices
2 – Disabled the Microsoft wifi direct virtual adapter
3 – Disable the Microsoft hosted network virtual adapter
4 – Restart computer

Update to enable TLS 1.1 and TLS 1.2 as a default secure protocols in WinHTTP in Windows

.NET Framework version history


SCCM – Windows 10 Upgrade – Task Sequence failed with error code 0xc1900204

email me

What is 0xc1900204 error?

The 0xc1900204 error code are used by windows operating systems to alert programmers and system users to a problem. There are thousands of different error codes, found in hundreds of places throughout a computer. They often need a deep IT background to decode and to fix, but many can be repaired through simple, step-by-step solutions either found online or with the help of support personnel.

The error code show up on your computer screen as numbers or number/letter combinations that correspond to the particular error or type of error occurring. Many of the common Windows Errors can be resolved with a quick search, but more complex or obscure errors need help from someone who is well trained in the Windows operating system. Windows error codes do not provide precise, actionable information, but are general codes provided to offer a starting point for a solution. With proper examination and testing, Windows error codes direct a troubleshooter to the problem.

What causes 0xc1900204 error?

The 0xc1900204 error may be caused by windows system files damage. The corrupted system files entries can be a real threat to the well being of your computer.

There can be many events which may have resulted in the system files errors. An incomplete installation, an incomplete uninstall, improper deletion of applications or hardware. It can also be caused if your computer is recovered from a virus or adware/spyware attack or by an improper shutdown of the computer. All the above actives may result in the deletion or corruption of the entries in the windows system files. This corrupted system file will lead to the missing and wrongly linked information and files needed for the proper working of the application.


Troubleshooting

First, clear the ccmcache folder using the Control Panel CM applet and try again.

Second, try disjoining from the domain and running the setup.exe manually. Does it work?

Third, look in the hidden folder C:\$WINDOWS.~BT\Sources\Panther to view the setuperr.log file for more information. Search for the hex return code found which will give you more information. Also search for setupact.log for more detailed information. Once you’ve done some research and tried a few things, move the whole setup folder to _Backup, and try again.

Fourth, see Repair Windows Updates

Fifth, see Rebuild WMI

Sixth, verify there are no unnecessary user accounts in C:\Users and ProfileList in the registry.

Determine Security Privileges an Account Has

email me

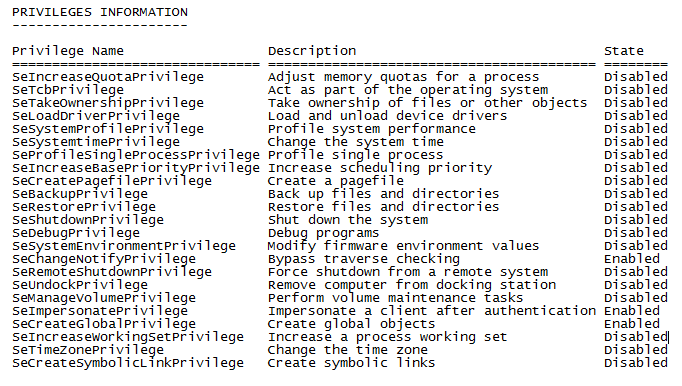
To determine privileges held by a user account, run whoami. This is especially useful when installing SQL, which does an account check.
Command

whoami /priv


Output


Notes

If you’re trying to install SQL,  but the account check is failing, you’ll need to either grant domain level privileges or local security privileges to Backup files and directoriesDebug Programs, and Manage auditing and security log. I recommend creating a new user account to be utilized as a SQL access account. If there is a domain policy overriding your changes, add the machine’s computer account into an OU that is blocking policy. Then, run gpupdate /force. Check the Local Security Settings on the computer. You should be able to make changes now. Once the changes have been made, run the SQL setup again.

Snapshot of what needs to be updated


Some other random notes

[HKEY_LOCAL_MACHINE\SYSTEM\CurrentControlSet\Control\SecurityProviders\SCHANNEL\Protocols\TLS 1.2]

[HKEY_LOCAL_MACHINE\SYSTEM\CurrentControlSet\Control\SecurityProviders\SCHANNEL\Protocols\TLS 1.2\Client]
“DisabledByDefault”=dword:00000000
“Enabled”=dword:00000001

[HKEY_LOCAL_MACHINE\SYSTEM\CurrentControlSet\Control\SecurityProviders\SCHANNEL\Protocols\TLS 1.2\Server]
“DisabledByDefault”=dword:00000000
“Enabled”=dword:00000001


The SQL error when TLS  1.0 is disabled

A connection was successfully established with the server, but then an error occurred
during the login process. (provider: Shared Memory Provider, error: 0 – No process is
on the other end of the pipe.)

(Microsoft SQL Server, Error: 233)


SCHANNEL registry status

SSL 2.0: Client: DisabledByDefault = 1 Enabled = 0 Server: DisabledByDefault = 1 Enabled = 0
SSL 3.0: Client: DisabledByDefault = 1 Enabled = 0 Server: DisabledByDefault = 1 Enabled = 0
TLS 1.0: Client: DisabledByDefault = 0 Enabled = 1 Server: DisabledByDefault = 0 Enabled = 1
TLS 1.1: Client: DisabledByDefault = 0 Enabled = 1 Server: DisabledByDefault = 0 Enabled = 1
TLS 1.2: Client: DisabledByDefault = 0 Enabled = 1 Server: DisabledByDefault = 0 Enabled = 1

SCCM – Distribution Point Selection Steps

email me

This is how a client computer determines which distribution point (DP) to use.

 Step From Action
 1 Client Sends a content location request to its Management Point (MP)
 2 MP The search for Distribution Points (DP’s), with the content, starts in the client’s current site. This can be the client’s assigned site, secondary site attached to it, or a site to which the client is roamed. When the content is not available here, the search goes to the assigned site.
 3 MP The list of Distribution Points will be sorted. When a protected DP is found, where the client’s boundary is included, only it will be returned. If there is no protected DP found, the MP will return a list of non-protected DP’s that host downloadable content.
 4 MP The remaining Distribution Points on the list will be marked as local, or remote, depending on the associated boundary.
 5 MP The Distribution Point list is sent back to the client.
 6 Client The client receives the Distribution Point list and then attempts to connect to DP’s in this order: local DP’s and then remote DP’s; same IP subnet, same AD site, and then the remaining DP’s. In every category, the client prefers DP’s with BITS enabled.


Content source priority

When a client needs content, it makes a content location request to the management point. The management point returns a list of source locations that are valid for the requested content. This list varies depending upon the specific scenario, technologies in use, site design, boundary groups, and deployment settings. The following list contains all of the possible content source locations that a client can use, in the order in which it prioritizes them:

  1. The distribution point on the same computer as the client
  2. A peer source in the same network subnet
  3. A distribution point in the same network subnet
  4. A peer source in the same boundary group
  5. A distribution point in the current boundary group
  6. A distribution point in a neighbor boundary group configured for fallback
  7. A distribution point in the default site boundary group
  8. The Windows Update cloud service
  9. An internet-facing distribution point
  10. A cloud distribution point in Azure


Notes

https://docs.microsoft.com/en-us/sccm/core/plan-design/hierarchy/understand-how-clients-find-site-resources-and-services

https://docs.microsoft.com/en-us/sccm/core/plan-design/hierarchy/fundamental-concepts-for-content-management

https://docs.microsoft.com/en-us/sccm/core/plan-design/hierarchy/package-transfer-manager

https://docs.microsoft.com/en-us/sccm/core/plan-design/hierarchy/client-peer-cache

SCCM – Windows 10 Upgrade – Boot Loop

email me

This is concerning a strange action…where after a Windows 10 upgrade using a SCCM task sequence, the state of the computer is thrown into a boot loop. Not exactly fun. In some cases, the last step in the task sequence, usually Install Windows Updates, will leave the computer in a bad state—this has to do with a KB not properly installing ( 1  2 ), or cleanly installing properly (though, there are other causes of this bad state). When this happens, two reg keys that would normally be modified, are left unchanged. These reg keys leave the machine state in ‘upgrade’ mode—not something you want.

The specific reg keys

HKLM\SYSTEM\Setup /v CmdLine

HKLM\SYSTEM\Setup /v SetupType


During the upgrade process, they look like this

HKLM\SYSTEM\Setup /v CmdLine /t REG_SZ /d “C:\Windows\SMSTSPostUpgrade\setupcomplete.cmd”

HKLM\SYSTEM\Setup /v SetupType /t REG_DWORD /d 2

The problem is, when the upgrade falls into limbo, the setupcomplete.cmd no longer exists—however the computer is trying to access the CMD file—thus a boot loop.


What you want the keys to look like

HKLM\SYSTEM\Setup /v CmdLine /t REG_SZ /d “”

HKLM\SYSTEM\Setup /v SetupType /t REG_DWORD /d 0


The Fix

To fix this boot loop, you’ll need to access the registry on the boot loop hard drive and make the modifications manually. This can be done by using the Win 10 DVD, dropping out to the command prompt, and running regedit, OR….just by slaving or cradling the drive. Here are the steps once you have access to the folder structure on the boot loop drive.

Open Regedit

Select HKLM

Select File from menu

Select Load Hive from menu

Navigate to E:\Windows\System32\config (E: being the 2nd drive)

Select SYSTEM file

Name ‘test’

Select ‘HKLM\test’ in regedit

Navigate to Setup

Remove contents of the CmdLine key

Change SetupType to 0

Try the drive in the main computer again. Boot loop should be gone.