Expanding SCCM Right-Click Tools

email me

NOTICE: You’re not going to find this info anywhere on the web, because it’s undocumented. This is experimental, so make backups of your files before editing.

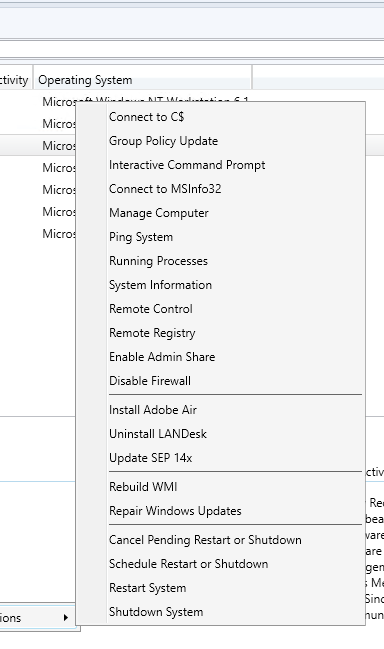
I figured out exactly how the Right-Click Tools work (which is a SCCM add-on), and have added some of my own features and modified some of the original features. In this post, I show you how to expand the Right-Click Tools to include functions you need.

To understand how options are added to the right-click menu, check out the XMLs located here:

C:\Program Files (x86)\Microsoft Configuration Manager\AdminConsole\XmlStorage\Extensions\Actions


If you were to modify those XMLs, options would appear on the menu, though, these options wouldn’t do anything. You would have to add code behind them.


Extra Options


There is a logical flow that the tool follows

1 – The XML File (these are the options that can be seen in the SCCM Console)

2 – SilentOpenPS.vbs or OpenPS.vbs (used to show or hide dialog boxes)

3 – Device – Tools.ps1 (any script which performs an action or function)


Step 1 – Code 


Let’s Talk About Code

So, in step 1, you’ll need to add code behind each menu option, before you make the option visible on the menu. Starting with something simple, let’s add the code for the ‘Disable Firewall’ option.

1 – Open Device – Tools.ps1 (located where you installed RCT).

2 – Add this code and save:

"DisableFirewall" {
If ($PSExecLocation.length -gt 1 -and (Test-Path $PSExecLocation)) {
if (Test-Connection -computername $CompName -count 1 -quiet){
& cmd /c "$Directory\psexec.exe" -accepteula "\\$CompName" netsh advfirewall set allprofiles state off
$Popup.Popup("Firewall disabled on $CompName!",0,"Alert",64)
}
else {
$Popup.Popup("$CompName is not online",0,"Error",16)
}
}
else {
$Popup.Popup("PsExec not found.",0,"Error",16)
$ArgList = @()
$ArgList += @("`"$Directory\SilentOpenPS.vbs`"")
$ArgList += @("`"$Directory\Configure Tools.ps1`"")
$ArgList += @("`"Interactive Command Prompt`"")
Start-Process wscript.exe -ArgumentList $ArgList
}
End-Script
}

The magic behind RCT is that it uses psexec to transparently execute remote commands on devices. Clever.


Step 2 – Modify XML


Menu Option

In step 2, once you have completed the coded portion, is to modify relative XML files to make the option visible in SCCM. I modified two XML files.

Main folder

     C:\Program Files (x86)\Microsoft Configuration Manager\AdminConsole\XmlStorage\Extensions\Actions

Subfolders

     ed9dee86-eadd-4ac8-82a1-7234a4646e62

     3fd01cd1-9e01-461e-92cd-94866b8d1f39


Add this XML to each file

* make sure the Right-Click volume and path are correct for your environment

<ActionDescription Class="Executable" DisplayName="Disable Firewall" MnemonicDisplayName="Disable Firewall" Description="Disable Firewall">
<ShowOn>
<string>ContextMenu</string>
</ShowOn>
<Executable>
<FilePath>"wscript.exe"</FilePath>
<Parameters>"D:\Right-Click_Tools\SilentOpenPS.vbs" "D:\Right-Click_Tools\Device - Tools.ps1" ##SUB:ResourceID## ##SUB:__Server## ##SUB:__Namespace## "DisableFirewall"</Parameters>
</Executable>
</ActionDescription>

Close and reopen the SCCM console.

Test the newly added ‘Disable Firewall’ option on a client machine.


Notes


My XML with other mods

<ActionDescription Class="Executable" DisplayName="Remote Control" MnemonicDisplayName="Remote Control" Description="Remote Control">
<ShowOn>
<string>ContextMenu</string>
</ShowOn>
<Executable>
<FilePath>"wscript.exe"</FilePath>
<Parameters> "D:\Right-Click_Tools\SilentOpenPS.vbs" "D:\Right-Click_Tools\Device - WOL.ps1" ##SUB:ResourceID## ##SUB:__Server## ##SUB:__Namespace##</Parameters>
</Executable>
</ActionDescription>

<ActionDescription Class="Executable" DisplayName="Remote Registry" MnemonicDisplayName="Remote Registry" Description="Remote Registry">
<ShowOn>
<string>ContextMenu</string>
</ShowOn>
<Executable>
<FilePath>"wscript.exe"</FilePath>
<Parameters>"D:\Right-Click_Tools\SilentOpenPS.vbs" "D:\Right-Click_Tools\Device - Tools.ps1" ##SUB:ResourceID## ##SUB:__Server## ##SUB:__Namespace## "RemoteRegistry"</Parameters>
</Executable>
</ActionDescription>

<ActionDescription Class="Executable" DisplayName="Enable Admin Share" MnemonicDisplayName="Enable Admin Share" Description="Enable Admin Share">
<ShowOn>
<string>ContextMenu</string>
</ShowOn>
<Executable>
<FilePath>"wscript.exe"</FilePath>
<Parameters>"D:\Right-Click_Tools\SilentOpenPS.vbs" "D:\Right-Click_Tools\Device - Tools.ps1" ##SUB:ResourceID## ##SUB:__Server## ##SUB:__Namespace## "EnableShare"</Parameters>
</Executable>
</ActionDescription>

<ActionDescription Class="Executable" DisplayName="Disable Firewall" MnemonicDisplayName="Disable Firewall" Description="Disable Firewall">
<ShowOn>
<string>ContextMenu</string>
</ShowOn>
<Executable>
<FilePath>"wscript.exe"</FilePath>
<Parameters>"D:\Right-Click_Tools\SilentOpenPS.vbs" "D:\Right-Click_Tools\Device - Tools.ps1" ##SUB:ResourceID## ##SUB:__Server## ##SUB:__Namespace## "DisableFirewall"</Parameters>
</Executable>
</ActionDescription>

<ActionDescription Class="Separator">
<ShowOn>
<string>ContextMenu</string>
</ShowOn>
</ActionDescription>

<ActionDescription Class="Executable" DisplayName="Install Adobe Air" MnemonicDisplayName="Install Adobe Air" Description="Install Adobe Air">
<ShowOn>
<string>ContextMenu</string>
</ShowOn>
<Executable>
<FilePath>"wscript.exe"</FilePath>
<Parameters> "D:\Right-Click_Tools\SilentOpenPS.vbs" "D:\Right-Click_Tools\Device - Tools.ps1" "##SUB:ResourceID##" ##SUB:__Server## ##SUB:__Namespace## "AdobeAir"</Parameters>
</Executable>
</ActionDescription>

<ActionDescription Class="Executable" DisplayName="Uninstall LANDesk" MnemonicDisplayName="Uninstall LANDesk" Description="Uninstall LANDesk">
<ShowOn>
<string>ContextMenu</string>
</ShowOn>
<Executable>
<FilePath>"wscript.exe"</FilePath>
<Parameters> "D:\Right-Click_Tools\SilentOpenPS.vbs" "D:\Right-Click_Tools\Device - Tools.ps1" "##SUB:ResourceID##" ##SUB:__Server## ##SUB:__Namespace## "UninstallLANDesk"</Parameters>
</Executable>
</ActionDescription>

<ActionDescription Class="Executable" DisplayName="Update SEP 14x" MnemonicDisplayName="Update SEP 14x" Description="Update SEP 14x">
<ShowOn>
<string>ContextMenu</string>
</ShowOn>
<Executable>
<FilePath>"wscript.exe"</FilePath>
<Parameters> "D:\Right-Click_Tools\SilentOpenPS.vbs" "D:\Right-Click_Tools\Device - Tools.ps1" "##SUB:ResourceID##" ##SUB:__Server## ##SUB:__Namespace## "UpdateSEP"</Parameters>
</Executable>
</ActionDescription>
<ActionDescription Class="Separator">
<ShowOn>
<string>ContextMenu</string>
</ShowOn>
</ActionDescription>

<ActionDescription Class="Executable" DisplayName="Rebuild WMI" MnemonicDisplayName="Rebuild WMI" Description="Rebuild WMI">
<ShowOn>
<string>ContextMenu</string>
</ShowOn>
<Executable>
<FilePath>"wscript.exe"</FilePath>
<Parameters> "D:\Right-Click_Tools\SilentOpenPS.vbs" "D:\Right-Click_Tools\Device - Tools.ps1" "##SUB:ResourceID##" ##SUB:__Server## ##SUB:__Namespace## "RebuildWMI"</Parameters>
</Executable>
</ActionDescription>

<ActionDescription Class="Executable" DisplayName="Repair Windows Updates" MnemonicDisplayName="Repair Windows Updates" Description="Repair Windows Updates">
<ShowOn>
<string>ContextMenu</string>
</ShowOn>
<Executable>
<FilePath>"wscript.exe"</FilePath>
<Parameters> "D:\Right-Click_Tools\SilentOpenPS.vbs" "D:\Right-Click_Tools\Device - Tools.ps1" "##SUB:ResourceID##" ##SUB:__Server## ##SUB:__Namespace## "RepairWinUpdates"</Parameters>
</Executable>
</ActionDescription>


Just remember the flow:

XML > SilentOpenPS.vbs > WhateverScript.ps1


At this point, you can begin experimenting with your own code.


tags: extending, expanding sccm, sccm tools, MrNetTek

C# – Audit Method Added to Jump Tool

email me

I have created a new audit method for my elevated tool to track usage.

static void Audit()
{
// create registry key

// set up strings
string reg1 = "HKEY_LOCAL_MACHINE";
string reg2 = @"SOFTWARE\XXXXX\XXXX";
string regPath = reg1 + @"\" + reg2;
string UName = System.Security.Principal.WindowsIdentity.GetCurrent().Name;
string regVal = appName + " " + UName;

DateTime dt = DateTime.Now;

// create new reg key each time
Registry.SetValue(regPath, dt.ToString(), regVal, RegistryValueKind.String);


// log event

// set up strings 
string sSource;
string sLog;
string sEvent;

sSource = "ABC.exe";
sLog = "Application";

sEvent = appName + " was installed using the Jump tool by " + UName;

if (!EventLog.SourceExists(sSource)) EventLog.CreateEventSource(sSource, sLog);

// create new event each time
EventLog.WriteEntry(sSource, sEvent);

// output to console
Console.ForegroundColor = ConsoleColor.Green;
Console.WriteLine("{{{ Security log has been updated }}}\n");
Console.ForegroundColor = ConsoleColor.White;
}

Windows 10 – Enter Safe Mode

email me

1) Ensure your PC is off.

2) Press the power button to turn on your PC, then hold the power button down until PC shuts down automatically (about 5 seconds) . Repeat this more than 2 times until you see the Preparing Automatic Repair (see below screenshot).

Note: This step is aim to bring up Preparing Automatic Repair screen. When Windows doesn’t boot properly, this screen pops up and Windows attempts to fix the problem by itself. If you’ve seen this screen at the first time when you power up the computer, skip this step.

Then wait for Windows to diagnose your PC.

2) Click Advanced options, then the system will bring up the Windows RE (Recovery environment.) screen.

3) On the Windows RE (Recovery environment) screen, click Troubleshoot.

4)  On the Troubleshoot screen, click Advanced options.

5) Click Startup Settings to continue.

6) Click Restart. The computer restarts and another screen opens showing a list of different startup options.

7) On your keyboard, press the number key to enter Safe Mode without network. (If you need to do some online research after boot into the safe mode, press the number key to enter Safe Mode with network access.)

Notes

c:
bcdedit /set {default} bootmenupolicy legacy
exit

SCCM – Windows Updates in Log Files

email me

Software Updates Client Computer Log Files

CAS.log – Provides information about the process of downloading software updates to the local cache and cache management.

CIAgent.log – Provides information about processing configuration items, including software updates.

LocationServices.log – Provides information about the location of the WSUS server when a scan is initiated on the client.

PatchDownloader.log – Provides information about the process for downloading software updates from the update source to the download destination on the site server. This log is only on the client computer configured as the synchronization host for the Inventory Tool for Microsoft Updates.

PolicyAgent.log – Provides information about the process for downloading, compiling, and deleting policies on client computers.

PolicyEvaluator – Provides information about the process for evaluating policies on client computers, including policies from software updates.

RebootCoordinator.log – Provides information about the process for coordinating system restarts on client computers after software update installations.

ScanAgent.log – Provides information about the scan requests for software updates, what tool is requested for the scan, the WSUS location, and so on.

ScanWrapper – Provides information about the prerequisite checks and the scan process initialization for the Inventory Tool for Microsoft Updates on Systems Management Server (SMS) 2003 clients.

SdmAgent.log – Provides information about the process for verifying and decompressing packages that contain configuration item information for software updates.

ServiceWindowManager.log – Provides information about the process for evaluating configured maintenance windows.

smscliUI.log – Provides information about the Configuration Manager Control Panel user interactions, such as initiating a Software Updates Scan Cycle from the Configuration Manager Properties dialog box, opening the Program Download Monitor, and so on.

SmsWusHandler – Provides information about the scan process for the Inventory Tool for Microsoft Updates on SMS 2003 client computers.

StateMessage.log – Provides information about when software updates state messages are created and sent to the management point.

UpdatesDeployment.log – Provides information about the deployment on the client, including software update activation, evaluation, and enforcement. Verbose logging shows additional information about the interaction with the client user interface.

UpdatesHandler.log – Provides information about software update compliance scanning and about the download and installation of software updates on the client.

UpdatesStore.log – Provides information about the compliance status for the software updates that were assessed during the compliance scan cycle.

WUAHandler.log – Provides information about when the Windows Update Agent on the client searches for software updates.

WUSSyncXML.log – Provides information about the Inventory Tool for the Microsoft Updates synchronization process. This log is only on the client computer configured as the synchronization host for the Inventory Tool for Microsoft Updates.


Software Updates Site Server Log Files

ciamgr.log – Provides information about the addition, deletion, and modification of software update configuration items.

distmgr.log – Provides information about the replication of software update deployment packages.

objreplmgr.log – Provides information about the replication of software updates notification files from a parent to child sites.

PatchDownloader.log – Provides information about the process for downloading software updates from the update source specified in the software updates metadata to the download destination on the site server.

replmgr.log – Provides information about the process for replicating files between sites.

smsdbmon.log – Provides information about when software update configuration items are inserted, updated, or deleted from the site server database and creates notification files for software updates components.

SUPSetup – Provides information about the software update point installation. When the software update point installation completes, Installation was successful is written to this log file.

WCM.log – Provides information about the software update point configuration and connecting to the Windows Server Update Services (WSUS) server for subscribed update categories, classifications, and languages.

WSUSCtrl.log – Provides information about the configuration, database connectivity, and health of the WSUS server for the site.

wsyncmgr.log -Provides information about the software updates synchronization process.

SCCM – Windows 10 – Agent Stuck in Provisioning Mode

email me

When you use the W10 Upgrade, the Configuration Manager client may be left in provisioning mode after the upgrade succeeds (or fails, for that matter). If provisioning is left enabled, you won’t be able to see or use packages or updates in Software Center, the ccmexec.exe process will look likes it’s processing data, which it isn’t, and the client certificate will not be installed. A client reinstall will not resolve this. The solution is to toggle the provisioning mode flag from true…to false.

Solution

Powershell.exe Invoke-WmiMethod -Namespace root\CCM -Class SMS_Client -Name SetClientProvisioningMode -ArgumentList $false


Notes

Reg Key

Path: HKEY_LOCAL_MACHINE\Software\Microsoft\CCM\CcmExec
Value: ProvisioningMode
Data: True


If the client needs remediation

Powershell.exe Start-Process $env:WinDir\ccmsetup\ccmsetup.exe -ArgumentList “/remediate:client” -Wait -NoNewWindow -PassThru -WindowStyle Hidden

Windows 10 – Clean up Locked Setup Files

email me

Sometimes the Windows 10 setup files remain after installation—and in rare cases—the files become locked, or…just won’t allow you to delete them because of permission issues.

Try this from an admin prompt

takeown /F C:\$Windows.~BT\* /R /A
icacls C:\$Windows.~BT\*.* /T /grant administrators:F
rmdir /S /Q C:\$Windows.~BT\

takeown /F C:\$Windows.~WS\* /R /A
icacls C:\$Windows.~WS\*.* /T /grant administrators:F
rmdir /S /Q C:\$Windows.~WS\

You can also rename the folder, if you need to begin a new setup, while keeping the original setup files.

What is Teredo?

email me

Teredo is an IPv6 transition technology that provides address assignment and host-to-host automatic tunneling for unicast IPv6 traffic when IPv6/IPv4 hosts are located behind one or multiple IPv4 network address translators (NATs). To traverse IPv4 NATs, IPv6 packets are sent as IPv4-based User Datagram Protocol (UDP) messages.


Disable and enable Teredo using the command line

netsh int ipv6 isatap set state disabled
netsh int ipv6 6to4 set state disabled
netsh interface teredo set state disable

netsh int ipv6 set teredo client
netsh interface teredo set state client

check status

netsh Int teredo show stat

more…


The package exchange process, useful when troubleshooting

  • Initial configuration for Teredo clients
  • Maintaining the NAT mapping
  • Initial communication between Teredo clients on the same link
  • Initial communication between Teredo clients in different sites
  • Initial communication from a Teredo client to a Teredo host-specific relay
  • Initial communication from a Teredo host-specific relay to a Teredo client
  • Initial communication from a Teredo client to an IPv6-only host
  • Initial communication from an IPv6-only host to a Teredo client


General Information

Teredo is an address assignment and automatic tunneling technology that provides unicast IPv6 connectivity across the IPv4 Internet. 6to4 is another automatic tunneling technology that provides unicast IPv6 connectivity across the IPv4 Internet. However, 6to4 works well when a 6to4 router exists at the edge of the site. The 6to4 router uses a public IPv4 address to construct the 6to4 prefix and acts as an IPv6 advertising and forwarding router. The 6to4 router encapsulates and decapsulates IPv6 traffic sent to and from site nodes.

6to4 relies on the configuration of a public IPv4 address and the implementation of 6to4 routing functionality in the edge device. Many small office/home office (SOHO) configurations use an IPv4 network address translator (NAT) for Internet connectivity. For more information about how network address translation works, see “Overview of Network Address Translators (NATs)” in this article. In most NAT configurations, the device providing NAT functionality is not capable of acting as a 6to4 router. Even if 6to4 was universally supported in Internet edge devices, there are some Internet connectivity configurations that contain multiple levels of NATs. A 6to4-capable edge device cannot use 6to4 if it is not assigned a public IPv4 address.

Teredo solves the issues of the lack of 6to4 functionality in modern-day Internet edge devices and multi-layered NAT configurations by tunneling IPv6 packets between the hosts within the sites. In contrast, 6to4 tunnels IPv6 packets between the edge devices. Tunneling from the hosts presents another issue for NATs: IPv6 packets that are encapsulated with IPv4 have the Protocol field in the IPv4 header set to 41. Most NATs only translate TCP or UDP traffic and must either be manually configured to translate other protocols or have NAT editors installed that handle the translation. Because Protocol 41 translation is not a common feature of NATs, IPv4-encapsulated IPv6 traffic will not flow through typical NATs. Therefore, to allow IPv6 traffic to flow through one or multiple NATs, Teredo encapsulates the IPv6 packet as an IPv4 UDP message, containing both an IPv4 and UDP header. UDP messages can be translated universally by NATs and can traverse multiple layers of NATs.

To summarize, Teredo is an IPv6 transition technology that allows automatic IPv6 tunneling between hosts that are located across one or more IPv4 NATs. IPv6 traffic from Teredo hosts can flow across NATs because it is sent as an IPv4 UDP message. If the NAT supports UDP port translation, then the NAT supports Teredo. The exception is a symmetric NAT, which is described in “Types of NATs” in this article.

Teredo is designed as a last resort transition technology for IPv6 connectivity. If native IPv6, 6to4, or Intrasite Automatic Tunnel Addressing Protocol (ISATAP) connectivity is present, the host does not act as a Teredo client. As more IPv4 edge devices are upgraded to support 6to4 and IPv6 connectivity becomes ubiquitous, Teredo will be used less and less until finally it is not used at all.

Benefits of Using Teredo

Teredo is a NAT traversal technology for IPv6 traffic. IPv6 traffic tunneled using Teredo can cross one or multiple NATs and allow a Teredo client to access the hosts on the IPv6 Internet (through a Teredo relay) and other Teredo clients on the IPv4 Internet. The ability to connect to other Teredo clients that are connected to the IPv4 Internet enables communication between applications that would otherwise have problems communicating over a NAT. With Teredo, IPv6-enabled applications can successfully communicate more frequently over the IPv4 Internet than IPv4-only applications.

Some types of IPv4-only server or peer applications have problems communicating when running on a computer that is behind a NAT. For more information, see Problems with Using Network Address Translators. These types of applications either require manual configuration of the NAT (to allow unsolicited incoming traffic to the server or peer computer on the private network) or the application must provide its own solution for NAT traversal.

If the application is IPv6-capable, it can use Teredo. There is no need to either configure the NAT or modify the application to perform its own NAT traversal. Therefore, rather than spending development time modifying applications for a custom NAT traversal solution, application vendors should update their applications to be IPv6-capable. If the application is already IPv6-capable, it can use Teredo, the NAT traversal solution for Windows.


Notes

Fixing Broken IPv6

netsh interface ipv6 delete route ::/0 interface=14
netsh interface ipv6 add route ::/0 interface=14

Announcing the .NET Framework 4.7.1

email me

Microsoft has announced the release of the .NET Framework 4.7.1. It’s included in the Windows 10 Fall Creators Update. .NET Framework 4.7.1 is also available on Windows 7+ and Windows Server 2008 R2+.  They have added support for targeting the .NET Framework 4.7.1 in Visual Studio 2017 15.5.

The .NET Framework 4.7.1 includes improvements in several areas:

  • Accessibility improvements in narration, high contrast and focus control areas
  • .NET Framework support for .NET Standard 2.0 and compiler features
  • More secure SHA-2 support in ASP.NET and System.Messaging
  • Configuration builders
  • ASP.NET Execution step feature
  • ASP.NET HttpCookie parsing
  • Enhancements in Visual Tree for WPF applications
  • Performance and reliability improvements

You can download the .NET Framework 4.7.1

For building applications targeting .NET 4.7.1 download the Developer Pack. You can see the complete list of improvements in the .NET Framework 4.7.1 release notes. .NET Framework 4.7.1 reference sources are available on the GitHub .NET Reference source read-only repository. .NET Framework 4.7.1 will be available on Windows Update in the near future. Docker images will be made available for this release and we will update this post when available.

more…