Python 3.6.150.0 Silent Install

email me

The people at Python may know Python quite well, but when it comes to packaging their product, nearly 100% of their installers have been botched in some way…and the 3.6.150.0 is no different. I ran into multiple issues when trying to deploy this. See below.

#1 – When deployed in the System Account, the app doesn’t appear in Programs and Features.

#2 – When installed in the System Account, the GUID {37a4e38b-baf7-4500-97f1-0f7c51d9a395} is installed in the wrong location.

#3 – The uninstall brings up the wrong window (their reg keys are wrong).

#4 – Once I modified the uninstaller to remove the app, not all files were removed.

#5 – Once I modified the uninstaller to remove the app, not all reg keys were removed.

Advice to Python, hire an actual packager. The 2.7.13150 MSI was also busted. I ended up just performing a capture/snapshot of the MSI install. For those looking to deploy the MSI and can’t, hit me up. I’ll send you the EXE I created from the snapshot. See bottom for a screenshot of 2.7.13150.


The Fix

So, to fix this mess, first I did the install with the options I wanted (scripted of course):

I add the GUID app to c:\ProgramData\Package Cache

* Point the reg keys to the new package cache path

* Create a simple removal tool.


The Script

“C:\Program Files (x86)\LANDesk\LDClient\sdmcache\apps\Python\Python.exe” /quiet InstallAllUsers=1 InstallLauncherAllUsers=1 Include_lib=1 Include_pip=1 Include_tcltk=1 PrependPath=1 Include_test=1 Include_tools=1 TargetDir=c:\Python_361500

REM COPY PACKAGE GUID TO PROGRAMDATA\PACKAGE CACHE
REM {37a4e38b-baf7-4500-97f1-0f7c51d9a395}
“C:\Program Files (x86)\LANDesk\LDClient\sdmcache\apps\Python\Cache.exe”

REM POINT REGISTRY TO NEW PACKAGE CACHE LOCATION
regedit /s “C:\Program Files (x86)\LANDesk\LDClient\sdmcache\apps\Python\3.6.150.0.reg”

REM ADD REMOVE UTIL
copy /y “C:\Program Files (x86)\LANDesk\LDClient\sdmcache\apps\Python\Remove.cmd” “c:\Python_361500\Remove.cmd”


Remove.cmd (simple uninstaller)

@echo off
title Python Uninstaller
cls
Echo Uninstalling Python…
“C:\ProgramData\Package Cache\{37a4e38b-baf7-4500-97f1-0f7c51d9a395}\python-3.6.0-amd64.exe” /uninstall /quiet

reg delete HKEY_LOCAL_MACHINE\SOFTWARE\Microsoft\Windows\CurrentVersion\Uninstall\{37a4e38b-baf7-4500-97f1-0f7c51d9a395} /f

reg delete HKEY_LOCAL_MACHINE\SOFTWARE\WOW6432Node\Microsoft\Windows\CurrentVersion\Uninstall\{37a4e38b-baf7-4500-97f1-0f7c51d9a395} /f

reg delete HKEY_LOCAL_MACHINE\SOFTWARE\WOW6432Node\Microsoft\Windows\CurrentVersion\Uninstall\{1944B5D6-0FFB-47C0-BFEC-5C7A2F013FA7} /f

del /q “C:\ProgramData\Package Cache\{37a4e38b-baf7-4500-97f1-0f7c51d9a395}\python-3.6.0-amd64.exe”

del /q “C:\ProgramData\Package Cache\{37a4e38b-baf7-4500-97f1-0f7c51d9a395}\state.rsm”

del /q “C:\ProgramData\Microsoft\Windows\Start Menu\Programs\Python 3.6\*.*”

rd /q “C:\ProgramData\Microsoft\Windows\Start Menu\Programs\Python 3.6”

rd /q “C:\ProgramData\Package Cache\{37a4e38b-baf7-4500-97f1-0f7c51d9a395}”

exit


Reg Keys

Windows Registry Editor Version 5.00

[HKEY_LOCAL_MACHINE\SOFTWARE\Microsoft\Windows\CurrentVersion\Uninstall\{37a4e38b-baf7-4500-97f1-0f7c51d9a395}]
“BundleCachePath”=”C:\\ProgramData\\Package Cache\\{37a4e38b-baf7-4500-97f1-0f7c51d9a395}\\python-3.6.0-amd64.exe”
“BundleUpgradeCode”=hex(7):7b,00,30,00,30,00,31,00,39,00,35,00,36,00,41,00,38,\
00,2d,00,38,00,46,00,39,00,46,00,2d,00,35,00,36,00,30,00,34,00,2d,00,41,00,\
43,00,45,00,39,00,2d,00,37,00,38,00,38,00,46,00,39,00,42,00,31,00,35,00,44,\
00,42,00,35,00,43,00,7d,00,00,00,00,00
“BundleAddonCode”=hex(7):
“BundleDetectCode”=hex(7):
“BundlePatchCode”=hex(7):
“BundleVersion”=”3.6.150.0”
“BundleProviderKey”=”CPython-3.6”
“BundleTag”=””
“EngineVersion”=”3.10.3.3007”
“DisplayIcon”=”C:\\ProgramData\\Package Cache\\{37a4e38b-baf7-4500-97f1-0f7c51d9a395}\\python-3.6.0-amd64.exe,0”
“DisplayName”=”Python 3.6.0 (64-bit)”
“DisplayVersion”=”3.6.150.0”
“Publisher”=”Python Software Foundation”
“URLInfoAbout”=”http://www.python.org/”
“QuietUninstallString”=”\”C:\\ProgramData\\Package Cache\\{37a4e38b-baf7-4500-97f1-0f7c51d9a395}\\python-3.6.0-amd64.exe\” /uninstall /quiet”
“UninstallString”=”C:\\Python_361500\\Remove.cmd”
“EstimatedSize”=dword:00016b9c
“Resume”=dword:00000003
“Installed”=dword:00000001


The problems (click image to zoom)

So, after fixing these reg keys, copying the app guid folder to the proper place, and creating a removal tool, I finally got everything working.


2.7.13150

This is a screenshot from my capture util for 2.7.13150 (click image to zoom)

Bose Headphones Replacement Cushions

email me

I have the Bose Sound Link headphones. I use them so much, I wore down the pads, so they needed to be replaced. Finding the replacements was easy. I ordered Bose 724277-0010 Sound Link On-Ear Bluetooth Headphones Ear Cushion Kit, Black right from Amazon. Once they arrived, I began the replacement process, which I thought would be easy. The replacements are nice, except…they seem a bit small.

To get them to fit onto the headphones, took some time. I eventually figured out you had to pull really hard, and slowly work your way around the edges, allowing the very edge to kind of snap into the ridge of the headphones.

Take a look.

The replacements

How tight of a fit they are

Surface Pro Stylus Issues — Hardware

email me

If you have a Surface Pro, then you know that they stylus is not indestructible like many other styluses (example, HP TC1100). Microsoft has chosen to build a stylus that will eventually break down.

The first issue will be the battery. Yes, it has a battery in it (why, Microsoft?). The battery is AAAA (that’s 4 A’s). A simple twist of the top of the stylus will open the battery compartment.

The second issue will be the stylus tips. I have the same argument here; Microsoft has chosen to create something that wears down pretty easily. The tips are soft rubber. To replace them, buy a tip repair/replacement kit (they are cheap). To replace it, just pull out the stylus from the bottom of the stylus, and insert replacement.

Here are a couple of pics.

The pen broken down with AAAA battery

The tips replacement kit with the battery

AutoHotKey and On Top Windows

email me

Every once in awhile, I find an app that should remain on top of all windows, but does not. In Windows 10, I noticed the Sticky Notes does not stay on top…when you obviously need it to. I’m not sure what Microsoft was thinking, the whole point of sticky notes, is that they are in your face to remind you. If your sticky note is behind 10 windows, I’m not sure how you’re going to remember. But…I digress. To bring the Sticky Note app forward (or any other app for that matter), I used AutoHotKey.

The AHK code is below. It works simply by looking at the app name/title, and then forcing it on top of other windows. I ended up adding the Sticky Note app to the code as well, compiling it, and replacing my shortcuts with this EXE. So, when I click the Sticky Note, it accesses the AHK EXE, loads the Sticky App, and then forces it to remain on top.

Code

Sleep, 1000 ; 1 second
WinSet, AlwaysOnTop, On, Sticky Notes


Notes

Ahk2Exe can be used in the following ways:

  1. GUI Interface: Run the “Convert .ahk to .exe” item in the Start Menu.
  2. Right-click: Within an open Explorer window, you can right-click any .ahk file and select “Compile Script” (only available if the script compiler option was chosen when AutoHotkey was installed).

Download AutoHotKey

Disable/Enable Touch Screen on the Surface Pro

email me

On the Surface Pro, you will notice there are two types of touch the tablet responds to: (1) Hand and (2) Pen.

While Microsoft has done pretty good with the pen detection and usage, the hand touch feature gets in the way of certain applications. For example, while using Autodesk Sketchpad Pro, I noticed multiple menus popping up and out at me. This has to do with the palm detection not being as accurate as it should be. The palm detection is supposed to prevent the screen from detecting your palm when the stylus is close to the screen. The issue is, the pen has to be VERY close, or else your palm is selecting things on the screen (not good). So, to prevent this unwanted behavior, you can disable the touch feature specifically meant for hands.

As an example, I just wanted to give you the general idea of how this works.

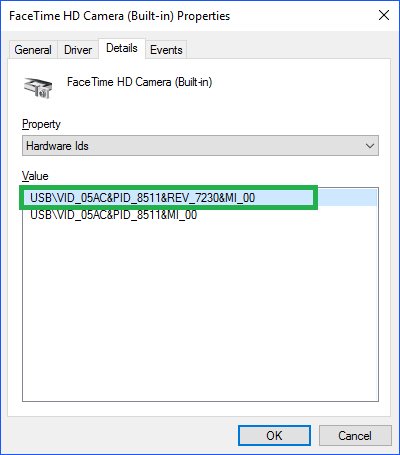
Here, I want to disable my cam. So find the Hardware ID in Device Manager

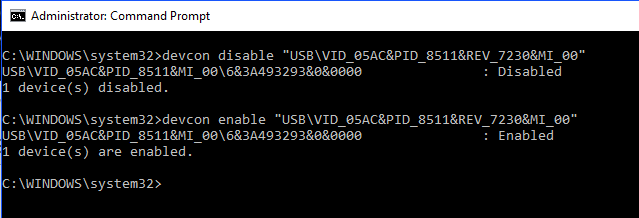
Next, I open a command prompt, and use devcon.exe…with the disable/enable option

Now that you see how it works, the Touch screen isn’t too much different. There is one caveat: The Surface has TWO device drivers for touch…so you’ll need to be sure you select the right one. The correct driver is the FIRST HID device, not the second one.


References

devcon.exe source file (for W10)

Windows Device Console (Devcon.exe)
How to Obtain the Current Version of Device Console Utility (DevCon.exe)

Windows Task View using Code

email me

One of the great new features in Windows 10 is the Task View. Using Windows-key + Tab, all the windows will appear on screen in their smaller forms. This gives you the ability to select which window you would like to focus on quickly. This code shows you how to simulate the hotkeys…thus allowing you to add the Task View option to your own scripts and apps.

This was done in VS 2015, C#, and as a console app

// I changed console output from Console to Application - to hide the window

//Run this command from the Package Manager Console:
//Install-Package InputSimulator
using WindowsInput.Native;

namespace taskview
{
class Program
{
static void Main(string[] args)
{
WindowsInput.InputSimulator kb = new WindowsInput.InputSimulator();
kb.Keyboard.ModifiedKeyStroke(VirtualKeyCode.LWIN, VirtualKeyCode.TAB);
}
}
}

How to find which OU a computer belongs to?

email me

1. Open Active Directory Users and Computers.

In the “Find Computers” screen where you are entering the name of the computer you are looking for in the “Computer name:” field you need to:

2. From the “View” menu select “Choose Columns…”

3. On the “Choose Columns” screen click “Published at” in the left hand column (“Columns available:“) and click “Add >>” to add it to the “Columns shown:” column on the right.

4. Click “OK”.

You will see that the “Published At” column has been added that shows you where in Active Directory the computer resides.

Enable Hyper-V on Windows 10

email me

Manually Install the Hyper-V role

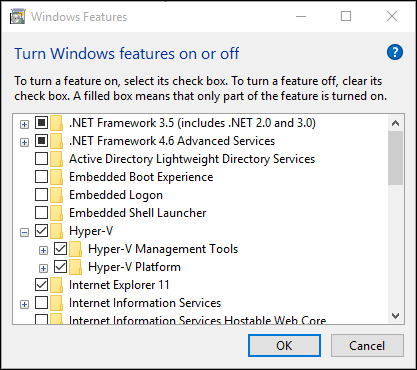
Right click on the Windows button and select ‘Programs and Features’.

Select Turn Windows Features on or off.

Select Hyper-V and click OK.

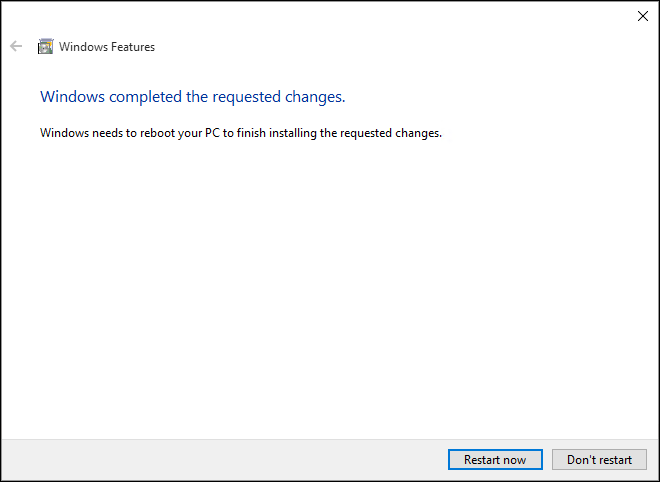
When the installation has completed you are prompted to restart your computer.


Install Hyper-V with PowerShell

Open a PowerShell console as Administrator.

Run the following command:

Enable-WindowsOptionalFeature -Online -FeatureName Microsoft-Hyper-V -All

When the installation has completed you need to reboot the computer.


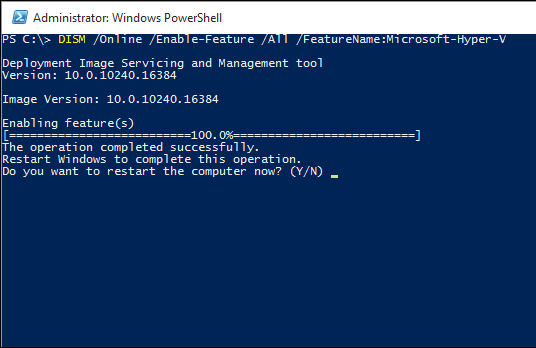
Install Hyper-V with DISM

The Deployment Image Servicing and Management tool or DISM is used to service Windows images and prepare Windows Pre installation environments. DISM can also be used to enable Windows features while the operating system is running.

To enable the Hyper-V role using DISM

Open up a PowerShell or CMD session as Administrator.

Type the following command:

DISM /Online /Enable-Feature /All /FeatureName:Microsoft-Hyper-V

Skype Wrapper and Installer

email me

This is what I use to install Skype standalone EXEs in our enterprise. This includes creating event logs, tracking, and splitting up the wrapper from the installer. I gather up all my resource files (progress bars, images, EXEs, and other files) and compile them into one nice EXE file. The wrapper acts as my initiation file and handles global sequencing.

The Wrapper.exe

On Error Resume Next

Dim CommandLine, CurrentFolder, objRegistry, strComputer, regValue, regValueName, regPath, objShell, objfso, Path64, Path86, LDFolder, strDate, BuildVersion

AppName = "Skype"
BuildVersion = "7.30.64.105"
CreateEventLog = "EVENTCREATE /T INFORMATION /L Application /ID 777 /d " & Chr(34) & "Engineer: " & AppName & " " & BuildVersion & " package installation"

Const HKEY_LOCAL_MACHINE = &H80000002

strComputer = "."
Set objRegistry = GetObject("winmgmts:{impersonationLevel=impersonate}!\\" & strComputer & "\root\default:StdRegProv")
set ObjShell = CreateObject("WScript.Shell")
Set objfso = CreateObject("Scripting.FileSystemObject")
SetStringValue = REG_SZ
'Determine if 32 or 64 bit LDClient is installed
Path64 = "C:\Progra~2"
Path86 = "C:\Progra~1"
LDFolder = "\LANDesk\LDClient\sdmcache\apps\Microsoft\Skype\7.30.64.105"

If (objfso.FolderExists(Path64 & LDFolder)) Then
     CurrentFolder = Path64 & LDFolder
Else
     CurrentFolder = Path86 & LDFolder
End If

'Set command line operation - the installer.exe contains vbscript with command line options to install Skype
'example:
'CommandLine = "%comspec% /c " & CurrentDirectory & "\SkypeSetupFull.exe /VERYSILENT /SP- /NOCANCEL /NORESTART /SUPPRESSMSGBOXES /NOLAUNCH"
'I separate the install process from the wrapper because it makes sequence file management much easier to handle
'if you have multiple installer.exe's
CommandLine = "%comspec% /c " & chr(34) & CurrentFolder & "\Installer.exe" & chr(34)

'Launch operation with event logging
ObjShell.Run CreateEventLog & " STARTED" & Chr(34),0,True
ObjShell.Run CommandLine,0,True
ObjShell.Run CreateEventLog & " COMPLETED" & Chr(34),0,True
WScript.Sleep 2000

'Stamp registry for tracking
strDate = chr(34) & NOW & chr(34)
regValueName = "Timestamp"
regPath = "SOFTWARE\COMPANY\" & AppName & "\" & BuildVersion
'create main key
objRegistry.CreateKey HKEY_LOCAL_MACHINE, regPath
'set value
objRegistry.SetStringValue HKEY_LOCAL_MACHINE,regPath, regValueName, strDate

'Clear session
CommandLine = ""
CurrentFolder = ""
objRegistry = ""
strComputer = ""
regValue = ""
regValueName = ""
regPath = ""
objShell = ""
objfso = ""
Path64 = ""
Path86 = ""
LDFolder = ""
strDate = ""
AppName = ""
BuildVersion = ""

WScript.Quit(0)


The Installer.exe

on error resume next

Dim CommandLine, CurrentFolder, objfso, Path64, Path86, LDFolder, objShell

set objShell = CreateObject("WScript.Shell")
Set objfso = CreateObject("Scripting.FileSystemObject")

'Determine if 32 or 64 bit LDClient is installed
Path64 = "C:\Progra~2"
Path86 = "C:\Progra~1"
LDFolder = "\LANDesk\LDClient\sdmcache\apps\Microsoft\Skype\7.30.64.105"

If (objfso.FolderExists(Path64 & LDFolder)) Then
CurrentFolder = Path64 & LDFolder
Else
CurrentFolder = Path86 & LDFolder
End If

'kills the progress bar
objShell.Run "taskkill.exe /f /im mshta.exe",0,False
WScript.Sleep 2000

'launches the progress bar
objShell.Run "%comspec% /c " & CurrentFolder & "\progress.hta",0,False

'set command line operation
CommandLine = "%comspec% /c " & chr(34) & CurrentFolder & "\SkypeSetupFull.exe" & Chr(34) & " /VERYSILENT /SP- /NOCANCEL /NORESTART /SUPPRESSMSGBOXES /NOLAUNCH"

'launch operation
objShell.Run CommandLine,0,True
WScript.Sleep 2000

'kills the progress bar
objShell.Run "taskkill.exe /f /im mshta.exe",0,false
'clear session
CommandLine = ""
CurrentFolder = ""
Path64 = ""
Path86 = ""
LDFolder = ""
objfso = ""
objShell = ""

WScript.Quit(0)