Scripting the Windows 10 Upgrade

email me

These solutions will launch the Windows 10 Upgrade in a zero touch setup. While these will certainly start the upgrade process, I do recommend uninstalling AV, DLP, and other security programs that may interfere with the upgrade. If you’re doing this in an enterprise environment, just make sure you test your security software and settings with the upgrade process.

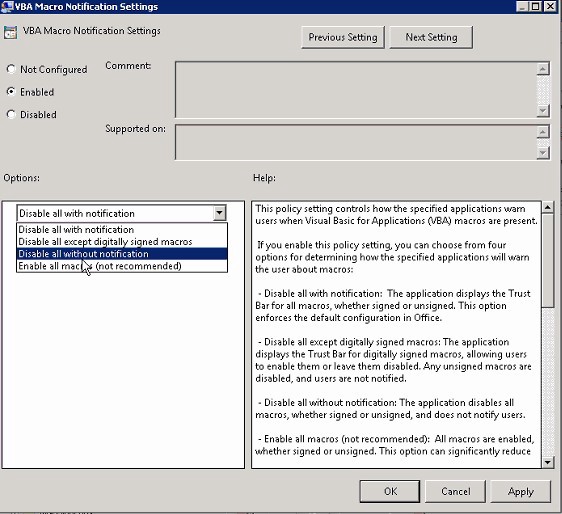
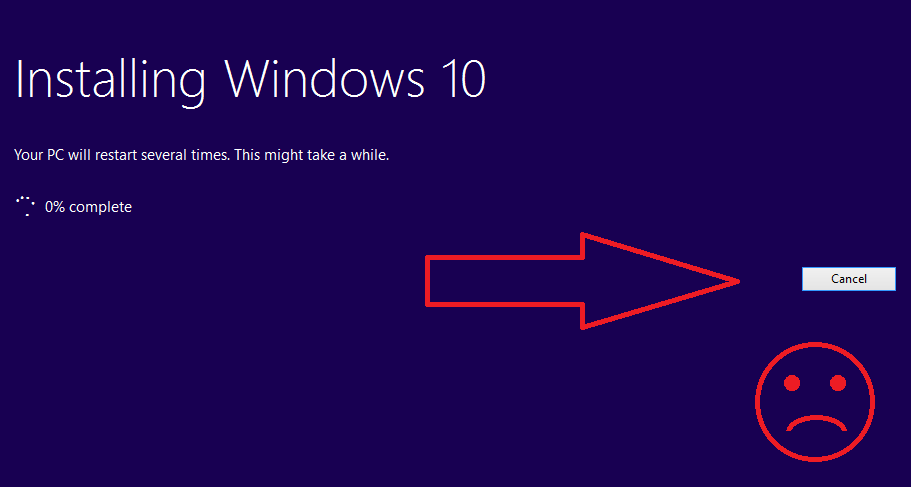
Also, if in an enterprise environment, I suggest disabling power management and screensavers, and creating your own splash screen to cover the initial Microsoft splash (if you’re clever, just create a nice splash with animation and automation…and run the setup.exe with /quiet). The MS splash allows the user to cancel the upgrade; you’ll want to prevent users from doing that.

User can cancel


Windows 10 Upgrade Command

This is a single command you can run in your scripts, on SCCM, or LANDesk that will automatically begin the upgrade process—in a zero touch setup.

SCCM

setup.exe /auto upgrade /quiet /copylogs %SystemDrive%\Logs\

setup.exe [/Auto:Upgrade | /Unattend:\\ServerName\ShareName\unattend.xml] /DynamicUpdate Disable /Copylogs %SystemDrive%\Logs\


LANDesk

1.) Download the Win10 ISO, once downloaded extract the contents to your LANDesk file server.

2.) Next you’re going to need the unattend.xml that’s attached. You cannot add or remove anything from this file – only the auto upgrade can be in here. save it to your fileserver in the same location as the extracted setup.exe.

Note – the installer is fully silent with the only UI being the one below. If you wish to change this, edit the .xml to what you require.
3.) Create a distribution task within LANDesk and point to the setup.exe within the windows 10 iso package for your primary file e.g. \\yourlandeskshare\images\Win10Images\Windows 10 OS\setup.exe

Within the Install/Uninstall options, use the following switches /Auto:Upgrade /Unattend:unattend.xml /DynamicUpdate Disable /Copylogs %SystemDrive%\ProgramData\LANDESK\Logs\

4.) Add all of the windows 10 media and unattend.xml as additional files.

5.) Schedule the task and install just as you would any other software. Make sure to use Download and Execute Settings.


Windows 10 PowerShell Script

This is the PowerShell code that does exactly what the single command does.

$scriptPath = split-path -parent $MyInvocation.MyCommand.Definition
$unattend = “””” + $scriptPath + “\unattend.xml” + “”””

$mount = Mount-DiskImage -ImagePath ($scriptpath + “\SW_DVD5_Win_Pro_10.ISO”) -PassThru
$driveLetter = ($mount | Get-Volume).DriveLetter

$setup = $driveLetter + “:\setup.exe”
$param = “/Auto:Upgrade /Unattend:$unattend /DynamicUpdate Disable”

Start-Process -FilePath $setup -WorkingDirectory ($driveLetter + “:\”) -ArgumentList $param


Contents of unattend.xml

You’ll need to point the setup to use this unattend.xml file. Make sure you don’t add anything else to it.

<UpgradeData>
<Upgrade>true</Upgrade>
<WillShowUI>Never</WillShowUI>
</UpgradeData>

Note:  <ProductKey>xxxxx-xxxxx-xxxxx-xxxxx-xxxxx</ProductKey>


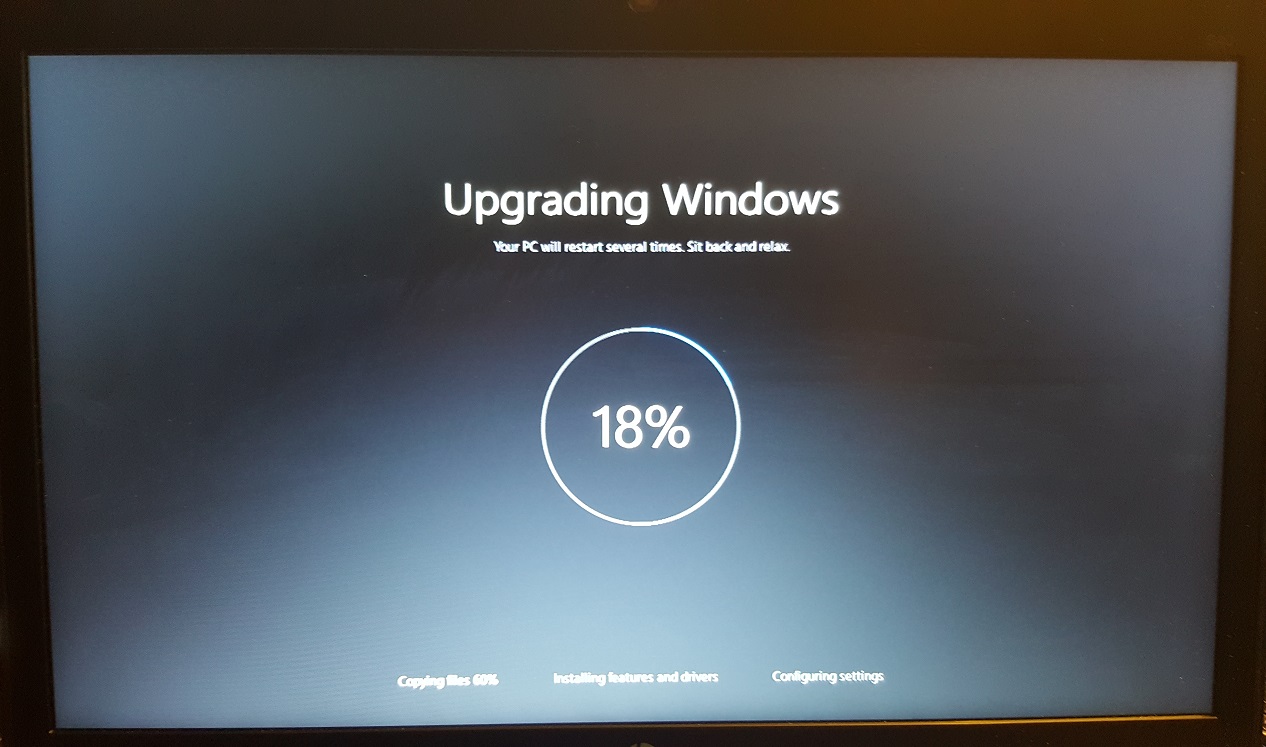
What the Upgrade Looks Like (after auto reboot)


The setup.exe command from SCCM

(for my own reference)

SETUP.EXE” /ImageIndex 3 /auto Upgrade /quiet /noreboot /postoobe “C:\Windows\SMSTSPostUpgrade\SetupComplete.cmd” /postrollback “C:\Windows\SMSTSPostUpgrade\SetupRollback.cmd” /DynamicUpdate Disable /pkey AAAAA-BBBBB-CCCCC-DDDDD-EEEEE /compat IgnoreWarning


If There Are Problems

Disable (preferably uninstall) your Antivirus utility before attempting the upgrade.

  • Disable General USB Devices (example – Smart Card Reader).
  • Do a clean boot and try again.
  • If you are upgrading using the .ISO file, disconnect from the Internet during setup, if you are connected by LAN (Ethernet) or Wi-Fi, disable both and attempt setup again.
  • If you are updating through Windows Update, when the download reaches 100% disconnect from the Internet LAN (Ethernet) or Wi-Fi and proceed with the installation.
  • If that does not work, try using the .ISO file to upgrade if possible.
  • If you are connected to a domain, switch to a local account
  • If you have any external devices attached to the machine, disconnect them (example, USB keys, external hard disk, printers, non-essential devices).
  • Remove USB flash drives, discs from the DVD/CD player, and other peripheral devices.

Example of Symantec Issue

If you don’t uninstall the Symantec AV, at least upgrade to 12.1.6.1 with the following command line switches: setup /v”/l*v c:\log.txt MIGRATIONDELAY=1 MAXMIGRATIONDELAY=1″


Reference

https://technet.microsoft.com/en-us/library/cc722011(v=ws.10).aspx
https://community.landesk.com/docs/DOC-39519

https://support.symantec.com/en_US/article.TECH231349.html


Notes

The following command line arguments can be used to modify the behavior of Windows installation:

Switch: /auto
Parameters: Upgrade; DataOnly; Clean

Action: Automate install with migration choice for the installation. The media setup UI and progress screens are shown by default, but are automated. This switch also assumes the following default configurations: EULA acceptance, Dynamic Update is enabled, telemetry collection and upload opt – in, OOBE will be skipped, PBR will be updated or created.

Example: setup.exe /auto upgrade


Switch: /quiet

Parameters : N /A

Action: The quiet flag will suppress any setup UX, including rollback UX

Example: setup.exe /auto upgrade /quiet


Switch: /pkey

Parameters: 5×5 product key

Action: Supplies setup with the specified product key. This parameter is not necessary when upgrading with volume licensed media or media that contains a pid.txt in the sources folder.

Example: setup.exe /auto upgrade /pkey ABC12-DEF34-GHI56-JKL78-MNP90


Switch: /showoobe

Parameters: Full; None

Action: When /showoobe is set to Full, the end user must interactively complete OOBE.
Alternatively, when /showoobe is set to None, OOBE is skipped and components are set to their default settings.

Example: setup.exe /auto upgrade /showoobe full


Switch: /noreboot

Parameters: N /A

Action: Setup will not automatically reboot the PC when it completes down – level OS tasks.
The next time the PC is rebooted, setup will continue.

Example: setup.exe /auto upgrade /noreboot


Switch: /DynamicUpdate

Parameters: Enable; Disable

Action: Specifies whether setup will perform Dynamic Update operations (search, download, and install updates).

Example: setup.exe /auto upgrade /DynamicUpdate disable


Switch: /Postoobe Path\setupcomplete.cmd

Parameters: Local file path or UNC network path to a file named setupcomplete.cmd

Action: Injects setupcomplete.cmd file from the specified location. Setupcomplete.cmd is a customized script to perform tasks after the installation completes but before first user login. It is run with System privileges.

Example: setup.exe /auto upgrade /postoobe c:\script\setupcomplete.cmd


Switch: /Postrollback

Parameters : Local file path or UNC network path to a file named setuprollback.cmd

Action: Injects setuprollback.cmd file from the specified location. Setuprolback.cmd is a customized script to perform tasks after the installation fails and the PC has rolled back to its previous OS. It is run with the same privileges as the user or process that launched setup.

Example: setup.exe /auto upgrade /postrollback \MyShare\script\setuprollback.cmd


Switch: /installfrom

Parameters: Local file path or network path to a specific.wim

Action: Specifies location for installation source media /files

Example: setup.exe /auto clean /installfrom d:\myWim\customwim.wim


Switch: /PBRUpdate

Parameters: Enable; Disable

Action: When /PBRUpdate is set to Enable, setup will update or create the PBR partition.
Conversely, when /PBRUpdate is set to Disable, setup will not update or create the PBR partition

Example: setup.exe /auto upgrade /PBRupdate disable


Switch: /migratealldrivers

Parameters: All; None

Action: When /migratealldrivers is set to All, setup will attempt to migrate all drivers as part of the installation. In contrast, when /migratealldrivers is set to None, setup will not migrate any drivers as part of the installation. NOTE: this switch should only be used in testing and test envoriments.It should not be used in production.

Example: setup.exe /auto upgrade /migratealldrivers none


Switch: /installdrivers

Parameters: Local file path or UNC network path to a folder that contains.inf files

Action: Setup will inject all driver.infs found in the specified location during the installation process. Setup will recursively search through all the subfolders of the specified location.

Example: setup.exe /auto upgrade /installdrivers c:\myUpgrade\drivers


Switch: /Telemetry

Parameters: Enable; Disable

Action: When /Telemetry is set to Enable, setup will collect and upload telemetry generated by the installation. However, when /Telemetry is set to Disable, setup will not collect and upload installation – related telemetry.

Example: setup.exe /auto upgrade /Telemetry enable


Switch: /copylogs

Parameters: Local file paths and UNC network paths

Action: Upon failure, setup will copy or upload compressed logs to the specified location.
Please note that the PC and /or user must have permission and network access to the specified file path. This command runs in the system context so may not have permissions to copy to locations that require user permissions

Example: setup.exe /auto upgrade /copylogs \MyShare\UpgradeLogs

Here are some usage examples.

An admin wants to upgrade the department’s PCs from Windows 7 Enterprise overnight. He does not want the setup user interface to appear, but he does want the end users to manually go through the Out of box experience(known as OOBE) experience.

The following command line can be used to orchestrate the full upgrade to Windows Next, requiring user input only once the machine reaches OOBE:

Setup.exe /auto upgrade /quiet /showoobe full

Alternatively, a deployment engineer may want to collect logs and other diagnostic information from test PCs in the event of a failure.

The following command line instructs setup invoke the setuprollback.cmd script after an installation failure:

Setup.exe /auto upgrade /installdrivers c:\myUpgrade\drivers /postrollback c:\setuprollback.cmd

Stop Ransomware – A Scripted Solution

email me

What is ransomware?

Ransomware stops you from using your PC. It holds your PC or files for ransom.

Some versions of ransomware are called “FBI Moneypak” or the “FBI virus” because they use the FBI’s logos.

What does it look like and how does it work?

There are different types of ransomware. However, all of them will prevent you from using your PC normally, and they will all ask you to do something before you can use your PC.

They can:

  • Prevent you from accessing Windows.
  • Encrypt files so you can’t use them.
  • Stop certain apps from running (like your web browser).

They will demand that you do something to get access to your PC or files. We have seen them:

  • Demand you pay money.
  • Make you complete surveys.

Often the ransomware will claim you have done something illegal with your PC, and that you are being fined by a police force or government agency.

These claims are false. It is a scare tactic designed to make you pay the money without telling anyone who might be able to restore your PC.

There is no guarantee that paying the fine or doing what the ransomware tells you will give access to your PC or files again.


Prevalent ransomware

Locky  and Cerber are two of the most prevalent and dangerous ransomware currently active.

Locky Recovery Notice

What the Locky encrypted files look like


Detection

So, with Locky on the rise, it got me thinking, what exactly does Locky (and other ransomware) do to your computer? What happens when the ransomware starts processing? Most ransomware—that encrypts files—uses something known as CryptoLocker, which uses a form of AES encryption. Even before Locky starts encrypting files, EXEs are added to folders, and registry keys are added to the registry.

Soo…how do we prevent or at least reduce the impact of ransomware? A simple approach would just be to monitor the computer for ransomwarelike behavior.

Something I came of up with—which is still early in development—is to scan all the known areas that Locky is likely to hit first. This would include common registry keys, EXEs in the user’s Local and Roaming folders, and monitoring ‘marker’ files. A marker file is just a text file in the user’s profile…which has a specific hash number associated with it. If that marker file disappears, is encrypted, or is changed in any way, a script changes from monitoring mode, to alert mode. Likewise, if known ransomware registry keys are detected, a script goes into alert mode. The idea is to create a monitoring script, with low impact to system resources, that will act as a method for early detection. Early detection means less of the files will be encrypted.

This is the start of my script – this would be compiled and ran as a silent process

@echo off
title Ransomware Scanner
color 0a

:: booValean set to false
set booVal=FALSE
:: reg key to check
set regKey=CryptoLocker
:: file marker name
set fileName=DO_NOT_DELETE
:: file extensions to check
set fileType1=.EXE
set fileType2=.exe
set fileType3=.locky
:: md5 to check
set md5=1914255e58188f70feced69533c99aec
Setlocal EnableDelayedExpansion
set timer=timeout /t 10

C:
cd C:\Users\%username%\AAA

:LOOP
:: CHECK FOR CRYPTOLOCKER REG KEY
cls
Echo Scanning computer for ransomware...Checking HKCU\SOFTWARE\Microsoft\Windows\CurrentVersion\Run
FOR /F "tokens=1" %%A IN ('REG QUERY "HKCU\SOFTWARE\Microsoft\Windows\CurrentVersion\Run"') DO (
if %%A==%regKey% set booVal=TRUE
)
%timer%>nul

:: CHECK FOR CRYPTOLOCKER REG KEY
cls
Echo Scanning computer for ransomware...Checking HKCU\SOFTWARE\CryptoLocker
REG QUERY HKCU\SOFTWARE\CryptoLocker
IF %errorlevel%==0 GOTO :END

:: CHECK FOR CRYPTOLOCKER_0388 REG KEY
cls
Echo Scanning computer for ransomware...Checking HKCU\SOFTWARE\CryptoLocker_0388
REG QUERY HKCU\SOFTWARE\CryptoLocker_0388
IF %errorlevel%==0 GOTO :END

:: CHECK FOR CRYPTOLOCKER REG KEY
cls
Echo Scanning computer for ransomware...Checking HKCU\SOFTWARE\Locky
REG QUERY HKCU\SOFTWARE\Locky
IF %errorlevel%==0 GOTO :END

:: CHECK FOR EXE IN THE LOCAL FOLDER
cls
Echo Scanning computer for ransomware...Checking Local Folder
for /F "tokens=*" %%U IN ('dir /b C:\Users\%username%\AppData\Local') do (
if [%%~xU]==[%fileType1%] set booVal=TRUE
if [%%~xU]==[%fileType2%] set booVal=TRUE
)
%timer%>nul
if %booVal% EQU TRUE goto :END

:: CHECK FOR EXE IN THE ROAMING FOLDER
cls
Echo Scanning computer for ransomware...Checking Roaming Folder
for /F "tokens=*" %%V IN ('dir /b C:\Users\%username%\AppData\Roaming') do (
if [%%~xV]==[%fileType1%] set booVal=TRUE
if [%%~xV]==[%fileType2%] set booVal=TRUE
)
%timer%>nul
if %booVal% EQU TRUE goto :END

:: CHECK FOR EXE IN THE DOCUMENT FOLDER
cls
Echo Scanning computer for ransomware...Checking C:\Users\%username%\Documents
for /F "tokens=*" %%W IN ('dir /b C:\Users\%username%\Documents') do (
if [%%~xW]==[%fileType3%] set booVal=TRUE
)
%timer%>nul
if %booVal% EQU TRUE goto :END

:: CHECK FOR EXE IN THE PICTURES FOLDER
cls
Echo Scanning computer for ransomware...Checking C:\Users\%username%\Pictures
for /F "tokens=*" %%X IN ('dir /b C:\Users\%username%\Pictures') do (
if [%%~xX]==[%fileType3%] set booVal=TRUE
)
%timer%>nul
if %booVal% EQU TRUE goto :END

:: CHECK TO SEE IF AAA FILE EXISTS
cls
Echo Scanning computer for ransomware...Checking AAA_%fileName%.txt
if not exist C:\Users\%username%\AAA\AAA_%fileName%.txt set booVal=TRUE
%timer%>nul
if %booVal% EQU TRUE goto :END

:: CHECK TO SEE IF BMP FILE EXISTS
cls
Echo Scanning computer for ransomware...Checking %UserpProfile%\Desktop\_Locky_recover_instructions.bmp
if exist %UserpProfile%\Desktop\_Locky_recover_instructions.bmp set booVal=TRUE
%timer%>nul
if %booVal% EQU TRUE goto :END

:: RETURN AAA FILE CHECKSUM
cls
Echo Scanning computer for ransomware...Checking MD5 on AAA_%fileName%.txt
set count=1
for /F "tokens=* delims=" %%Y IN ('CertUtil -hashfile C:\Users\%username%\AAA\AAA_%fileName%.txt MD5') do (
set var!count!=%%Y
set /a count+=1
)
if %booVal% EQU TRUE goto :END

:: CHECK TO SEE IF MD5 IS THE SAME -- IF NOT EQUAL, SET TRUE
:: removes spaces
set var2=%var2: =%
if %var2% NEQ %md5% set booVal=TRUE
%timer%>nul
if %booVal% EQU TRUE goto :END

CLS
echo Old MD5: %var2%
echo New MD5: %md5%
echo Detect: %booVal%
%timer%>nul
goto :LOOP

:END
CLS
echo Old MD5: %var2%
echo New MD5: %md5%
echo Detect: %booVal%
echo.
echo msgbox "  Ransomware has been detected^!" > "%temp%\popup.vbs"
wscript.exe "%temp%\popup.vbs"
set booVal=FALSE
goto :LOOP


Notes

https://blog.malwarebytes.org/threat-analysis/2016/03/look-into-locky/

http://www.bleepingcomputer.com/virus-removal/cryptolocker-ransomware-information

USB Ports and Devices

email me

Have you wondered how USB devices are powered? Or, how about…can certain USB devices be made portable? I explore these questions.

USB runs at 5v. The max current you can draw is 500ma. Therefore the max load is 5v x 0.5A=2.5. Watts. (W=VxI) If you try and draw more than 500mA, you may overload the port which will cause it to break.

Thus, to power a device off a USB port, it needs to be under 5 volts — as that is how much a USB port gives out:

4 x AAA = Good
4 x AA = Good

Here is a chart that shows batteries and mA

Battery Type Capacity (mAh) Typical Drain (mA)
D 13000 200
C 6000 100
AA 2400 50
AAA 1000 10
N 650 10
9 Volt 500 15
6 Volt Lantern 11000 300


Now, something cool you may not know, many USB devices can be rigged to run off batteries (even rechargeable ones — even solar). For example, I have a pretty nice USB LED light.

To make it portable, I simply bought an AA battery pack housing (for 2 batteries — for a couple of bucks), and connected the two terminal wires (one black and one red) to the outer pins on the USB LED light. See pictures for pins.

Pins lead to these wires

The pins we’re concerned about

Of course, it does matter which terminal wire goes where, so to demonstrate the working USB light, I have turned the USB connector facing upwards (the way you would plug it in), and have attached the terminal wires to the outer pins. The next step will be to buy a USB female connector, and create a more permanent solution.


Completed Reading Light Project


Notes

Some things I would like to try: Build a portable charger for cell phones, a solar powered light, a portable dual USB light.

Disable Macros in Office

email me

What is a macro and what is the security risk?

Macros automate frequently-used tasks; many are created with VBA and are written by software developers. However, some macros pose a potential security risk. A person with malicious intent can introduce a destructive macro, in a document or file, which can spread a virus on your computer.

Use these registry keys to disable macros—one machine at a time.


Word

Windows Registry Editor Version 5.00

[HKEY_CURRENT_USER\Software\Microsoft\Office\15.0\Word\Security]
“VBAWarnings”=dword:00000004

[HKEY_CURRENT_USER\Software\Microsoft\Office\15.0\Word\Security\FileBlock]

[HKEY_CURRENT_USER\Software\Microsoft\Office\15.0\Word\Security\FileBlock\OoxmlConverters]
“{A5C79653-FC73-46ee-AD3E-B64C01268DAA}”=dword:00000000


Excel

Windows Registry Editor Version 5.00

[HKEY_CURRENT_USER\Software\Microsoft\Office\15.0\Excel\Security]
“VBAWarnings”=dword:00000004


PowerPoint

Windows Registry Editor Version 5.00

[HKEY_CURRENT_USER\Software\Microsoft\Office\15.0\PowerPoint\Security]
“VBAWarnings”=dword:00000004


What this setting looks like under File, Options, Trust Center, Trust Center Settings, Macros in the respective app.


Notes

You may of course need to do this for a fleet of computers. The best way to handle that is through Group Policy. See https://www.microsoft.com/en-us/download/details.aspx?id=35554

User Configuration/Administrative Templates/Microsoft Office VERSION 20VERSION/Application Settings/Security/Trust Center/Trusted Locations


As a secondary enterprise solution, you could also deploy a script to disable the macros—cycling through each user reg hive and applying the appropriate reg keys. Note, this will not prevent someone from re-enabling them, but will at least turn them off.

The script I created is below. The magic happens when each user SID is loaded and the reg keys are applied.

on error resume next 

Set objShell = CreateObject("Wscript.Shell")
Set objFSO = CreateObject("Scripting.FileSystemObject")

strComputer = "."

strCurrentDirectory = objShell.CurrentDirectory

Const HKEY_LOCAL_MACHINE = &H80000002
Const OverwriteExisting = TRUE
Const POPUP_TITLE = "User To SID Conversion"

Set objWMIService = GetObject("winmgmts:\\" & strComputer & "\root\cimv2")
Set objRegistry=GetObject("winmgmts:\\" & strComputer & "\root\default:StdRegProv")
strKeyPath = "SOFTWARE\Wow6432Node\Microsoft\Windows NT\CurrentVersion\ProfileList"
objRegistry.EnumKey HKEY_LOCAL_MACHINE, strKeyPath, arrSubkeys
For Each objSubkey In arrSubkeys
 'on error resume next
 strValueName = "ProfileImagePath"
 strSubPath = strKeyPath & "\" & objSubkey
 objRegistry.GetExpandedStringValue HKEY_LOCAL_MACHINE,strSubPath,strValueName,strValue
 
 Set objWMIService = GetObject("winmgmts:\\" & strComputer & "\root\cimv2") 
 Set objAccount = objWMIService.Get("Win32_SID.SID='" & objSubkey & "'")
 strUser = objAccount.AccountName
 'strDomain = objAccount.ReferencedDomainName'returns referenced domain

'DISPLAY PROFILE NAME & SID
 objSubkey = trim(objSubkey)'trims whitespace
 strUser = trim(strUser)'trims whitespace
 'msgbox "objSubkey: " & objSubkey'returns SID
 'msgbox strUser'returns username

'LOGIC TO DETERMINE IF REGISTRY ACCOUNT IS TO BE LOADED
if strUser = "SYSTEM" then strUser=""
if strUser = "LOCAL SERVICE" then strUser=""
if strUser = "NETWORK SERVICE" then strUser=""
'if strUser = "ADMINISTRATOR" then strUser=""

if strUser <> "" then
	on error resume next
	'msgbox objSubkey
	objShell.Run "cmd /c reg.exe add ""HKEY_USERS\" & objSubkey & "\Software\Microsoft\Office\16.0\Word\Security"" /v VBAWarnings /d 00000004 /t REG_DWORD /f /reg:64",0,true
	objShell.Run "cmd /c reg.exe add ""HKEY_USERS\" & objSubkey & "\Software\Microsoft\Office\16.0\Word\Security\FileBlock\OoxmlConverters"" /v {A5C79653-FC73-46ee-AD3E-B64C01268DAA} /d 00000000 /t REG_DWORD /f /reg:64",0,true
	objShell.Run "cmd /c reg.exe add ""HKEY_USERS\" & objSubkey & "\Software\Microsoft\Office\16.0\Excel\Security"" /v VBAWarnings /d 00000004 /t REG_DWORD /f /reg:64",0,true
	objShell.Run "cmd /c reg.exe add ""HKEY_USERS\" & objSubkey & "\Software\Microsoft\Office\16.0\PowerPoint\Security"" /v VBAWarnings /d 00000004 /t REG_DWORD /f /reg:64",0,true
	
	objShell.Run "cmd /c reg.exe add ""HKEY_USERS\" & objSubkey & "\Software\Microsoft\Office\15.0\Word\Security"" /v VBAWarnings /d 00000004 /t REG_DWORD /f /reg:64",0,true
	objShell.Run "cmd /c reg.exe add ""HKEY_USERS\" & objSubkey & "\Software\Microsoft\Office\15.0\Word\Security\FileBlock"" /v {A5C79653-FC73-46ee-AD3E-B64C01268DAA} /d 00000000 /t REG_DWORD /f /reg:64",0,true
	objShell.Run "cmd /c reg.exe add ""HKEY_USERS\" & objSubkey & "\Software\Microsoft\Office\15.0\Excel\Security"" /v VBAWarnings /d 00000004 /t REG_DWORD /f /reg:64",0,true
	objShell.Run "cmd /c reg.exe add ""HKEY_USERS\" & objSubkey & "\Software\Microsoft\Office\15.0\PowerPoint\Security"" /v VBAWarnings /d 00000004 /t REG_DWORD /f /reg:64",0,true
	
	objShell.Run "cmd /c reg.exe add ""HKEY_USERS\" & objSubkey & "\Software\Microsoft\Office\14.0\Word\Security"" /v VBAWarnings /d 00000004 /t REG_DWORD /f",0,true
	objShell.Run "cmd /c reg.exe add ""HKEY_USERS\" & objSubkey & "\Software\Microsoft\Office\14.0\Word\Security\FileBlock"" /v {A5C79653-FC73-46ee-AD3E-B64C01268DAA} /d 00000000 /t REG_DWORD /f",0,true
	objShell.Run "cmd /c reg.exe add ""HKEY_USERS\" & objSubkey & "\Software\Microsoft\Office\14.0\Excel\Security"" /v VBAWarnings /d 00000004 /t REG_DWORD /f",0,true
	objShell.Run "cmd /c reg.exe add ""HKEY_USERS\" & objSubkey & "\Software\Microsoft\Office\14.0\PowerPoint\Security"" /v VBAWarnings /d 00000004 /t REG_DWORD /f",0,true
end if

Next


Reference

https://support.office.com/en-us/article/Enable-or-disable-macros-in-Office-documents-7b4fdd2e-174f-47e2-9611-9efe4f860b12?ui=en-US&rs=en-US&ad=US&fromAR=1

https://support.office.com/en-us/article/Enable-or-disable-macros-in-Office-files-12b036fd-d140-4e74-b45e-16fed1a7e5c6

QuickTime: Remove App using Display Name

email me

This will retrieve a GUID using the Display name you see in Programs and Features, and then uninstall that application using msiexec. What’s great about this ‘scan’ and ‘uninstall’ method is that the GUID doesn’t need to be known and hardcoded into your scripts. This allows for a much more dynamic approach to removing different versions of an application in an automated fashion.

Script 1

$appname = "QuickTime"
 
$32bit = get-itemproperty 'HKLM:\Software\Microsoft\Windows\CurrentVersion\Uninstall\*' | Select-Object DisplayName, UninstallString | Where-Object { $_.DisplayName -match "$appname"}
$64bit = get-itemproperty 'HKLM:\Software\Wow6432Node\Microsoft\Windows\CurrentVersion\Uninstall\*' | Select-Object DisplayName, UninstallString | Where-Object { $_.DisplayName -match "$appname"}

$GUID32 = ($32bit.UninstallString -replace 'msiexec.exe /i','' )
$GUID64 = ($64bit.UninstallString -replace 'msiexec.exe /i','' )

cmd /c ("msiexec /qn /x $GUID32")
cmd /c ("msiexec /qn /x $GUID64")

Script 2


$appname = "QuickTime"

$32bit = get-itemproperty 'HKLM:\Software\Microsoft\Windows\CurrentVersion\Uninstall\*' | Select-Object DisplayName, DisplayVersion, UninstallString, PSChildName | Where-Object { $_.DisplayName -match "^*$appname*"}
$64bit = get-itemproperty 'HKLM:\Software\Wow6432Node\Microsoft\Windows\CurrentVersion\Uninstall\*' | Select-Object DisplayName, DisplayVersion, UninstallString, PSChildName | Where-Object { $_.DisplayName -match "^*$appname*"}


if ($64bit -eq "" -or $64bit.count -eq 0) {

switch ($32bit.DisplayName.count) {
1 {
if ($32bit -match "msiexec.exe") {
$GUID = ($32bit.UninstallString -replace 'msiexec.exe /i','' )
cmd /c ("msiexec /qn /x")$GUID
}
}
}
}

else {

switch ($64bit.DisplayName.count) {
1 {
if ($64bit -match "msiexec.exe") {
$GUID = ($64bit.UninstallString -replace 'msiexec.exe /i','' )
cmd /c ("msiexec /qn /x")$GUID
}
}
}
}


Notes

msiexec /x{B67BAFBA-4C9F-48FA-9496-933E3B255044} /qn /norestart
msiexec /x{8A8505BC-E098-431E-A912-4468C95E110F} /qn /norestart
msiexec /x{929408E6-D265-4174-805F-81D1D914E2A4} /qn /norestart
msiexec /x{08094E03-AFE4-4853-9D31-6D0743DF5328} /qn /norestart
msiexec /x{50D8FFDD-90CD-4859-841F-AA1961C7767A} /qn /norestart
msiexec /x{F07B861C-72B9-40A4-8B1A-AAED4C06A7E8} /qn /norestart
msiexec /x{55BF0E5F-EA8E-4C13-A8B4-9E4857F5A2DE} /qn /norestart
msiexec /x{3868A8EE-5051-4DB0-8DF6-4F4B8A98D083} /qn /norestart
msiexec /x{C21D5524-A970-42FA-AC8A-59B8C7CDCA31} /qn /norestart
msiexec /x{5E863175-E85D-44A6-8968-82507D34AE7F} /qn /norestart

CIM from Microsoft

email me

I’m learning about CIM (in PowerShell), so I’d thought I’d post what I’m reading…

CIM – Common Information Model. It is a set of standards that describes how information is structured and represented at the heart of the system. It was created by the DMTF (Distributed Management Task Force), a working group to which Microsoft belongs.


CIM * from the MS site

The Common Information Model (CIM) is an extensible, object-oriented data model that contains information about different parts of an enterprise. The CIM is a cross-platform standard maintained by the Desktop Management Task Force (DMTF). Through WMI, a developer can use the CIM to create classes that represent hard disk drives, applications, network routers, or even user-defined technologies, such as a networked air conditioner. By viewing and making changes to a CIM class, a manager can control different aspects of the enterprise. For example, a manager could query a CIM class instance representing a desktop workstation. The manager could then run a script to modify the CIM workstation instance. WMI would translate any change to the workstation CIM class instance into a change to the actual workstation.

The CIM is a language-independent programming model that uses object-oriented techniques to describe an enterprise. Using three levels of parent/child inheritance, the CIM can describe both general and specific aspects of an enterprise. The CIM also uses a technique called “association” to link different parts of the enterprise model together, and uses schemas to distinguish different management environments.

The CIM is designed to present a consistent view of logical and physical objects in a management environment. The CIM represents managed objects using an object-oriented construct called a “class.” Like a C++ or COM class, a CIM class can include properties to describe data and methods to describe behavior. Like a set of COM classes, the CIM is not tied to any platform. However, WMI includes an extension to the CIM that describes the Microsoft Windows operating system platforms.

The CIM defines three levels of classes:

  • CoreCore classes represent managed objects that apply to all areas of management. These classes provide a basic vocabulary for analyzing and describing managed systems. The __Parameters and __SystemSecurity classes are examples of core classes.
  • CommonCommon classes represent managed objects that apply to specific management areas. However, common classes are independent from a particular implementation or technology. Common classes are an extension of the core classes. The CIM_UnitaryComputerSystem class is an example of a common class.
  • ExtendedExtended classes represent managed objects that are technology-specific additions to the common classes. An extended class typically applies to a specific platform, such as UNIX or the Microsoft Win32 environment. The Win32_ComputerSystem class is an example of an extended class.

A developer can derive a class from another class. A derived class represents a special case of the parent class, and inherits all of the properties and methods of the parent. For example, Win32_ComputerSystem inherits from CIM_UnitaryComputerSystem. Inheritance relationships may be determined using the system properties __Derivation, __Dynasty, and __SuperClass. The __Derivation system property is an array of strings listing the entire chain of inheritance up to and including the root class, which is also included in __Dynasty. The __SuperClass system property shows the immediate parent of the current class.

WMI also supports associations. An association is a relationship between two or more different WMI classes. For example, a running workstation usually has a processor. The WMI association class Win32_ComputerSystemProcessor associates the workstation class Win32_ComputerSystem with the processor class Win32_Processor. However, an association class does not have to tie two dependent classes together. In fact, the primary purpose of an association class is to show relationships between classes that are not necessarily dependent on each other. For more information, see Declaring an Association Class.

Finally, WMI supports the concept of schemas. In the context of WMI, a schema is a group of classes that describe a particular management environment. The Microsoft Windows Software Development Kit (SDK) uses two schemas: the CIM schema and the Win32 schema. The CIM schema class names begin with CIM_, and the Win32 schema class names begin with Win32_. The CIM schema contains the definitions for the core and common classes, while the Win32 schema contains the definitions for the extended classes that are common to the Win32 environment. However, a third-party vendor can create their own schemas to describe vendor-specific requirements. Because schemas are designed to be infinitely extensible, a developer can always add new classes to describe new managed objects in an existing environment. For simplicity, however, most vendors choose to create schemas that inherit properties from the CIM or Win32 schemas.


Notes

CmdLets
Introduction to CIM CmdLets

PowerShell – Auto Login

email me

New-ItemProperty -Path 'HKLM:\SOFTWARE\Microsoft\Windows NT\CurrentVersion\Winlogon' -Name AutoAdminLogon -Value 1 -force

New-ItemProperty -Path 'HKLM:\SOFTWARE\Microsoft\Windows NT\CurrentVersion\Winlogon' -Name DefaultUserName -Value "TheLoginUsername" -force

New-ItemProperty -Path 'HKLM:\SOFTWARE\Microsoft\Windows NT\CurrentVersion\Winlogon' -Name DefaultPassword -Value 'Th3P@55W0rd' -force

Clearing an IE Session

email me

This is how you perform a cleanup of cached files and cookies.

‘To clear offline favorites and download history
objShell.run “RunDll32.exe InetCpl.cpl,ClearMyTracksByProcess 8”,0,true

‘To clear browsing cookies
objShell.run “RunDll32.exe InetCpl.cpl,ClearMyTracksByProcess 2”,0,true

‘To clear browsing history
objShell.run “RunDll32.exe InetCpl.cpl,ClearMyTracksByProcess 1”,0,true


Notes

// This magic value is the combination of the following bitflags:
// #define CLEAR_HISTORY         0x0001 // Clears history
// #define CLEAR_COOKIES         0x0002 // Clears cookies
// #define CLEAR_CACHE           0x0004 // Clears Temporary Internet Files folder
// #define CLEAR_CACHE_ALL       0x0008 // Clears offline favorites and download history
// #define CLEAR_FORM_DATA       0x0010 // Clears saved form data for form auto-fill-in
// #define CLEAR_PASSWORDS       0x0020 // Clears passwords saved for websites
// #define CLEAR_PHISHING_FILTER 0x0040 // Clears phishing filter data
// #define CLEAR_RECOVERY_DATA   0x0080 // Clears webpage recovery data
// #define CLEAR_PRIVACY_ADVISOR 0x0800 // Clears tracking data
// #define CLEAR_SHOW_NO_GUI     0x0100 // Do not show a GUI when running the cache clearing
//
// Bitflags available but not used in this magic value are as follows:
// #define CLEAR_USE_NO_THREAD      0x0200 // Do not use multithreading for deletion
// #define CLEAR_PRIVATE_CACHE      0x0400 // Valid only when browser is in private browsing mode
// #define CLEAR_DELETE_ALL         0x1000 // Deletes data stored by add-ons
// #define CLEAR_PRESERVE_FAVORITES 0x2000 // Preserves cached data for "favorite" websites

Enable Remote Desktop

email me

This was used in a VB script to enable Remote Desktop

* snippet from one of my scripts

strKeyPath = “SYSTEM\CurrentControlSet\Control\Terminal Server”
strValueName = “fDenyTSConnections”
regValue = 0

HKEY_LOCAL_MACHINE,strKeyPath,strValueName,regValue


Notes

regValue =1 would be used to ‘disable’ remote desktop

I  deployed via desktop management software, so I could remote into a locked down machine.

To make this even more powerful, Disable Firewall could also be added

netsh advfirewall set AllProfiles state off

…as well as Enable Admin Share: link