Automate Imaging via USB Drive

I created a bootable USB drive that can be used by anyone to setup a machine. Once completed, the process requires no real technical ability.

What does this allow me to do?

1- Boot from USB Drive
2- One prompt alerting user that all contents will be erased
3- Setup 4 partitions: system, data, recovery, and reserved for windows
4- Restores the Recovery partition
5- Restores the System partition
6- Setup Windows 7 0 touch
7- Installs drivers, apps, scripts 0 touch
8- 100% complete: no errors and everything works

Created a bootable USB
———————————————————————
– used diskpart to format a USB drive
create primary partition, format, set active
– copied over winpe bootable files
———————————————————————

Created a diskpart.txt setup file
(to be stored on the root of USB drive)
———————————————————————
Select disk 0
Clean
Create partition primary size=100
Select partition 1
Format fs=ntfs label=”System Reserved” quick
assign letter=s

Create partition primary size=100000
select partition 2
Format fs=ntfs quick
assign letter=m

Create partition primary size=49000
select partition 3
Format fs=ntfs label=”Recovery” quick
assign letter=n

Create partition extended
select partition 0
Create partition logical size=100000
select partition 4
Format fs=ntfs label=”Data” quick

Select partition 1
active
exit
———————————————————————

Modified the startnet.cmd in the boot.wim
(you have to mount the wim and go to the system32 folder)

Startnet.cmd
———————————————————————
if exist c:\recovery.wim set MyDrv=c
if exist d:\recovery.wim set MyDrv=d
if exist e:\recovery.wim set MyDrv=e
if exist f:\recovery.wim set MyDrv=f
if exist g:\recovery.wim set MyDrv=g
if exist h:\recovery.wim set MyDrv=h
if exist i:\recovery.wim set MyDrv=i
if exist j:\recovery.wim set MyDrv=j
if exist k:\recovery.wim set MyDrv=k
if exist l:\recovery.wim set MyDrv=l

rem performs partitioning
diskpart /s %MyDrv%:\diskpart.txt

rem restores the recovery partition
%MyDrv%:\imagex /apply %MyDrv%:\recovery.wim 1 n:\

rem restores the system partition
%MyDrv%:\imagex /apply n:\boot\wim\image.wim 1 m:\

rem makes the reserved partition bootable
bcdboot m:\windows /s s:
bootsect /nt60 s:
———————————————————————

Complete USB Drive Setup
———————————————————————
– Copy Recovery.WIM to USB drive (contains the recovery partition)
– copy imagex.exe to USB drive
– copy diskpart.txt to USB drive
———————————————————————

Test USB drive
———————————————————————
– Boot to USB drive
– tested successfully – fully partitioned drives,
restored Recovery partition, restored System partition,
setup Windows 7, installed apps, drivers, scripts
– 100% success
———————————————————————

email me

Diskpart a Drive to Create 4 Partitions

email me

What does this allow me to do?

I can have a system partition, data partition, and a recovery partition…plus a hidden partition reserved for the system. Adding this to your startnet.cmd file will automate the partitioning; and as you can see with imagex.exe, it will restore the Recovery partition, and then restore the System partition. Basically, this is an automated script to rebuild a machine with multiple partitions. My particular WIM file also creates a Refresh option on the boot menu, which will allow users to automatically refresh their System partition without affecting their Data partition.

To be added to startnet.cmd in your boot.wim
———————————————-

if exist c:\recovery.wim set MyDrv=c
if exist d:\recovery.wim set MyDrv=d
if exist e:\recovery.wim set MyDrv=e
if exist f:\recovery.wim set MyDrv=f
if exist g:\recovery.wim set MyDrv=g
if exist h:\recovery.wim set MyDrv=h
if exist i:\recovery.wim set MyDrv=i
if exist j:\recovery.wim set MyDrv=j
if exist k:\recovery.wim set MyDrv=k
if exist l:\recovery.wim set MyDrv=l

diskpart /s %MyDrv%:\diskpart.txt
%MyDrv%:\imagex /apply %MyDrv%:\recovery.wim 1 n:\
%MyDrv%:\imagex /apply n:\boot\wim\image.wim 1 m:\

bcdboot m:\windows /s s: 
bootsect /nt60 s:


the diskpart.txt file
———————————————-
Select disk 0
Clean
Create partition primary size=100
Select partition 1
Format fs=ntfs label=”System Reserved” quick
assign letter=s

Create partition primary size=100000
select partition 2
Format fs=ntfs quick
assign letter=m

Create partition primary size=49000
select partition 3
Format fs=ntfs label=”Recovery” quick
assign letter=n

Create partition extended
select partition 0
Create partition logical size=100000
select partition 4
Format fs=ntfs label=”Data” quick

Select partition 1
active
exit
———————————————-

Create/Import Custom LANDesk Entry into LANDesk Database

email me

This will add custom data to a ldcustom2.dat file, and when the LANDesk inventory runs (in the system account) it will detect the custom data and import it into the LANDesk database.

This specific script imports the Bitlocker recovery information into the LANDesk database.  Note, these instructions could be written pretty much in any scripting language. I have this in batch shell and VBScript, but could also be in PowerShell or AutoIt.

The Code

@echo off
title Bitlocker Import for LANDesk
color 0b

cls
Echo Checking Bitlocker compliance…
echo.
set MyVar=

setlocal ENABLEDELAYEDEXPANSION

REM RETURNS RECOVERY INFO
REM PRIMARY EXTRACTION METHOD and creates the LDCustom2.dat file for landesk

rem returns bitlocker ID
for /f “skip=4 tokens=2 delims=:” %%g in (‘”\\%computername%\c$\windows\system32\manage-bde.exe -protectors -get c:”‘) do set MyVar=%%g

rem returns bitlocker password
for /f “skip=5 tokens=1 delims=Password ” %%h in (‘”\\%computername%\c$\windows\system32\manage-bde.exe -protectors -get c:”‘) do set MyPass=%%h
\\%computername%\c$\windows\system32\ping.exe -n 8 127.0.0.1>nul

rem if the recovery id exists, enter info into custom dat file
if %MyVar% neq “” (
echo success
echo Custom Data – Bitlocker – Recovery – ID = %MyVar%>”C:\Program Files (x86)\LANDesk\LDClient\LDCUSTOM2.DAT”
echo Custom Data – Bitlocker – Recovery – Password = %MyPass%>>”C:\Program Files (x86)\LANDesk\LDClient\LDCUSTOM2.DAT”
echo Custom Data – Bitlocker – Recovery – Date = %DATE%>>”C:\Program Files (x86)\LANDesk\LDClient\LDCUSTOM2.DAT”
echo Custom Data – Bitlocker – Recovery – Time = %TIME%>>”C:\Program Files (x86)\LANDesk\LDClient\LDCUSTOM2.DAT”
) || (
echo failed
echo Custom Data – Bitlocker – Recovery – ID = NONE>”C:\Program Files (x86)\LANDesk\LDClient\LDCUSTOM2.DAT”
echo Custom Data – Bitlocker – Recovery – Password = NONE>>”C:\Program Files (x86)\LANDesk\LDClient\LDCUSTOM2.DAT”
echo Custom Data – Bitlocker – Recovery – Date = %DATE%>>”C:\Program Files (x86)\LANDesk\LDClient\LDCUSTOM2.DAT”
echo Custom Data – Bitlocker – Recovery – Time = %TIME%>>”C:\Program Files (x86)\LANDesk\LDClient\LDCUSTOM2.DAT”
)

rem modifies the LDSCNHLP.INI file to use the LDCustom2.dat file
cls
Echo Checking Bitlocker compliance…done
Echo.
Echo Creating custom LANDesk scan…
Echo.
rem create updated ldscan file
Echo [Execute WIN16]>”C:\Progra~2\LANDesk\LDClient\LDSCNHLP.INI”
Echo.>>”C:\Progra~2\LANDesk\LDClient\LDSCNHLP.INI”
Echo [Execute WIN32]>>”C:\Progra~2\LANDesk\LDClient\LDSCNHLP.INI”
Echo.>>”C:\Progra~2\LANDesk\LDClient\LDSCNHLP.INI”
Echo [DATA FILES]>>”C:\Progra~2\LANDesk\LDClient\LDSCNHLP.INI”
Echo DATANOPREPEND1=c:\progra~2\LANDesk\LDClient\LDCustom2.DAT>>”C:\Progra~2\LANDesk\LDClient\LDSCNHLP.INI”
Echo DATA1=c:\progra~2\LANDesk\LDClient\LDCustom.DAT>>”C:\Progra~2\LANDesk\LDClient\LDSCNHLP.INI”
\\%computername%\c$\windows\system32\ping.exe -n 8 127.0.0.1>nul

rem runs the landesk inventory scanner
cls
Echo Checking Bitlocker compliance…done
Echo.
Echo Creating custom LANDesk Inventory scan…done
Echo.
Echo Running LANDesk Inventory Scan…
Echo.
“c:\ProgramData\Microsoft\Windows\Start Menu\Programs\LANDesk Management\Inventory Scan.lnk”
REM if the above live doesn’t work, use this

REM “C:\Program Files (x86)\LANDesk\LDClient\LDISCN32.EXE” /NTT=YourLANDeskServer.YourDomain.com:5007 /S=YourLANDeskServer.YourDomain.com /I=HTTP://YourLANDeskServer.YourDomain.com/ldlogon/ldappl3.ldz /F /SYNC
exit /b 0


Notes

From LANDesk: Reference

Two things I’d like to point out:

#1 You can import data into LANDesk using the LDCUSTOM2.DAT file, which can return information back into the Custom Data in LD, like in the script above. Caveat, the LDSCNHLP.INI has to point to your custom file (of course this can be scripted).

Screenshot of a modified LDSCNHLP.ini file

#2 You can create HKLM reg keys on the client machine, and use LANDesk Inventory to return the contents of those keys into Custom Data in LD. Caveat, only HKLM can be used. If you use HKCU, the Inventory Scanner has to be launched as the user, while they are logged into the computer.

Let’s look at the registry key method, which would look something like this to return Bitlocker passwords to the LD DB. Note, you would have already set up the registry keys on the back end, under Manage Software List – Custom Data – Registry Items.

On the LANDesk Server

The Code (to be deployed to computer)

@echo on
SETLOCAL ENABLEDELAYEDEXPANSION

REM CHECK TO SEE IF BITLOCKER DAT FILES ARE MISSING (FROM OUR IMAGING PROCESS)
if not exist \\%computername%\c$\Bitlocker\B1.dat goto :FETCH

:REGKEYS
REM USING DAT FILES, IMPORT BITLOCKER PASSWORDS INTO REGISTRY

if exist \\%computername%\c$\Bitlocker\B1.dat (
for /f “tokens=* delims=” %%a in (c:\Bitlocker\B1.dat) do set BitPass1=%%a
\\%computername%\c$\windows\system32\reg delete hklm\software\BitPass /v BitPass1 /f /reg:64
\\%computername%\c$\windows\system32\reg add hklm\software\BitPass /v BitPass1 /t REG_SZ /d “!BitPass1!” /f /reg:64
)

if exist \\%computername%\c$\Bitlocker\B2.dat (
for /f “tokens=* delims=” %%b in (c:\Bitlocker\B2.dat) do set BitPass2=%%b
\\%computername%\c$\windows\system32\reg delete hklm\software\BitPass /v BitPass2 /f /reg:64
\\%computername%\c$\windows\system32\reg add hklm\software\BitPass /v BitPass2 /t REG_SZ /d “!BitPass2!” /f /reg:64
)

REM CLEANUP
del /q C:\Bitlocker\drive.dat
del /q C:\Bitlocker\B1.dat
del /q C:\Bitlocker\B2.dat

REM LAUNCH INVENTORY SCANNER 
“C:\Program Files (x86)\LANDesk\LDClient\LDISCN32.EXE” /NTT=YourLANDeskServer.YourDomain.com:5007 /S=YourLANDeskServer.YourDomain.com /I=HTTP://YourLANDeskServer.YourDomain.com/ldlogon/ldappl3.ldz /F /SYNC

exit /b 0

:FETCH
md \\%computername%\c$\Bitlocker
REM RETRIEVE BITLOCKER PASSWORDS AND PUT INTO DAT FILE
\\%computername%\c$\windows\system32\manage-bde -protectors -get c: -type recoverypassword>C:\Bitlocker\drive.dat
for /f “tokens=*” %%j in (C:\Bitlocker\drive.dat) do set KEY1=%%j
echo !KEY1!>c:\Bitlocker\B1.dat

\\%computername%\c$\windows\system32\manage-bde -protectors -get d: -type recoverypassword>C:\Bitlocker\drive.dat
for /f “tokens=*” %%k in (C:\Bitlocker\drive.dat) do set KEY2=%%k
echo !KEY2!>c:\Bitlocker\B2.dat
goto :REGKEYS

* I am currently working on a method to do a bulk import of data, all from the back end. I’ll post that solution once I have it working.


from LANDesk…

How to extend the Inventory Scanner capabilities

Introduction

The LANDesk Inventory Scanner (LDISCN32.EXE) is able to scan and report back to the Core Server a huge amount of information but time to time collect some more, specific, information from the client is required.

There are basically three different approaches:

Scan for a specific value of the registry

for example this is useful if we know exactly the name and location of the registry value we want to scan for.

The procedure to instruct the Inventory Scanner to retrieve it is quite simple and well covered in the article DOC-1089


Scan for something that is not in the registry

If the value we need to scan for is not directly available in the registry or some manipulations to it are necessary before to acquire it we need to use a different approach.

The idea is to write a script or a program that will run periodically on the device. The program will collect the data and put the result of the execution in a specific registry key of the client.

Then we can use the  DOC-1089 to retrieve the values and store them in the inventory.


Scan for information that are not contained in specific registry value and that cannot fit in a single registry value

In some specific cases we need to grab some information that is complex and the result of our script elaboration cannot fit in a single registry value.

A good example for this situation is how to retrieve the all the registry values that are under the Run registry key (HKEY_LOCAL_MACHINE\SOFTWARE\Microsoft\Windows\CurrentVersion\Run ).

How to scan for the full registry key is explained in the article DOC-5709

How can we generalize the method used by the article DOC-5709 ?

To do this we need some background information before to start.
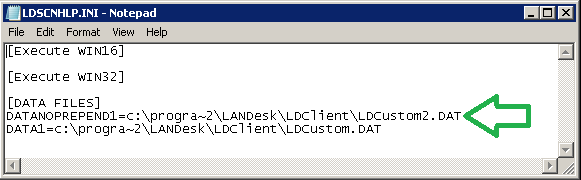
In the client folder directory ( C:\Program Files\LANDesk\LDClient for English OS ) there is the file LDSCNHLP.INI.

This file will tell to the Inventory Scanner two things:

  • A program to execute before to start the scan of the device
  • Where to catch the output that my program will generate


The file contains generally three sections:

[EXECUTE WIN16]

Not so much used in these days:

In this section we need to list all the programs we want to start on a 16bit platform

[EXECUTE WIN32]

In this section we need to list all the programs we want to start on a 32bit platform
The syntax to use in the EXECUTE section is:

LAUNCH<n>=<compete path of the program to launch>

Where <n> is a sequence number starting from 1

Example

LAUNCH1=C:\Program Files\LANDesk\LDClient\ldcstm32.exe /s
LAUNCH2=C:\Program Files\LANDesk\LDClient\myPersonalScan.exe


Optionally is possible to add the statement TIMEOUT<n>=millisecond to wait before to give up:

Example

LAUNCH1=C:\Program Files\LANDesk\LDClient\ldcstm32.exe /s
TIMEOUT1=600
LAUNCH2=C:\Program Files\LANDesk\LDClient\myPersonalScan.exe
TIMEOUT2=600


[DATA FILES]
In this section we need to specify the name of the file(s) where our program(s) will write the output information

The data needs to be in a particular format that we will cover in the next point.

The syntax to use to specify the files is:

DATA<n>=<compete path of the file that contains the information to add to the inventory>

Where <n> is a sequence number starting from 1


Example

DATA1=C:\PROGRA~1\LANDesk\LDClient\LDCUSTOM.DAT
DATA2=C:\PROGRA~1\LANDesk\LDClient\MyStuff.DAT

The data gathered from the data files needs to be Custom Data and will be stored under the Custom Data node of the inventory

If we want to store the data in other part of the Inventory (for example under the OS node) we need to use the keyword

DataNoPrepend<n>=<compete path of the file that contains the information to add to the inventory>

Where <n> is a sequence number starting from 1.


Format of the data files

The format of the data files is quite simple and resemble the format used in the LDAPPL3.TEMPLATE to scan for registry keys.

The format is:

<node of the inventory><node of the inventory> – ….. – <value name> = <the value>

Example

We want to store the information under Custom Data -> My Special node -> Is Working and the value is YES. The file need to contain this line:

Custom Data – My Special node – Is Working = YES

If we want to store something under OS -> RegistryKey -> RunCount and the value of RunCount is 100 we need to have a line like this one:

OS – RegistryKey – RunCount = 100

Note that in this case the file that contains this line needs to be referenced with the keyword DataNoPrepend<n> in the LDSCNHLP.INI file.

Note, if you use DataNoPrepend<n> to read a .DAT file, make sure you press the Enter key to move the cursor to the next line in the .DAT file. Failing to do so will result in the text being only 11 characters long in the inventory scan.

Example

MyAttribute == this is the attribute in the database that I want to populate with a value of 012345678901. This will look like below in my .DAT file

MyAttribute = 012345678901

Without an empty line in the .DAT file, MyAttribute will have only 01234567890


Considerations

The usage of LDSCNHLP.INI extends incredibly the potentiality of the Inventory Scanner but there are some important considerations to keep in mind before to use it:

  • Make sure that the program you are calling will not impact too much the CPU of the machine and will not produce any visible output:
    If a VbScript or JScript is used, call it with CSCRIPT to be sure that eventually present PRINT calls will not be displayed as modal message boxes.
  • Make sure that the program is not asking for any form of input or interaction.
  • The program will be executed in the context of the user that is launching the Inventory Scanner.


Script to Import BitLocker Recovery Info and Update Computer Description in AD

email me

I wrote this script to run locally on a computer, which will import BitLocker information into Active Directory. There are two caveats,

#1 The security context must be a user that has been delegated access to the OU containing the computer objects.

#2 If you run this from LANDesk, using a service account is recommended (System Account will not work). A better, more reliable option is just to use reg keys. LANDesk has a built-in way of reading specific reg keys from client machines. See the reg key method at the bottom.

No matter what you decide to do, locally retrieving and parsing the BitLocker information isn’t all that difficult. Once you have it, you just have to upload/import it into AD; I just use manage-bde.exe -protectors -adbackup c: -id to accomplish the task.

Local/Service Account Method

@echo off
title Import Bitlocker Recovery Information
cls
Echo Checking Bitlocker compliance…
set MyVar=
rem used for setting path for testing and remote management software
set CurDir=\\%computername%\c$\Users\%username%\Desktop\BitLocker_Compliance
rem example for landesk \\%computername%\c$\Progra~2\LANDesk\LDClient\sdmcache\apps\BitLocker\importer
rem and, make sure you select the script to run under current user – interactive mode
rem the user must have admin rights or access to run manage-bde

setlocal ENABLEDELAYEDEXPANSION

REM PRIMARY EXTRACTION METHOD – RETURNS BITLOCKER ID
for /f “skip=4 tokens=2 delims=:” %%g in (‘”\\%computername%\c$\windows\system32\manage-bde.exe -protectors -get c:“‘) do set MyVar=%%g
\\%computername%\c$\windows\system32\ping.exe -n 10 127.0.0.1>nul
rem new line
cls
Echo Checking BitLocker compliance…done
echo.
Echo Importing Recovery information into AD…
echo.
REM IMPORT BITLOCKER INFO INTO AD USING BITLOCKER ID
\\%computername%\c$\windows\system32\manage-bde.exe -protectors -adbackup c: -id%MyVar% && (
\\%computername%\c$\windows\system32\ping.exe -n 10 127.0.0.1>nul
rem new line
cls
Echo Checking BitLocker compliance…done
echo.
Echo Importing Recovery Information into AD…done
echo.
Echo Updating the Computer Description in AD…
echo.
REM This adds some text into the computer object description in AD
“%CurDir%\compliance.vbs”

\\%computername%\c$\windows\system32\ping.exe -n 10 127.0.0.1>nul
rem new line
cls
Echo Checking BitLocker compliance…done
echo.
Echo Importing Recovery information into AD…done
echo.
Echo Updating Computer Description in AD…done
Echo.
Echo Import completed successfully.
echo.
pause
) || (
cls
echo Failed. Try again, and Run as Administrator.
pause
)

exit /b 0


Reg Key Method

@echo on
SETLOCAL ENABLEDELAYEDEXPANSION

REM CHECK TO SEE IF BITLOCKER DAT FILES ARE MISSING (FROM OUR IMAGING PROCESS)
if not exist \\%computername%\c$\Bitlocker\B1.dat goto :FETCH

:REGKEYS
REM USING DAT FILES, IMPORT BITLOCKER PASSWORDS INTO REGISTRY

if exist \\%computername%\c$\BitLocker\B1.dat (
for /f “tokens=* delims=” %%a in (c:\BitLocker\B1.dat) do set BitPass1=%%a
\\%computername%\c$\windows\system32\reg delete hklm\software\BitPass /v BitPass1 /f /reg:64
\\%computername%\c$\windows\system32\reg add hklm\software\BitPass /v BitPass1 /t REG_SZ /d “!BitPass1!” /f /reg:64
)

if exist \\%computername%\c$\BitLocker\B2.dat (
for /f “tokens=* delims=” %%b in (c:\BitLocker\B2.dat) do set BitPass2=%%b
\\%computername%\c$\windows\system32\reg delete hklm\software\BitPass /v BitPass2 /f /reg:64
\\%computername%\c$\windows\system32\reg add hklm\software\BitPass /v BitPass2 /t REG_SZ /d “!BitPass2!” /f /reg:64
)

REM CLEANUP
del /q C:\BitLocker\drive.dat
del /q C:\BitLocker\B1.dat
del /q C:\BitLocker\B2.dat

REM LAUNCH INVENTORY SCANNER 
“C:\Program Files (x86)\LANDesk\LDClient\LDISCN32.EXE” /NTT=YourLANDeskServer.YourDomain.com:5007 /S=YourLANDeskServer.YourDomain.com /I=HTTP://YourLANDeskServer.YourDomain.com/ldlogon/ldappl3.ldz /F /SYNC

exit /b 0

:FETCH
md \\%computername%\c$\BitLocker
REM RETRIEVE BITLOCKER PASSWORDS AND PUT INTO DAT FILE
\\%computername%\c$\windows\system32\manage-bde -protectors -get c: -type recoverypassword>C:\BitLocker\drive.dat
for /f “tokens=*” %%j in (C:\BitLocker\drive.dat) do set KEY1=%%j
echo !KEY1!>c:\Bitlocker\B1.dat

\\%computername%\c$\windows\system32\manage-bde -protectors -get d: -type recoverypassword>C:\BitLocker\drive.dat
for /f “tokens=*” %%k in (C:\BitLocker\drive.dat) do set KEY2=%%k
echo !KEY2!>c:\BitLocker\B2.dat
goto :REGKEYS

Note, you would have already set up the registry keys on the back end, under Manage Software List – Custom Data – Registry Items.

Manage Software List in LANDesk

The Bitlocker Query in LANDesk

See also: Create/Import Custom LANDesk Entry into LANDesk Database

GMail Mailto Handler

How to enable the mailto links to automatically load into GMail. Note, Google does not currently have an automated method for achieving this, so I created my own.

Source files: Source Files

Add these steps into a sequencing file.

Step 1 – kill the chrome.exe process

Step 2 – apply reg key

Reg File

Windows Registry Editor Version 5.00

[HKEY_CURRENT_USER\Software\Classes\mailto]
“URL Protocol”=””

[HKEY_CURRENT_USER\Software\Classes\mailto\DefaultIcon]
@=”C:\\Program Files (x86)\\Google\\Chrome\\Application\\chrome.exe,0″

[HKEY_CURRENT_USER\Software\Classes\mailto\shell]
@=”open”

[HKEY_CURRENT_USER\Software\Classes\mailto\shell\open]

[HKEY_CURRENT_USER\Software\Classes\mailto\shell\open\command]
@=”\”C:\\Program Files (x86)\\Google\\Chrome\\Application\\chrome.exe\” — \”%1\””

[HKEY_CURRENT_USER\Software\Classes\mailto\shell\open\ddeexec]
@=””

Step 3 – Install the handler.exe – which installs the extension and reg keys

Step 4 – Run VBScript

VBScript File

‘THIS ENABLES THE MAILTO HANDLER IN GMAIL
‘MAKES UPDATE TO THE PREFERENCE FILE LOCATED HERE C:\USERS\%USERNAME%\APPDATA\LOCAL\GOOGLE\CHROME\USER DATA\DEFAULT

‘on error resume next

dim filter1, strLine

Set objShell = CreateObject(“Wscript.Shell”)
Set objFSO = CreateObject(“Scripting.FileSystemObject”)

Const ForReading = 1
Const ForWriting = 2

‘user profile – dynamic variable
UserProf=objShell.ExpandEnvironmentStrings(“%userprofile%”)

‘sets working directory
strCurrentDirectory = UserProf & “\AppData\Local\Google\Chrome\User Data\Default\”

‘sets doc to scan
varDocToScan = “Preferences”

‘sets filter
filter1 = chr(34) & “url” & chr(34) & “: ” & chr(34) & “https://mail.google.com/mail/?extsrc=mailto&url=%s” & chr(34)

Set objFile = objFSO.OpenTextFile(strCurrentDirectory & varDocToScan, ForReading)

‘CHECK TO SEE IF HANDLER HAS BEEN ENABLED AND MAIL IS ENABLED

Do Until objFile.AtEndofStream
strLine = objFile.Readline
strLine = trim(strLine)
if strLine = filter1 then
objFile.Close
Wscript.Quit(0)
end if
Loop

objFile.Close

‘PATCH PREFERENCES FILE
‘chrome must not be running while the preferences file gets patched
objShell.Run “taskkill.exe /f /im chrome.exe”,0,true

varFind = chr(34) & “countryid_at_install” & chr(34) & “: 21843,”
varReplace = chr(34) & “countryid_at_install” & chr(34) & “: 21843,” &_
chr(13) & chr(34) & “custom_handlers” & chr(34) & “: {” &_
chr(13) & chr(34) & “enabled” & chr(34) & “: true,” &_
chr(13) & chr(34) & “registered_protocol_handlers” & chr(34) & “: [ {” &_
chr(13) & chr(34) & “default” & chr(34) & “: true,” &_
chr(13) & chr(34) & “protocol” & chr(34) & “: ” & chr(34) & “mailto” & chr(34) & “,” &_
chr(13) & chr(34) & “title” & chr(34) & “: ” & chr(34) & “Mail” & chr(34) & “,” &_
chr(13) & chr(34) & “url” & chr(34) & “: ” & chr(34) & “https://mail.google.com/mail/?extsrc=mailto&url=%s” & chr(34) &_
chr(13) & “} ]” &_
chr(13) & “},”

Set objFile = objFSO.OpenTextFile(strCurrentDirectory & “\” & varDocToScan, ForReading)
strText = objFile.ReadAll
objFile.Close

strNewText = Replace(strText, varFind, varReplace)

Set objFile = objFSO.OpenTextFile(strCurrentDirectory & “\” & varDocToScan, ForWriting)
objFile.WriteLine strNewText
objFile.Close

objShell.Run chr(34) & “C:\Program Files (x86)\Google\Chrome\Application\chrome.exe” & chr(34) & “–restore-last-session”,9,false
WScript.Quit(0)

Reg File

Windows Registry Editor Version 5.00

[HKEY_CURRENT_USER\Software\Classes\mailto]
“URL Protocol”=””

[HKEY_CURRENT_USER\Software\Classes\mailto\DefaultIcon]
@=”C:\\Program Files (x86)\\Google\\Chrome\\Application\\chrome.exe,0″

[HKEY_CURRENT_USER\Software\Classes\mailto\shell]
@=”open”

[HKEY_CURRENT_USER\Software\Classes\mailto\shell\open]

[HKEY_CURRENT_USER\Software\Classes\mailto\shell\open\command]
@=”\”C:\\Program Files (x86)\\Google\\Chrome\\Application\\chrome.exe\” — \”%1\””

[HKEY_CURRENT_USER\Software\Classes\mailto\shell\open\ddeexec]
@=””

email me

Remote Execution on Windows 7 Machines

How to remotely execute packages on Windows 7 machines. You will need psexec, a computers.txt file (with your machine names), and an automated installation package.

@echo off
title Remote Installation by Eddie Jackson
color 0a

REM EXTERNAL VARIABLES
rem must be an automated package
set appname=Automated.exe

rem credentials to the machine(s)
set UserN=administrator
set PassW=welcome123

rem —————————————————–
Setlocal EnableDelayedExpansion

rem Server file(s) path
set CurDir=%CD%

rem Report name
Set report=Report.txt

rem Enter name of computer text file
Set PCList=computers.txt

REM CREATES DATE AND TIME TIMESTAMP
for /F “tokens=2-4 delims=/- ” %%p in (‘date/T’) do set mdate=%%r%%p%%q
for /F “tokens=1-2 delims=:- ” %%p in (‘time/T’) do set mtime=%%p%%q

Set ReportN=%mdate%_%mtime%_%report%
rem —————————————————–

for /f “tokens=* delims= ” %%a in (%PCList%) do (
echo Loading workstation name…
ping %%a | find “Reply” > nul
if errorlevel 1 (echo !date! !time! %%a, OFFLINE >> “Reports\%ReportN%”
echo %%a not found…
echo %%a>> “Reports\offline_machines.txt”
echo.
echo.
%windir%\system32\ping.exe -n 2 127.0.0.1>nul
) else (
echo !date! !time! %%a, ONLINE >> “Reports\%ReportN%”

rem clear session
del /q \\%%a\c$\windows\system32\remote.vbs

rem create remote.vbs
echo on error resume next>”%CurDir%\remote.vbs”
echo Set objShell = CreateObject^(“Wscript.Shell”^)>>”%CurDir%\remote.vbs”
echo objShell.Run “c:\windows\system32\%appname%”,0,true>>”%CurDir%\remote.vbs”

rem copy files
copy /y “%CurDir%\%appname%” \\%%a\c$\windows\system32
copy /y “%CurDir%\remote.vbs” \\%%a\c$\windows\system32
ping -n 4 127.0.0.1>nul

rem launch remote – REMOVE THE -I TO MAKE SILENT
psexec.exe -d -i \\%%a -u %%a\%UserN% -p %PassW% wscript.exe remote.vbs
ping -n 4 127.0.0.1>nul

rem clear session
del /q \\%%a\c$\windows\system32\remote.vbs
del /q “%CurDir%\remote.vbs”
)
)
email me

Install Application Under Restricted User – with 3 possible passwords

‘ —– ExeScript Options Begin —–
‘ ScriptType: window,silent,activescript,invoker
‘ DestDirectory: %temp%
‘ Icon: C:\Windows\System32\shell32.dll,162
‘ File: I:\temp\_LDClient\cpau.exe
‘ File: I:\temp\_LDClient\YourProgramHere.exe
‘ File: I:\temp\_LDClient\progress.gif
‘ File: I:\temp\_LDClient\progressbar.hta
‘ OutputFile: I:\temp\_LDClient\Automated_Name_of_Program_Here.exe
‘ Comments: Created by Eddie Jackson
‘ CompanyName: YourCompanyHere
‘ FileDescription: Automated LANDesk Client
‘ FileVersion: 9.50.0.530
‘ LegalCopyright: YourCompanyHere
‘ ProductName: Automated LANDesk Client
‘ ProductVersion: 9.50.0.530
‘ —– ExeScript Options End —–
On error resume next

”””””””””””””””””””””””””””
‘Author
‘Eddie Jackson

‘Created
’02/13/2014

‘Modified


‘Purpose
‘Installs Apps for restricted users
‘Cycles through a list of specified passwords

‘Note
‘This file must be compiled
”””””””””””””””””””””””””””

Set filesys = CreateObject(“Scripting.FileSystemObject”)
Set objShell = CreateObject(“Wscript.Shell”)

‘SET LOCAL TEMP DIRECTORY
LocalTemp = CreateObject(“WScript.Shell”).ExpandEnvironmentStrings(“%Temp%”)

AppName = “YourProgramHere.exe”

‘CORPORATE PASSWORD 1
Password1 = “PutPassword1Here”

‘CORPORATE PASSWORD 2
Password2 = “PutPassword2Here”

‘CORPORATE PASSWORD 3
Password3 = “PutPassword3Here”

objShell.Run “taskkill.exe /f /im mshta.exe”,0,true

If filesys.FileExists(LocalTemp & “\CPAU.exe”) then
objShell.Run “C:\Windows\System32\mshta.exe” & ” ” & LocalTemp & “\progressbar.hta”,9,false

on error resume next
‘msgbox “Trying password 1”
Err.Number = objShell.Run (LocalTemp & “\CPAU.exe -u %computername%\administrator -p ” & Password1 & ” -ex ” & chr(34) & LocalTemp & “\” & AppName & chr(34) & ” -LWoP -hide -wait”,0,true)

if Err.Number <> 0 then
on error resume next
‘msgbox “Trying password 2”
Err.Number = objShell.Run (LocalTemp & “\CPAU.exe -u %computername%\administrator -p ” & Password2 & ” -ex ” & chr(34) & LocalTemp & “\” & AppName & chr(34) & ” -LWoP -hide -wait”,0,true)
end if

if Err.Number <> 0 then
on error resume next
‘msgbox “Trying password 3”
Err.Number = objShell.Run (LocalTemp & “\CPAU.exe -u %computername%\administrator -p ” & Password3 & ” -ex ” & chr(34) & LocalTemp & “\” & AppName & chr(34) & ” -LWoP -hide -wait”,0,true)
end if

end if

objShell.Run “taskkill.exe /f /im mshta.exe”,0,false

WScript.Quit(0)

email me

Create Local User Account via Input

You can add this script to your imaging process to create a local user account.

Dim strUserFirst,StrUserLast,strPass, CombinedUserName

Set objShell = CreateObject(“Wscript.Shell”)
Set objEnv = objShell.Environment(“Process”)
strComputer = objEnv(“COMPUTERNAME”)
‘msgbox strComputer
GetInfo()

Sub GetInfo()
on error resume next
strUserFirst = inputbox(“Please enter your first name”,”Account Setup”)

If IsEmpty(strUserFirst) Then
MsgBox “You cannot cancel the account setup.”
GetInfo()
ElseIf Len(strUserFirst) = 0 Then
MsgBox “You Clicked OK but left the box blank”
GetInfo()
End If

strUserLast = inputbox(“Please enter your last name.”,”Account Setup”)
If IsEmpty(strUserLast) Then
MsgBox “You cannot cancel the account setup.”
GetInfo()
ElseIf Len(strUserLast) = 0 Then
MsgBox “You Clicked OK but left the box blank”
GetInfo()
End If

strPass = inputbox(“Enter the password for the new account.”,”Account Setup”)
If IsEmpty(strPass) Then
MsgBox “You cannot cancel the account setup.”
GetInfo()
ElseIf Len(strPass) = 0 Then
MsgBox “You Clicked OK but left the box blank”
GetInfo()
End If

‘Trim white space
strUserFirst=Trim(strUserFirst)
strUserLast=Trim(strUserLast)
strPass=Trim(strPass)
strUserFirstInitial = Left(strUserFirst, 1)
CombinedUserName = strUserFirstInitial & strUserLast
‘Msgbox CombinedUserName

CheckResponse()
end sub

Sub CheckResponse()

intAnswer = _
Msgbox(“Is this the correct information? ” & chr(13) & chr(13) _
& “First Name: ” & strUserFirst & chr(13) & “Last Name: ” & strUserLast & chr(13) & “Password: ” & strPass _
,vbYesNo, “Account Setup”)

If intAnswer = vbYes Then
‘Msgbox “OK. Account is being setup.”
CreateAccount()
ExitNow()
Else
Msgbox “Please re-enter your account information.”
GetInfo()
End If
end sub

Sub ExitNow()
Wscript.quit
end sub

Sub CreateAccount()
Set colAccounts = GetObject(“WinNT://” & strComputer & “,computer”)

Set objUser = colAccounts.Create(“user”, CombinedUserName)

objUser.SetPassword strPass

Const ADS_UF_DONT_EXPIRE_PASSWD = &h10000
objPasswordExpirationFlag = ADS_UF_DONT_EXPIRE_PASSWD
objUser.Put “userFlags”, objPasswordExpirationFlag

objUser.SetInfo
Set Group = GetObject(“WinNT://” & strComputer & “/Administrators,group”)
Group.Add(objUser.ADspath)
End Sub

email me

Scripting the SymHelp.exe Utility

This is how you would script using the SymHelp extracted files. The files can be found in %temp%\STSFX2ADF when you launch the SymHelp.exe.

Note, source_files.exe and temp.exe contain the SymHelp extracted files—I used WinRAR to make self-extracting EXEs.

@echo on
title Administrative Spyware Utility

REM LANDESK INSTALL
“C:\Program Files (x86)\LANDesk\LDClient\sdmcache\apps\Symantec\symhelp\source_files.exe”
ping -n 4 127.0.0.1>nul
if exist “C:\Program Files (x86)\LANDesk\LDClient\sdmcache\apps\Symantec\symhelp\STSFX2ADF\SymDiagUi3.exe” (
start “” “C:\Program Files (x86)\LANDesk\LDClient\sdmcache\apps\Symantec\symhelp\STSFX2ADF\SymDiagUi3.exe” -spe
goto :end
)

REM LOCAL INSTALL
@echo off
color 0a
set CurDir=%CD%
md c:\temp
“%CurDir%\temp.exe”
ping -n 4 127.0.0.1>nul
if exist “C:\temp\STSFX2ADF\SymDiagUi3.exe” (
cls
echo SymHelp 2.1.21.164 Utility from Symantec
echo.
runas /u:administrator “c:\temp\STSFX2ADF\SymDiagUi3.exe -spe”
goto :end
)

:end
exit /b 0

email me