Deploy Reg Settings to 64 bit Systems

Wow6432Node and how to Deploy Registry settings to 64 bit systems via Sccm

Unless your company decided to deploy only 32 bit OS versions, you most probably have encountered some problems trying to figure out where a specific registry entry will end up being written to when you deploy it via Sccm.

If you compare the registry hives of Windows 32 and 64 bits systems, you will easily see that some additional entries are present:

HKLM\SOFTWARE\MYapp (64 bits native app)

HKLM\SOFTWARE\Wow6432Node\Myapp (32 bits ‘Redirected’ App)

So, let’s deploy a reg key in HKLM\SOFTWARE\MYapp on a 64 bits System. A common program would be REG ADD HKLM\SOFTWARE\MYapp

When you run this via the command line, it writes at the expected location. But when you try to run this same command via SCCM, it writes it under the Wow6432Node hive…!

The issue is the client is a 32bits application that will be redirected to the Wow6432Node by the OS.

Here is a list of examples and workarounds. I use always the same key, as well as a reg file in the following format for application with import tools.

<

Windows Registry Editor Version 5.00

[HKEY_LOCAL_MACHINE\SOFTWARE\MYapp]

>

1. You apply the changes from the command line (without SCCM Client)

The following commands will write to the 64 bits hive [HKLM\SOFTWARE\MYapp]

REG ADD HKLM\SOFTWARE\MYapp

REG ADD HKLM\SOFTWARE\MYapp /reg:64

C:\Windows\System32\REG ADD HKLM\SOFTWARE\MYapp

C:\Windows\System32\REG ADD HKLM\SOFTWARE\MYapp /reg:64

REGEDIT /s MYapp.reg

C:\Windows\REGEDIT /s MYapp.reg

The following commands will write to the 32 bits redirected hive [HKLM\SOFTWARE\Wow6432Node\MYapp]

REG ADD HKLM\SOFTWARE\MYapp /reg:32

C:\Windows\System32\REG ADD HKLM\SOFTWARE\MYapp /reg:32

C:\Windows\Syswow64\regedit /s MYapp.reg

2. You apply the changes via a SCCM Package (32 bits SCCM Client on 64 Bits Operating System)

The following commands will write to the 64 bits hive [HKLM\SOFTWARE\MYapp]

REG ADD HKLM\SOFTWARE\MYapp /reg:64

The following commands will write to the 32 bits redirected hive [HKLM\SOFTWARE\Wow6432Node\MYapp]

REG ADD HKLM\SOFTWARE\MYapp

REG ADD HKLM\SOFTWARE\MYapp /reg:32

C:\Windows\System32\REG ADD HKLM\SOFTWARE\MYapp

C:\Windows\Syswow64\REG ADD HKLM\SOFTWARE\MYapp

REGEDIT /s MYapp.reg

C:\Windows\REGEDIT /s MYapp.reg

C:\Windows\Syswow64\REGEDIT /s MYapp.reg

3. You apply the changes via a SCCM Task Sequence

The following commands will write to the 64 bits hive [HKLM\SOFTWARE\MYapp]

REG ADD HKLM\SOFTWARE\MYapp Only When checkbox ‘Disable 64-bit file system redirection is CHECKED

C:\Windows\REGEDIT /s MYapp.reg Only When checkbox ‘Disable 64-bit file system redirection is CHECKED

The following commands will write to the 32 bits redirected hive [HKLM\SOFTWARE\Wow6432Node\MYapp]

REG ADD HKLM\SOFTWARE\MYapp Only When checkbox ‘Disable 64-bit file system redirection is UNCHECKED

C:\Windows\REGEDIT /s MYapp.reg Only When checkbox ‘Disable 64-bit file system redirection is UNCHECKED

4. You apply the changes via a MSI packaged Application

When using MSI, the path that will be used is set at the Component level.

If you set the property of the component ’64-bit’ to YES it will write to the 64 bit path, otherwise it will be redirected.

Note that when using SCCM to deploy MSI files, there is no side effect so the same applies.
email me

Rename Computer Model Number & Service Tag

email me

This script allows you to name a computer using the model number and service tag.  Just throw it into your imaging/deployment process, and you can automate the naming portion of your imaging.

on error resume next

'returns service tag
Dim computername
strComputer = "."

Set objWMIservice = GetObject("winmgmts:\\" & strComputer & "\root\cimv2")
set colitems = objWMIservice.ExecQuery("Select * from Win32_BIOS",,48)
For each objitem in colitems
'for testing only
'Wscript.echo "Dell Service Tag: " & objitem.serialnumber
computername = objitem.serialnumber

Next

'returns machine model number only
'PRIMARY MODEL DETECTION
Set objWMI = GetObject("winmgmts:")
Set colSettings = objWMI.ExecQuery("Select * from Win32_ComputerSystem")

For Each objComputer in colSettings
LaptopModel = Trim(objComputer.Model)
Next

Select Case LaptopModel

Case "HP EliteBook 8470p"
strModel = "8470"

Case "HP EliteBook 8460p"
strModel = "8460"

Case "HP EliteBook 8450p"
strModel = "8450"

Case "HP EliteBook 8440p"
strModel = "8440"

Case "HP EliteBook 6930p"
strModel = "6930"

Case "HP EliteBook 2530p"
strModel = "2530"

Case "HP EliteBook 2540p"
strModel = "2540"

Case "HP Compaq dc7900 Small Form Factor"
strModel = "7900"

Case "HP Compaq 8000 Elite SFF PC"
strModel = "8000"

Case "HP Compaq 8200 Elite SFF PC"
strModel = "8200"

Case "OptiPlex 755"
strModel = "755"

Case "OptiPlex 745"
strModel = "745"

Case "Latitude D630"
strModel = "630"

Case "Latitude D620"
strModel = "620"

Case "Latitude D430"
strModel = "430"

End Select

'SECONDARY MODEL DETECTION
if strModel = "" then
'msgbox "no model was detected"
myLength = Len(LaptopModel)

For i = 1 To myLength
If Asc(Mid(LaptopModel, i, 1)) <> 32 Then
If Asc(Mid(LaptopModel, i, 1)) >= 48 And Asc(Mid(LaptopModel, i, 1)) <= 57 Then
myNumber = myNumber & Mid(LaptopModel, i, 1)
End If
Else
'msgbox("no numeric")
End If
Next
'msgbox(myNumber)
strModel = myNumber
end if

'for testing only
'msgbox strModel

'renames machine with model number - service tag
Set objWMIService = GetObject("winmgmts:" & "{impersonationLevel=impersonate}!\\" & strComputer & "\root\cimv2")

Set colComputers = objWMIService.ExecQuery ("Select * from Win32_ComputerSystem")

For Each objComputer in colComputers
err = objComputer.Rename(strModel & "-" & computername)
Next

WScript.Quit(0)

XOR Encryption

email me

'characters to hex
mymessage1 = "Hello World"

mykey1 = "supersecret"

strR=""
strQ=""
toHex mymessage1
msgbox mymessage1 & " = " & trim(strR)
mymessagetohex1 = trim(strR)
mymessage1 = trim(mymessage1)

strR=""
strQ=""
toHex mykey1
msgbox mykey1 & " = " & trim(strR)
mykeytohex1 = trim(strR)
mykey1 = trim(mykey1)

function toHex(x)
if x <> "" then
strQ= Left(x,1)
strQ= Asc(strQ)
strQ= Hex(strQ)
strR=strR & strQ & ""'add space here
toHex mid(x,2)
else
trim(strR)
end if
end function

Dim myKeycode : myKeycode = mykey1
Dim myEncryptedText, myDecryptedText

XOREncrypt mymessage1
msgbox "ciphertext = " & myEncryptedText

XORDecrypt myEncryptedText
msgbox "decrypted text = " & myDecryptedText

Function XOREncrypt(byVal plaintext)
' Declare necessary vars
Dim xorValue1, xorValue2, i
Dim hexVal
For i = 1 To Len(plaintext)
xorValue1 = Asc(Mid(plaintext, i, 1))
'msgbox "plaintext: " & xorValue1 & " location: " & i
xorValue2 = Asc(Mid(myKeycode, (i Mod LEN(myKeycode) + 1), 1))
'msgbox "my key: " & xorValue2 & " location: " & i
hexVal = Hex(xorValue1 Xor xorValue2)
If Len(hexVal) = 1 Then hexVal = "0" & hexVal
myEncryptedText = myEncryptedText & hexVal
Next
XOREncrypt = myEncryptedText
End Function

function XORDecrypt(byval myEncryptedText)
' Declare necessary vars
Dim xorValue1, xorValue2, i
For i = 1 To (Len(myEncryptedText) / 2)
xorValue1 = CInt("&H" & (Mid(myEncryptedText, (2 * i) - 1, 2)))
xorValue2 = Asc(Mid(myKeycode, CInt(((i Mod Len(myKeycode)) + 1)), 1))
myDecryptedText = myDecryptedText + Chr(xorValue1 Xor xorValue2)
Next
XORDecrypt = myDecryptedText
End function

WScript.Quit(0)

Return Machine Model 2 Ways

This will return the model of a computer. I am using this in conjunction with a computer naming script to name a computer using this convention: model-service tag

On error resume next

‘PRIMARY MODEL DETECTION
Set objWMI = GetObject(“winmgmts:”)
Set colSettings = objWMI.ExecQuery(“Select * from Win32_ComputerSystem”)

For Each objComputer in colSettings
LaptopModel = Trim(objComputer.Model)
Next

Select Case LaptopModel

Case “HP EliteBook 8470p”
‘strModel = “8470”

Case “HP EliteBook 8460p”
strModel = “8460”

Case “HP EliteBook 8450p”
strModel = “8450”

Case “HP EliteBook 8440p”
strModel = “8440”

Case “HP EliteBook 6930p”
strModel = “6930”

Case “HP EliteBook 2530p”
strModel = “2530”

Case “HP EliteBook 2540p”
strModel = “2540”

Case “HP Compaq dc7900 Small Form Factor”
strModel = “7900”

Case “HP Compaq 8000 Elite SFF PC”
strModel = “8000”

Case “HP Compaq 8200 Elite SFF PC”
strModel = “8200”

Case “OptiPlex 755”
strModel = “755”

Case “OptiPlex 745”
strModel = “745”

Case “Latitude D630”
strModel = “630”

Case “Latitude D620”
strModel = “620”

Case “Latitude D430”
strModel = “430”

End Select

‘SECONDARY MODEL DETECTION
if strModel = “” then
‘msgbox “no model was detected”
myLength = Len(LaptopModel)

For i = 1 To myLength
If Asc(Mid(LaptopModel, i, 1)) <> 32 Then
If Asc(Mid(LaptopModel, i, 1)) >= 48 And Asc(Mid(LaptopModel, i, 1)) <= 57 Then
myNumber = myNumber & Mid(LaptopModel, i, 1)
End If
Else
‘msgbox(“no numeric”)
End If
Next
‘msgbox(myNumber)
strModel = myNumber
end if

msgbox strModel

email me

Decrypt / Encrypt String in ROT-13

email me

Converts a string to and from ROT13

Check out encode/decode


Option Explicit

Dim strTestData

strTestData = "This is some test data for ROT13." 


'Before encoding
msgbox "Before encoding: " & strTestData,64,"ROT13"

'After Encoding
strTestData = ROT13Translation(strTestData) 
msgbox "After encoding: " & strTestData,64,"ROT13"

'After Decoding
strTestData = ROT13Translation(strTestData) 
msgbox "After decoding: " & strTestData,64,"ROT13"


Public Function ROT13Translation(stringText)

	Const Characters = "abcdefghijklmnopqrstuvwxyzabcdefghijklmnopqrstuvwxyzABCDEFGHIJKLMNOPQRSTUVWXYZABCDEFGHIJKLMNOPQRSTUVWXYZ" 
	Dim sROT13Translation, stringPositioning, returnCharacter

	For stringPositioning = 1 To Len(stringText) 
		returnCharacter = Instr(Characters, Mid(stringText, stringPositioning, 1)) 
		If returnCharacter = 0 Then 
			sROT13Translation = sROT13Translation & Mid(stringText, stringPositioning, 1) 
		Else 
			sROT13Translation = sROT13Translation & Mid(Characters, returnCharacter + 13, 1) 
		End If 
	Next 

ROT13Translation = sROT13Translation 

End Function


PowerShell


    Clear-Host

    #what to encode
    $rot13string = "ThisIsTheTestString"
    Write-Host Before ecoding: $rot13string

    #after encoding
    $ROT13 = ROT13 $rot13string    
    $rot13string = $ROT13
    Write-Host After ecoding: $ROT13

    #after decoding
    $ROT13 = ROT13 $rot13string
    Write-Host After decoding: $ROT13

    #does translation
    function ROT13 {
    $rot13string.ToCharArray() | ForEach-Object {
        if((([int] $_ -ge 97) -and ([int] $_ -le 109)) -or (([int] $_ -ge 65) -and ([int] $_ -le 77)))
        {
            $string += [char] ([int] $_ + 13);
        }
        elseif((([int] $_ -ge 110) -and ([int] $_ -le 122)) -or (([int] $_ -ge 78) -and ([int] $_ -le 90)))
        {
            $string += [char] ([int] $_ - 13);
        }
        else
        {
            $string += $_
        }        
    }
    return $string
    }
    

Shrinking WIM Files

If you make regular changes to your WIM files with the use of the /MOUNTRW or /DELETE switches of IMAGEX, then you may have noticed that your WIM files do not shrink in size after you commit the changes back to the file.  You could delete 500mb of data from an image file, only to see the file stay the same size, or even grow by a few megabytes.  The reason for this is that the data in a WIM file are not actually removed from the file when deleted, rather the references to it’s contents are simply removed; this is a bit like how deleting a file from your C: drive only deletes the reference to it in the allocation table rather than actually scrubbing all the files binary 1’s and 0’s from the disk sectors.

But don’t worry, there is a solution to this which you can use to optimize the size of your WIM files!  With the use of the /EXPORT switch of IMAGEX, you simply export the image from the WIM file into a new one, and you can even change the level of compression used.  An example of the use of the command is:

ImageX.exe /export existing.wim X new.wim “My optimised WIM file”    (where X is the number of the image file you want to export)

If you make regular manual edits to your existing WIM files then you might want to consider including the process of exporting the WIM to a new one into your work routine.  However, it is probably not worth using export if you make infrequent or one off changes.  One important thing to remember when using the export command is not to lose any of the /FLAGS settings during your export!

email me

Use Putty to SSH into LANDesk Gateway

email me

Description

How to use Putty to SSH into the LANDesk Management Gateway Appliance.

Applies to the LANDesk Management Gateway Appliance and Putty Version 0.60.0.0.

Resolution

On the LANDesk Management Gateway Appliance, SSH must be allowed on the interface you desire to connect through. This is configured on the Security tab found on the left hand tool bar (https://gatewayname/gsb/firewall.php).

Next you will need to configure Putty to SSH to the LDMGA.

The latest version of Putty can be found here.

http://www.putty.nl/download.html

The license information for Putty can be viewed here.

http://www.putty.nl/licence.html

Enter the Host Name or IP address in the destination field on the Session category.

Next go to the SSH section found in the Connection category.

Move 3DES up above AES and Blowfish, then open the connection.

Note SSH 2 must be used.

Recover the disk space on the LANDesk Gateway

Description

The Management Gateway may run out of disk space causing it to not function.


Cause

Log are not properly purged. Logs are normally stored in /var/log. There are also logs that are entered into the Local MYSQL database.

Sometimes this is due to a lack of configuration of the System e-mail settings in the web interface. Without the email settings, the logs accumulate on the Gateway while with proper settings, the logs would normally be sent via e-mail and reduced.


Resolution

Log into the Management Gateway.

Press Alt-F2 to switch to a different screen.

Note: To switch back to the main screen press Alt-F1. The windows manager that the Gateway uses is Fluxbox.

Right-click anywhere on the desktop to get the Fluxbox menu to appear. It will display some options as follows:
xterm
Admin Console
fluxbox menu
Logout
Reboot
Shutdown

Choose xterm. This opens an xterm command prompt.

In the command prompt, open a shell running as root:
sudo sh

Warning! Now every command is issued as root. Entering a wrong command can potentially damage the Gateway installation

To check the disk space utilization issue the command:
df -h

Check the Used column. If the usage is near to 100% there is definitely a disk space problem.

See if there are any files in /var larger than 20 MB:
sudo find /var -size +20M

Important Do not delete the large database files manually as doing this could cause corruption.

If the issue is with text log files, do the following:

Check the /var/log directory by entering the following commands:
cd /var/log
ls -lah

A list of files with the size will be displayed.

If any text log files are found, such as the debug file, consider deleted and recreating them. If deleting the file, run the following commands:
#View current file permissions
sudo ls -lAF somefile
# Remove the file
sudo rm somefile
# Recreate the file
sudo touch somefile
# Set the permissions back to what they were above
chown 644 somefile

Check again with the command df -h the space left on the device. If the situation is improved and no database files seem large, do not continue. If the database files are large then it is necessary to purge the logs that are stored in the MySQL database. To purge the logs in the MySQL database do the following

Stop the gateway service.

Obtain the MySQL password.

sudo cat /root/.dbtool

Log into MySQL.

sudo mysql -p

Delete all rows from the log table form the syslog database.
use syslog;
delete from logs;

Note: If many errors are occurring and the database logs continue to fill up, you may want to delete from logs regularly. Also, you may want to contact support and discuss the errors you are seeing that are causing the logs to fill up.

email me

Remove/Uninstall LANDesk Client

email me

@ECHO Off
TASKKILL /F /IM ldiscn32.exe
TASKKILL /F /IM vulscan.exe
TASKKILL /F /IM sdclient.exe
net stop "intel local scheduler service"
net stop "intel alert handler"
net stop "intel pds"
net stop "LANDesk Policy Invoker"
net stop "LANDesk Remote Control Service"
net stop "LANDesk Targeted Multicast"
net stop "LANDesk(R) Management Agent"
net stop "LANDesk(R) Out-of-Band Monitor"
net stop "LANDesk(R) Software Monitoring Service"

xcopy <a href="file://\\yourserver\packages\LANDesk_Software\UninstallWinClient.exe">\\yourserver\packages\LANDesk_Software\UninstallWinClient.exe</a> "%SYSTEMDRIVE%\Temp\" /c /i /q /y "%SYSTEMDRIVE%Temp\UninstallWinClient.exe"  /UI /NOREBOOT /FORCECLEAN

DEL "%PROGRAMFILES%\LANDesk" /F /S /Q &gt; NUL
DEL "%ALLUSERSPROFILE%\Application Data\LANDesk" /F /S /Q > NUL
DEL "%ALLUSERSPROFILE%\Application Data\Vulscan" /F /S /Q > NUL

Hide Hard Drive Letters

email me

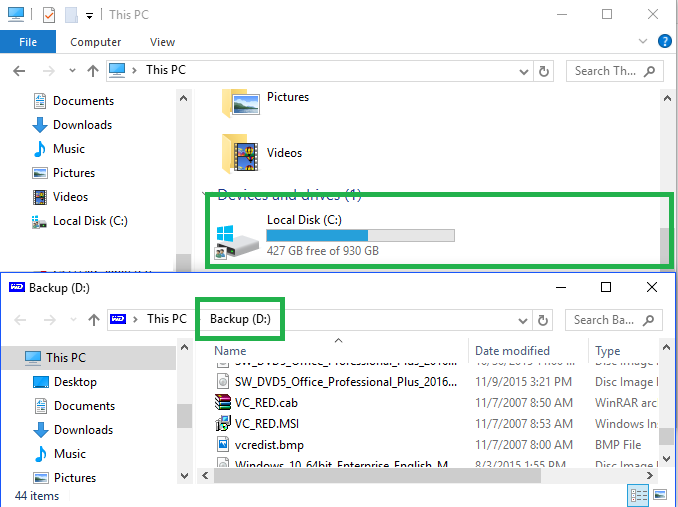
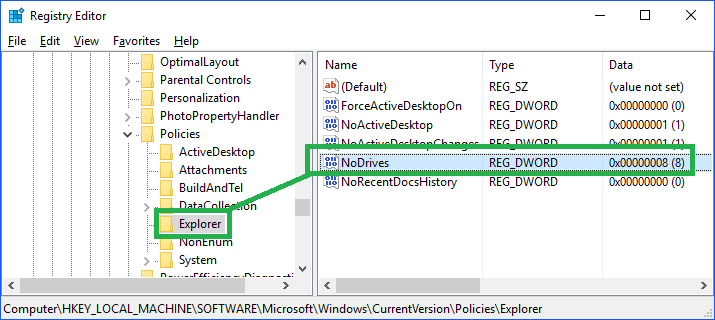
This has been tested under Windows 7 and Windows 10. For Windows 10, make sure the script is compiled as, ran as, 64 bit.

W10 Screenshot of Registry

W10 Screenshot of Explorer (D drive is hidden)

The Code (save as script.vbs – run as admin)

On error resume next

'THIS WILL CREATE A REG KEY FOR THE SPECIFIED DRIVE LETTER
'REG KEY WILL LOOK SOMETHING LIKE THIS
'NODRIVES REG_DWORD 0X00000008

'SET DRIVE LETTER TO HIDE
Const Drive = "D"

'CALL SUBROUTINE
HideDriveLetter()

'----------------------------
Sub HideDriveLetter()
On Error Resume Next

Dim objShell, RegKeyPath, DriveBits, substr
Dim fso, d, drives, s, count
Dim ReturnCode
Dim x, i , j

ReturnCode = 0
DriveBits = 0

Set objShell = CreateObject("WScript.Shell")
RegKeyPath = "HKLM\Software\Microsoft\Windows\CurrentVersion\Policies\Explorer\NoDrives"

Set fso = CreateObject("Scripting.FileSystemObject")
Set drives= fso.Drives

If UCase(Drive) = "SHOWALL" Then
'DELETE WRITE REGISTRY, SET SYSTEM DEFAULT
objShell.RegDelete RegKeyPath

If Err = 0 Then
Call ReloadExplorer()
Err.clear
Else
'msgbox "Admin access required!"
Err.clear
End If
Else

For i = 1 To Len(Drive)
substr= Mid(Drive,i,1)
x = 0

For j = Asc("A") To Asc("Z")
If Chr(j) = UCase(substr) Then
'VERIFY INPUT
If InStr(Drive,substr) = InStrRev(Drive,substr) Then

'VERIFY LETTER
If fso.DriveExists(substr) Then
DriveBits = DriveBits + 2^x
Else
'msgbox "Drive does not exist!"
ReturnCode = 1
Exit For
End If

Else
ReturnCode = 1
End If
End If

x = x + 1

Next
If ReturnCode = 1 Then
Exit For
End If

Next

'VALIDATE RETURN CODE
Dim strDriveDriveBits

'READ REGISTRY KEY
strDriveDriveBits = objShell.RegRead(RegKeyPath)
Err.clear

If ReturnCode = 0 And Drive <> "" Then
If DriveBits = 0 Then
'msgbox "Missing drive letter!"
Call HideDriveLetter()
Else
If strDriveDriveBits = DriveBits Then
'msgbox "Drive has been hidden!"
Else
'Write Registry
objShell.RegWrite RegKeyPath, DriveBits, "REG_DWORD"
If Err = 0 Then
Call ReloadExplorer()
Else
'msgbox "Admin access required!"
Err.clear
End If
End If
End If

ElseIf ReturnCode = 1 Then
Call HideDriveLetter()
End If
End If

End Sub

Function ReloadExplorer()
Dim strComputer, objWMIService, colProcess, objProcess
strComputer = "."

Set objWMIService = GetObject("winmgmts:" & "{impersonationLevel=impersonate}!\\" & strComputer & "\root\cimv2")
Set colProcess = objWMIService.ExecQuery ("Select * from Win32_Process Where Name = 'explorer.exe'")

'KILL/RELOAD
For Each objProcess in colProcess
objProcess.Terminate()
Next

End Function

* to unhide a drive letter, simply delete the reg key and reload explorer.exe

Update 01/24/2017

If you would like to ‘automate’ the drive detection, so…the script determines which drive letter should be hidden, add the following code to the top. You will need some kind of marker file or folder. I used MyFolder.

Figure out by previous marker

‘AUTOMATICALLY DETERMINE DRIVE LETTER TO HIDE
dim fso
Set fso = CreateObject(“Scripting.FileSystemObject”)

if (fso.FolderExists(“D:\MyFolder”)) then AutoDrive = “D”
if (fso.FolderExists(“E:\MyFolder”)) then AutoDrive = “E”
if (fso.FolderExists(“F:\MyFolder”)) then AutoDrive = “F”
if (fso.FolderExists(“G:\MyFolder”)) then AutoDrive = “G”
if (fso.FolderExists(“H:\MyFolder”)) then AutoDrive = “H”

‘SET DRIVE LETTER TO HIDE
Drive = AutoDrive

Figure out drive letter by label

strComputer = “.”
DriveLetter = “”
Set objWMIService = GetObject(“winmgmts:\\” & strComputer & “\root\cimv2”)
Set colItems = objWMIService.ExecQuery (“Select * From Win32_LogicalDisk”)
For Each objItem in colItems
    If objItem.VolumeName = “KINGSTON” then DriveLetter = objItem.DeviceID
Next
msgbox DriveLetter

Extracting Citrix Receiver

CitrixReceiverEnterprise.exe /extract [Destination_name]

where Destination _name is a complete pathname to the directory into which the .msi files are extracted. The directory must exist already and /extract adds a subfolder called extract to that directory. For example, you create a C:\test directory and when you run /extract, the extracted .msi files are put in C:\test\extract.

To install the .msi files, double click each file.

Note: If User Access Control (UAC) is enabled, Citrix advises that you install the .msi files in elevated mode. The .msi files are supported per-machine and require administrator privileges to deploy them.

When installing the Receiver (Enterprise) components, run the .msi files in this order:

  1. RIInstaller.msi
  2. ICAWebWrapper.msi
  3. SSONWrapper.msi
  4. GenericUSB.msi
  5. DesktopViewer.msi
  6. CitrixHDXMediaStreamForFlash-ClientInstall.msi
  7. PNAWrapper.msi
  8. Vd3d.msi

To remove the components

When removing the components, remove them in this order:

  1. Vd3d.msi
  2. PNAWrapper.msi
  3. CitrixHDXMediaStreamForFlash-ClientInstall.msi
  4. DesktopViewer.msi
  5. GenericUSB.msi
  6. SSONWrapper.msi
  7. ICAWebWrapper.msi
  8. RIInstaller.msi

Each .msi file has an Add/Remove (Control Panel on Windows XP or Windows Server 2003) or Programs and Features (Control Panel on Windows Vista, Windows 7, and Windows Server 2008) entry in the following format:

 Name of package

 Name displayed in Add/Remove or Programs and Features

 RIInstaller.msi  Citrix Receiver   Inside
 ICAWebWrapper.msi  Online Plug-in
 PNAWrapper.msi  Citrix Receiver   (PNA)
 SSONWrapper.msi  Citrix Receiver   (SSON)
 CitrixHDXMediaStreamForFlash-
ClientInstall.msi
 Citrix Receiver (HDX   Flash Redirection)
 DesktopViewer.msi  Citrix Receiver (DV)
 GenericUSB.msi  Citrix Receiver   (USB)
 Vd3d.msi  Citrix Receiver   (Aero)


email me

Repair BCD Boot Errors

The reason that you are getting this error is because the Windows Boot Manager (Bootmgr) entry is not present in the Boot Configuration Data (BCD) store or that the Boot\BCD file on the active partition is damaged or missing.

No OS Installed

To rectify the problem you can rebuild the BCD store using the Bootrec.exe tool in the Windows Recovery Environment.

Do this by following these steps:

1. Re-start the computer, pressing the F8 key at the same time (Windows Recovery Console is part of Win 7 installation, no need to use your installation DVD).

2. Select “Repair Your Computer” from the screen that appears. Windows loads the necessary files.Click NEXT

3. Select a language and a keyboard on the screen that appears and then click Next.(Windows will now search for installed operating systems, if you only have one, Win 7, it will be selected otherwise Click the operating system that you want to repair).Click NEXT.

4. In the System Recovery Options dialog box, click Command Prompt.

5. Type Bootrec /RebuildBcd and ENTER.

6. If Bootrec.exe runs successfully, you will see the installation path of the Windows directory. To add the entry to the BCD store, type Yes. A confirmation message appears that indicates the entry was added successfully.

7. If Bootrec.exe does not find any missing Windows installations, you must remove the BCD store, and then you must re-create it.Do this by typing the following commands.

Bcdedit /export C:\BCD_Backup – press ENTER

ren c:\boot\bcd bcd.old – ENTER

Bootrec /rebuildbcd – ENTER

8. Restart the computer and you should be good to go.

email me