Windows 10 – Repair-Reset Network Adapters

email me

If you’re experiencing network adapter/VPN issues, try this from an admin prompt:

netsh winsock reset
netsh int ip reset
netsh advfirewall reset
netsh advfirewall set allprofiles state off
nbtstat -R
nbtstat -RR
ipconfig /release
ipconfig /renew
ipconfig /flushdns
ipconfig /registerdns
netcfg -d
shutdown -r -f -t 60


Notes

In Device Manager, verify all network adapters are being removed.


Command to Remove Device

devcon remove “PCI\VEN_8086&DEV_156F&SUBSYS_8079103C”

Download devcon


Commands to Remove Adapter Profile

#1 netsh lan show profiles
#2 netsh lan delete profile interface=”Adapter Name”


Disable Network Adapter

Command: netsh interface set interface name=”Adapter Name” admin=DISABLED
PowerShell: Disable-NetAdapter -Name “Adapter Name” -Confirm:$false


Return Network Adapters

Command: netsh interface ip show config
PowerShell: Get-NetIPConfiguration -Detailed or Get-NetAdapter -Physical


Network Adapter Reset

Open Settings > Click on Network & Internet > Click on Status > Click on Network reset


Disable Proxy on Windows 10

Settings > Network & Internet > Automatically detect settings > Off

reg add “HKEY_LOCAL_MACHINE\SOFTWARE\Policies\Microsoft\Windows\CurrentVersion\Internet Settings” /v ProxySettingsPerUser /t REG_DWORD /d 1 /f


Registry — Main Locations for Network Adapters

HKEY_LOCAL_MACHINE\SYSTEM\ControlSet001\Services\Tcpip\Parameters\Adapters\

HKEY_LOCAL_MACHINE\SYSTEM\ControlSet001\Services\Tcpip\Parameters\Interfaces\

HKEY_LOCAL_MACHINE\SYSTEM\ControlSet001\Services\Tcpip6\Parameters\Interfaces\

HKEY_LOCAL_MACHINE\SYSTEM\ControlSet001\Services\WFPLWFS\Parameters\Adapters\

HKEY_LOCAL_MACHINE\SYSTEM\CurrentControlSet\Control\Class\{4d36e972-e325-11ce-bfc1-08002be10318}\

HKEY_LOCAL_MACHINE\SYSTEM\CurrentControlSet\Services\Tcpip\Parameters\Interfaces

HKEY_LOCAL_MACHINE\SYSTEM\CurrentControlSet\Services\Tcpip6\Parameters\Interfaces\

HKEY_LOCAL_MACHINE\SOFTWARE\Microsoft\dot3svc\Interfaces\

HKEY_LOCAL_MACHINE\SOFTWARE\Microsoft\Windows NT\CurrentVersion\NetworkCards\

HKEY_LOCAL_MACHINE\SOFTWARE\WOW6432Node\Microsoft\Windows NT\CurrentVersion\NetworkCards\

HKEY_LOCAL_MACHINE\SYSTEM\ControlSet001\Control\Class\{4d36e972-e325-11ce-bfc1-08002be10318}\

HKEY_LOCAL_MACHINE\SYSTEM\ControlSet001\Control\Network\
Skype for Desktop – 8.52.0.138

email me

Description

Skype is software that enables the world’s conversations. Millions of individuals and businesses use Skype to make free video and voice one-to-one and group calls, send instant messages and share files with other people on Skype.


Download

New Skype for Desktop (Windows) is available here:

https://go.skype.com/windows.desktop.download mirror


Size

65.4 MB


Silent Install

setup.exe /VERYSILENT /SP- /NOCANCEL /NORESTART /SUPPRESSMSGBOXES /NOLAUNCH -ms


Install Location (32 Folders, 154 Files, 240 MB)

C:\Program Files (x86)\Microsoft\Skype for Desktop

view contents: installed files  more info


Silent Uninstall

“C:\Program Files (x86)\Microsoft\Skype for Desktop\unins000.exe” /SILENT


Registry

[HKEY_LOCAL_MACHINE\SOFTWARE\WOW6432Node\Microsoft\Windows\CurrentVersion\Uninstall\Skype_is1]


Notes

Download Skype for Mac


Skype Community Forum

Disable Skype auto updates (for Windows and Macs)


Skype uses asar compression

C:\Program Files (x86)\Microsoft\Skype for Desktop\resources\app.asar


tags: Skype automation, Skype scripting, MrNetTek

Citrix Workspace – 19.9.0.21 (1909)

email me

Download

A new Citrix Workspace client is available here:

https://www.citrix.com/downloads/workspace-app/windows/workspace-app-for-windows-latest.html


Size

124 MB


Silent Install

setup.exe /forceinstall /silent STORE0=”Store;https://mycitrix.umc.edu/Citrix/ummcWeb/discovery;Store”


Install Location (115 Folders, 945 Files, 344 MB)

C:\Program Files (x86)\Citrix

view contents: installed files  more info


Silent Uninstall

setup.exe /silent /uninstall

“C:\ProgramData\Citrix\Citrix Workspace 1909\TrolleyExpress.exe” /uninstall /cleanup


Registry

[HKEY_LOCAL_MACHINE\SOFTWARE\WOW6432Node\Microsoft\Windows\CurrentVersion\Uninstall\CitrixOnlinePluginPackWeb]


Notes

Download Citrix Workspace for Mac

Product Documentation  What’s new

Citrix moves from Receiver to Workspace

https://www.citrix.com/products/receiver.html


Setup EXE Extraction (using 7zip)

C:\Users\%username%\AppData\Local\Temp\Ctx-E24E4EE1-D366-481D-8298-A08B79E27D2B\Extract

view contents: extracted files


Supported Parameters

/help – Displays this usage information

/uninstall – Removes an existing installation


/silent – Suppresses all graphical user interface


/noreboot – Suppresses all reboots and reboot prompts


/preview – Displays preview of changes without altering the machine


/extract <folder> – Extract self-extracting package to an existing folder


/includeSSON – Installs the single sign-on component for domain pass-through logon


/EnableCEIP – Enables (true) or disables (false) the Citrix Customer Improvement Program (CEIP)


/AutoUpdateCheck – Enables automatic update (auto), enables manual update (manual), bans
AutoUpdate (disabled)


/AutoUpdateStream – Specify AutoUpdate stream to be in long term (LTSR) or short term service releases (Current)


/DeferUpdateCount – Specify number of times AutoUpdate can be deferred

MSI property values are supported and must be separated by spaces, e.g.:
PROPERTY=”Value” PROPERTY2=”Value2″

Example silent command-line using all defaults:
CitrixWorkspaceApp.exe /silent

Example command-line specifying multiple options:
CitrixWorkspaceApp.exe /silent ADDLOCAL=”ReceiverInside,ICA_Client,USB,DesktopViewer,Flash,Vd3d,WebHelper,BrowserEngine” INSTALLDIR=”C:\myfolder” ENABLE_DYNAMIC_CLIENT_NAME=”No” CLIENT_NAME=”my_overrided_name” DEFAULT_NDSCONTEXT=”Context1,Context2″

Example command-line to enable domain pass-through:
CitrixWorkspaceApp.exe /silent /includeSSON ADDLOCAL=”ReceiverInside,ICA_Client,SSON,USB,DesktopViewer,Flash,Vd3d,WebHelper,BrowserEngine” INSTALLDIR=”C:\myfolder” ENABLE_DYNAMIC_CLIENT_NAME=”No” CLIENT_NAME=”my_overrided_name” DEFAULT_NDSCONTEXT=”Context1,Context2″

Example command-line to Install Single Sign-On server but to disable capture of logon credentials:
CitrixWorkspaceApp.exe /includesson LOGON_CREDENTIAL_CAPTURE_ENABLE=No [defaults to Yes]

Example command-line to Install Citrix Workspace in NonSelfServiceMode
CitrixWorkspaceApp.exe SELFSERVICEMODE=false [defaults to true]

Example command-line to support upgrade from unsupported version to latest version
CitrixWorkspaceApp.exe /RCU

Example command-line to disable CEIP:
CitrixWorkspaceApp.exe /EnableCEIP=false [defaults to true]

Example command-line to enable manual update:
CitrixWorkspaceApp.exe /AutoUpdateCheck=manual [defaults to auto]

Example command-line to disable auto update:
CitrixWorkspaceApp.exe /AutoUpdateCheck=disabled

Example command-line to choose long term service release stream:
CitrixWorkspaceApp.exe /AutoUpdateStream=LTSR

Example command-line to choose 2 times AutoUpdate can be deferred:
CitrixWorkspaceApp.exe /DeferUpdateCount=2


tags: Citrix automation, Citrix options, MrNetTek

Google Chrome – 77.0.3865.90

email me

Description

Google Chrome is a cross-platform web browser developed by Google. It was first released in 2008 for Microsoft Windows, and was later ported to Linux, macOS, iOS, and Android. The browser is also the main component of Chrome OS, where it serves as the platform for web apps. more…


Download

New Chrome browser is available here:

https://enterprise.google.com/intl/en_version/chrome/chrome-browser/ mirror


Size

55.6 MB


Silent Install

setup.msi /quiet /norestart


Install Location (10 Folders, 99 Files, 435 MB)

C:\Program Files (x86)\Google\Chrome\Application\77.0.3865.90

view contents: installed files


Silent Uninstall

msiexec /x{50ADB1A8-7D22-3FA4-9F99-AD149455FE09} /qn /norestart

“C:\Program Files (x86)\Google\Chrome\Application\77.0.3865.90\Installer\setup.exe” –uninstall –multi-install –chrome –system-level –force-uninstall


Registry

HKEY_LOCAL_MACHINE\SOFTWARE\Microsoft\Windows\CurrentVersion\Uninstall\{50ADB1A8-7D22-3FA4-9F99-AD149455FE09}


App GUID

{50ADB1A8-7D22-3FA4-9F99-AD149455FE09}


MSI Property Table


Notes

Download Chrome for Mac

Release Notes v77: September 10, 2019

Chrome v77 Features

Chrome Platform Status

Chrome Scrubber


Mac – Disable Chrome Auto Updates

Method 1

On Mac, you can go to “Users > Your Mac Drive > Library > Google > GoogleSoftwareUpdate” and rename this folder.


Method 2

Open Finder and go to “Applications” folder.

Right click or control + click on the Google Chrome folder and go to “Show Packaged Content”.

Click “Contents” folder and open “Info.plist” file. Remember you need to have editors like Xcode to open plist file. Also you should have write permission for both “Contents” folder and “Info.plist” file to edit.

Look for “KSUpdateURL” key. In our case this is pointing to “https://tools.google.com/service/update2”.

Simply rename the file to something else and save your changes.


Method 3

#!/bin/sh

Version=$(/Applications/Google\ Chrome.app/Contents/MacOS/Google\ Chrome --version | awk '{print $3}')

sudo rm -rf /Applications/Google\ Chrome.app/Contents/Frameworks/Google\ Chrome\ Framework.framework/Versions/"$Version"/Frameworks/KeystoneRegistration.framework


tags: Chrome development, Chrome scripting, MrNetTek

Firefox – 69.0.1

email me

Description

Mozilla Firefox, or simply Firefox, is a free and open-source web browser developed by the Mozilla Foundation and its subsidiary, Mozilla Corporation. more…


Download

New Firefox is available here:

https://ftp.mozilla.org/pub/firefox/releases/69.0.1/win64/en-US/  all


Size

47.2 MB


Silent Install

setup.exe -ms


Install Location (9 Folders, 88 Files, 186 MB)

C:\Program Files\Mozilla Firefox

view contents: installed files  moreinfo


Silent Uninstall

“C:\Program Files\Mozilla Firefox\uninstall\helper.exe” /s


Registry

[HKEY_LOCAL_MACHINE\SOFTWARE\Microsoft\Windows\CurrentVersion\Uninstall\Mozilla Firefox 69.0.1 (x64 en-US)]


Notes

Download Firefox for Mac

Version 69.0.1, first offered to Release channel users on September 18, 2019

Security vulnerabilities fixed in Firefox 69.0.1

Advisories


MSI Property Table


tags: Firefox scripting, Firefox development, MrNetTek

Mac – SCCM – VLC CMMAC Error

email me

VLC Player fails the CMMAC creation process using the CMAppUtil.


CMMAC Error

Creating Cmmac file for /Volumes/VLC media player/VLC.app
2019-09-19 19:59:44.417 CMAppUtil[1948:88903] Reading /var/folders/zz/zyxvpxvq6csfxvn_n0000000000000/T/VLC.app/Contents/Info.plist file failed with error The file “Info.plist” couldn’t be opened using text encoding Unicode (UTF-8)..
2019-09-19 19:59:44.418 CMAppUtil[1948:88903] ParseDirectory failed with 80004005.


Why?

It’s a bug in the vendor’s plist, or, more likely, the plist has been saved in binary format, when it should be Unicode (UTF-8) XML for SCCM. It definitely was not tested with the CMAppUtil CMMAC process.


Solution

* this does assume you have some basic packaging knowledge

Install VLC using the DMG.

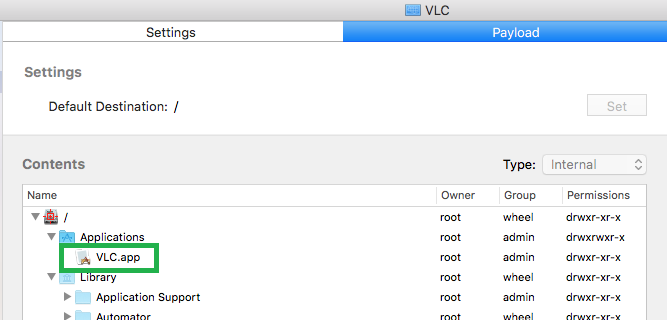
Using Packages, create a PKG file, using the VLC.app as a resource file.

When you open Packages, VLC.app will go under Payload > Applications.

Build the package.

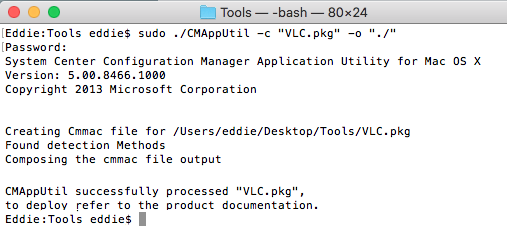
Attempt the CCMMac process again using the PKG file you just created.

Great success!


 Notes

Create Mac computer applications with System Center Configuration Manager

What is a plist?


Converting plists

* the plutil app is native to Mac OS X, and is included when iTunes is installed on Windows.

plutil -convert xml1 binary.plist
plutil -convert binary1 XML.plist


Windows 10 – Launch Store App from Command Line

email me

Launch Windows 10 Store App from command line.

explorer.exe shell:appsFolder\Microsoft.BingWeather_8wekyb3d8bbwe!App


Notes

get-appxpackage | Select-Object Where -ExpandProperty PackageFamilyName

Microsoft.NET.Native.Runtime.1.6_8wekyb3d8bbwe
timeanddate.com.WorldClock-TimeZones_nqsmpkknst3ta
Microsoft.VCLibs.120.00_8wekyb3d8bbwe
Microsoft.WinJS.2.0_8wekyb3d8bbwe
Microsoft.WindowsPhone_8wekyb3d8bbwe
Microsoft.Appconnector_8wekyb3d8bbwe
Microsoft.NET.Native.Runtime.1.7_8wekyb3d8bbwe
Microsoft.XboxSpeechToTextOverlay_8wekyb3d8bbwe
6764XLGeekCoder.XLStylesTool_491centepbgsm
Microsoft.Windows.CloudExperienceHost_cw5n1h2txyewy
Microsoft.AAD.BrokerPlugin_cw5n1h2txyewy
windows.immersivecontrolpanel_cw5n1h2txyewy
Microsoft.MicrosoftEdge_8wekyb3d8bbwe
Microsoft.Windows.ContentDeliveryManager_cw5n1h2txyewy
Microsoft.LockApp_cw5n1h2txyewy
Microsoft.Wallet_8wekyb3d8bbwe
Microsoft.Windows.HolographicFirstRun_cw5n1h2txyewy
Microsoft.Windows.CapturePicker_cw5n1h2txyewy
Windows.PrintDialog_cw5n1h2txyewy
Windows.CBSPreview_cw5n1h2txyewy
Microsoft.XboxGameCallableUI_cw5n1h2txyewy
Microsoft.Windows.SecureAssessmentBrowser_cw5n1h2txyewy
Microsoft.Windows.SecHealthUI_cw5n1h2txyewy
Microsoft.Windows.PinningConfirmationDialog_cw5n1h2txyewy
Microsoft.Windows.PeopleExperienceHost_cw5n1h2txyewy
Microsoft.Windows.ParentalControls_cw5n1h2txyewy
Microsoft.Windows.OOBENetworkConnectionFlow_cw5n1h2txyewy
Microsoft.Windows.OOBENetworkCaptivePortal_cw5n1h2txyewy
Microsoft.Windows.AssignedAccessLockApp_cw5n1h2txyewy
Microsoft.Windows.Apprep.ChxApp_cw5n1h2txyewy
Microsoft.Win32WebViewHost_cw5n1h2txyewy
Microsoft.PPIProjection_cw5n1h2txyewy
Microsoft.ECApp_8wekyb3d8bbwe
Microsoft.CredDialogHost_cw5n1h2txyewy
Microsoft.BioEnrollment_cw5n1h2txyewy
Microsoft.AsyncTextService_8wekyb3d8bbwe
Microsoft.AccountsControl_cw5n1h2txyewy
InputApp_cw5n1h2txyewy
F46D4000-FD22-4DB4-AC8E-4E1DDDE828FE_cw5n1h2txyewy
E2A4F912-2574-4A75-9BB0-0D023378592B_cw5n1h2txyewy
c5e2524a-ea46-4f67-841f-6a9465d9d515_cw5n1h2txyewy
1527c705-839a-4832-9118-54d4Bd6a0c89_cw5n1h2txyewy
Microsoft.Windows.ShellExperienceHost_cw5n1h2txyewy
Microsoft.VCLibs.140.00_8wekyb3d8bbwe
Microsoft.NET.Native.Runtime.2.1_8wekyb3d8bbwe
Microsoft.EdgeDevtoolsPlugin_cw5n1h2txyewy
Microsoft.Getstarted_8wekyb3d8bbwe
Microsoft.NET.Native.Runtime.1.4_8wekyb3d8bbwe
39365PlayBestTalkingGames.ChessFree_9tkwm9hgzzx7y
Microsoft.XboxGamingOverlay_8wekyb3d8bbwe
Microsoft.NET.Native.Framework.2.2_8wekyb3d8bbwe
Microsoft.NET.Native.Runtime.2.2_8wekyb3d8bbwe
Microsoft.UI.Xaml.2.0_8wekyb3d8bbwe
Microsoft.Xbox.TCUI_8wekyb3d8bbwe
Microsoft.HEVCVideoExtension_8wekyb3d8bbwe
Microsoft.Advertising.Xaml_8wekyb3d8bbwe
Microsoft.WebMediaExtensions_8wekyb3d8bbwe
Microsoft.MicrosoftEdgeDevToolsClient_8wekyb3d8bbwe
Microsoft.Services.Store.Engagement_8wekyb3d8bbwe
Microsoft.UI.Xaml.2.0_8wekyb3d8bbwe
Microsoft.VCLibs.140.00_8wekyb3d8bbwe
Microsoft.NET.Native.Runtime.2.2_8wekyb3d8bbwe
Microsoft.NET.Native.Framework.2.2_8wekyb3d8bbwe
Microsoft.NET.Native.Framework.1.7_8wekyb3d8bbwe
Microsoft.NET.Native.Framework.1.6_8wekyb3d8bbwe
Microsoft.NET.Native.Framework.1.3_8wekyb3d8bbwe
Microsoft.NET.Native.Framework.2.1_8wekyb3d8bbwe
Microsoft.People_8wekyb3d8bbwe
Microsoft.Print3D_8wekyb3d8bbwe
Microsoft.WindowsCamera_8wekyb3d8bbwe
Microsoft.Messaging_8wekyb3d8bbwe
Microsoft.DesktopAppInstaller_8wekyb3d8bbwe
Microsoft.WindowsStore_8wekyb3d8bbwe
Microsoft.VCLibs.140.00.UWPDesktop_8wekyb3d8bbwe
Microsoft.UI.Xaml.2.1_8wekyb3d8bbwe
Microsoft.OneConnect_8wekyb3d8bbwe
Microsoft.XboxIdentityProvider_8wekyb3d8bbwe
Microsoft.3DBuilder_8wekyb3d8bbwe
Microsoft.MSPaint_8wekyb3d8bbwe
Microsoft.WindowsAlarms_8wekyb3d8bbwe
Microsoft.WindowsMaps_8wekyb3d8bbwe
Microsoft.WindowsSoundRecorder_8wekyb3d8bbwe
Microsoft.XboxApp_8wekyb3d8bbwe
Microsoft.WindowsCalculator_8wekyb3d8bbwe
Microsoft.BingFinance_8wekyb3d8bbwe
Microsoft.BingSports_8wekyb3d8bbwe
Microsoft.GetHelp_8wekyb3d8bbwe
Microsoft.Microsoft3DViewer_8wekyb3d8bbwe
Microsoft.NET.Native.Framework.2.2_8wekyb3d8bbwe
Microsoft.WindowsFeedbackHub_8wekyb3d8bbwe
Microsoft.MicrosoftSolitaireCollection_8wekyb3d8bbwe
VitalSourceTechnologiesIn.VitalSourceBookshelf_wasrd15zsyawm
Microsoft.BingNews_8wekyb3d8bbwe
Microsoft.Windows.Cortana_cw5n1h2txyewy
Microsoft.SkypeApp_kzf8qxf38zg5c
Microsoft.MicrosoftStickyNotes_8wekyb3d8bbwe
Microsoft.ZuneVideo_8wekyb3d8bbwe
Microsoft.ZuneMusic_8wekyb3d8bbwe
Microsoft.BingWeather_8wekyb3d8bbwe
Microsoft.StorePurchaseApp_8wekyb3d8bbwe
Microsoft.Windows.Photos_8wekyb3d8bbwe
AppleInc.iTunes_nzyj5cx40ttqa
Microsoft.XboxGameOverlay_8wekyb3d8bbwe
microsoft.windowscommunicationsapps_8wekyb3d8bbwe

PowerShell – Download Specific Type of Files

email me

Download all the files from a website that are a specific type:

$Site = 'http://eddiejackson.net/apps'
$Links = (Invoke-WebRequest –Uri $Site).Links | ? href -like *zip*
$Links | select -Unique href | % {
$File = $_.href
$URL = "http://eddiejackson.net/apps/$File"
Invoke-WebRequest -Uri $URL -OutFile "c:\zip\$File" -Verbose
}


Notes

Invoke-WebRequest


Download two types of files:

$Site = 'https://eddiejackson.net/apps'

$Type1 = (Invoke-WebRequest –Uri $Site).Links | ? href -like *zip*
$Type2 = (Invoke-WebRequest –Uri $Site).Links | ? href -like *exe*
$List = $Type1 + $Type2

Clear-Host

$List | select -Unique href | % {

$File = $_.href
$URL = "http://eddiejackson.net/apps/$File"

#Write-Host $File
Invoke-WebRequest -Uri $URL -OutFile "c:\downloads\$File" -Verbose

}


tags: Download files from web, file types, MrNetTek

Windows 10 – PowerShell – 1809-20H2 – Install RSAT

email me

Starting with Windows 10 October 2018 Update, RSAT is included as a set of “Features on Demand” in Windows 10, itself. RSAT lets IT admins manage Windows Server roles and features from a Windows 10 PC.


Step 1 – PowerShell

Open PowerShell as Admin


Step 2 – Return Features

Get-WindowsCapability -Online -Name "RSAT*"


Step 3 – Install Feature

Single Feature

Add-WindowsCapability -Online -Name&nbsp;FeatureName

Example for AD Users and Computers

Add-WindowsCapability -Online -Name Rsat.ActiveDirectory.DS-LDS.Tools~~~~0.0.1.0

All Features

Get-WindowsCapability -Online -Name "RSAT*" | Add-WindowsCapability -Online


Notes


Manually install RSAT using W10 GUI

Settings > Apps > Manage optional features > Add a feature > Select RSAT package

Example: RSAT: Active Directory Domain Services and Lightweight Directory Services Tools


Download RSAT for 1709-1803

Installer script in my vault (use this if you have any problems installing RSAT)


Dealing with RSAT Error

Error 0x800f0954

HKLM\Software\Policies\Microsoft\Windows\WindowsUpdate\AU\
Value: UseWUServer
Data: 0

Restart Windows Update Service


Or, just use this code

$regPath = "HKLM:\SOFTWARE\Policies\Microsoft\Windows\WindowsUpdate\AU\"
$regVal = "UseWUServer"
$regData = "0"
$winService = "wuauserv"

$resetVal = Get-ItemPropertyValue -Name $regVal -Path $regPath

Set-ItemProperty -Path $regPath -Name $regVal -Value $regData -Force | Out-Null
Restart-Service -InputObject $winService -Force

Get-WindowsCapability -Online | ? Name -like 'RSAT*'| where {$_.State -eq 'NotPresent'} | foreach {Add-WindowsCapability -Online -Name $_.Name}

Set-ItemProperty -Path $regPath -Name $regVal -Value $resetVal -Force | Out-Null
Restart-Service -InputObject $winService -Force


tags: RSAT install, MrNetTek

Apple iTunes – 12.10.0.7

email me

Description

iTunes is a media player, media library, Internet radio broadcaster, and mobile device management application developed by Apple Inc. It was announced on January 9, 2001. It is used to play, download, and organize digital multimedia files, including music and video, on personal computers running the macOS and Windows operating systems. Content could be purchased through the iTunes Store, or imported from CDs, with iTunes as the software letting users manage their online and physical purchases. more…


Download

New iTunes app is available from here:

https://www.apple.com/itunes/download/win64


Contents of iTunes64Setup.exe
 (use 7zip)


Size

262 MB


Silent Install

AppleApplicationSupport.msi /qn /norestart
AppleApplicationSupport64.msi /qn /norestart
AppleMobileDeviceSupport64.msi /qn /norestart
Bonjour64.msi /qn /norestart
AppleSoftwareUpdate.msi /qn /norestart

iTunes64.msi /qn /norestart IAcceptLicense=Yes ALLUSERS=1 DESKTOP_SHORTCUTS=1 INSTALL_ASUW=0 NO_ASUW=1 SCHEDULE_ASUW=0


Installation Path (332 Folders, 4,458 Files, 391 MB)

C:\Program Files\iTunes


MSI Property Table


Notes

iTunes for Mac

32 Bit Installer


Batch Install for SCCM

* save as script.cmd

cd "%~dp0"
md C:\setup
start /wait msiexec /i "AppleApplicationSupport.msi" /qn /norestart ALLUSERS=true /l "C:\Setup\AppleApplication.log"
start /wait msiexec /i "AppleApplicationSupport64.msi" /qn /norestart ALLUSERS=true /l "C:\Setup\AppleApplicationx64.log"
start /wait msiexec /i "AppleMobileDeviceSupport64.msi" /qn /norestart /l "C:\Setup\AppleMobileDevice.log"
start /wait msiexec /i "AppleSoftwareUpdate.msi" /qn /norestart /l "C:\Setup\AppleSoftwareUpdate.log"
start /wait msiexec /i "Bonjour64.msi" /qn /norestart /l "C:\Setup\Bonjour64.log"
start /wait msiexec /i "iTunes64.msi" /qn /norestart /l "C:\Setup\iTunes64.log"

* I don’t allow logs to be created in the current folder, i.e., the ccmcache, as this messes with the peer hosting and package sync hashes.


Remove AppxPackage

* how you remove the Windows Store App version

C:\WINDOWS\system32\WindowsPowerShell\v1.0\powershell -ExecutionPolicy Bypass -Command "Get-AppxPackage *AppleInc.iTunes* | Remove-AppxPackage"


Current Version Uninstall GUIDs

msiexec /x “{2DB9CC90-24C4-4260-935D-511973B75707}” /qn
msiexec /x “{DC327764-A1B1-4EF3-A07C-38741E3557E7}” /qn
msiexec /x “{6CECF0FB-EE71-4FE5-8AE0-FA007408934A}” /qn
msiexec /x “{A30EA700-5515-48F0-88B0-9E99DC356B88}” /qn
msiexec /x “{56DDDFB8-7F79-4480-89D5-25E1F52AB28F}” /qn
msiexec /x “{D6969886-0A8A-46BF-A3FA-D6CD43FC8F85}” /qn


tags: Apple iTunes Installer, iTunes Uninstaller, MrNetTek

Google Chrome – 77.0.3865.75

email me

Description

Google Chrome is a cross-platform web browser developed by Google. It was first released in 2008 for Microsoft Windows, and was later ported to Linux, macOS, iOS, and Android. The browser is also the main component of Chrome OS, where it serves as the platform for web apps. more…


Download

New Chrome browser is available here:

https://enterprise.google.com/intl/en_version/chrome/chrome-browser/ mirror


Size

55.6 MB


Silent Install

setup.msi /quiet /norestart


Install Location (10 Folders, 99 Files, 435 MB)

C:\Program Files (x86)\Google\Chrome\Application\77.0.3865.75

view contents: 77.0.3865.75.txt


Silent Uninstall

msiexec /x{C27ED456-9EA7-3541-BB95-16033B22B71E} /qn /norestart

“C:\Program Files (x86)\Google\Chrome\Application\77.0.3865.75\Installer\setup.exe” –uninstall –multi-install –chrome –system-level –force-uninstall


Registry

HKEY_LOCAL_MACHINE\SOFTWARE\Microsoft\Windows\CurrentVersion\Uninstall\{C27ED456-9EA7-3541-BB95-16033B22B71E}


App GUID

{C27ED456-9EA7-3541-BB95-16033B22B71E}


MSI Property Table


Notes

Download Chrome for Mac

Release Notes v77: September 10, 2019

Chrome v77 Features

Chrome Platform Status

Chrome Scrubber


Mac – Disable Chrome Auto Updates

Method 1

On Mac, you can go to “Users > Your Mac Drive > Library > Google > GoogleSoftwareUpdate” and rename this folder.


Method 2

Open Finder and go to “Applications” folder.

Right click or control + click on the Google Chrome folder and go to “Show Packaged Content”.

Click “Contents” folder and open “Info.plist” file. Remember you need to have editors like Xcode to open plist file. Also you should have write permission for both “Contents” folder and “Info.plist” file to edit.

Look for “KSUpdateURL” key. In our case this is pointing to “https://tools.google.com/service/update2”.

Simply rename the file to something else and save your changes.


Method 3

#!/bin/sh

Version=$(/Applications/Google\ Chrome.app/Contents/MacOS/Google\ Chrome --version | awk '{print $3}')

sudo rm -rf /Applications/Google\ Chrome.app/Contents/Frameworks/Google\ Chrome\ Framework.framework/Versions/"$Version"/Frameworks/KeystoneRegistration.framework


tags: MrNetTek

SCCM – Link Two Packages, Run in Two Security Contexts

email me

This is how you would link two SCCM packages that have different security contexts (Admin and Current User), allowing you to create an installation process that works in admin mode, but also can access the Current User environmental variables.

This is not an uncommon scenario. I just don’t think everyone realizes they can tackle this problem using SCCM’s built-in features. Thank you, Microsoft, for this option.


Steps

Step 1

Create Package #1 with Current User security context


Step 2

Create Package #2 with Admin (System Account) security context


Step 3

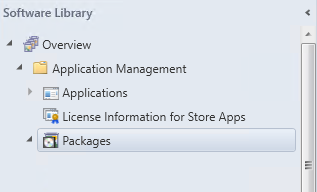
Navigate to CM Console > Overview > Application Management > Packages


Step 4

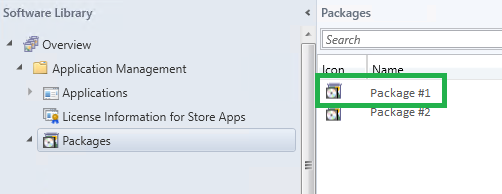
Select Package #1 (in most cases, the first package will be the Current User security context)


Step 5

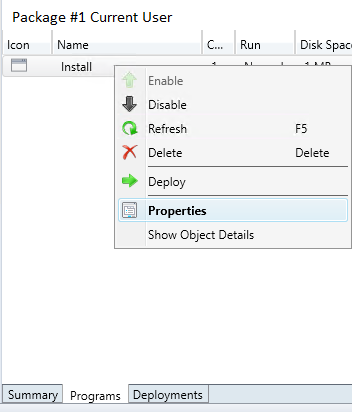
In the lower pane, select the Programs tab, and then Program and its Properties


Step 6

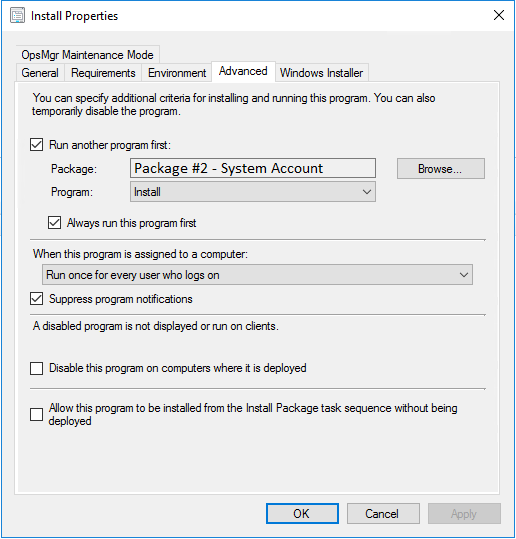
Select the Advanced tab.

Check Run another program first. Browse to Package #2.

Check Always run this program first. Click OK.


Step 7

Deploy Package #1, just like you would any other package.


On the Workstation

Now, two components will download and install on the workstation—each in the specified security context.


tags: SCCM automation, security context, system account, packaging, MrNetTek