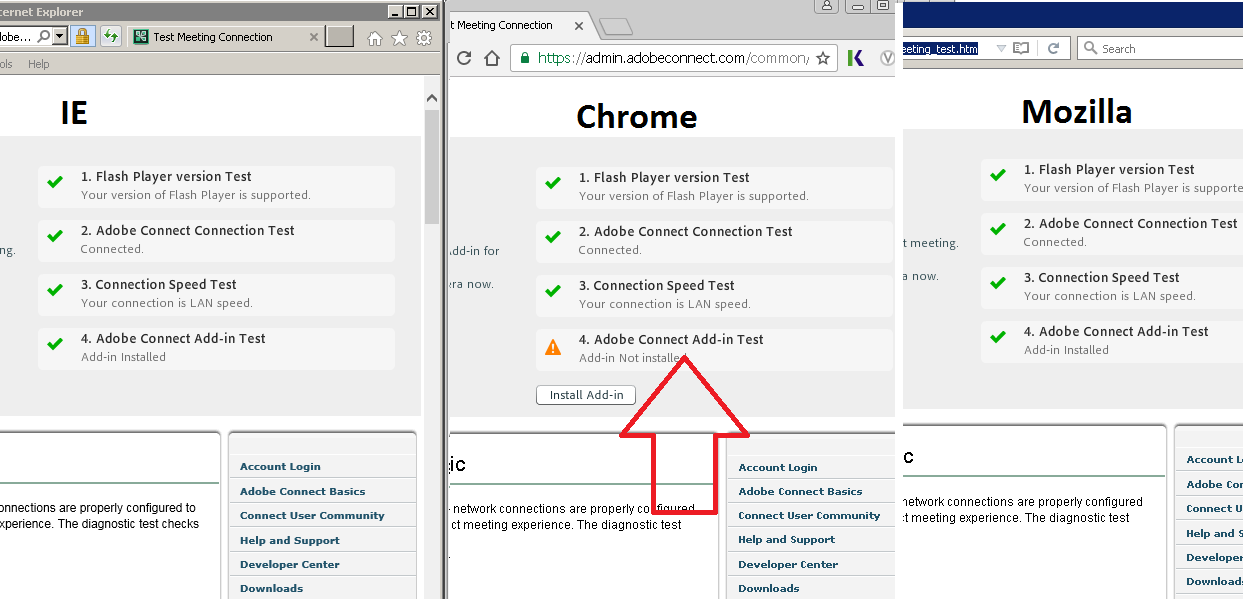
Here is a problem (unresolved as of now) that I’m having with the Adobe Connect plugin in the Chrome browser. I used to be able to deploy it silently, and it would not prompt the end-user to complete installation. Now, however, the end-user receives multiple pop ups. I have no issues in IE or Firefox.
In testing, this is what I get
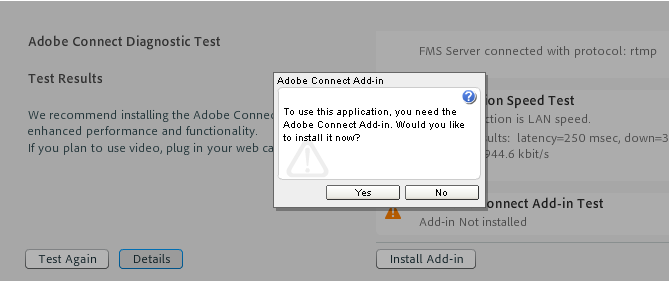
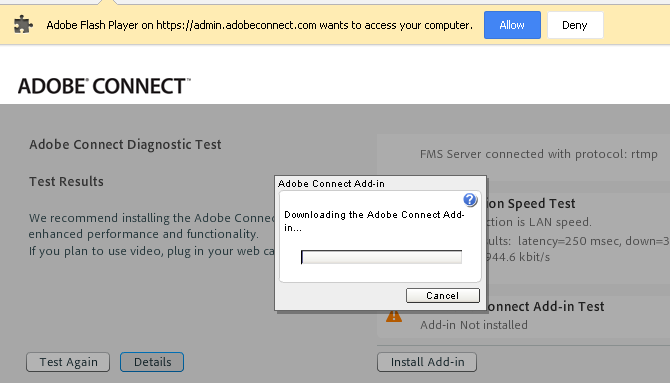
What the end-user is seeing
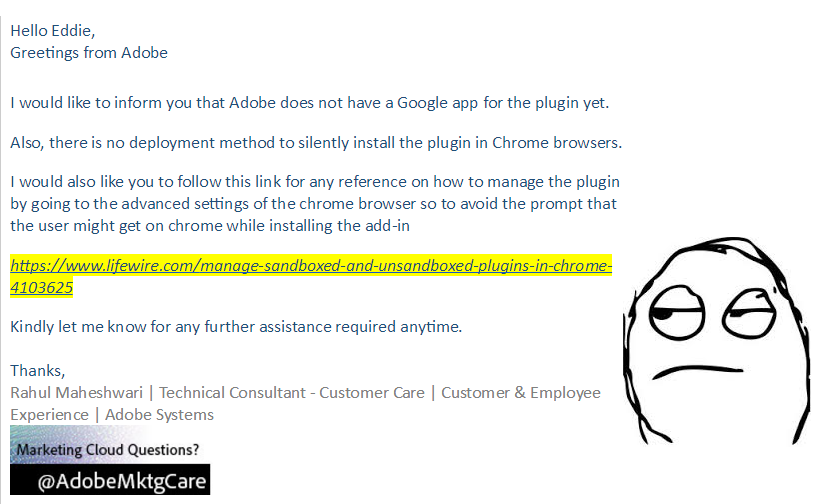
I’ve contacted Google and Adobe thus far…nothing yet. I used installers from here:
Final word from Adobe and Google, there is no way to suppress the pop ups.
Notes
If I copy the Google preference file from a reference machine, it does work…of course, there is no good way of deploying that file without wiping out the end-user’s personal Chrome preferences.
And, yes, I did try manually adding the plugin to C:\Users\%username%\AppData\Roaming\Macromedia\Flash Player\macromedia.com\bin\connectaddin
So, this came about because I was looking at an old script that uses manage-bde.exe to return the Bitlocker. No big deal,really, but…apparently someone forgot to actually verify the returned value was at least numbers.
This was the command
for /f “skip=5 tokens=1 delims=Password ” %%h in (‘”c:\windows\system32\manage-bde.exe -protectors -get c:”‘) do set BitPass=%%h
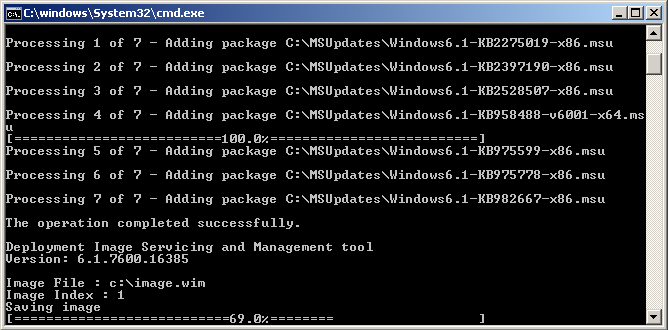
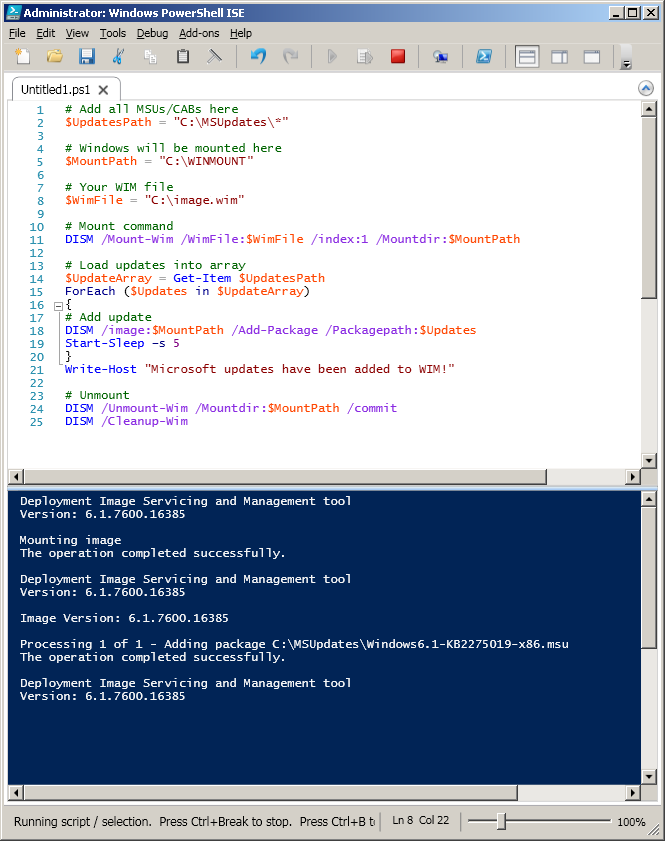
Inject Windows Updates right into your WIM, aka slipstreaming.
Batch Method – Single or Multiple Updates
@echooff:: add your update(s) heresetUDates=C:\MSUpdates
:: The mount pathsetWMount=c:\WINMOUNT
:: Your WIMsetWIMPath=c:\image.wim
:: A single updatesetSUpdate=windows10.0-kb3214628-x64-1511.msu
:: ————:: Make folderMD%UDates%:: Make the mount folderMD%WMount%:: Command to mount wim to folder
DISM /Mount-Wim /WimFile:%WIMPath% /Index:1 /MountDir:%WMount%
:: Add a single update:: DISM /image:%WMount% /Add-Package /Packagepath:%UDates%\%SUpdate%:: Add multiple updates – do not add a specific update
Dism /image:%WMount% /Add-Package /PackagePath:%UDates%\
:: Save changes and unmount
DISM /Unmount-Wim /MountDir:%WMount% /Commit
:: Perform cleanup
DISM /Cleanup-Wim
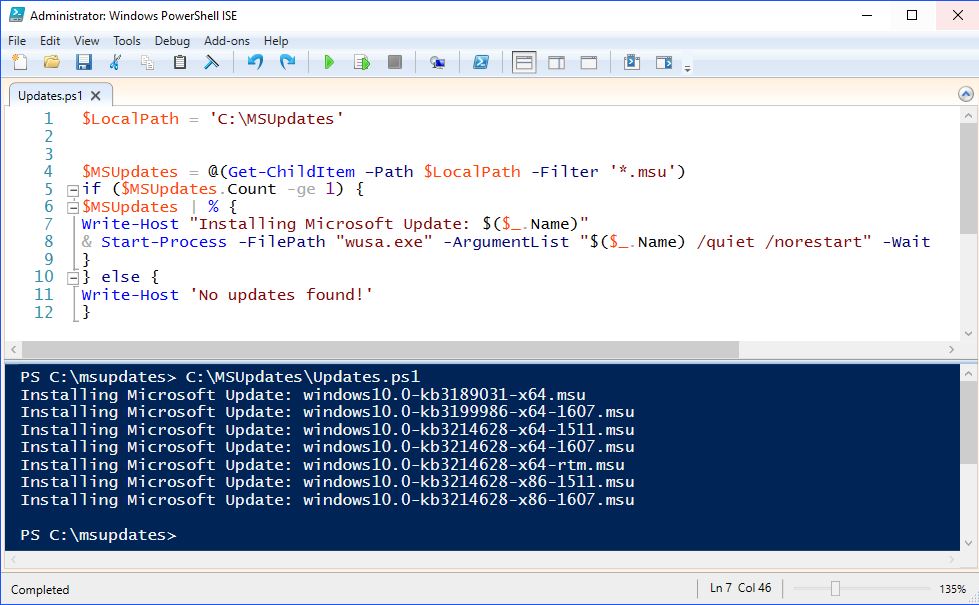
This script allows you to cycle through any amount of Windows updates (MSUs), and install them silently while suppressing reboots. I was able to install 180+ updates…without rebooting every few updates.
Code
@ECHOOFF
title Administrative Windows Updates
CLS
setlocal enabledelayedexpansion:STARTREM GO TO UPDATES PATH
C:
CD\MS_Updates\
REM SCAN THROUGH INSTALLING EACH UPDATE SILENTLYFOR %%# IN (*.msu) DO (
Echo Installing Microsoft Update: %%#
C:\Windows\System32\Wusa.exe “%%#” /quiet /norestart
)
ECHO.
:ENDECHO Windows Update is complete!
PING -n 10127.0.0.1>nul
EXIT
Screenshot of the script running (click image to zoom)
Notes
If you think you need to update the Wusa, run this:
And, with very little effort, you could throw in cab files
For %%# in (*.cab) Do ( Echo Installing Microsoft Update: %%# C:\Windows\System32\dism.exe /online /add-package /packagepath:”%%#” /quiet /norestart )
Or even MSIs…
For %%# in (*.msi) Do ( Echo Installing Microsoft Update: %%# C:\Windows\System32\msiexec.exe /i “%%#” /quiet /norestart )
It may be the case your MSUs aren’t installing as intended (error 50, error 85, error 87). This is because the cab itself has to be extracted, and then installed.
Here is the code for that (the ‘expand‘ command does it).
@Echooff
title Microsoft Windows Updates
clssetlocal enabledelayedexpansion
c:
cd C:\setup\PostSetup\Updates_MS
setUpdates=C:\setup\PostSetup\Updates_MS
cd "%~dp0"
gotoEXP rem expands files
:EXPecho Scanning MSUs...
For %%# in (*.msu) Do (
Echo Expanding: %%#
Expand -F:* %%# %Updates%
)
echo.
:INSTALLfor /R "%~dp0" %%# IN (*-KB*.MSU) DO (
call:GETFILE%%~n#
echo Installing Windows Update: KB!update!...
start /wait c:\windows\system32\wusa.exe "%%#" /quiet /norestart
C:\Windows\System32\dism /online /add-package /packagepath:"%Updates%\%%#" /quiet /norestart
)
::QUIT:ENDEcho.
Echo Windows Updates are complete^^!
timeout /t 4 >nul
pause
exit /b 0:GETFILESET "update=%*"
FOR /F "DELIMS=-" %%U IN ("%update:*-KB=%") DOSET "update=%%U"
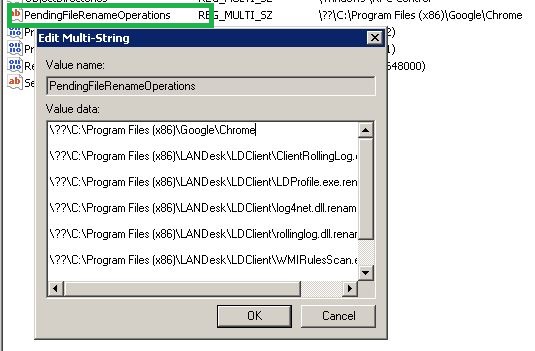
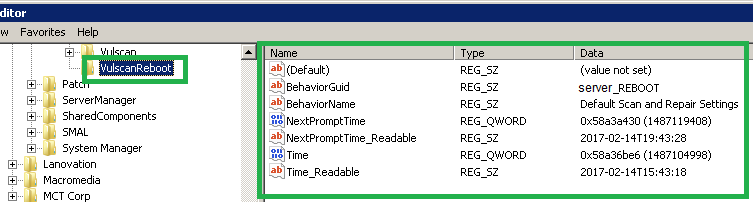
If you’re looking to start a LANDesk deployment, without rebooting, delete the contents in those keys.
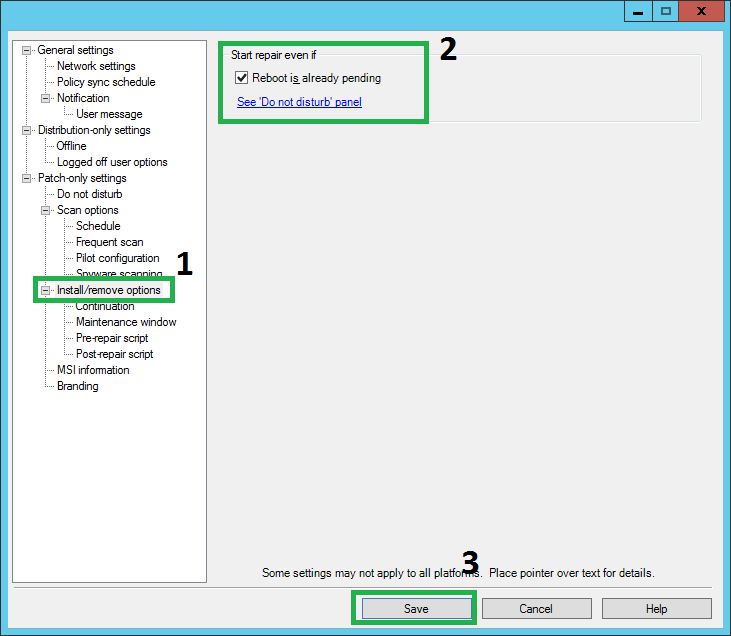
Alternatively, you can set the agent from the LANDesk management suite to ignore pending reboots.
1 – Open the Agent’s Distribution and Patch settings.
2 – Navigate to Patch-only settings | Install/remove options.
3 – Click the checkbox that says Start repair even if Reboot is already pending.
4 – Click Save.
* If you have individual agent profiles set up, you may just be able to select a non-reboot profile for a specific computer. That is under Task, Properties, Agent settings.
Notes
Delete
Delete C:\Program Files (x86)\LANDesk\Shared Files\cbaroot\actions.ini
Delete everything from C:\ProgramData\LANDesk\Data
Delete everything from C:\ProgramData\LANDesk\Policies
Delete everything from C:\ProgramData\LANDesk\Log
Registry HKEY_LOCAL_MACHINE\SYSTEM\ControlSet001\Control\Session Manager\
HKEY_LOCAL_MACHINE\SYSTEM\ControlSet002\Control\Session Manager\
Search for “Pending” and delete or set to “2”
HKEY_LOCAL_MACHINE\SOFTWARE\Microsoft\Windows\CurrentVersion\WindowsUpdate\Auto Update\
If there, Delete “RebootRequired”
Search Registry for UpdateExeVolatile
Change value to “0”
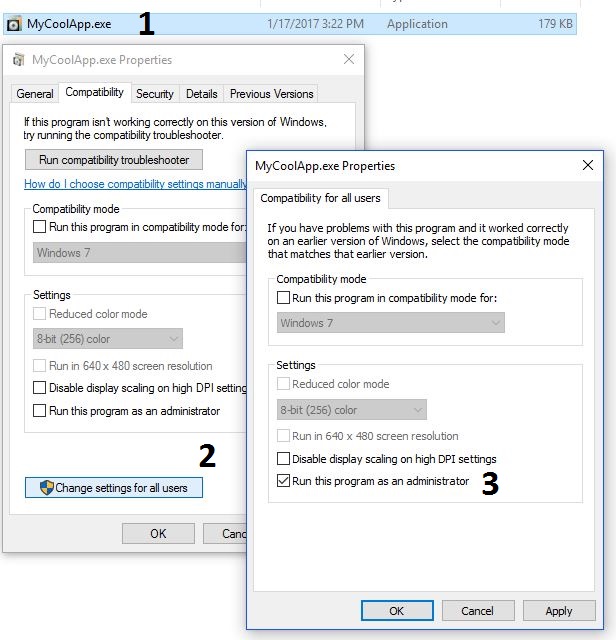
For each application there are three settings that can be applied. The compatibility mode, (Display) Settings and the Privilege Level. One or multiple values can be set (separated by a space).
Compatibility Modes
Value
Description
WIN95
Windows 95
WIN98
Windows 98
WIN4SP5
Windows NT 4.0 SP5
WIN2000
Windows 2000
WINXPSP2
Windows XP SP2
WINXPSP3
Windows XP SP3
VISTARTM
Vista
VISTASP1
Vista SP1
VISTASP2
Vista SP2
WIN7RTM
Windows 7
WINSRV03SP1
Windows Server 2003 SP1
WINSRV08SP1
Windows Server 2008 SP1
Display Settings
Value
Description
DISABLETHEMES
Disable Visual Themes
640X480
Run in 640 x 480 screen resolution
HIGHDPIAWARE
Disable display scaling on high DPI settings
256COLOR
Run in 256 colors
DISABLEDWM
Disable Desktop Composition
Privilege Level
Value
Description
RUNASADMIN
Run program as an administrator
If the settings are written into the HKEY_LOCAL_MACHINE part of the registry, the settings cannot be changed by a user that has no local administrative rights.
Let’s say you are writing a series of numbers to the registry for desktop management scanning or security purposes (Bitlocker passwords, phone numbers, serial numbers, etc.). In these scenarios, you want the numbers to be available to desktop software, however not be visible by the end-user. A great way to secure these numbers is through simple numeric to alpha translation.
For example,
On Error Resume Next

Set objShell = WScript.CreateObject("WScript.Shell")

'RegValue
numValue = objShell.RegRead("HKEY_LOCAL_MACHINE\SOFTWARE\TheNumber\RegValue")
if numValue = "" then WScript.Quit()

Set re = New RegExp
re.Pattern = "[A-Z]"
re.IgnoreCase = True
re.Global = True
hasMatches = re.Test(numValue)

If hasMatches = True Then
wscript.quit
End If

'ENCODING HERE
EncodedValue = (Replace(numValue,"0","Z"))
EncodedValue = (Replace(EncodedValue,"1","K"))
EncodedValue = (Replace(EncodedValue,"2","Y"))
EncodedValue = (Replace(EncodedValue,"3","X"))
EncodedValue = (Replace(EncodedValue,"4","D"))
EncodedValue = (Replace(EncodedValue,"5","O"))
EncodedValue = (Replace(EncodedValue,"6","C"))
EncodedValue = (Replace(EncodedValue,"7","V"))
EncodedValue = (Replace(EncodedValue,"8","S"))
EncodedValue = (Replace(EncodedValue,"9","P"))
EncodedValue = (Replace(EncodedValue,"-","Q"))

'WRITE TO REGISTRY HERE
objShell.RegWrite "HKEY_LOCAL_MACHINE\SOFTWARE\TheNumber\RegValue",EncodedValue,"REG_SZ"
Screenshot 1 – Before script
Screenshot 2 – After script
What’s great about this, is that no matter what the length or complexity of the number, it can be translated into something more secure.
So, how do you reverse the process? Easy. Just swap your translation alphanumerics.
For example: 0 Z becomes Z 0.
Example script
On Error Resume Next

Set objShell = WScript.CreateObject("WScript.Shell")

'RegValue
numValue = objShell.RegRead("HKEY_LOCAL_MACHINE\SOFTWARE\TheNumber\RegValue")
if numValue = "" then WScript.Quit()

Set re = New RegExp
re.Pattern = "[A-Z]"
re.IgnoreCase = True
re.Global = True
hasMatches = re.Test(numValue)

If hasMatches = False Then
wscript.quit
End If

'DECODING HERE
DecodedValue = (Replace(numValue,"Z","0"))
DecodedValue = (Replace(DecodedValue,"K","1"))
DecodedValue = (Replace(DecodedValue,"Y","2"))
DecodedValue = (Replace(DecodedValue,"X","3"))
DecodedValue = (Replace(DecodedValue,"D","4"))
DecodedValue = (Replace(DecodedValue,"O","5"))
DecodedValue = (Replace(DecodedValue,"C","6"))
DecodedValue = (Replace(DecodedValue,"V","7"))
DecodedValue = (Replace(DecodedValue,"S","8"))
DecodedValue = (Replace(DecodedValue,"P","9"))
DecodedValue = (Replace(DecodedValue,"Q","-"))

'WRITE TO REGISTRY HERE
objShell.RegWrite "HKEY_LOCAL_MACHINE\SOFTWARE\TheNumber\RegValue",DecodedValue,"REG_SZ"
PowerShell is definitely the scripting flavor of the week. Thus, I have ended up purchasing several PowerShell books, just to learn the ins and outs of the scripting language. Something I have noticed in 100% of the books…is what they are missing, which is GUI coding and how exactly to create finished EXE packages.
Well, because of this, I bought some scripting tools, you know, the ones that provide a full IDE. They are nice, and even allow you to build some GUI components. But, sadly, a complete package still could not be built. Why not? Hundreds of dollars spent…but you can’t do something as simple as code a PowerShell script and package it with some resource files.
{eye-roll}
So, as a workaround, I figured out how to code my GUI components in PowerShell, package my resource files, and create an EXE. The answer was to use to WinRAR. That’s right, the compression utility. Here is an example.
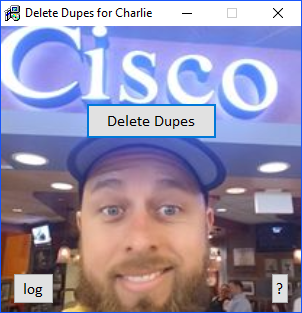
In this example, I wanted to create a simple tool for scanning and deleting all duplicate files on a computer. And, the tool needed GUI components, was to be coded in PowerShell, and had to be contained in a single EXE file.
First, I created a PowerShell form in my IDE. It has a main function button, access to a log, and an info button. But, as you can see, there is a background (a picture of the friend I was creating it for).
And, I also had an animation that pops up using HTA, which contains a background image and a gif animation.
Using WinRAR, you have the ability to add all files, including your compiled PowerShell script, and then save it as an EXE file. Main.exe is the PowerShell script. Delete_Dupes.exe is the name of the WinRAR EXE.
The magic happens by selecting what to do after the files are extracted. You put your compiled PowerShell file name here:
When you’re done, the EXE file should look like this:
Now, when you click the Delete_Dupes.exe, it extracts the files, and launches the PowerShell script! I will cover the details of the Delete_Dupes.exe in another post.
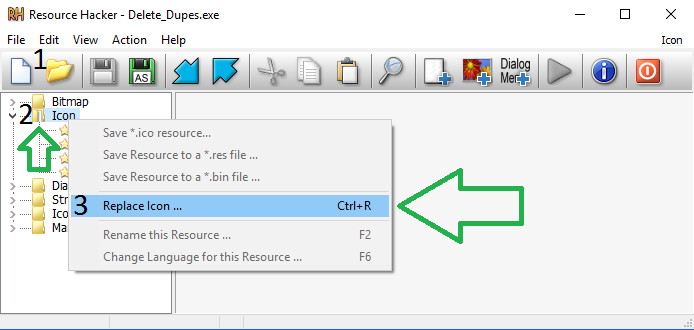
As a side note, you may wonder…but, what about that ugly icon? Can it be changed? Yes! Using Resource Hacker, you can easily replace the embedded WinRAR icon with one of your own.
Resource Hacker (just open the archive in here)
The updated icon
Notes
This isn’t the first time I have packaged PowerShell scripts into EXEs. If you happen to have a compiler tool, I use EXEScript, you can create a wrapper/launch file that jumps to your PowerShell script. This would permit you to have an EXE that contains all your files, while still being able to do most of your coding in PowerShell. This method offers a little more security and allows you to add/edit the EXE file properties. For example, this is a wrapper I used in EXEScript to jump to a PS script:
BitLocker Drive Encryption is a data protection feature that integrates with the operating system and addresses the threats of data theft or exposure from lost, stolen, or inappropriately decommissioned computers.
BitLocker provides the most protection when used with a Trusted Platform Module (TPM) version 1.2 or later. The TPM is a hardware component installed in many newer computers by the computer manufacturers. It works with BitLocker to help protect user data and to ensure that a computer has not been tampered with while the system was offline.
On computers that do not have a TPM version 1.2 or later, you can still use BitLocker to encrypt the Windows operating system drive. However, this implementation will require the user to insert a USB startup key to start the computer or resume from hibernation. Starting with Windows 8, you can use an operating system volume password to protect the operating system volume on a computer without TPM. Both options do not provide the pre-startup system integrity verification offered by BitLocker with a TPM.
In addition to the TPM, BitLocker offers the option to lock the normal startup process until the user supplies a personal identification number (PIN) or inserts a removable device, such as a USB flash drive, that contains a startup key. These additional security measures provide multifactor authentication and assurance that the computer will not start or resume from hibernation until the correct PIN or startup key is presented.
Returning Protector Numerical ID (save as script.cmd)
for /f “skip=2 tokens=2 delims=:” %%g in (‘”C:\Windows\system32\manage-bde.exe -protectors -get c:”‘) do set MyVar=%%g echo Protector ID:%MyVar% set MyVar=%MyVar: =%
Verify a BitLocker Password was Returned
SET “var=”&for /f “delims=0123456789-” %%i in (“%Pass%”) do set var=%%i rem if not matching the delims, exit if defined var (exit)
Importing BitLocker Password into Active Directory using Numerical ID
Note: If writing BitLocker PW to the registry, a good practice would be to encrypt/obfuscate it.
Note: There is a good chance if you’re compiling your scripts (in a non-64 bit manner), you may need to change from c:\windows\system32 to %windir%\sysnative. The System32 is reserved for 64 bit applications, while the WOW64 will recognize 32 bit applications.
NOTES
Note#1 The TPM chip can store numerous BitLocker IDs and passwords. If this isn’t cleared between computer setups, a new BitLocker password will be appended.
Note#2 If you have key rotation enabled, after a BitLocker password has been once, a new one will be created and securely stored [in SCCM or Azure].
Note#3 As newer Windows operating systems are released, TPM 2.0 (or newer) will become a requirement. This may prompt upgrading your fleet.
The people at Python may know Python quite well, but when it comes to packaging their product, nearly 100% of their installers have been botched in some way…and the 3.6.150.0 is no different. I ran into multiple issues when trying to deploy this. See below.
#1 – When deployed in the System Account, the app doesn’t appear in Programs and Features.
#2 – When installed in the System Account, the GUID {37a4e38b-baf7-4500-97f1-0f7c51d9a395} is installed in the wrong location.
#3 – The uninstall brings up the wrong window (their reg keys are wrong).
#4 – Once I modified the uninstaller to remove the app, not all files were removed.
#5 – Once I modified the uninstaller to remove the app, not all reg keys were removed.
Advice to Python, hire an actual packager. The 2.7.13150 MSI was also busted. I ended up just performing a capture/snapshot of the MSI install. For those looking to deploy the MSI and can’t, hit me up. I’ll send you the EXE I created from the snapshot. See bottom for a screenshot of 2.7.13150.
The Fix
So, to fix this mess, first I did the install with the options I wanted (scripted of course):
* I add the GUID app to c:\ProgramData\Package Cache
* Point the reg keys to the new package cache path
* Create a simple removal tool.
The Script
“C:\Program Files (x86)\LANDesk\LDClient\sdmcache\apps\Python\Python.exe” /quiet InstallAllUsers=1 InstallLauncherAllUsers=1 Include_lib=1 Include_pip=1 Include_tcltk=1 PrependPath=1 Include_test=1 Include_tools=1 TargetDir=c:\Python_361500REM COPY PACKAGE GUID TO PROGRAMDATA\PACKAGE CACHEREM {37a4e38b-baf7-4500-97f1-0f7c51d9a395}
“C:\Program Files (x86)\LANDesk\LDClient\sdmcache\apps\Python\Cache.exe”
REM POINT REGISTRY TO NEW PACKAGE CACHE LOCATION
regedit /s “C:\Program Files (x86)\LANDesk\LDClient\sdmcache\apps\Python\3.6.150.0.reg”
REM ADD REMOVE UTIL
copy /y “C:\Program Files (x86)\LANDesk\LDClient\sdmcache\apps\Python\Remove.cmd” “c:\Python_361500\Remove.cmd”