PowerShell – Create AD Group and Mirror Members

email me

Create a new AD group and mirror members from existing AD group.

# The New AD Group Name
$NewGrpName = "Pilot"

# Group Scope: DomainLocal, Global, Universal
$GrpScope = "Global"

# New AD Group Description
$GrpDescription = "This is a pilot group"

# AD Group Category: Distribution, Security
$GrpCat = "Security"

# AD Path of OU
$OUPath = "OU=groups,OU=YourOU,DC=YourDomain,DC=com"

# Use an existing AD Group to mirror membership
$ExistingGrpName = "MirrorThisGroupMembers"

# Cmdlet command line using above variables
New-ADGroup -name $NewGrpName -GroupScope $GrpScope -description $GrpDescription -GroupCategory $GrpCat -path $OUPath -passthru |
Add-ADGroupMember -member (Get-ADGroupMember $ExistingGrpName) -passthru |
Get-ADGroupMember | Select Name


Notes

New-ADGroup

New-ADGroup -Name "RODC Admins" -SamAccountName RODCAdmins -GroupCategory Security -GroupScope Global -DisplayName "RODC Administrators" -Path "CN=Users,DC=Fabrikam,DC=Com" -Description "Members of this group are RODC Administrators"


Add-ADGroupMember

Add-ADGroupMember SvcAccPSOGroup SQL01,SQL02


Get-ADGroupMember

cmdlet Get-ADGroupMember at command pipeline position 1
Supply values for the following parameters:
(Type !? for Help.)
Identity: Administrators

distinguishedName : CN=Domain Admins,CN=Users,DC=Fabrikam,DC=com
name              : Domain Admins
objectClass       : group
objectGUID        : 5ccc6037-c2c9-42be-8e92-c8f98afd0011
SamAccountName    : Domain Admins
SID               : S-1-5-21-41432690-3719764436-1984117282-512

distinguishedName : CN=Enterprise Admins,CN=Users,DC=Fabrikam,DC=com
name              : Enterprise Admins
objectClass       : group
objectGUID        : 0215b0a5-aea1-40da-b598-720efe930ddf
SamAccountName    : Enterprise Admins
SID               : S-1-5-21-41432690-3719764436-1984117282-519

distinguishedName : CN=LabAdmin,CN=Users,DC=Fabrikam,DC=com
name              : LabAdmin
objectClass       : user
objectGUID        : ab7c269d-aec5-4fcc-aebe-6cd1a2e6cd53
SamAccountName    : LabAdmin
SID               : S-1-5-21-41432690-3719764436-1984117282-1000

distinguishedName : CN=Administrator,CN=Users,DC=Fabrikam,DC=com
name              : Administrator
objectClass       : user
objectGUID        : 994f46e6-c62c-483f-a6cf-124197b6a959
SamAccountName    : Administrator
SID               : S-1-5-21-41432690-3719764436-1984117282-500


tags: Active Directory scripting, PowerShell Active Directory, MrNetTek

Hyper-V – PowerShell – Create VM

email me

Create a VM using PowerShell.

* This assumes Hyper-V is installed


$VMName = "myVM1"

$VM = @{
Name = $VMName
MemoryStartupBytes = 4294967296
Generation = 2
NewVHDPath = "D:\VM\$VMName\$VMName.vhdx"
NewVHDSizeBytes = 107374182400
BootDevice = "VHD"
Path = "D:\VM\$VMName"
SwitchName = (Get-VMSwitch).Name
}

New-VM @VM


Notes

New-VM

Get-VMSwitch

see Hyper-V Cmdlets


Install-WindowsFeature -Name Hyper-V -ComputerName TheComputerName -IncludeManagementTools -Restart


tags: MrNetTek

Mac – Bash – Install Fink

email me

Fink is a project that wants to bring the full world of Unix Open Source software to Darwin and Mac OS X. As a result, we have two main goals. First, to modify existing Open Source software so that it will compile and run on Mac OS X. (This process is called porting.) Second, to make the results available to casual users as a coherent, comfortable distribution that matches what Linux users are used to. (This process is called packaging.) The project offers precompiled binary packages as well as a fully automated build-from-source system.


This is how you install Fink on a Mac:

Step 1 – Install Java JDK

Step 2 – Install Xcode command-line tools

xcode-select --install

Step 3 – Save and Run helper script (script.tool)

#!/bin/bash
# shellcheck disable=SC2155
# shellcheck disable=SC2164
# shellcheck disable=SC1091
# shellcheck disable=SC1117

# Config
OSXVersion="$(sw_vers -productVersion | cut -f -2 -d .)"
DarwinVersion="$(uname -r | cut -d. -f1)"
XcodeURL="macappstore://itunes.apple.com/us/app/xcode/id497799835?mt=12"

Jvers="1.6"

FinkVersion="0.45.0"
FinkMD5Sum="43b36011a3c744e20a2591044df4cf02"
FinkOutDir="fink"
FinkDirectorY="${FinkOutDir}-${FinkVersion}"
FinkFileName="${FinkDirectorY}.tar.gz"
FinkSourceDLP="http://downloads.sourceforge.net/fink/${FinkFileName}"

XQuartzVersion="2.7.11"
XQuartzMD5Sum="8e9dbfe2717c8d74c262b3a963597898"
XQuartzPKGPath="XQuartz.pkg"
XQuartzFileName="XQuartz-${XQuartzVersion}.dmg"
XQuartzSourceDLP="https://dl.bintray.com/xquartz/downloads/${XQuartzFileName}"

function fetchBin {

local MD5Sum="$1"
local SourceDLP="$2"
local FileName="$3"
local DirectorY="$4"
local OutDir="$5"

# Checks
if [[ -d "${OutDir}" ]] && [[ -f "${FileName}" ]]; then
# Check to make sure we have the right file
local MD5SumLoc="$(cat "${OutDir}/.MD5SumLoc" 2>/dev/null || echo "")"
if [ "${MD5SumLoc}" != "${MD5Sum}" ]; then
echo "warning: Cached file is outdated or incorrect, removing" >&2
rm -fR "${DirectorY}" "${OutDir}"
MD5SumFle="$(md5 -q "${FileName}")"
if [ "${MD5SumFle}" != "${MD5Sum}" ]; then
rm -fR "${FileName}"
fi
else
# Do not do more work then we have to
echo "${OutDir} already exists, skipping" >&2
return
fi
elif [[ -f "${FileName}" ]]; then
MD5SumFle="$(md5 -q "${FileName}")"
if [ "${MD5SumFle}" != "${MD5Sum}" ]; then
rm -fR "${FileName}"
fi
fi

# Fetch
if [ ! -r "${FileName}" ]; then
echo "Fetching ${SourceDLP}"
if ! curl -Lfo "${FileName}" --connect-timeout "30" "${SourceDLP}"; then
echo "error: Unable to fetch ${SourceDLP}" >&2
exit 1
fi
else
echo "${FileName} already exists, skipping" >&2
fi

# Check our sums
local MD5SumLoc="$(md5 -q "${FileName}")"
if [ -z "${MD5SumLoc}" ]; then
echo "error: Unable to compute md5 for ${FileName}" >&2
exit 1
elif [ "${MD5SumLoc}" != "${MD5Sum}" ]; then
echo "error: MD5 does not match for ${FileName}" >&2
exit 1
fi

# Unpack
local ExtensioN="${FileName##*.}"
if [[ "${ExtensioN}" = "gz" ]] || [[ "${ExtensioN}" = "tgz" ]]; then
if ! tar -zxf "${FileName}"; then
echo "error: Unpacking ${FileName} failed" >&2
exit 1
fi
elif [ "${ExtensioN}" = "bz2" ]; then
if ! tar -jxf "${FileName}"; then
echo "error: Unpacking ${FileName} failed" >&2
exit 1
fi
elif [ "${ExtensioN}" = "dmg" ]; then
return
else
echo "error: Unable to unpack ${FileName}" >&2
exit 1
fi

# Save the sum
echo "${MD5SumLoc}" > "${DirectorY}/.MD5SumLoc"

# Move
if [ ! -d "${DirectorY}" ]; then
echo "error: Can't find ${DirectorY} to rename" >&2
exit 1
else
mv "${DirectorY}" "${OutDir}"
fi
}

# Make sure we are in the right place
cd "${HOME}/Downloads"

# Version check
if [[ "${DarwinVersion}" -lt "13" ]]; then
echo "This script is for use on OS 10.9+ only."
exit 1
fi

# Intro Explanation
cat > "/dev/stderr" << EOF This script will automate the installation of fink, its prerequisets and help out a bit with initial setup; to do this an internet connection is required. Before fink can be installed you need to have java, the Command Line Tools, XQuartz and accepted the xcode licence. Additionally you may wish to install the full Xcode app. After this script detects one of these requirements to be missing it will attempt to install it for you; in most cases this will mean the script will exit while it waits for the install to finish. After an install has completed just run this script again and it will pick up where it left off. EOF # Handle existing installs if [ -d "/sw" ]; then FinkExisting="1" cat > "/dev/stderr" << EOF It looks like you already have fink installed; if it did not finish or you are upgrading we will move it aside to /sw.old so you can delete it later if you like; otherwise you may want to exit. EOF fi if ! read -n1 -rsp $'Press any key to continue or ctrl+c to exit.\n'; then exit 1 fi if [ "${FinkExisting}" = "1" ]; then if ! sudo mv /sw /sw.old; then clear cat > "/dev/stderr" << EOF Could not move /sw to /sw.old; you may need to delete one or both these yourself. EOF exit 1 fi fi # Check for Xcode clear echo "Checking to see if xcode is installed..." >&2
XcodePath="$(mdfind kMDItemCFBundleIdentifier = "com.apple.dt.Xcode")"
if [ ! -z "${XcodePath}" ]; then
echo "Xcode is installed, setting up the defaults..." >&2
sudo xcode-select -switch "${XcodePath}/Contents/Developer"
else
echo "You do not have Xcode installed." >&2
read -rp $'Do you want to install xcode?\n[N|y] ' choice
if [[ "${choice}" = "y" ]] || [[ "${choice}" = "Y" ]]; then
open "${XcodeURL}"
exit 0
fi
fi

# Check for java
clear
echo "Checking for Java..." >&2
if ! /usr/libexec/java_home -Fv "${Jvers}+"; then
java -version > /dev/null 2>&1
echo "Please install the JDK not the JRE, since we need it to build things against; please rerun this script when it finishes installing." >&2
exit 0
fi
echo "Found version $(java -version > /dev/null 2>&1 | grep 'version' | sed -e 's:java version ::' -e 's:"::g')." >&2

# Check for Command Line Tools
clear
echo "Checking for the Xcode Command Line Tools..." >&2
if ! pkgutil --pkg-info=com.apple.pkg.CLTools_Executables; then
echo "The Xcode Command Line Tools are installing, please rerun when it finishes." >&2
xcode-select --install
exit 0
fi

# Check for XQuartz
clear
echo "Checking for XQuartz..." >&2
if ! pkgutil --pkg-info=org.macosforge.xquartz.pkg; then
echo "XQuartz is not installed, fetching..." >&2
fetchBin "${XQuartzMD5Sum}" "${XQuartzSourceDLP}" "${XQuartzFileName}" "-" "-"
echo "Mounting the XQuartz disk..." >&2
hdiutilOut="$(hdiutil mount "${XQuartzFileName}" 2>/dev/null | tr -d "\t" | grep -F '/dev/disk' | grep -Fv 'GUID_partition_scheme')"
XQuartzVolPath="$(echo "${hdiutilOut}" | sed -E 's:(/dev/disk[0-9])(s[0-9])?( +)?(Apple_HFS)?( +)::')"
echo "Starting the XQuartz install; please rerun this script when it finishes." >&2
open "${XQuartzVolPath}/${XQuartzPKGPath}"
exit 0
fi

# Check the xcode licence
if [[ ! -f /Library/Preferences/com.apple.dt.Xcode.plist ]] && [[ ! -z "${XcodePath}" ]]; then
choice=""
while [[ ! "${choice}" = "1" ]] || [[ ! "${choice}" = "2" ]] || [[ ! "${choice}" = "3" ]]; do
clear
cat > "/dev/stderr" << EOF You need to accept the xcode licence to continue. You can: [1] Read the licence and accept it. (Default) [2] Accept the licence without reading it. [3] Quit. EOF read -rp $'[1|2|3] ' choice if [ -z "${choice}" ]; then choice="1" fi case "${choice}" in 1) sudo xcodebuild -license ;; 2) sudo xcodebuild -license accept ;; 3) exit 0 ;; *) echo "Not a valid choice." >&2 ;;
esac
done
fi

# Get Fink
clear
echo "Fetching Fink..." >&2
fetchBin "${FinkMD5Sum}" "${FinkSourceDLP}" "${FinkFileName}" "${FinkDirectorY}" "${FinkOutDir}"
# clear
# read -rp $'Do you want to use the binary distribution instead of having to build all packages locally?\n[Y|n] ' choice
# if [[ "${choice}" = "y" ]] || [[ "${choice}" = "Y" ]] || [[ -z "${choice}" ]]; then
# 	UseBinaryDist="1"
# fi

# Build Fink
clear
cat > "/dev/stderr" << EOF We are about to start building Fink; this may take a bit, so feel free to grab a cup of you favorite beverage while you wait. EOF if ! read -n1 -rsp $'Press any key to continue or ctrl+c to exit.\n'; then exit 1 fi clear cd "${FinkOutDir}" if ! ./bootstrap /sw; then exit 1 fi # Set up bindist # shellcheck disable=SC2154 if [ "${UseBinaryDist}" = "1" ]; then clear echo "Activating the Binary Distribution..." >&2
sudo rm /sw/etc/fink.conf.bak
sudo mv /sw/etc/fink.conf /sw/etc/fink.conf.bak
sed -e 's|UseBinaryDist: false|UseBinaryDist: true|' "/sw/etc/fink.conf.bak" | sudo tee "/sw/etc/fink.conf"

if grep -Fqx 'bindist.finkmirrors.net' "/sw/etc/apt/sources.list"; then
# Fix wrong address.
sudo rm "/sw/etc/apt/sources.list.finkbak"
sudo mv "/sw/etc/apt/sources.list" "/sw/etc/apt/sources.list.finkbak"
sed -e 's:finkmirrors.net:finkproject.org:g' "/sw/etc/apt/sources.list.finkbak" | sudo tee "/sw/etc/apt/sources.list"
elif ! grep -Fqx 'http://bindist.finkproject.org/' "/sw/etc/apt/sources.list"; then
sudo tee -a "/sw/etc/apt/sources.list" << EOF # Official bindist see http://bindist.finkproject.org/ for details. deb http://bindist.finkproject.org/${OSXVersion} stable main EOF fi fi # Set up paths clear echo "Setting up Fink paths..." >&2
/sw/bin/pathsetup.sh

# First selfupdate
source /sw/bin/init.sh
clear
cat > "/dev/stderr" << EOF
Now the last thing we will do is run 'fink selfupdate' for the first
time.

It will ask you to choose a method; unless you have a really picky
firewall you probaly want to choose rsync.

EOF

if ! read -n1 -rsp $'Press any key to continue or ctrl+c to exit.\n'; then
exit 1
fi

fink selfupdate

exit 0


tags: MrNetTek

Google Chrome – 76.0.3809.132

email me

Description

Google Chrome is a cross-platform web browser developed by Google. It was first released in 2008 for Microsoft Windows, and was later ported to Linux, macOS, iOS, and Android. The browser is also the main component of Chrome OS, where it serves as the platform for web apps. more…


Download

New Chrome browser is available here:

https://enterprise.google.com/intl/en_version/chrome/chrome-browser/ mirror


Size

55.5 MB


Silent Install

setup.msi /quiet /norestart


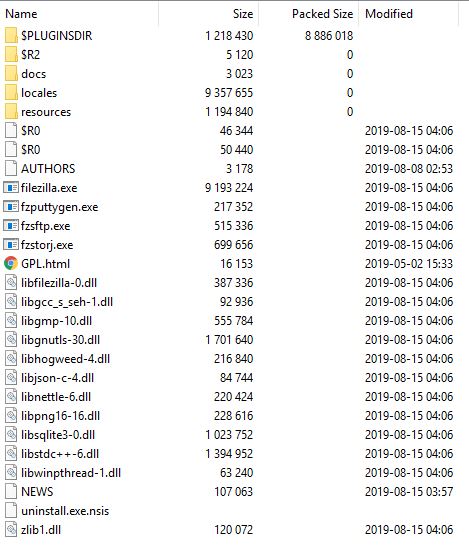
Install Location (10 Folders, 99 Files, 431 MB)

C:\Program Files (x86)\Google\Chrome\Application\76.0.3809.132


Silent Uninstall

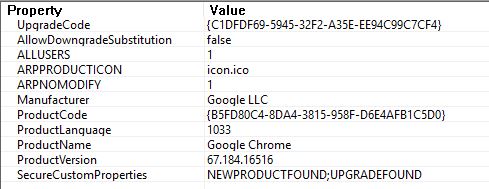
msiexec /x{B5FD80C4-8DA4-3815-958F-D6E4AFB1C5D0} /qn /norestart

“C:\Program Files (x86)\Google\Chrome\Application\76.0.3809.132\Installer\setup.exe” –uninstall –multi-install –chrome –system-level –force-uninstall
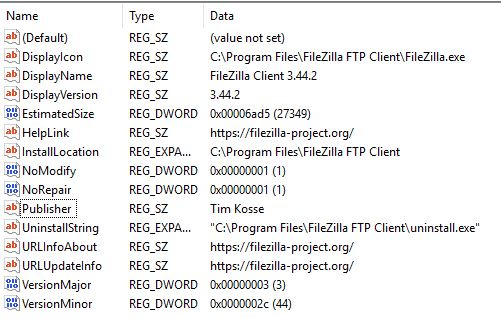

Registry

HKEY_LOCAL_MACHINE\SOFTWARE\Microsoft\Windows\CurrentVersion\Uninstall\{B5FD80C4-8DA4-3815-958F-D6E4AFB1C5D0}


App GUID

{B5FD80C4-8DA4-3815-958F-D6E4AFB1C5D0}

MSI Property Table


Notes

Download Chrome for Mac

Release Notes v76: July 30, 2019

Chrome Platform Status

Chrome v76 Features

Admin Insider: What’s new in Chrome Enterprise, Release v76

Chrome Scrubber


Mac – Disable Chrome Auto Updates

Method 1

On Mac, you can go to “Users > Your Mac Drive > Library > Google > GoogleSoftwareUpdate” and rename this folder.


Method 2

Open Finder and go to “Applications” folder.

Right click or control + click on the Google Chrome folder and go to “Show Packaged Content”.

Click “Contents” folder and open “Info.plist” file. Remember you need to have editors like Xcode to open plist file. Also you should have write permission for both “Contents” folder and “Info.plist” file to edit.

Look for “KSUpdateURL” key. In our case this is pointing to “https://tools.google.com/service/update2”.

Simply rename the file to something else and save your changes.


Method 3

#!/bin/sh

Version=$(/Applications/Google\ Chrome.app/Contents/MacOS/Google\ Chrome --version | awk '{print $3}')

sudo rm -rf /Applications/Google\ Chrome.app/Contents/Frameworks/Google\ Chrome\ Framework.framework/Versions/"$Version"/Frameworks/KeystoneRegistration.framework


tags: MrNetTek

Skype for Desktop – 8.51.0.92

email me

Download

New Skype for Desktop (Windows) is available here:

https://go.skype.com/windows.desktop.download mirror


Size

65.4 MB


Silent Install

setup.exe /VERYSILENT /SP- /NOCANCEL /NORESTART /SUPPRESSMSGBOXES /NOLAUNCH -ms


Install Location (32 Folders, 153 Files, 240 MB)

C:\Program Files (x86)\Microsoft\Skype for Desktop


Silent Uninstall

“C:\Program Files (x86)\Microsoft\Skype for Desktop\unins000.exe” /SILENT


Registry

Windows Registry Editor Version 5.00

[HKEY_LOCAL_MACHINE\SOFTWARE\WOW6432Node\Microsoft\Windows\CurrentVersion\Uninstall\Skype_is1]
“Inno Setup: Setup Version”=”5.6.1 (u)”
“Inno Setup: App Path”=”C:\\Program Files (x86)\\Microsoft\\Skype for Desktop”
“InstallLocation”=”C:\\Program Files (x86)\\Microsoft\\Skype for Desktop\\”
“Inno Setup: Icon Group”=”Skype”
“Inno Setup: User”=”Demo99”
“Inno Setup: Language”=”en”
“DisplayName”=”Skype version 8.51”
“DisplayIcon”=”C:\\Program Files (x86)\\Microsoft\\Skype for Desktop\\Skype.exe”
“UninstallString”=”\”C:\\Program Files (x86)\\Microsoft\\Skype for Desktop\\unins000.exe\””
“QuietUninstallString”=”\”C:\\Program Files (x86)\\Microsoft\\Skype for Desktop\\unins000.exe\” /SILENT”
“DisplayVersion”=”8.51”
“Publisher”=”Skype Technologies S.A.”
“URLInfoAbout”=”http://www.skype.com/”
“HelpLink”=”https://support.skype.com/”
“URLUpdateInfo”=”www.skype.com/download-skype/”
“NoModify”=dword:00000001
“NoRepair”=dword:00000001
“InstallDate”=”20190829”
“MajorVersion”=dword:00000008
“MinorVersion”=dword:00000033
“VersionMajor”=dword:00000008
“VersionMinor”=dword:00000033
“EstimatedSize”=dword:0003603e


Notes

Download Skype for Mac


Disable Skype auto updates (for Windows and Macs)


Skype uses asar compression

C:\Program Files (x86)\Microsoft\Skype for Desktop\resources\app.asar


tags: Skype automation, MrNetTek

FileZilla – 3.44.2

email me

Description

FileZilla is a free software, cross-platform FTP application, consisting of FileZilla Client and FileZilla Server. Client binaries are available for Windows, Linux, and macOS, server binaries are available for Windows only.


Download

New FileZilla client is available here:

https://download.filezilla-project.org/client/FileZilla_3.44.2_win64_sponsored-setup.exe  All


Size

8.6 MB


Silent install

setup.exe /NCRC /S


Install Location (102 Folders, 819 Files, 27.3 MB)

C:\Program Files\FileZilla FTP Client


Silent uninstall

“C:\Program Files\FileZilla FTP Client\uninstall.exe” /S


Registry

HKEY_LOCAL_MACHINE\SOFTWARE\WOW6432Node\Microsoft\Windows\CurrentVersion\Uninstall\FileZilla Client


Inside the EXE (using 7zip)


tags: Filezilla automation, FileZilla scripting, MrNetTek

Slack – 4.0.2

email me

Download

New Slack setup is available here:

https://slack.com/downloads/windows


Size

75.3 MB


Install

setup.exe

* note, this application is installed in the Current User security context


Install Location (75 Folders, 250 Files, 253 MB)

C:\Users\%username%\AppData\Local\slack

view contents: 4.0.2.txt


Silent Uninstall

"C:\Users\%username%\AppData\Local\slack\Update.exe" --uninstall -s


Registry

HKEY_CURRENT_USER\Software\Microsoft\Windows\CurrentVersion\Uninstall\slack


Notes

Download Slack for Mac


Contents of setup.exe


Contents of slack-4.0.2-full.nupkg


Slack 4.0.2 August 19, 2019

Bug Fixes

  • Videos in channels were found to be the cause of a minor (but pesky) memory leak that has now been well and truly plugged.
  • It’s taken a few tries, but the app should now crash less often when connected to an external display. Hopefully.
  • On opening your computer, the app is now, thankfully, more likely to launch properly every time. And, if you’re using the direct download version, you can choose whether that launch is in the background, or front and center.
  • We spruced up the notifications a little so now they’ll not only show up every time you need them to, they’ll show up looking like whatever theme you wear proudly on your sidebar. Neat.
  • Now whenever an app update is available, we’ll send you a polite little notification to tell you so.
  • If you’d become used to opening Slack from a shortcut on your desktop or menu… you’ll know that we broke that recently. Sorry about that. It is now unbroken once more.
  • While using focus assist in Windows, we’ll now assist that focus further, by no longer serving you noisy notifications. Sorry about that.
  • Using the alt key to move focus to the menu is great… but was a little over-excitable. Should you tap it by mistake (or otherwise), it will no longer take ALL the focus, and you can continue to do other things.


tags: Slack silent install, Slack automation, MrNetTek

Azure – PowerShell – Create a Virtual Machine (VM)

email me


Create a VM Using PowerShell

* this assumes you already have a virtual network setup

# 0 Before starting VM, create a Resource Group (if you don't have one)
New-AzResourceGroup -Name myRG1 -Location EastUS

# 1 Set the admin username and password
$cred = Get-Credential

# 2 Create the initial config
$vm = New-AzVMConfig -VMName myVM1 -VMSize Standard_D1

# 3 Add the OS Info
$vm = Set-AzVMOperatingSystem `
-VM $vm `
-Windows `
-ComputerName "LabPC1" `
-Credentials $cred `
-ProvisionVMAgent `
-EnableAutoUpdate

# 4 Add the image info
$vm = Set-AzVMSourceImage -VM $vm -PublisherName MicrosoftWindowsServer -Offer WindowsServer -Skus 2016-Datacenter

# 5 Add OS settings
$vm = Set-AzVMOSDisk -VM $vm -Name myOsDisk1 -DiskSizeInGB 128 -CreatOption FromImage -Caching ReadWrite

# 6 Add the NIC
$vm = Add-AzVMNetworkInterface -VM $vm -Id $nic.Id

# 7 Create the VM
New-AzVM -ResourceGroupName myRGVM1 -Location EastUS -VM $vm


Create a VM Using PowerShell

* this assumes you do not have a virtual network setup

# 1 Create variables to store the location and resource group names.
$location = "local"
$ResourceGroupName = "myRG1"

New-AzureRmResourceGroup `
-Name $ResourceGroupName `
-Location $location

# 2 Create variables to store the storage account name and the storage account SKU information
$StorageAccountName = "mySA1"
$SkuName = "Standard_LRS"

# 3 Create a new storage account
$StorageAccount = New-AzureRMStorageAccount `
-Location $location `
-ResourceGroupName $ResourceGroupName `
-Type $SkuName `
-Name $StorageAccountName

Set-AzureRmCurrentStorageAccount `
-StorageAccountName $storageAccountName `
-ResourceGroupName $resourceGroupName

# 4 Create a subnet configuration
$subnetConfig = New-AzureRmVirtualNetworkSubnetConfig `
-Name "mySubnet1" `
-AddressPrefix 192.168.1.0/24

# 5 Create a virtual network
$vnet = New-AzureRmVirtualNetwork `
-ResourceGroupName $ResourceGroupName `
-Location $location `
-Name "myVNet1" `
-AddressPrefix 192.168.0.0/16 `
-Subnet $subnetConfig

# 6 Create a public IP address and specify a DNS name
$pip = New-AzureRmPublicIpAddress `
-ResourceGroupName $ResourceGroupName `
-Location $location `
-AllocationMethod Static `
-IdleTimeoutInMinutes 4 `
-Name "mypublicdns$(Get-Random)"

# 7 Create an inbound network security group rule for port 3389
$nsgRuleRDP = New-AzureRmNetworkSecurityRuleConfig `
-Name "myNSGRuleRDP" `
-Protocol Tcp `
-Direction Inbound `
-Priority 1000 `
-SourceAddressPrefix * `
-SourcePortRange * `
-DestinationAddressPrefix * `
-DestinationPortRange 3389 `
-Access Allow

# 8 Create an inbound network security group rule for port 80
$nsgRuleWeb = New-AzureRmNetworkSecurityRuleConfig `
-Name "myNSGRuleWWW1" `
-Protocol Tcp `
-Direction Inbound `
-Priority 1001 `
-SourceAddressPrefix * `
-SourcePortRange * `
-DestinationAddressPrefix * `
-DestinationPortRange 80 `
-Access Allow

# 9 Create a network security group
$nsg = New-AzureRmNetworkSecurityGroup `
-ResourceGroupName $ResourceGroupName `
-Location $location `
-Name "myNSG1" `
-SecurityRules $nsgRuleRDP,$nsgRuleWeb

# 10 Create a virtual network card and associate it with public IP address and NSG
$nic = New-AzureRmNetworkInterface `
-Name "myNic1" `
-ResourceGroupName $ResourceGroupName `
-Location $location `
-SubnetId $vnet.Subnets[0].Id `
-PublicIpAddressId $pip.Id `
-NetworkSecurityGroupId $nsg.Id

# 11 Define a credential object to store the username and password for the VM
$UserName = 'AzureUsername'
$Password = 'AzurePassword'| ConvertTo-SecureString -Force -AsPlainText
$Credential = New-Object PSCredential($UserName,$Password)

# 12 Create the VM configuration object
$VmName = "VirtualMachinelatest"
$VmSize = "Standard_A1"
$VirtualMachine = New-AzureRmVMConfig `
-VMName $VmName `
-VMSize $VmSize

$VirtualMachine = Set-AzureRmVMOperatingSystem `
-VM $VirtualMachine `
-Windows `
-ComputerName "LabPC1" `
-Credential $Credential

$VirtualMachine = Set-AzureRmVMSourceImage `
-VM $VirtualMachine `
-PublisherName "MicrosoftWindowsServer" `
-Offer "WindowsServer" `
-Skus "2016-Datacenter" `
-Version "latest"

# 13 Sets the operating system disk properties on a VM.
$VirtualMachine = Set-AzureRmVMOSDisk `
-VM $VirtualMachine `
-CreateOption FromImage | `
Set-AzureRmVMBootDiagnostics -ResourceGroupName $ResourceGroupName `
-StorageAccountName $StorageAccountName -Enable |`
Add-AzureRmVMNetworkInterface -Id $nic.Id

# 14 Create the VM.
New-AzureRmVM `
-ResourceGroupName $ResourceGroupName `
-Location $location `
-VM $VirtualMachine

# 15 Return the IP address
$IP = Get-AzureRmPublicIpAddress -ResourceGroupName $ResourceGroupName | Select IpAddress

# 16 Connect to VM
mstsc /v $IP


Notes

Create a VM using the Portal

New-AzResourceGroup
New-AzVMConfig
Set-AzVMOperatingSystem
Set-AzVMSourceImage
Set-AzVMOSDisk
Add-AzVMNetworkInterface
New-AzVM

New-AzureRMStorageAccount
Set-AzureRmCurrentStorageAccount
New-AzureRmVirtualNetworkSubnetConfig
New-AzureRmVirtualNetwork
New-AzureRmPublicIpAddress
New-AzureRmNetworkSecurityRuleConfig
New-AzureRmNetworkSecurityGroup
New-AzureRmNetworkInterface
New-AzureRmVMConfig
Set-AzureRmVMOperatingSystem
Set-AzureRmVMSourceImage
Set-AzureRmVMOSDisk
Set-AzureRmVMBootDiagnostics

Add-AzureRmVMNetworkInterface
New-AzureRmVM
Get-AzureRmPublicIpAddress


tags: MrNetTek