Windows – Perfmon not working

email me

My notes during a troubleshooting session for the Performance Monitor. Maybe they’ll be helpful to you.

Before trying anything beyond Disabling the Firewall and checking to make sure you have an account to access the machine:

Launch perfmon as an admin.
Remove all counters.
Add a new counter.
Select remote computer.

 
Then, order of troubleshooting…


START SERVICES
—————————-

Remote Procedure Call (RPC)
Remote Registry
WMI Performance Adapter
Performance Counter DLL Host
Performance Logs and Alerts
Remote Procedure Call (RPC) Locator


REG KEYS
—————————-

Change reg key permission on Perflib
HKEY_LOCAL_MACHINE\SOFTWARE\Microsoft\Windows NT\CurrentVersion\Perflib.
‘Local Service’ with ‘Full control’

Add reg key
HKEY_LOCAL_MACHINE\SYSTEM\ControlSet001\Services\LanmanWorkstation\Parameters
AllowInsecureGuestAuth REG_DWORD to 1

Delete reg key ‘SMBv1’ from
HKEY_LOCAL_MACHINE\SYSTEM\ControlSet001\services\LanmanWorkstation\Parameters

Delete reg key ‘EnableSecuritySignature’ from
HKEY_LOCAL_MACHINE\SYSTEM\ControlSet001\services\LanmanWorkstation\Parameters


NETWORK

—————————-

Turn on sharing so anyone with network access can read and write files


USERS AND GROUPS

—————————-

Add Everyone to ‘Performance Log Users’
Add Everyone to ‘Performance Monitor Users’

Enable Guest account


GROUP POLICY
—————————-

Add ‘Everyone’
The “Allow log on locally” setting specifies the users or groups that are allowed to log into the local computer. This policy can be found in Computer Configuration > Security Settings > Local Policies > User Rights Assignment > Allow log on locally


REBUILDING COUNTERS
—————————-

cd c:\windows\system32
lodctr /R
cd c:\windows\sysWOW64
lodctr /R
WINMGMT.EXE /RESYNCPERF
restart machine


References

https://support.microsoft.com/en-us/help/2554336/how-to-manually-rebuild-performance-counters-for-windows-server-2008-6

https://support.microsoft.com/en-us/help/300956/how-to-manually-rebuild-performance-counter-library-values

http://mvolo.com/troubleshooting-performance-counter-problems-with-perfmon-and-a-debugger/


Notes

Error: The performance counter ‘# result objects in memory’ was not found.
Fix: LODCTR /R
 

PowerShell – Verify if Device is Connected

email me

This will check to see if a device is connected to computer

clear-host

# list out all devices - just for troubleshooting purposes
Get-PnpDevice -PresentOnly

# which device to test
$TestDevice = "Bluetooth"

# test device
If (Get-PnpDevice -PresentOnly -FriendlyName $TestDevice) {write-host "TRUE"} Else {Write-host "FALSE"} -silentlycontinue


Notes

$ErrorActionPreference = ‘Stop’
$ErrorActionPreference= ‘silentlycontinue’

try
{
Main code
}
catch
{
Error handling
}

more…

PowerShell – View Objects of Processes

email me

Screenshot


Code

$processName = "explorer.exe"

Set-StrictMode -Version 3

Add-Type -Assembly System.Windows.Forms

$inputObject = dir variable:\* -Exclude InputObject,Args |
    Where-Object {
        $_.Value -and
        ($_.Value.GetType() -eq $processName.GetType()) -and
        ($_.Value.GetHashCode() -eq $processName.GetHashCode())
}

$inputObject = $inputObject| % Name | Select -First 1

if(-not $inputObject)
{
    $inputObject = "InputObject"
}

function PopulateNode($node, $object)
{
    if(-not $object) { return }

    if([System.Management.Automation.LanguagePrimitives]::GetEnumerator($object))
    {
 
        $count = 0

        $isOnlyEnumerable = $object.GetHashCode() -eq $object[0].GetHashCode()
        

        foreach($childObjectValue in $object)
        {            
            $newChildNode = New-Object Windows.Forms.TreeNode
            $newChildNode.Text = "$($node.Name)[$count] = $childObjectValue : " + $childObjectValue.GetType()
                     
            if($isOnlyEnumerable)
            {
                $newChildNode.Name = "@"
            }

            $newChildNode.Name += "[$count]"
            $null = $node.Nodes.Add($newChildNode)               
                        
            AddPlaceholderIfRequired $newChildNode $childObjectValue

            $count++
        }
    }
    else
    {
        
        foreach($child in $object.PSObject.Properties)
        {
        
            $childObject = $child.Value
            $childObjectType = $null
            if($childObject)
            {
                $childObjectType = $childObject.GetType()
            }

            $childNode = New-Object Windows.Forms.TreeNode
            $childNode.Text = $child.Name + " = $childObject : $childObjectType"
            $childNode.Name = $child.Name
            $null = $node.Nodes.Add($childNode)

            AddPlaceholderIfRequired $childNode $childObject
        }
    }
}

function AddPlaceholderIfRequired($node, $object)
{
    if(-not $object) { return }

    if([System.Management.Automation.LanguagePrimitives]::GetEnumerator($object) -or
        @($object.PSObject.Properties))
    {
        $null = $node.Nodes.Add( (New-Object Windows.Forms.TreeNode "...") )
    }
}

function OnAfterSelect
{
    param($Sender, $processTreeEventArgs)

    $nodeSelected = $Sender.SelectedNode

    $nodePath = GetPathForNode $nodeSelected

    $resultObject = Invoke-Expression $nodePath
    $output.Text = $nodePath

    if($resultObject)
    {
        $members = Get-Member -InputObject $resultObject | Out-String       
        $output.Text += "`n" + $members
    }
}


function OnBeforeExpand
{
    param($Sender, $processTreeCancelEventArgs)

    $selectedNode = $processTreeCancelEventArgs.Node

    if($selectedNode.FirstNode -and
        ($selectedNode.FirstNode.Text -eq "..."))
    {
        $selectedNode.Nodes.Clear()
    }
    else
    {
        return
    }

    $nodePath = GetPathForNode $selectedNode 

    Invoke-Expression "`$resultObject = $nodePath"

    PopulateNode $selectedNode $resultObject
}

function OnKeyPress
{
    param($Sender, $KeyPressEventArgs)

    if($KeyPressEventArgs.KeyChar -eq 3)
    {
        $KeyPressEventArgs.Handled = $true

        $node = $Sender.SelectedNode
        $nodePath = GetPathForNode $node
        [System.Windows.Forms.Clipboard]::SetText($nodePath)

        $winform.Close()
    }
}

function GetPathForNode
{
    param($Node)

    $nodeElements = @()

    while($Node)
    {
        $nodeElements = ,$Node + $nodeElements
        $Node = $Node.Parent
    }

    $nodePath = ""
    foreach($Node in $nodeElements)
    {
        $nodeName = $Node.Name

        if($nodeName.StartsWith('@'))
        {
            $nodeName = $nodeName.Substring(1)
            $nodePath = "@(" + $nodePath + ")"
        }
        elseif($nodeName.StartsWith('['))
        {

        }
        elseif($nodePath)
        {
            $nodePath += "."
        }

        $nodePath += $nodeName
    }

    $nodePath
}

$processTree = New-Object Windows.Forms.TreeView
$processTree.Dock = "Top"
$processTree.Height = 200
$processTree.PathSeparator = "."
$processTree.Add_AfterSelect( { OnAfterSelect @args } )
$processTree.Add_BeforeExpand( { OnBeforeExpand @args } )
$processTree.Add_KeyPress( { OnKeyPress @args } )

$output = New-Object System.Windows.Forms.TextBox
$output.Multiline = $true
$output.ScrollBars = "Vertical"
$output.Font = "Calibri"
$output.Dock = "Top"
$output.Height = 600

$root = New-Object Windows.Forms.TreeNode
$root.Text = "$processName : " + $processName.GetType()
$root.Name = '$' + $inputObject
$root.Expand()
$null = $processTree.Nodes.Add($root)

PopulateNode $root $processName

$winform = New-Object Windows.Forms.Form
$winform.Text = "Browsing " + $root.Text
$winform.Width = 1100
$winform.Height = 800
$winform.Controls.Add($output)
$winform.Controls.Add($processTree)
$null = $winform.ShowDialog()
$winform.Dispose()

Python – ICSplit – Split Google Calendar File

email me

Split .ics files into smaller ones for import into Google Calendar, which only supports files less than 1 MB.


Source File

https://files.pythonhosted.org/packages/c3/99/539170da786a51936bca8cf6b8998a6616a2aff7827174bba15985da2a5c/icssplit-1.0.0.tar.gz

https://github.com/beorn/icssplit

Python


Command

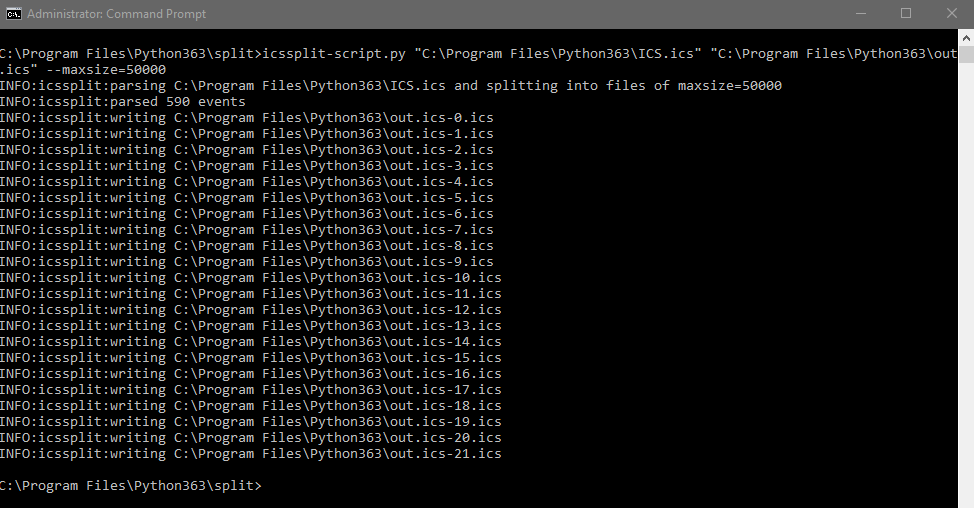
icssplit “path\ICS.ics” “path\out.ics” –maxsize=50000


Output

INFO:icssplit:parsing C:\Program Files\Python363\ICS.ics and splitting into files of maxsize=50000
INFO:icssplit:parsed 590 events
INFO:icssplit:writing C:\Program Files\Python363\out.ics-0.ics
INFO:icssplit:writing C:\Program Files\Python363\out.ics-1.ics
INFO:icssplit:writing C:\Program Files\Python363\out.ics-2.ics
INFO:icssplit:writing C:\Program Files\Python363\out.ics-3.ics
INFO:icssplit:writing C:\Program Files\Python363\out.ics-4.ics
INFO:icssplit:writing C:\Program Files\Python363\out.ics-5.ics
INFO:icssplit:writing C:\Program Files\Python363\out.ics-6.ics
INFO:icssplit:writing C:\Program Files\Python363\out.ics-7.ics
INFO:icssplit:writing C:\Program Files\Python363\out.ics-8.ics
INFO:icssplit:writing C:\Program Files\Python363\out.ics-9.ics
INFO:icssplit:writing C:\Program Files\Python363\out.ics-10.ics
INFO:icssplit:writing C:\Program Files\Python363\out.ics-11.ics
INFO:icssplit:writing C:\Program Files\Python363\out.ics-12.ics
INFO:icssplit:writing C:\Program Files\Python363\out.ics-13.ics
INFO:icssplit:writing C:\Program Files\Python363\out.ics-14.ics
INFO:icssplit:writing C:\Program Files\Python363\out.ics-15.ics
INFO:icssplit:writing C:\Program Files\Python363\out.ics-16.ics
INFO:icssplit:writing C:\Program Files\Python363\out.ics-17.ics
INFO:icssplit:writing C:\Program Files\Python363\out.ics-18.ics
INFO:icssplit:writing C:\Program Files\Python363\out.ics-19.ics
INFO:icssplit:writing C:\Program Files\Python363\out.ics-20.ics
INFO:icssplit:writing C:\Program Files\Python363\out.ics-21.ics

Screenshot


Notes

Installation: setup.py install

NOTE Make sure the ICS file is saved as ANSI.


Export Calendar

  1. Select the Settings button from the top right of the page.
  2. Choose Settings when the menu shows.
  3. Open the Calendars tab.
  4. At the bottom of the My Calendars section, choose Export calendars to save every calendar to the ICS format.

To export just one calendar from Google Calendar, click or tap on the calendar from this page and then use the Export this calendar link from the bottom of the next page.


SCCM – Install Agent on Workgroup Computer

email me

These are the options I used to install the SCCM agent on Workgroup or Azure AD computers

ccmsetup.exe /source:PathToFolder:\SCCM /NATIVE SMSSIGNCERT=PathToFolder:\SCCM\SCCM_WORKGROUP.cer /skipprereq:vcredist_x86.exe /UsePKICert /NoCRLCheck FSP=dmz.domain.com CCMALWAYSINF=1 CCMFIRSTCERT=1 CCMHOSTNAME=dmz.domain.com DNSSUFFIX=domain.com SMSSITECODE=ABC

PKI – CES/CEP – Enrollment Policy

email me

These are the enrollment policy reg keys taken from a reference machine. You basically set up a reference computer using the Manage Enrollment Policies (in mmc, Add certificates, Computer account. And then…Personal, Certificates, All Tasks, Advanced Operations—set up the enrollment policy), export those reg keys, and then automate the import on your client machines.

Windows Registry Editor Version 5.00

[HKEY_LOCAL_MACHINE\SOFTWARE\Microsoft\Cryptography\PolicyServers]
@=””
“Flags”=dword:00000000
[HKEY_LOCAL_MACHINE\SOFTWARE\Microsoft\Cryptography\PolicyServers\54317f2ebe81a09c15eeb976a6cead1b98353dff]
“URL”=”https://server.external.com/ADPolicyProvider_CEP_UsernamePassword/service.svc/CEP”
“PolicyID”=”{2BEEB86C-F2C8-8C63-796C-0B593C1F6BA5}”
“FriendlyName”=”DOMAIN.COM”
“Flags”=dword:00000020
“AuthFlags”=dword:00000004
“Cost”=dword:7ffffffd


Notes

Enable auto enrollment renewal

“Flags”=dword:00000032


Delete existing enrollment server URL

certutil –config “{CA Config String}” –enrollmentServerURL https://server.external.com/CA1_CES_UsernamePassword/service.svc/CES delete


To add the enrollment service URI to the CA Enrollment Services in AD

certutil –config “{cahostname.domain.com}\{caname}” –enrollmentServerURL https://server.external.com/Domain-CA_CES_UsernamePassword/service.svc/CES


To display CA Enrollment Services object attributes (including the enrollment service URI)

certutil –adca


To display enrollment policy data including general certificate enrollment web service configuration details

certutil –policy


Display existing enrollment server URI’s

certutil –config “{CA Config String}” –enrollmentServerURL

PKI – Autogenerate INF

email me

When submitting a cert request to a certificate authority, to automate this process, you’re going to need an INF. This is how you create that file

echo [NewRequest] > SCCM_WORKGROUP.INF
echo Subject=”CN=%computername%” >> SCCM_WORKGROUP.INF
echo Exportable=TRUE >> SCCM_WORKGROUP.INF
echo KeyLength=1024 >> SCCM_WORKGROUP.INF
echo KeySpec=1 >> SCCM_WORKGROUP.INF
echo KeyUsage=0xA0 >> SCCM_WORKGROUP.INF
echo ProviderName=”Microsoft RSA SChannel Cryptographic Provider” >> SCCM_WORKGROUP.INF
echo ProviderType=12 >> SCCM_WORKGROUP.INF
echo RequestType=PKCS10 >> SCCM_WORKGROUP.INF
echo MachineKeySet=TRUE >> SCCM_WORKGROUP.INF
echo [RequestAttributes] >> SCCM_WORKGROUP.INF
echo SAN=%computername% >> SCCM_WORKGROUP.INF

IDEA You can use PowerShell or another scripting language to create the INF. Just make sure the CN=EnvironmentalVariable for the computer name and SAN.

Notes

Batch – Return Serial Number of Certificate.cer File

PKI – Script the Request, Submit, and Import Cert

email me

This is the client side process for creating a certificate request, submitting a request, and importing a returned certificate for workgroup computers. These steps need to be done in order. This assumes CEP and CES are properly working in your DMZ, and that you have set up the enrollment policy, locally. What is recommended…if you’re going to automate this, is to create a script, and then compile it. The account used in the enrollment process should have no access to do anything else on your domain.


Step 1 of 5 – Using an INF (which you’ve already saved), create request

certreq -new SCCM_WORKGROUP.INF SCCM_WORKGROUP.req


Step 2 of 5 – Submit request (this is dependent on a working CES and CEP)

certreq -submit -username DOMAIN\USERNAME -p PASSWORD -PolicyServer “https://server.external.com/ADPolicyProvider_CEP_UsernamePassword/service.svc/CEP” -config “https://server.external.com/DOMAIN-CA_CES_UsernamePassword/service.svc/CES” -attrib “CertificateTemplate:WorkgroupCertificateNameHere” SCCM_WORKGROUP.req SCCM_WORKGROUP.cer


Step 3 of 5 – Accepting the Certificate

certreq -accept SCCM_Workgroup.cer


Step 4 of 5 – Exporting the Certificate

certutil -p PASSWORD -exportPFX %computername% SCCM_WORKGROUP.pfx


Step 5 of 5 – Import certificate returned from request

certutil -f -addstore “ROOT” SCCM_WORKGROUP.cer
certutil -p PASSWORD -importPFX SCCM_WORKGROUP.pfx NoExport


Notes

Submit request

certreq -submit -f -config “10.1.0.11\DOMAIN-CA” SCCM_Workgroup.req SCCM_Workgroup.cer


Delete cert url cache:

certutil -urlcache * delete


Delete cert user cache:

C:\Users\%username%\AppData\LocalLow\Microsoft\CryptnetUrlCache


Delete cert computer cache:

C:\Windows\System32\config\systemprofile\AppData\LocalLow\Microsoft\CryptnetUrlCache