Simple AI Learner Bot

email me

I created this simple batch file to demonstrate a learning bot…you will help it build its data file named speech.txt. Just copy the below text into a file like AI.cmd, and run it.

@echo off
set BotName=Chatty

title AI %BotName% 1.0 – Learner Bot
color 0b

rem Create the speech file if not exist
if not exist speech.txt echo.>speech.txt

Echo Start up a conversation with %BotName%
echo.

:START
set /p text=”You: ”

REM DYNAMIC QUESTIONS THAT PULL REALTIME INFORMATION
if /i “%text%”==”What time is it?” goto :TIME
if /i “%text%”==”What is the time?” goto :TIME
if /i “%text%”==”What is the date?” goto :DATE

REM OUR SPEECH FILE
for /f “tokens=1,* delims=@” %%a in (speech.txt) do (

if /i “%text%”==”%%a” (
echo.
echo %BotName%: %%b
echo.
goto :START
)
)

echo %BotName%: I don’t know what that means.
set /p answer=%BotName%:  How should this be answered ‘%text%’?
echo %text%@%answer%>>speech.txt
echo %BotName%: Thanks!
echo.
goto :START
:TIME
echo.
echo %BotName%: The time is %TIME%
echo.
goto :START

:DATE
echo.
echo %BotName%: The date is %DATE%
echo.
goto :START

Change User Wallpaper

email me

This is how you update a user’s wallpaper scriptomatically.

xcopy /y \\TheComputerName\WallPaper\new_wallpaper.bmp “%userprofile%\”

REG ADD “HKCU\Control Panel\Desktop” /V Wallpaper /T REG_SZ /F /D “%userprofile%\newa_wallpaper.bmp”
REG ADD “HKCU\Control Panel\Desktop” /V WallpaperStyle /T REG_SZ /F /D 2
REG ADD “HKCU\Control Panel\Desktop” /V TileWallpaper /T REG_SZ /F /D 0

%SystemRoot%\System32\RUNDLL32.EXE user32.dll, UpdatePerUserSystemParameters

How to Install .CAB File on Windows

email me

Scenario:
You downloaded a file that you required urgently but its format is .cab. What do you do with it?

Solution:
The .cab Cabinet file is a compressed archive that cannot be ran or executed directly. However, Windows has built-in support to open and view .cab archive content, but not outright install the .cab even if it’s part of an update or hotfix. In order to install a manually downloaded .cab file, use the following trick that makes use of pkgmgr.exe (Windows Package Manager) instead.
Open an elevated privileges command prompt as administrator, and run the following command to install and integrate the Cabinet archive:

pkgmgr /ip /m:<path><file name>.cab /quiet

Or,

start /wait pkgmgr /ip /m:<path><file name>.cab /quiet

Note, you need the /quiet…otherwise errors will be generated.
Replace <path> with the path (location) to the .cab file, and <file name> with the actual file name of the .cab file, without parenthesis. If the Cabinet file is located on the current directory (same directory where command is ran, the path can be skipped.

Tip:
If you intend to save an installation log, append the /l:<path><file name>.log to the end of the command. Again, replace <path><file name>.cab with the file name of log file to save to with its folder location (path). Also, if you do not want to restart at the end of installation, use the switch  /norestart

Elevated Commands

email me

How to launch an elevated command using sanur

C:\Windows\SysWOW64\runas /u:%computername%\USERNAME “cmd /c C:\setup\java\jre-7u55-windows-i586.exe” | c:\setup\java\sanur PASSWORD


Using cpau

cpau -u USERNAME -p PASSWORD-ex “cmd /c C:\setup\java\jre-7u55-windows-i586.exe” -lwop


Using lsrunas

lsrunas /user:USERNAME /password:PASSWORD /domain: /command:notepad.exe /runpath:c:\


Receiving White Java Icon in Control Panel or Application Error

email me

Change this (the actual exported keys)

Windows Registry Editor Version 5.00

[HKEY_CLASSES_ROOT\CLSID\{4299124F-F2C3-41b4-9C73-9236B2AD0E8F}]
@=”Java”
“System.ControlPanel.Category”=”8”
“InfoTip”=”@C:\\Program Files\\Java\\jre7\\bin\\javacpl.exe,-2″

[HKEY_CLASSES_ROOT\CLSID\{4299124F-F2C3-41b4-9C73-9236B2AD0E8F}\DefaultIcon]
@=”C:\\Program Files\\Java\\jre7\\bin\\javacpl.exe”

[HKEY_CLASSES_ROOT\CLSID\{4299124F-F2C3-41b4-9C73-9236B2AD0E8F}\Shell]

[HKEY_CLASSES_ROOT\CLSID\{4299124F-F2C3-41b4-9C73-9236B2AD0E8F}\Shell\Open]

[HKEY_CLASSES_ROOT\CLSID\{4299124F-F2C3-41b4-9C73-9236B2AD0E8F}\Shell\Open\Command]
@=”C:\\Program Files\\Java\\jre7\\bin\\javacpl.exe”

To this

Windows Registry Editor Version 5.00

[HKEY_CLASSES_ROOT\CLSID\{4299124F-F2C3-41b4-9C73-9236B2AD0E8F}]
@=”Java”
“System.ControlPanel.Category”=”8”
“InfoTip”=”@C:\\Program Files (x86)\\Java\\jre7\\bin\\javacpl.exe,-2″

[HKEY_CLASSES_ROOT\CLSID\{4299124F-F2C3-41b4-9C73-9236B2AD0E8F}\DefaultIcon]
@=”C:\\Program Files (x86)\\Java\\jre7\\bin\\javacpl.exe”

[HKEY_CLASSES_ROOT\CLSID\{4299124F-F2C3-41b4-9C73-9236B2AD0E8F}\Shell]

[HKEY_CLASSES_ROOT\CLSID\{4299124F-F2C3-41b4-9C73-9236B2AD0E8F}\Shell\Open]

[HKEY_CLASSES_ROOT\CLSID\{4299124F-F2C3-41b4-9C73-9236B2AD0E8F}\Shell\Open\Command]
@=”C:\\Program Files (x86)\\Java\\jre7\\bin\\javacpl.exe”
* you are basically redirecting the Control Panel applet from 64 bit to 32 bit files

Now, why do you have to do this?

This has to be done due to missing files in the Program Files path. You could also just verify the 64 bit and 32 bit versions are installed properly, and that the Program Files and Program Files (x86) bin folders are populated with files.


AutoIt – Monitor Window Title

email me

This is how you monitor for a window title, and then do something when the window appears.

Opt("TrayIconHide", 1) ;0=show, 1=hide tray icon;hides the icon

Global $i = 0
DO
Sleep(1000) ;wait 1 second
If WinExists("TheWindowTitle") Then
WinActivate("TheWindowTitle")
;Send("{Enter}") ;you could send a key
;Run("RUN SOMETHING") ;you could execute a program
;ExitLoop
; $i = 20
EndIf
;$i = $i + 1
UNTIL $i > 1

Read Text File into an Array

email me

Set objFileToRead = CreateObject(“Scripting.FileSystemObject”).OpenTextFile(“C:\scripts\MyTextFile.txt”,1)
Dim i
i = 0
do while not objFileToRead.AtEndOfStream
Redim Preserve arrFileLines(i)
arrFileLines(i) = objFileToRead.ReadLine
i = i + 1
Loop

objFileToRead.Close
Set objFileToRead = Nothing

Now, if you want to use each line, just refer to the line by arrFileLines(0), arrFileLines(1), arrFileLines(2), etc.

Find the Most Recent File in Folder

email me

This is how to return the most recent file in a folder

Dim fso, path, file, recentDate, recentFile
Set fso = CreateObject(“Scripting.FileSystemObject”)
Set recentFile = Nothing
For Each file in fso.GetFolder(“C:\scripts”).Files
If (recentFile is Nothing) Then
Set recentFile = file
ElseIf (file.DateLastModified > recentFile.DateLastModified) Then
Set recentFile = file
End If
Next

and then I wanted to read that file

Set objFileToRead = CreateObject(“Scripting.FileSystemObject”).OpenTextFile(“C:\scripts\” & recentFile.Name,1)
strFileText = objFileToRead.ReadAll()
objFileToRead.Close
Set objFileToRead = Nothing

Disable Auto Updates in the VLC Player

email me

There are 3 ways to disable auto updates in the VLC Player.

1 – Unchecking the option under preferences.
Tools->Preferences->[Activate updates notifier]

2 – Adjusting the user shortcut.
C:\Program Files (x86)\VideoLAN\VLC\vlc.exe “–no-qt-privacy-ask” “–no-qt-updates-notif”

3 – Creating a settings file that can be copied to another computer. This option is good for enterprise deployment.

Disable the option on a reference, then copy the config file to another machine.

The VLC config file is located here: c:\users\%username%\appdata\roaming\vlc
and named vlcrc


Screenshot


Script to copy the vlcrc pref file to each profile

on error resume next 

Set objShell = CreateObject("Wscript.Shell")
Set objFSO = CreateObject("Scripting.FileSystemObject")

Const HKEY_LOCAL_MACHINE = &H80000002
Const OverwriteExisting = TRUE
Const POPUP_TITLE = "User To SID Conversion"


'SETS CURRENT DIRECTORY TO VARIABLE
strCurrentDirectory = objShell.CurrentDirectory
strComputer = "."

Set objWMIService = GetObject("winmgmts:\\" & strComputer & "\root\cimv2")
Set objRegistry=GetObject("winmgmts:\\" & strComputer & "\root\default:StdRegProv")
strKeyPath = "SOFTWARE\Wow6432Node\Microsoft\Windows NT\CurrentVersion\ProfileList"
objRegistry.EnumKey HKEY_LOCAL_MACHINE, strKeyPath, arrSubkeys
For Each objSubkey In arrSubkeys
 on error resume next
 strValueName = "ProfileImagePath"
 strSubPath = strKeyPath & "\" & objSubkey
 objRegistry.GetExpandedStringValue HKEY_LOCAL_MACHINE,strSubPath,strValueName,strValue
 
 Set objWMIService = GetObject("winmgmts:\\" & strComputer & "\root\cimv2") 
 Set objAccount = objWMIService.Get("Win32_SID.SID='" & objSubkey & "'")
 strUser = objAccount.AccountName
 'strDomain = objAccount.ReferencedDomainName'returns referenced domain

'DISPLAY PROFILE NAME & SID
 objSubkey = trim(objSubkey)'trims whitespace
 strUser = trim(strUser)'trims whitespace
 'msgbox "objSubkey: " & objSubkey'returns SID
 'msgbox strUser'returns username

'LOGIC TO DETERMINE IF REGISTRY ACCOUNT IS TO BE LOADED
if strUser = "SYSTEM" then strUser=""
if strUser = "LOCAL SERVICE" then strUser=""
if strUser = "NETWORK SERVICE" then strUser=""
if strUser = "ADMINISTRATOR" then strUser=""
if strUser <> "" then
	on error resume next
	Wscript.Sleep 1000		
	
	dirPath = "C:\Users\" & strUser & "\appdata\roaming\vlc"
	target = dirPath & "\vlcrc"
	
	
	'Copy file
	If (objFSO.FileExists(strCurrentDirectory & "\vlcrc")) Then
		objShell.Run "%comspec% /c md " &  chr(34) & dirPath & chr(34),0,true
		objShell.Run "%comspec% /c copy /y " & chr(34) & strCurrentDirectory & "\vlcrc" & chr(34) & " " &  chr(34) & target & chr(34),0,true
	end if	

end if

Next

Robocopy

email me

Robust File and Folder Copy

By default, Robocopy will only copy a file if the source and destination have different time stamps or different file sizes.

For incremental backups
robocopy D:\Source F:\destination *.* /s /E /COPYALL /ZB /R:3 /W:5 /TEE /LOG:F:\log.txt

Syntax
      ROBOCOPY Source_folder Destination_folder [files_to_copy] [options]

Key
   file(s)_to_copy : A list of files or a wildcard.
                          (defaults to copying *.*)

  Source options
                /S : Copy Subfolders.
                /E : Copy Subfolders, including Empty Subfolders.
 /COPY:copyflag[s] : What to COPY (default is /COPY:DAT)
                      (copyflags : D=Data, A=Attributes, T=Timestamps
                       S=Security=NTFS ACLs, O=Owner info, U=aUditing info).
              /SEC : Copy files with SECurity (equivalent to /COPY:DATS).
          /DCOPY:T : Copy Directory Timestamps. ##
          /COPYALL : Copy ALL file info (equivalent to /COPY:DATSOU).
           /NOCOPY : Copy NO file info (useful with /PURGE).

                /A : Copy only files with the Archive attribute set.
                /M : like /A, but remove Archive attribute from source files.
            /LEV:n : Only copy the top n LEVels of the source tree.

         /MAXAGE:n : MAXimum file AGE - exclude files older than n days/date.
         /MINAGE:n : MINimum file AGE - exclude files newer than n days/date.
                     (If n < 1900 then n = no of days, else n = YYYYMMDD date).

              /FFT : Assume FAT File Times (2-second date/time granularity).
              /256 : Turn off very long path (> 256 characters) support.

   Copy options
                /L : List only - don’t copy, timestamp or delete any files.
              /MOV : MOVe files (delete from source after copying).
             /MOVE : Move files and dirs (delete from source after copying).

                /Z : Copy files in restartable mode (survive network glitch).
                /B : Copy files in Backup mode.
               /ZB : Use restartable mode; if access denied use Backup mode.
            /IPG:n : Inter-Packet Gap (ms), to free bandwidth on slow lines.

              /R:n : Number of Retries on failed copies - default is 1 million.
              /W:n : Wait time between retries - default is 30 seconds.
              /REG : Save /R:n and /W:n in the Registry as default settings.
              /TBD : Wait for sharenames To Be Defined (retry error 67).

   Destination options

    /A+:[RASHCNET] : Set file Attribute(s) on destination files + add.
    /A-:[RASHCNET] : UnSet file Attribute(s) on destination files - remove.
              /FAT : Create destination files using 8.3 FAT file names only.

           /CREATE : CREATE directory tree structure + zero-length files only.
              /DST : Compensate for one-hour DST time differences ##
            /PURGE : Delete dest files/folders that no longer exist in source.
              /MIR : MIRror a directory tree - equivalent to /PURGE plus all subfolders (/E)

   Logging options
                /L : List only - don’t copy, timestamp or delete any files.
               /NP : No Progress - don’t display % copied.
         /LOG:file : Output status to LOG file (overwrite existing log).
      /UNILOG:file : Output status to Unicode Log file (overwrite) ##
        /LOG+:file : Output status to LOG file (append to existing log).
     /UNILOG+:file : Output status to Unicode Log file (append) ##
               /TS : Include Source file Time Stamps in the output.
               /FP : Include Full Pathname of files in the output.
               /NS : No Size - don’t log file sizes.
               /NC : No Class - don’t log file classes.
              /NFL : No File List - don’t log file names.
              /NDL : No Directory List - don’t log directory names.
              /TEE : Output to console window, as well as the log file.
              /NJH : No Job Header.
              /NJS : No Job Summary.

 Repeated Copy Options
            /MON:n : MONitor source; run again when more than n changes seen.
            /MOT:m : MOnitor source; run again in m minutes Time, if changed.

     /RH:hhmm-hhmm : Run Hours - times when new copies may be started.
               /PF : Check run hours on a Per File (not per pass) basis.

 Job Options
      /JOB:jobname : Take parameters from the named JOB file.
     /SAVE:jobname : SAVE parameters to the named job file
             /QUIT : QUIT after processing command line (to view parameters). 
             /NOSD : NO Source Directory is specified.
             /NODD : NO Destination Directory is specified.
               /IF : Include the following Files.

Advanced options you'll probably never use
           /EFSRAW : Copy any encrypted files using EFS RAW mode. ##
           /MT[:n] : Multithreaded copying, n = no. of threads to use (1-128) ###
                     default = 8 threads, not compatible with /IPG and /EFSRAW
                     The use of /LOG is recommended for better performance.
           /SECFIX : FIX file SECurity on all files, even skipped files.
           /TIMFIX : FIX file TIMes on all files, even skipped files.

               /XO : eXclude Older - if destination file exists and is the same date
                     or newer than the source - don’t bother to overwrite it.
         /XC | /XN : eXclude Changed | Newer files
               /XL : eXclude "Lonely" files and dirs (present in source but not destination)
                     This will prevent any new files being added to the destination.
               /XX : eXclude "eXtra" files and dirs (present in destination but not source)
                     This will prevent any deletions from the destination. (this is the default)

/XF file [file]... : eXclude Files matching given names/paths/wildcards.
/XD dirs [dirs]... : eXclude Directories matching given names/paths.
                     XF and XD can be used in combination  e.g.
                     ROBOCOPY c:\source d:\dest /XF *.doc *.xls /XD c:\unwanted /S 

   /IA:[RASHCNETO] : Include files with any of the given Attributes
   /XA:[RASHCNETO] : eXclude files with any of the given Attributes
               /IS : Include Same, overwrite files even if they are already the same.
               /IT : Include Tweaked files.
               /XJ : eXclude Junction points. (normally included by default).

            /MAX:n : MAXimum file size - exclude files bigger than n bytes.
            /MIN:n : MINimum file size - exclude files smaller than n bytes.
         /MAXLAD:n : MAXimum Last Access Date - exclude files unused since n.
         /MINLAD:n : MINimum Last Access Date - exclude files used since n.
                     (If n < 1900 then n = n days, else n = YYYYMMDD date).

            /BYTES : Print sizes as bytes.
                /X : Report all eXtra files, not just those selected & copied.
                /V : Produce Verbose output log, showing skipped files.
              /ETA : Show Estimated Time of Arrival of copied files.


File Attributes
[RASHCNETO]

 R – Read only 
 A – Archive 
 S – System 
 H – Hidden
 C – Compressed 
 N – Not content indexed
 E – Encrypted 
 T – Temporary
 O - Offline

If either the source or desination are a “quoted long foldername” do not include a trailing backslash as this will be treated as an escape character, i.e. “C:\some path\” will fail but “C:\some path\\” or “C:\some path\.” or “C:\some path” will work.

By copying only the files that have changed, robocopy can be used to backup very large volumes.

ROBOCOPY will accept UNC pathnames including UNC pathnames over 256 characters long.

/REG Writes to the registry at HKCU\Software\Microsoft\ResKit\Robocopy

/XX (exclude extra) If used in conjunction with /Purge or /Mir, this switch will take precedence and prevent any files being deleted from the destination.

To limit the network bandwidth used by robocopy, specify the Inter-Packet Gap parameter /IPG:n
This will send packets of 64 KB each followed by a delay of n Milliseconds.

Robocopy will fail to copy files that are locked by other users or applications, so limiting the number of retries with /R:0 will speed up copying by skipping any in-use files. The Windows Volume Shadow Copy service is the only Windows subsystem that can copy open files. Robocopy does not use the Volume Shadow Copy service, but it can backup a volume shadow that has already been created with VSHADOW or DISKSHADOW.

All versions of Robocopy will copy security information (ACLs) for directories, version XP010 will not copy file security changes unless the file itself has also changed, this greatly improves performance.

/B (backup mode) will allow Robocopy to override file and folder permission settings (ACLs).

ERROR 5 (0x00000005) Changing File Attributes … Access is denied
This error usually means that File/Folder permissions or Share permissions on either the source or the destination are preventing the copy, either change the permissions or run the command in backup mode with /B.

To run ROBOCOPY under a non-administrator account will require backup files privilege, to copy security information auditing privilege is also required, plus of course you need at least read access to the files and folders.

Examples:

Some main options I use are

/mir /r:1 /w:0 /l:LogFileName.txt

That would be: /mir copy the exact folder/file structure, /r:1 retry only once on failed copy attempts, /w:0 no wait time, /l and create a log file

Simple copy of all files from one folder to another:

ROBOCOPY \\Server1\reports \\Server2\backup

Copy files including subfolders (even empty ones /E)
If this command is run repeatedly it will skip any files already in the destination, however it is not a true mirror as any files deleted from the source will remain in the destination.

ROBOCOPY \\Server1\reports \\Server2\backup *.* /E

List files over 32 MBytes in size:

ROBOCOPY C:\work /MAX:33554432 /L

Move files over 14 days old: (note the MOVE option will fail if any files are open and locked.)

ROBOCOPY C:\work C:\destination /move /minage:14

Backup a Server:
The script below copies data from FileServ1 to FileServ2, the destination holds a full mirror along with file security info. When run regularly to synchronize the source and destination, robocopy will only copy those files that have changed (change in time stamp or size.)

@ECHO OFF
SETLOCAL

SET _source=\\FileServ1\e$\users

SET _dest=\\FileServ2\e$\BackupUsers

SET _what=/COPYALL /B /SEC /MIR
:: /COPYALL :: COPY ALL file info
:: /B :: copy files in Backup mode.
:: /SEC :: copy files with SECurity
:: /MIR :: MIRror a directory tree

SET _options=/R:0 /W:0 /LOG:MyLogfile.txt /NFL /NDL
:: /R:n :: number of Retries
:: /W:n :: Wait time between retries
:: /LOG :: Output log file
:: /NFL :: No file logging
:: /NDL :: No dir logging

ROBOCOPY %_source% %_dest% %_what% %_options%

Run two robocopy jobs at the same time with START /Min

Start /Min "Job one" Robocopy \\FileServA\C$\Database1 \\FileServeBackupA\c$\Backups
Start /Min "Job two" Robocopy \\FileServB\C$\Database2 \\FileServeBackupB\c$\Backups

Copy only permission changes (additions and removals) assuming we already have a copy of the data:
ROBOCOPY \\FileServer\C$ \\SVR-Backups\c$\Backups /E /Copy:S /IS /IT
QuickBooks MST for Silent Deployment

email me

* see QuickBooks Silent Install – Enterprise Deployment


This post is about QuickBooks 2012 (or newer) and how to set up the MSI for silent unattended installation. 


The QuickBooks Content

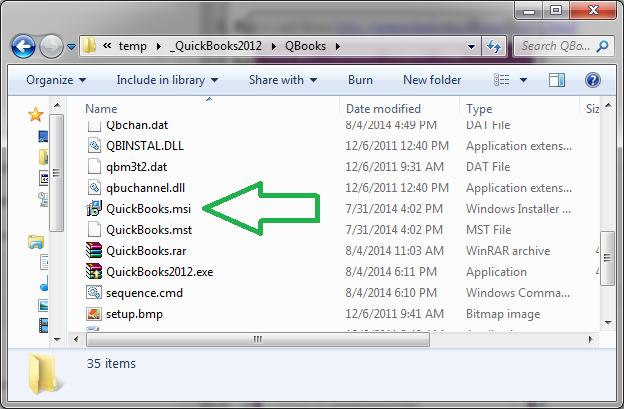
We will be using the QuickBooks installation media. The content will look like this, but we will be accessing the QBooks folder specifically.

Locate the QuickBooks.msi

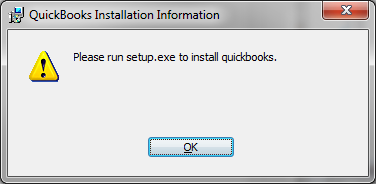
which is what Setup.exe uses during the install. This is what you see if you double-click the MSI by itself.

As you can see, when we run the MSI directly we get this message, denying us the ability to use the MSI as the default installer. However, once we edit the MSI (creating a transform file), this message will go away. Why do we want to edit the MSI? Not only will the setup message go away, but we can also add configuration items that will embed the serial number and control the end user license agreement.

Using Orca, we can directly edit the MSI…or in our case, create a transform file.


Build the Transform File

01/11. Install Orca – Download Link

02/11. Extract you QuickBooks install to an accessible location

03/11. Launch Orca

04/11. In Orca select open and navigate to the QuickBooks.msi file located in the QBooks folder

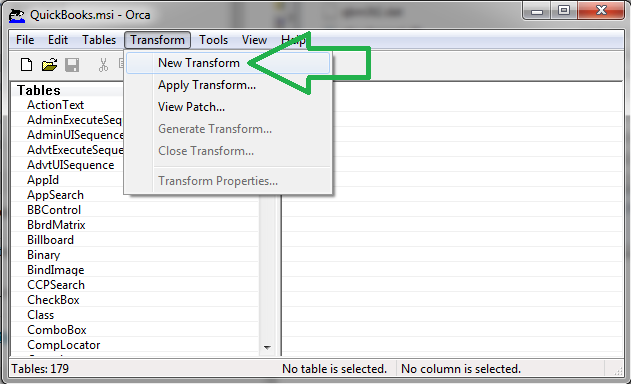
05/11. Select New Transform from the drop down menu


06/11. Drop the LaunchCondition
The first change we will make is under the table LaunchCondition, which controls our ability to launch the MSI by itself

1. Select the table LaunchCondition

2. Highlight the Condition that starts out as (PARENTAPP=”INSTALLMANAGER”)

3. Right click on it

4. Select Drop Row


07/11. Unchecked the Google Desktop Search
The second change is under the table Property, which controls the installation of the add-on Google Desktop Search.

1. Select the table Property

2. Highlight the Property that says CKBOX_GDS

3. Double click on its Value (Be default it is 0)

4. Change the Value to 2


08/11. Select Agree to License Agreement
The third change is under the table Property, which is the radio button for the I Agree to the License agreements.

1. Select the table Property

2. Highlight the Property that says AgreeToLicense

3. Double click on its Value (By default it is No)

4. Change the Value to Yes


09/11. Enter License Key
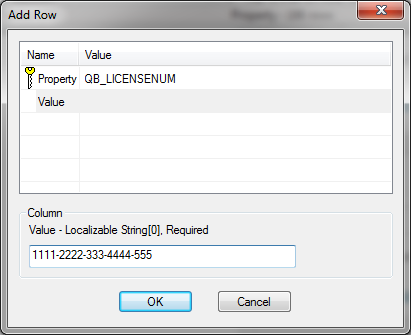
The fourth change is to enter the license key for your QuickBooks installation.

1. Select the table Property

2. Right Click in the table

3. Select Add Row

4. In the Property string enter QB_LICENSENUM

5. In the Value string enter your License Key (with dashes)


10/11. Enter Product Key
The fifth change is under the table Property, which is the product key for your QuickBooks installation.

1. Select the table Property

2. Right click in the table

3. Select Add Row

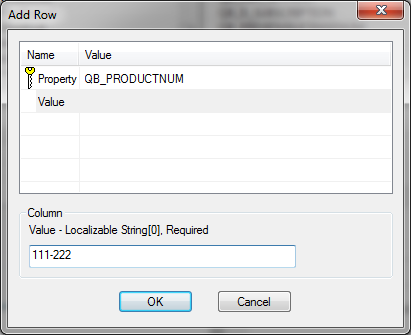
4. In the Property string enter QB_PRODUCTNUM

5. In the Value string enter your Product Key

You have to have the dash ‘-‘ in this field in order for the program to read your product correctly.


11/11. Generate Transform

Now, generate the transform and test it with the QuickBooks.msi file.

1. Click on the Transform tab at the top of the screen

2. Click on Generate Transform…

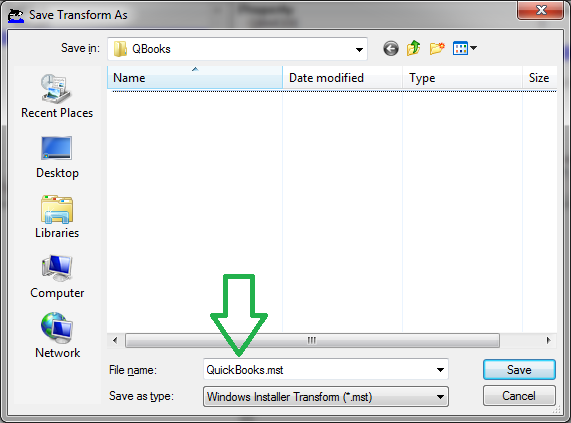
3. Save your Transform with a meaningful name. I used Quickbooks.mst.


All done – Now you’re ready for testing

1. Open an Administrative Command Prompt (or create a simple batch file—run as admin).

2. Enter: MSIEXEC /I “PathToFile\QuickBooks.msi” TRANSFORMS=”PathToFile\QuickBooks.mst” /qb

3. Execute the command