![]()
The change the accent color in Windows 10, just open Run (Windows key + R) paste the following command, hit [Enter].
rundll32.exe shell32.dll,Control_RunDLL desk.cpl,Advanced,@Advanced
Lab Core | The Lab of MrNetTek
A blog about IT, technical solutions, and code.
![]()
The change the accent color in Windows 10, just open Run (Windows key + R) paste the following command, hit [Enter].
rundll32.exe shell32.dll,Control_RunDLL desk.cpl,Advanced,@Advanced
![]()
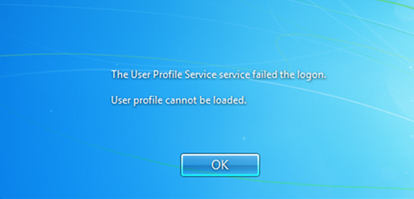
After installing Internet Explorer 11 in the enterprise (on a few test machines), we were receiving the User Profile Service failed the logon, user profile service cannot be loaded prompt during login, but only for ‘new’ users that logged into a machine; it did not affect existing users.
Digging into a machine, I found this in the Event Log
Windows cannot copy file \\?\C:\Users\Default\AppData\Local\Microsoft\Windows\Temporary Internet Files\SQM\iesqmdata_setup0.sqm to location \\?\C:\Users\TEMP\AppData\Local\Microsoft\Windows\Temporary Internet Files\SQM\iesqmdata_setup0.sqm. This error may be caused by network problems or insufficient security rights.
Quick Fix
Notice the C:\Users\Default\AppData\Local\Microsoft\Windows\Temporary Internet Files\SQM\iesqmdata_setup0.sqm in the error above. I just deleted that file, and suddenly new users could log into computers just fine.
This problem may happen in all situations if you run the IE installation package under SYSTEM account (or any other account, besides the logged in user), which, most desktop management software uses the SYSTEM account.
Why does it happen?
As we know, C:\Users\Default is the template user profile folder, everything under this folder and its subfolders will be copied to the new user profile folder when you try to logon a new user. If the copying fails, or there are privilege issues, the user cannot login successfully. And, that’s exactly what was happening in our case.
Now, how is this iesqmdata_setup0.sqm file created?
When you try to install IE9/10/11 via IEAK, it will try to create the %USERPROFILE%\AppData\Local\Microsoft\Windows\Temporary Internet Files\SQM\iesqmdata_setup#.sqm file and upload to SQM server (http://sqm.microsoft.com/sqm/ie/sqmserver.dll). If the uploading succeeds, it will be deleted automatically; otherwise, the file will be kept in the C:\Users\Default\AppData\Local\Microsoft\Windows\Temporary Internet Files\SQM folder.
The *.sqm file is created because of CEIP (aka Microsoft Customer Experience Improvement Program). Please note there are several Experience Improvement Programs in Windows (one for Windows, one for Windows Live, one for Office and one for Windows Media Player and perhaps more. Internet Explorer uses your Windows CEIP setting, which is enabled by default.
How do you resolve it?
Now that we have figured out why this happens, here are the solutions to the problem. To resolve the SQM file problem, there are 3 options.
—Option 1—
You may create scripts to delete the file.
VBScript
strFile = “c:\Users\Default\AppData\Local\Microsoft\Windows\Temporary Internet Files\SQM\iesqmdata_setup0.sqm”

Set objFSO = CreateObject(“Scripting.FileSystemObject”)

objFSO.DeleteFile(strFile)
Batch
Del /q “c:\Users\Default\AppData\Local\Microsoft\Windows\Temporary Internet Files\SQM\iesqmdata_setup0.sqm”
If you are using SCCM to deploy IE, you may refer to the “Scenario 2 : Internet explorer 9 Post install hotfix” section of this article to resolve the issue:
—Option 2—
Set “HKLM\Registry\Machine\Software\Microsoft\SQMClient\Windows\CEIPEnable” to 0 to disable Windows CEIP before installing IE. For more options to disable CEIP, please refer to http://support.microsoft.com/kb/951282
—Option 3— (not really a great option)
Make sure the computer has access to: http://sqm.microsoft.com/sqm/ie/sqmserver.dll
Reference
![]()
{ updated 2/23/2019 – see personal notes }
When thinking about buying a ‘corporate’ tablet/slate device, it’s important to factor in repairability. While one may be inclined to purchase a palette of beautiful looking devices, but you really have to think about what happens when the units break down or need some basic repair. Who is going to repair them? How easy will it be? What costs will be associated with the repair?
When reviewing just the HP X2 and Surface Pro 4 batteries, I wanted to see just how difficult it would be to do a battery swap (a common task in the corporate world). So, I did a little research.
Well, what I found out was that the Surface Pro basically isn’t repairable, not in the sense you would just have all your site technicians do a battery swap. I also noticed that the MS price for batteries range from $400-$500, and were very hard to find. Wow! That’s expensive.
In contrast, the HP X2 was easier to swap the battery (using a repair kit) and, best of all, the battery only costs $40 bucks, which was available anywhere. This may not seem like a big deal, but in a business, even a dollar or two can make all the difference in the world. While the Surface Pro 4 is a pretty solid device (hardware speaking), thinking about maintenance and costs sound like a nightmare.
Check out the battery replacement videos:
SP4
HP X2 general disassembly or…check out this web site: LINK
HP Split X2 13 or HP ENVY X2
The Surface Deployment Accelerator Image.wim includes trash
—The image.wim from MS still includes things like XBox, XBox live, 3D Builder, etc.
—RECOMMENDED: There is pretty much no scenario where a business needs these extra apps—please remove, or add GP options.
Chrome kept crashing (no issues with Firefox or Edge)
—I could not get Chrome working; it kept crashing.
Edge browser
—Google Hangout plugin would not install (no issues in Firefox).
—I tried restarting and reinstalling the latest hangout plugin. Does not work.
Pen is awkward in landscape mode
—RECOMMENDED: There needs to be a magnet at the the top of the SP4 in landscape mode.
—Taking the pen off and laying it to the side is unacceptable.
Battery lasts just under 4 hours, with heavy use. In comparison, the Samsung Note lasts 8 hours
—RECOMMENDED: The keyboard needs to have extended battery capability,
—RECOMMENDED: Or, there needs to be a way to add on an extended battery.
The kickstand doesn’t work great for a laptop; it’s awkward and needs to be readjusted often
—RECOMMENDED: The keyboard (with an extended battery), ‘should’ be attached to the screen…keeping the kickstand only for those who want to use it.
The battery replacement is a nightmare
—RECOMMENDED: Battery needs to become easily accessible from outside the SP4.
An untethered pen is just asking to be lost
—RECOMMENDED: The pen needs to snap into the SP4 or have some kind of proximity alarm.
—At $50 per replacement, the current pen placement is unacceptable.
When using the SP4 for reading, in portrait orientation, the keyboard doesn’t stick to the back of the SP4. It is constantly falling away.
—RECOMMENDED: A simple magnet strip under the space bar area will take care of the keyboard flopping back and forth.
Screen gets really hot
—Screen gets so hot, it is uncomfortable to hold. The heat is eventually going to fry the unit or kill the batteries.
Freshly imaged machine, using the Surface Pro Accelerator image, was locking up
—Locked up after apparently receiving updates that I don’t remember checking.
—Locked up after logging in.
—Lockup up just sitting on desk.
* This may have been the Chrome browser causing this, so I uninstalled it.
When using the device as an eReader, or just browsing social media sites, I noticed the pinch and zoom content will not stay centered
—RECOMMENDED: There needs to be a way to disable the X axis on the the X Y axis to prevent strafing to the left and right, when all you want to do is navigate up and down.
Doesn’t function all that well as an eReader
—RECOMMENDED: I would like to see a sensor on the side/edge of the SP4 just for scrolling…flipping pages, rather than touching the screen.
The portable docking station needs to be re-engineered
—A horrible black block is unacceptable.
—RECOMMENDED: A wireless docking station would also be nice.
Keyboard
—RECOMMENDED: While the keyboard works fine, it would be nice if it could be used in a detached state, as in through bluetooth or IR.
—RECOMMENDED: A little thicker, sturdier keyboard would be nice.
Final assessment of the SP4, do not buy. Wait for the next model, or look to HP.
References
http://ifixit.org/blog/8135/hats-off-to-hps-repairable-tablet/
tags: Surface Pro, SP4
![]()
I just received a Surface Pro for the enterprise, and will be building an enterprise imaging solution. I’m starting with the Microsoft Surface Deployment Accelerator and seeing where that takes me. I will be adding screenshots and new posts as I build the imaging server.
From Microsoft…
Microsoft Surface Deployment Accelerator (SDA) provides a quick and simple deployment mechanism for organizations to reimage Surface devices.
SDA includes a wizard that automates the creation and configuration of a Microsoft recommended deployment experience by using free Microsoft deployment tools. The resulting deployment solution is complete with everything you need to immediately begin the deployment of Windows to a Surface device. You can also use SDA to create and capture a Windows reference image and then deploy it with the latest Windows updates.
SDA is built on the powerful suite of deployment tools available from Microsoft including the Windows Assessment and Deployment Kit (ADK), the Microsoft Deployment Toolkit (MDT), and Windows Deployment Services (WDS). The resulting deployment share encompasses the recommended best practices for managing drivers during deployment and automating image creation and can serve as a starting point upon which you build your own customized deployment solution.
You can find more information about how to deploy to Surface devices, including step-by-step walkthroughs of customized deployment solution implementation, on the Deploy page of the Surface TechCenter.
Download Microsoft Surface Deployment Accelerator
You can download the installation files for SDA from the Microsoft Download Center. To download the installation files:
References
https://technet.microsoft.com/en-us/itpro/surface/microsoft-surface-deployment-accelerator
https://www.microsoft.com/en-us/download/details.aspx?id=46703
![]()
If you’re not aware, Microsoft has removed InfoPath from Office 2016. So, the last version of InfoPath is from Office 2013. Microsoft has packaged these as standalone packages to make things a little easier, but now the trick is to get it silently installed on your fleet of computers. Here are the steps I’ve come up with to silently install InfoPath 2013.
Step 1 – Download InfoPath standalone packages from here
Step 2 – Extract files from EXE(s):
infopath_4753-1001_x64_en-us.exe /extract
Step 3 – Open “infopathr.ww” folder
Step 4 – Open Config.xml in notepad
Step 5 – Modify the Config.xml file like this:
<Configuration Product=”Infopathr”>
<Display Level=”none” CompletionNotice=”no” SuppressModal=”yes” AcceptEula=”Yes” />
</Configuration>
Step 6 – Add the following to a script of your choice
PathToFile\setup.exe /config PathToFile\infopathr.ww\config.xml
* if you have problems activating, try this:
cscript “C:\Program Files (x86)\Microsoft Office\Office15\ospp.vbs” /sethst:YourKMSServerIP
cscript “C:\Program Files (x86)\Microsoft Office\Office15\ospp.vbs” /act
Notes
![]()
On the boot device in question, locate the efi folder. Rename it to something else like _efi.
Note
To prevent booting into BIOS mode, remove the bootmgr file on the device.
Located
C:\bootmgr.sys
C:\windows\Boot
![]()
Step 1 – Download the WAIK Tools
Step 2 – Create folder structure C:\WinPE\mount
Step 3 – Move a copy of your boot.wim into C:\WinPE
Step 4 – Open admin command prompt
Step 5 – copype amd64 C:\WinPE
Step 6 – Run the following commands in the console
Dism /Mount-Image /ImageFile:”C:\WinPE\boot.wim” /Index:1 /MountDir:”C:\WinPE\mount”
Dism /Add-Package /Image:”C:\WinPE\mount” /PackagePath:”C:\Program Files\Windows Kits\8.1\Assessment and Deployment Kit\Windows Preinstallation Environment\amd64\WinPE_OCs\WinPE-WMI.cab”
Dism /Add-Package /Image:”C:\WinPE\mount” /PackagePath:”C:\Program Files\Windows Kits\8.1\Assessment and Deployment Kit\Windows Preinstallation Environment\amd64\WinPE_OCs\en-us\WinPE-WMI_en-us.cab”
Dism /Add-Package /Image:”C:\WinPE\mount” /PackagePath:”C:\Program Files\Windows Kits\8.1\Assessment and Deployment Kit\Windows Preinstallation Environment\amd64\WinPE_OCs\WinPE-NetFX.cab”
Dism /Add-Package /Image:”C:\WinPE\mount” /PackagePath:”C:\Program Files\Windows Kits\8.1\Assessment and Deployment Kit\Windows Preinstallation Environment\amd64\WinPE_OCs\en-us\WinPE-NetFX_en-us.cab”
Dism /Add-Package /Image:”C:\WinPE\mount” /PackagePath:”C:\Program Files\Windows Kits\8.1\Assessment and Deployment Kit\Windows Preinstallation Environment\amd64\WinPE_OCs\WinPE-Scripting.cab”
Dism /Add-Package /Image:”C:\WinPE\mount” /PackagePath:”C:\Program Files\Windows Kits\8.1\Assessment and Deployment Kit\Windows Preinstallation Environment\amd64\WinPE_OCs\en-us\WinPE-Scripting_en-us.cab”
Dism /Add-Package /Image:”C:\WinPE\mount” /PackagePath:”C:\Program Files\Windows Kits\8.1\Assessment and Deployment Kit\Windows Preinstallation Environment\amd64\WinPE_OCs\WinPE-PowerShell.cab”
Dism /Add-Package /Image:”C:\WinPE\mount” /PackagePath:”C:\Program Files\Windows Kits\8.1\Assessment and Deployment Kit\Windows Preinstallation Environment\amd64\WinPE_OCs\en-us\WinPE-PowerShell_en-us.cab”
Dism /Add-Package /Image:”C:\WinPE\mount” /PackagePath:”C:\Program Files\Windows Kits\8.1\Assessment and Deployment Kit\Windows Preinstallation Environment\amd64\WinPE_OCs\WinPE-StorageWMI.cab”
Dism /Add-Package /Image:”C:\WinPE\mount” /PackagePath:”C:\Program Files\Windows Kits\8.1\Assessment and Deployment Kit\Windows Preinstallation Environment\amd64\WinPE_OCs\en-us\WinPE-StorageWMI_en-us.cab”
Dism /Add-Package /Image:”C:\WinPE\mount” /PackagePath:”C:\Program Files\Windows Kits\8.1\Assessment and Deployment Kit\Windows Preinstallation Environment\amd64\WinPE_OCs\WinPE-DismCmdlets.cab”
Dism /Add-Package /Image:”C:\WinPE\mount” /PackagePath:”C:\Program Files\Windows Kits\8.1\Assessment and Deployment Kit\Windows Preinstallation Environment\amd64\WinPE_OCs\en-us\WinPE-DismCmdlets_en-us.cab”
Dism /Unmount-Image /MountDir:C:\WinPE\mount /Commit
![]()
$s = gwmi -class hp_biossettinginterface -Namespace "root\hp\instrumentedbios"
$s.SetBIOSSetting('USB Storage Boot','Disable')
Output
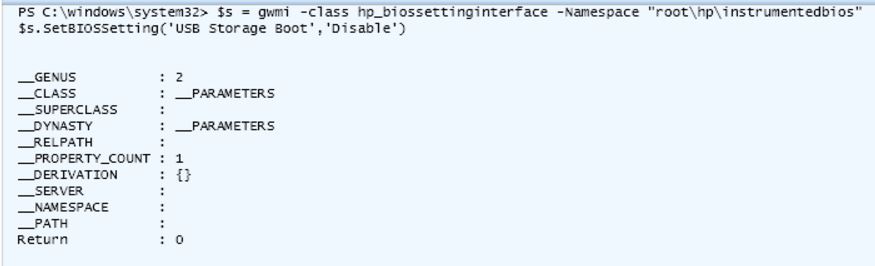
* Note, if the ‘Return’ is 0, it worked.
![]()
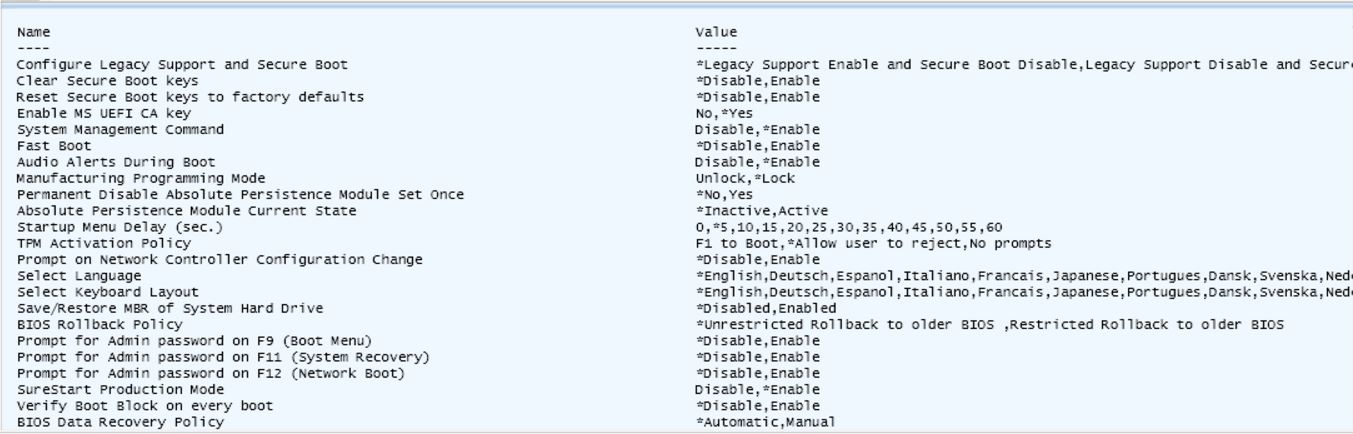
Something really nice is to have the ability to modify BIOS settings directly. Well, out of necessity, I needed to temporarily disable the USB Boot device; the HP EliteBook G3 autoboots to an external USB HD, causing all kind of flow process issues with imaging computers. So, I figured out how to first list those BIOS settings (with their corresponding values), and then how to change them.
Get-WmiObject -Namespace root/hp/instrumentedBIOS -Class hp_biosEnumeration |
Format-Table Name,Value -AutoSize
Output (click for zoom)
![]()
Eventually, you’re going to want to send information from clients (create records) to a database. There are many ways to do this, but using PowerShell is the most modern way.
This script accesses the ‘Test’ DB, and creates a record with the client computer name and timestamp.
[String]$dbname = "Test";

$computername = $env:COMPUTERNAME
$timeformat='MM-dd-yyyy hh:mm:ss tt'
$time = (Get-Date).ToString($timeformat)

# Open Connection with Windows authentication to local SQLSERVER.
$con = New-Object Data.SqlClient.SqlConnection;
$con.ConnectionString = "Data Source=.;Initial Catalog=Test;Integrated Security=True;";
$con.Open();

# Create the record.
$sql = "INSERT INTO Inventory.ComputerInfo ([ComputerName],[AcquiredDate])
VALUES('{0}','{1}')" -f
$computername,$time
$cmd = New-Object Data.SqlClient.SqlCommand $sql, $con;
$cmd.ExecuteNonQuery();

# Write-Host "Computer Name: $computername";
# Write-Host "Time: $time";
# Write-Host "SQL Command: $sql";
Write-Host "Record has been created";

# Close and Clear all objects.
$cmd.Dispose();
$con.Close();
$con.Dispose();
![]()
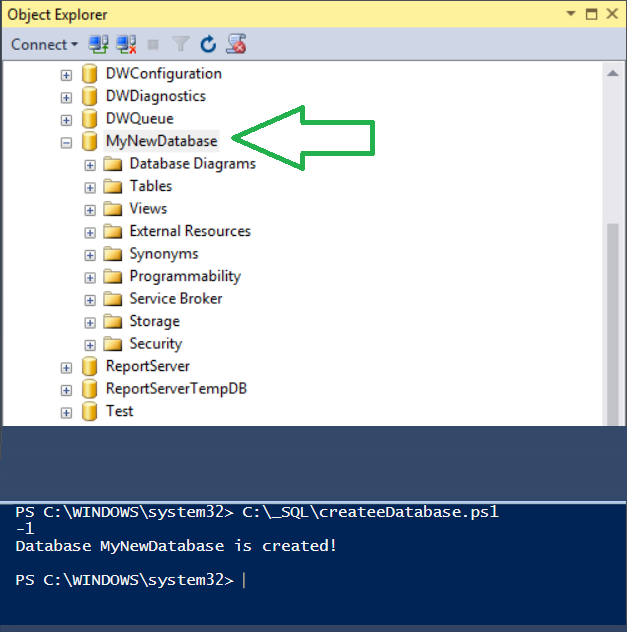
Using this PowerShell code, you can either run it directly in the console, or make a CreateDB.ps1 file, to add a new SQL DB. Note, you could use with some of the previous PS code to create a single solution to automate the creation of the database, add the schema, and add tables.
[String]$dbname = "MyNewDatabase";

# Open ADO.NET Connection with Windows authentification to local SQLSERVER.
$con = New-Object Data.SqlClient.SqlConnection;
$con.ConnectionString = "Data Source=.;Initial Catalog=master;Integrated Security=True;";
$con.Open();

# Select-Statement for AD group logins
$sql = "SELECT name
        FROM sys.databases
        WHERE name = '$dbname';";

# New command and reader.
$cmd = New-Object Data.SqlClient.SqlCommand $sql, $con;
$rd = $cmd.ExecuteReader();
if ($rd.Read())
{
	Write-Host "Database $dbname already exists";
	Return;
}

$rd.Close();
$rd.Dispose();

# Create the database.
$sql = "CREATE DATABASE [$dbname];"
$cmd = New-Object Data.SqlClient.SqlCommand $sql, $con;
$cmd.ExecuteNonQuery();
Write-Host "Database $dbname is created!";


# Close & Clear all objects.
$cmd.Dispose();
$con.Close();
$con.Dispose();
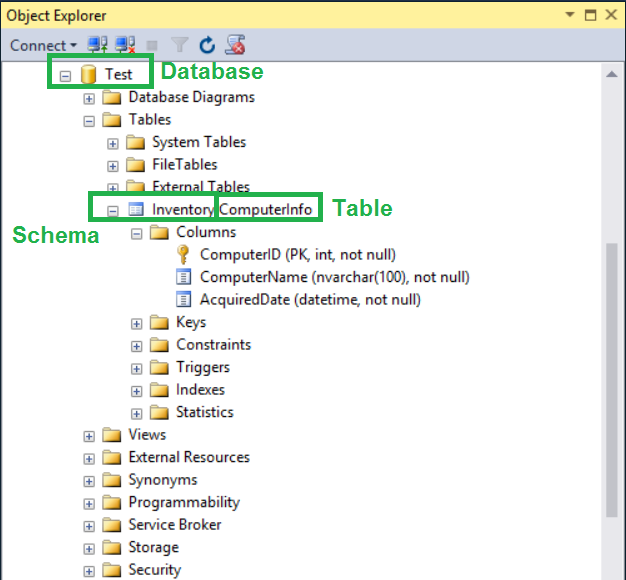
![]()
This is how you would create a schema and add a table into your own Test database.
Add-Type -Path 'C:\Program Files\Microsoft SQL Server\130\SDK\Assemblies\Microsoft.SqlServer.Smo.dll'

$ns = 'Microsoft.SqlServer.Management.Smo'
$svr = new-object ("$ns.Server") $inst

#Create reusable datatype objects
$dtint = [Microsoft.SqlServer.Management.Smo.Datatype]::Int
$dtvchar100 = [Microsoft.SqlServer.Management.Smo.Datatype]::NVarChar(100)
$dtdatetm = [Microsoft.SqlServer.Management.Smo.Datatype]::DateTime

#Reference the database.
$db = $svr.Databases["Test"]

#Schema variables
$SchemaName = "Inventory"
$Schema = $db.Schemas[$SchemaName]

#Ensure that the schema, if not, create it
if (!($Schema))
{
    Write-Host "Creating Schema: $SchemaName"
    $Schema = New-Object ('Microsoft.SqlServer.Management.SMO.Schema') ($db, $SchemaName)
    $Schema.Create()
}

#Create the table in the HumanResources schema
$tbcomp = new-object ("$ns.Table") ($db, "ComputerInfo", "Inventory")

#Create the ComputerID column
$colcoid = new-object ("$ns.Column") ($tbcomp, "ComputerID", $dtint)
$colcoid.Identity = $true
$colcoid.IdentitySeed = cls
$colcoid.IdentityIncrement = 1
$tbcomp.Columns.Add($colcoid)

#Create the ComputerName column
$colconame = new-object ("$ns.Column") ($tbcomp, "ComputerName", $dtvchar100)
$colconame.Nullable = $false
$tbcomp.Columns.Add($colconame)

#Create the AcquiredDate column
$colacqdate = new-object ("$ns.Column") ($tbcomp, "AcquiredDate", $dtdatetm)
$colacqdate.Nullable = $false
$tbcomp.Columns.Add($colacqdate)

#Create the Primary Key
$idxpkcomputer = new-object ("$ns.Index") ($tbcomp, "PK_AcquiredComputer")
$idxpkcomputer.IndexKeyType = "DriPrimaryKey"
$idxpkcomputer.IsClustered = $true
$idxpkcomputercol = new-object ("$ns.IndexedColumn") ($idxpkcomputer, "ComputerID")
$idxpkcomputer.IndexedColumns.Add($idxpkcomputercol)
$tbcomp.Indexes.Add($idxpkcomputer)

#Create the table
$tbcomp.Create()