< back
Hey, people…Assembly (aka assembler, aka machine language, aka ASM) isn’t dead. I thought I’d write several programs demonstrating assembly language. So, expect more to follow after this one. Who knows, maybe I’ll even revisit some COBOL, Fortran, and Pascal—I still have all my books from college. Check out my prime numbers code…written in multiple languages: http://eddiejackson.net/wp/?p=15672
What is ASM?
An assembly language is a low-level programming language for microprocessors and other programmable devices. It is not just a single language, but rather a group of languages. An assembly language implements a symbolic representation of the machine code needed to program a given CPU architecture.
An assembly language is the most basic programming language available for any processor. With assembly language, a programmer works only with operations that are implemented directly on the physical CPU.
Assembly languages generally lack high-level conveniences such as variables and functions, and they are not portable between various families of processors. They have the same structures and set of commands as machine language, but allow a programmer to use names instead of numbers. This language is still useful for programmers when speed is necessary or when they need to carry out an operation that is not possible in high-level languages.
On to the code…
All my assembly coding and testing will be in Windows 10.
; I'd like to welcome you to assembly!
;
; This will be your first assembly program.
;
; Action items will include the hashtag symbol (#)
; You're supposed to do something when you see it.
;
; #Download and install: http://eddiejackson.net/apps/masm32v11r.zip
;
; After successful installation, we can begin...
;
; The first thing you'll notice is that the semicolon is
; being used for comments. Get used to seeing and using it.
;
; Now, we begin coding our .ASM file...the main code block is highlighted below.
;
; #1 Open your favorite editor (could be notepad++), and begin typing this code. I do
; not recommend copying and pasting. Do the typing.
;
;
.386 ; Use the 386 instruction set
.model flat, stdcall ; Memory model - flat for Windows programs
option casemap :none ; Labels are case sensitive
include \masm32\include\windows.inc ; Include files are required and add
include \masm32\include\kernel32.inc ; functionality to your program
include \masm32\include\masm32.inc ;
includelib \masm32\lib\kernel32.lib ;
includelib \masm32\lib\masm32.lib ;
.data ; Initialized data follows this directive
msg1 db "Assembly Message: ", 0 ; Variables go here
msg2 db "Your first Assembly program!", 0
.code ; Starting point for your main code
start: ; Code execution begins now
invoke StdOut, addr msg1 ; Calls the StdOut, passing addr of msg1
invoke StdOut, addr msg2 ; Calls the StdOut, passing addr of msg2
invoke ExitProcess, 0 ; Successful return code
end start ; Code ends now
;
;
; #2 Save: this code as Test1.asm
; #3 Open: command prompt
; #4 To navigate to your file, type: cd PathTo\Test1.asm
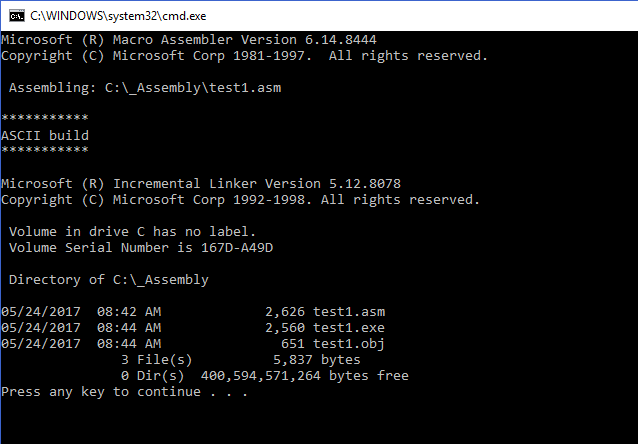
; #5 To assemble your program, type: \masm32\bin\ml /c /Zd /coff Test1.asm
;
;
; OUTPUT
; Microsoft (R) Macro Assembler Version 6.14.8444
; Copyright (C) Microsoft Corp 1981-1997. All rights reserved.
; Assembling: Test1.asm
; ***********
; ASCII build
; ***********
;
;
; #To link your program, type: \masm32\bin\Link /SUBSYSTEM:CONSOLE Test1.obj
;
;
; OUTPUT
; Microsoft (R) Incremental Linker Version 5.12.8078
; Copyright (C) Microsoft Corp 1992-1998. All rights reserved.
;
;
; #To run your program, type: Test1
;
;
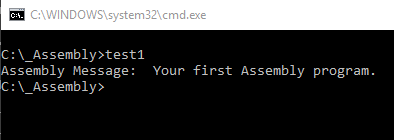
; OUTPUT
; Assembly Message: Your first Assembly program!
;
;
; WOW! Look at you go. You'll be hacking the Matrix in no time.
;
;
; [ /options ] [ /link linkoptions ]
; /AT Enable tiny model (.COM file) /nologo Suppress copyright message
; /Bl Use alternate linker /Sa Maximize source listing
; /c Assemble without linking /Sc Generate timings in listing
; /Cp Preserve case of user identifiers /Sf Generate first pass listing
; /Cu Map all identifiers to upper case /Sl Set line width
; /Cx Preserve case in publics, externs /Sn Suppress symbol-table listing
; /coff generate COFF format object file /Sp Set page length
; /D[=text] Define text macro /Ss Set subtitle
; /EP Output preprocessed listing to stdout /St Set title
; /F Set stack size (bytes) /Sx List false conditionals
; /Fe Name executable /Ta Assemble non-.ASM file
; /Fl[file] Generate listing /w Same as /W0 /WX
; /Fm[file] Generate map /WX Treat warnings as errors
; /Fo Name object file /W Set warning level
; /FPi Generate 80x87 emulator encoding /X Ignore INCLUDE environment path
; /Fr[file] Generate limited browser info /Zd Add line number debug info
; /FR[file] Generate full browser info /Zf Make all symbols public
; /G<c|d|z> Use Pascal, C, or Stdcall calls /Zi Add symbolic debug info
; /H Set max external name length /Zm Enable MASM 5.10 compatibility
; /I Add include path /Zp[n] Set structure alignment
; /link /Zs Perform syntax check only
The assembly and linking can also be done in a GUI, in the Small Memory Footprint Editor.
Load up your ASM file.

BAM! You have assembled and linked your program. Now, from the console, just type test1, and your program will run.
Notes
Recommended Books
Modern X86 Assembly Language Programming: 32-bit, 64-bit, SSE, and AVX
X86 Assembly Language and C Fundamentals
If you’re going to do some serious debugging in Windows, download: WinDbg