Mac – Create a Bootable Mac Drive

email me

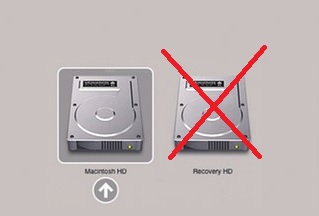
It is possible that a Mac may be missing the Recovery Partition. In this scenario, follow the steps below to access Recovery Mode. You will need a USB drive (at least 8 GB) and a copy of El Capitan (or latest OS X).

A missing Recovery Partition (the drive with the red X would not be there)

Step 1

Download the OS X El Capitan (or the current MacOS) from the Mac App Store.

Step 2

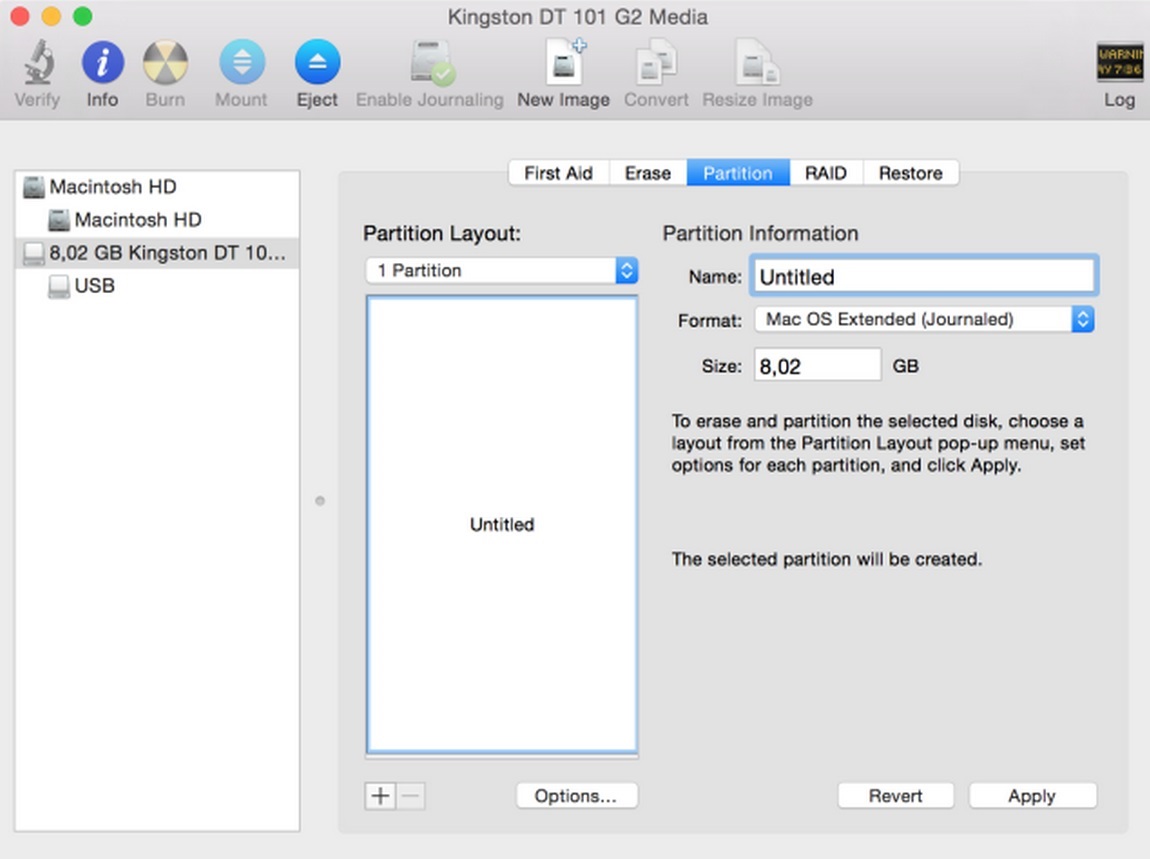
Next, format the USB flash drive to get it into a state where it can accept the payload for the installation of El Capitan. Plug the USB flash drive into an available USB port and launch the Disk Utility application. Make sure that the USB flash drive is selected within the left sidebar, and then select the Erase tab from the main window interface.

Step 3

In the main window, ensure that the Format dropdown box is set to Mac OS Extended (journaled), and the Name is set to Untitled. Click on the Erase button on the interface.

Step 4

Now, in the same window select the Partition tab. From within the Partition Layout dropdown, make sure that 1 Partition is selected. Click the Options button at the bottom of the window and ensure that GUID Partition Table is selected as the chosen partition scheme. Check the name of the partition and clarify that it’s set to Untitled and not Untitled 1 or anything. Click on Apply.

Step 5

Launch the Terminal application. Type the following command and hit Enter:

sudo /Applications/Install\ OS\ X\ El\ Capitan.app/Contents/Resources/createinstallmedia –volume /Volumes/Untitled –applicationpath /Applications/Install\ OS\ X\ El\ Capitan.app –nointeraction

Type your administrator password and then hit Enter.

Step 6

The Mac will now install the OS X El Capitan installer onto the connected USB flash drive and then turn it into a bootable drive. Wait until you see Done.

Step 7

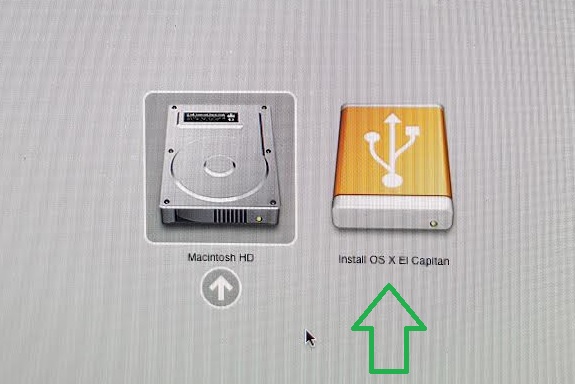
Once it has completed, plug the USB drive into the Mac that is missing the Recovery Partition, hold down the Option key until you see the Macintosh HD and Install OS X El Capitan. Select the El Capitan drive. The Mac will ask for the language, select Use English for the main language, click the arrow, and Recovery Mode will load.

Enable/Disable Admin Share

email me

By modifying the reg key AutoShareWks key (1 or 0), you can enable or disable the admin share.

Note, this does not require a reboot.

The reg key

HKEY_LOCAL_MACHINE\SYSTEM\CurrentControlSet\Services\LanManServer\Parameters
Name: AutoShareWks
Data Type: REG_DWORD
Value: 1


A script (to enable the admin share)

@echo on

reg delete "HKEY_LOCAL_MACHINE\SYSTEM\CurrentControlSet\Services\LanManServer\Parameters" /v AutoShareWks /f
ping -n 2 127.0.0.1>nul
reg add "HKEY_LOCAL_MACHINE\SYSTEM\CurrentControlSet\Services\LanManServer\Parameters" /v AutoShareWks /t REG_DWORD /d 1 /f
exit /b 0


Notes

reg add HKEY_LOCAL_MACHINE\SOFTWARE\Microsoft\Windows\CurrentVersion\Policies\System /v LocalAccountTokenFilterPolicy /t REG_DWORD /d 1 /f

OSSEC Install

email me

This is how to install the OSSEC Agent using a simple batch script.

set CurDir=%CD%
"%CurDir%\ossec.exe" /S
if exist "C:\Program Files (x86)\ossec-agent\" (
copy /y "%CurDir%\ossec.conf" "C:\Program Files (x86)\ossec-agent\ossec.conf"
)
if exist "C:\Program Files\ossec-agent\" (
copy /y "%CurDir%\ossec.conf" "C:\Program Files\ossec-agent\ossec.conf"
)
exit /b 0

Remove – Modify the Utility Text in TwentyTwelve Theme

email me

Have you ever noticed the Created Date and Categories just below your post? Well, let’s say you didn’t want to show ‘Categories’ anymore. How would you remove it?

To modify what is known as utility text, open the functions.php file, and change the utility code section to your liking.

Before


	// Translators: 1 is category, 2 is tag, 3 is the date and 4 is the author's name.
	if ( $tag_list ) {
		$utility_text = __( 'This entry was posted in %1$s and tagged %2$s on %3$s<span class="by-author"> by %4$s</span>.', 'twentytwelve' );
	} elseif ( $categories_list ) {
		$utility_text = __( 'This entry was posted in %1$s on %3$s<span class="by-author"> by %4$s</span>.', 'twentytwelve' );
	} else {
		$utility_text = __( 'This entry was posted on %3$s<span class="by-author"> by %4$s</span>.', 'twentytwelve' );
	}


After


// Translators: 1 is category, 2 is tag, 3 is the date and 4 is the author's name.
	if ( $tag_list ) {
		$utility_text = __( 'Posted by Eddie Jackson on %3$s<span class="by-author"> by %4$s</span>.', 'twentytwelve' );
	} elseif ( $categories_list ) {
		$utility_text = __( 'Posted by Eddie Jackson on %3$s<span class="by-author"> by %4$s</span>.', 'twentytwelve' );
	} else {
		$utility_text = __( 'Posted by Eddie Jackson on %3$s<span class="by-author"> by %4$s</span>.', 'twentytwelve' );
	}

Adjust Sidebar Size in TwentyTwelve Theme

email me

If you would like to shrink (or expand) the size of the sidebar, access the sidebar.php in the theme, and just add width.

Before

	<?php if ( is_active_sidebar( 'sidebar-1' ) ) : ?>


<div id="secondary" class="widget-area" role="complementary">
		
			<?php dynamic_sidebar( 'sidebar-1' ); ?>
			</div>


<!-- #secondary -->
	<?php endif; ?>


After

	<?php if ( is_active_sidebar( 'sidebar-1' ) ) : ?>


<div id="secondary" class="widget-area" role="complementary" style="width: 179px">
		
			<?php dynamic_sidebar( 'sidebar-1' ); ?>
			</div>


<!-- #secondary -->
	<?php endif; ?>


Note

You could add other code here that would create new features, add pictures, links, etc., which would be visible on all your posts and pages.

For instance, you could add an email link here.

Modify Syntaxhighlighter Font Size and Width

email me

To change the syntaxhighlighter settings, access the shCore.css from ftp. Change font-size and width from there.


Before

.syntaxhighlighter {
width: 100% !important;
margin: 1em 0 1em 0 !important;
position: relative !important;
overflow: auto !important;
overflow-y: hidden !important;
font-size: 1em !important;


After

.syntaxhighlighter {
width: 115% !important;
margin: 1em 0 1em 0 !important;
position: relative !important;
overflow: auto !important;
overflow-y: hidden !important;
font-size: 12px !important;

Make Your Scripts Speak using PowerShell

email me

# Speech method 1 - Single phrase
Add-Type -AssemblyName System.speech
$speechObject = New-Object System.Speech.Synthesis.SpeechSynthesizer
$speechObject.Speak('Hello, my name is Eddie!')
exit

# Speech method 2 - An array of messages
Add-Type -AssemblyName System.speech
$speechObject = New-Object System.Speech.Synthesis.SpeechSynthesizer

$strMessage = @("Hello, this is your computer talking.",
"I am the ghost in the machine",
"I'm sorry, I can't let you do that $env:USERNAME") | Get-Random
$speechObject.Speak($strMessage)
exit

# Speech method 3 - Speech from a file
Add-Type -AssemblyName System.speech
$speechObject = New-Object System.Speech.Synthesis.SpeechSynthesizer

$speechFile = "C:\Speech.csv"
$strMessage = (Get-Content $speechFile) | Get-Random
$speechObject.Speak($strMessage)

Take Snapshot of Screen using PowerShell

email me

#Takes snapshot of your screen and saves to a file

$outputFile = "c:\temp\screenshot.bmp"

Add-Type -AssemblyName System.Windows.Forms
Add-type -AssemblyName System.Drawing

# Return resolution
$Screen = [System.Windows.Forms.SystemInformation]::VirtualScreen
$Width = $Screen.Width
$Height = $Screen.Height
$Left = $Screen.Left
$Top = $Screen.Top

# Create graphic
$screenshotImage = New-Object System.Drawing.Bitmap $Width, $Height

# Create graphic object
$graphicObject = [System.Drawing.Graphics]::FromImage($screenshotImage)

# Capture screen
$graphicObject.CopyFromScreen($Left, $Top, 0, 0, $screenshotImage.Size)

# Save to file - Saves to c:\temp
$screenshotImage.Save($outputFile)

Write-Output "Saved to:"
Write-Output $outputFile
Start-Sleep -s 5