Suspended MSI

email me

Have you ever noticed or seen a suspended MSI? When installing a new app via MSI, it will basically ask you to rollback a previous installation before continuing a new MSI installation—which can be a real pain. To NOT rollback, do this:

REG DELETE HKLM\Software\Microsoft\Windows\CurrentVersion\Installer\InProgress

or

Run MSIZap.exe

Delete the InProgress information:
msizap.exe p

Delete the rollback information:
msizap.exe s
Batch – Add TCP/IP Printer via Scripted Commands

email me

{updated on 5/21/2019}

Network Method

Install specific printer based upon part of the computer name

set PCName=%computername%

echo %PCName% | findstr /C:”LAB1″ >nul

if errorlevel 1 (
cscript c:\Windows\System32\Printing_Admin_Scripts\en-US\prnport.vbs -a -r IP_10.10.10.101 -h 10.10.10.101
rundll32 printui.dll,PrintUIEntry /ga /if /b “Lab 2” /f C:\printer_driver\hpcu150t.inf /r “IP_10.10.10.101” /m “HP Universal Printing PCL 5” /Z
) ELSE (
cscript c:\Windows\System32\Printing_Admin_Scripts\en-US\prnport.vbs -a -r IP_10.10.10.102 -h 10.10.10.102
rundll32 printui.dll,PrintUIEntry /ga /if /b “Lab 1” /f C:\printer_driver\hpcu150t.inf /r “IP_10.10.10.102” /m “HP Universal Printing PCL 5” /Z
)

 
Just Install Printer via TCP/IP Address

cscript c:\Windows\System32\Printing_Admin_Scripts\en-US\prnport.vbs -a -r IP_10.10.10.100 -h 10.10.10.100

rundll32 printui.dll,PrintUIEntry /ga /if /b “Printer 1” /f C:\printer_driver\hpcu150t.inf /r “IP_10.10.10.100” /m “HP Universal Printing PCL 5” /Z


:: Enable Legacy Mode – Disables Windows 10 Printer Management
reg add “HKEY_CURRENT_USER\SOFTWARE\Microsoft\Windows NT\CurrentVersion\Windows” /v LegacyDefaultPrinterMode /t REG_DWORD /d 1 /f /reg:64

:: Create the TCP/IP printer port on the computer with IP address
cscript %WINDIR%\System32\Printing_Admin_Scripts\en-US\Prnport.vbs -a -r IP_10.10.10.10 -h 10.10.10.10 

:: Install the HP Universal PCL 6 print driver
:: Requires driver to be available on a network share
:: The /m “printer name” must match what’s available in the INF file
rundll32 printui.dll,PrintUIEntry /ia /m “HP Universal Printing PCL 6” /f “\\ServerName\printers\HPUPD\PCL\hpcu118c.inf”

:: Create the printer on the computer
rundll32 printui.dll,PrintUIEntry /ga /if /q /b “ABC_Printer” /f “\\ServerName\printers\HPUPD\PCL\hpcu118c.inf” /r “IP_10.10.10.10” /m “HP Universal Printing PCL 6”


Local Method

:: Enable Legacy Mode – Disables Windows 10 Printer Management
reg add “HKEY_CURRENT_USER\SOFTWARE\Microsoft\Windows NT\CurrentVersion\Windows” /v LegacyDefaultPrinterMode /t REG_DWORD /d 1 /f /reg:64

:: Create port
cscript c:\Windows\System32\Printing_Admin_Scripts\en-US\prnport.vbs -a -r IP_10.10.10.10 -h 10.10.10.10

:: Install printer using INF
:: The printer driver must already be installed, or locally available
:: the /m “printer name” must match what’s available in the INF file
rundll32 printui.dll,PrintUIEntry /ga /if /b “ABC_Printer” /f C:\Windows\inf\oem8.inf /r “IP_10.10.10.10” /m “HP Universal Printing PCL 5” /Z

:: OR

:: Install from local printer driver source files
rundll32 printui.dll,PrintUIEntry  /ga /if /b “PC Lab 4” /f C:\printer_driver\hpcu150t.inf /r “IP_10.10.10.10” /m “HP Universal Printing PCL 5” /Z

:: Set printer as default
:: Must run in Current User security context
timeout /t 60
RUNDLL32 PRINTUI.DLL,PrintUIEntry /y /n “ABC_Printer”


Notes

/q = hide messages

Launch Add Printer Wizard
printui.dll,PrintUIEntryDPIAware /im


PrintBRM.exe

%windir%\System32\Spool\Tools\PrintBRM.exe -?

Access the Backup Recovery Migration tool through a command line interface.

PrintBrm -B|R|Q [-S <server>] -F <file> [-D <directory>] [-O FORCE] [-P ALL|ORIG] [-NOBIN] [-LPR2TCP] [-C <config file>] [-NOACL] [-?]
-B Backup the server to the specified file
-R Restore the configuration in the file to the server
-Q Query the server or the backup file
-S <server name> Target server
-F <file name> Target backup File
-D <directory> Unpack the backup file to (with -R) or repack a backup file from (with -B) the given directory
-O FORCE Force overwriting of existing objects
-P ALL|ORIG Publish all printers in directory, or publish printers that were published originally
-NOBIN Omit the binaries from the backup
-LPR2TCP Convert LPR ports to Standard TCP/IP ports on restore
-C <file name> Use the specified configuration file for BRM
-NOACL Remove ACLs from print queues on restore
-? Display this help

Examples

Export
%windir%\System32\Spool\Tools\PrintBRM.exe -s \\source -b -f file.printerExport

Import
%windir%\System32\Spool\Tools\PrintBRM.exe -s \\target -r -f file.printerExport


Prncnfg.vbs

Prncnfg.vbs Printer configuration
Prndrvr.vbs Printer driver configuration
Prnjobs.vbs Print job monitoring
Prnmngr.vbs Printer management
Prnport.vbs Printer port management
Prnqctl.vbs Printer queue management
Pubprn.vbs Publish a printer to Active Directory


Prncnfg.vbs

The Prncnfg.vbs script provides you with a printer configuration utility that allows you to display and change printer configuration information. It will also allow you to rename a printer.

This printer configuration utility can come in handy in a number of different situations. For instance, suppose you want to build an inventory database of all the printers on your network. You can take advantage of the Prncnfg.vbs script’s ability to display printer configuration information. To do so, you use this command syntax:

cscript prncnfg.vbs -g [-s ServerName] -p PrinterName [-u UserName -w Password]

You could then use the redirection symbols on the actual command line to compile the output into a text file that you could later import into a database or a spreadsheet. The parameters used in this command are defined in Table B.

Table B: Parameters to configure the Prncnfg.vbs script to display printer configuration information.

Parameter

Description

-g Required. Specifies that you want to display configuration information about a printer.
-s ServerName Optional. Specifies the name of the remote computer sharing the printer. If you do not specify a computer name, the local computer is used.
-p PrinterName Required. Specifies the name of the printer about which you want to display information.
-u UserName -w Password Optional. Specifies an account with permissions to connect, via Windows Management Instrumentation (WMI) services, to the computer sharing the printer about which you want to display information. If you do not specify an account, you must be logged on under an account with these permissions for the command to work.

Prndrvr.vbs

The Prndrvr.vbs script provides you with a printer driver utility that allows you to list and examine printer drivers. This utility will also allow you to delete and add printer drivers.

If you’re troubleshooting a printer problem that could possibly be linked to outdated or missing printer drivers, you can use the Prndrvr.vbs script to quickly build a list of all the files that make up the printer driver, which you could then use for comparison. To do so, you use this command syntax:

cscript prndrvr.vbs -l [-s ServerName] [-u UserName -w Password]

The parameters used on this command line are defined in Table C.

Table C: Parameters to configure the Prndrvr.vbs script to list all the printer driver files.

Parameter

Description

-l Required. Specifies that you want to list all the drivers on a computer.
-s ServerName Optional. Specifies the name of the remote computer sharing the printer. If you do not specify a computer, the local computer is used.
-u UserName -w Password Optional. Specifies an account with permissions to connect, via Windows Management Instrumentation (WMI) services, to the computer sharing the printer about which you want to display information. If you do not specify an account, you must be logged on under an account with these permissions for the command to work.

Prnjobs.vbs

The Prnjobs.vbs script provides you with a print job monitoring utility that allows you to pause, resume, cancel, and list print jobs. Suppose that there are a number of network printers to which you can print and you have an urgent print job. You can use the Prnjobs.vbs script to browse around for the least busy printer. To do so, you’d use this command syntax:

cscript prnjobs -l [-s ServerName] [-p PrinterName] [-u UserName -w Password] 

The parameters used on this command line are defined in Table D.

Table D: Parameters to configure the Prnjobs.vbs script to list all the print queue.

Parameter

Description

-l Required. Specifies that you want to list all the print jobs in a print queue.
-s ServerName Optional. Specifies the name of the remote computer sharing the printer. If you do not specify a computer, the local computer is used.
-p PrinterName Optional. Specifies the name of the printer whose print queue contains the jobs you want to list. If you do not specify a printer, then all jobs in all print queues are listed.
-u UserName -w Password Optional. Specifies an account with permissions to connect, via Windows Management Instrumentation (WMI) services, to the computer sharing the printer about which you want to display print job information. If you do not specify an account, you must be logged on under an account with these permissions for the command to work.

Prnmngr.vbs

The Prnmngr.vbs script provides you with a printer management utility that allows you to add, delete, and list printer connections. It will also allow you to set and display the default printer.

The Prnmngr.vbs script can come in handy if you need to quickly add a new network printer connection to a group of computers. You could create a script or a batch file that automates the installation procedure via the Prnmngr.vbs script. To do so, you’d use the command syntax:

cscript prnmngr.vbs -a -p PrinterName [-s ServerName] -m DriverName -r PortName [-u UserName -w Password]

The parameters used on this command line are defined in Table E.

Table E: Parameters to configure the Prnmngr.vbs script to add a new printer.

Parameter Description
-a Required. Specifies that you want add a printer.
-p PrinterName Required. Specifies the name of the printer that you want to add.
-s ServerName Optional. Specifies the name of the remote computer to which you want to add a printer. If you do not specify a computer, the printer is added to the local computer.
-m DriverName Required. Specifies the name of the driver for the local printer you want to add.
-r PortName Required. Specifies the port to which the printer is connected. If this is a parallel or a serial port, use the ID of the port (for example, LPT1 or COM1). If this is a TCP/IP port, use the port name that was specified when the port was added
-u UserName -w Password Optional. Specifies an account with permissions to connect, via Windows Management Instrumentation (WMI) services, to the computer to which you want to add a local printer. If you do not specify an account, you must be logged on under an account with these permissions for the command to work.

Prnport.vbs

The Prnport.vbs script provides you with a printer port management utility that allows you to create, delete, and list standard TCP/IP printer ports. It also allows you to display and change port configuration.

Suppose that you need to create a standard TCP/IP printer port. If you already have all the settings in hand, you can perform the operation very quickly using the Prnport.vbs script with this syntax

cscript prnport.vbs -a -r PortName [-s ServerName] -h HostAddress [-u UserName -w Password] [-o {raw -n PortNumber | lpr}] [-q QueueName] [-m{e | d}] [-i SNMPName] [-y CommunityName] [-2{e | d}]

The parameters used on this command line are defined in Table F.

Table F: Parameters to use the Prnport.vbs script to create a standard TCP/IP printer port.

Parameter

Description

-a Required. Specifies that you want to create a standard TCP/IP port.
-r PortName Required. Specifies the port to which the printer is connected.
-s ServerName Optional. Specifies the name of the remote computer to which you want to add the port. If you do not specify a computer, the port is added to the local computer.
-h HostAddress Required. Specifies the IP address you want to assign to the port.
-u UserName -w Password Optional. Specifies an account with permissions to connect, via Windows Management Instrumentation (WMI) services, to the computer on which you want to create a standard TCP/IP printer port. If you do not specify an account, you must be logged on under an account with these permissions for the command to work.
-o {raw -n PortNumber | lpr} Optional. Specifies which protocol the port uses: TCP raw or TCP LPR.
-q QueueName Optional. Specifies the queue name for a TCP raw port.
-m{e | d} Optional. Specifies whether SNMP is enabled. The parameter e enables SNMP. The parameter d disables SNMP.
-i SNMPName Optional. Specifies the SNMP index, if SNMP is enabled.
-y CommunityName Optional. Specifies the SNMP community name, if SNMP is enabled.
-2{e | d} Optional. Specifies whether double spools (also known as respooling) are enabled for TCP LPR ports.

Prnqctl.vbs

The Prnqctl.vbs script provides you with a printer queue management utility that allows you to pause or resume a printer as well as to clear a printer queue. It also allows you to print a test page on a printer.

When troubleshooting printer problems, chances are that you find yourself often printing test pages, which can be a multistep operation. The neatest feature of the Prnqctl.vbs script is that it allows you to quickly print a test page right from the command line. As such, if you were to create a simple script that automates the Prnqctl.vbs script, you could print a test page just by double-clicking an icon. To do so, you’d use the syntax:

cscript prnqctl.vbs -e [-s ServerName] -p PrinterName [-u UserName -w Password]

The parameters used on this command line are defined in Table G.

Table G: Parameters to use the Prnqctl.vbs script to print a test page.

Parameter

Description

-e Required. Specifies that you want to print a test page.
-s ServerName Optional. Specifies the name of the remote computer sharing the printer on which you want to print a test page. If you do not specify a computer, the local computer is used.
-p PrinterName Required. Specifies the name of the printer on which you want to print a test page.
-u UserName -w Password Optional. Specifies an account with permissions to connect, via Windows Management Instrumentation (WMI) services, to the computer sharing the printer on which you want to print a test page. If you do not specify an account, you must be logged on under an account with these permissions for the command to work.

Pubprn.vbs

The Pubprn.vbs script provides you with a tool that you can use to easily publish a printer to your Active Directory. To do so, you’d use the syntax:

cscript pubprn.vbs ServerName LDAP://CN=<Container>,DC=<Container>"

The parameters used on this command line are defined in Table H.

Table H: Parameters to publish a printer to Active Directory.

Parameter

Description

ServerName Optional. Specifies the name of the Windows server that hosts the printer that you want to publish. If you do not specify a computer, the local computer is used.
“LDAP://CN=<Container>, DC=<Container>” Specifies the path to the container in Active Directory Domain Services where you want to publish the printer.


printui.dll

Usage: rundll32 printui.dll,PrintUIEntry [options] [@commandfile]

/a[file] binary file name
/b[name] base printer name
/c[name] unc machine name if the action is on a remote machine
/dl delete local printer
/dn delete network printer connection
/dd delete printer driver
/e display printing preferences
/f[file] either inf file or output file
/F[file] location of an INF file that the INF file specified with /f may depend on
/ga add per machine printer connections (the connection will be propagated to the user upon logon)
/ge enum per machine printer connections
/gd delete per machine printer connections (the connection will be deleted upon user logon)
/h[arch] driver architecture one of the following, x86, x64 or Itanium
/ia install printer driver using inf file
/id install printer driver using add printer driver wizard
/if install printer using inf file
/ii install printer using add printer wizard with an inf file
/il install printer using add printer wizard
/im install printer using add printer wizard skiping network listed printers
/in add network printer connection
/ip install printer using network printer installation wizard
/j[provider] print provider name
/k print test page to specified printer, cannot be combined with command when installing a printer
/l[path] printer driver source path
/m[model] printer driver model name
/n[name] printer name
/o display printer queue view
/p display printer properties
/q quiet mode, do not display error messages
/r[port] port name
/s display server properties
/Ss Store printer settings into a file
/Sr Restore printer settings from a file
Store or restore printer settings option flags that must be placed at the end of command:
2 PRINTER_INFO_2
7 PRINTER_INFO_7
c Color Profile
d PrinterData
s Security descriptor
g Global DevMode
m Minimal settings
u User DevMode
r Resolve name conflicts
f Force name
p Resolve port
i Driver name conflict
/u use the existing printer driver if it’s already installed
/t[#] zero based index page to start on
/v[version] driver version one of the following, “Type 2 – Kernel Mode” or “Type 3 – User Mode”
/w prompt the user for a driver if specified driver is not found in the inf
/y set printer as the default
/Xg get printer settings
/Xs set printer settings
/z do not auto share this printer
/Y do not auto generate a printer name
/K changes the meaning of /h to accept 2, 3, 4 for x86, x64, or Itanium (respectively), and /v to accept 3 for “Type 3 – User Mode”
/Z share this printer, can only be used with the /if option
/? help this message
@[file] command line argument file
/Mw[message] show a warning message before committing the command
/Mq[message] show a confirmation message before committing the command
/W[flags] specifies flags and switches for the wizards (for APW & APDW)
r make the wizards to be restart-able from the last page
/G[flags] specifies global flags and switches
w suppress setup driver warnings UI (super quiet mode)
/R force selected driver to replace exisiting driver


Examples

Run server properties:
rundll32 printui.dll,PrintUIEntry /s /t1 /c\\machine

Run printer properties:
rundll32 printui.dll,PrintUIEntry /p /n\\machine\printer

Run add printer wizard locally:
rundll32 printui.dll,PrintUIEntry /il

Run add printer wizard on \\machine:
rundll32 printui.dll,PrintUIEntry /im /c\\machine

Run queue view:
rundll32 printui.dll,PrintUIEntry /o /n\\machine\printer

Run inf install:
rundll32 printui.dll,PrintUIEntry /if /b “Test Printer” /f c:\infpath\infFile.inf /r “lpt1:” /m “Brother DCP-128C”

Run inf install (with inf dependency). In the example, prnbr002.inf depends on ntprint.inf
rundll32 printui.dll, PrintUIEntry /ia /m “Brother DCP-128C” /K /h x64 /v 3 /f “c:\infpath\prnbr002.inf” /F “c:\infpath\ntprint.inf”

Run add printer wizard using inf:
rundll32 printui.dll,PrintUIEntry /ii /f c:\infpath\infFile.inf

Add printer using inbox printer driver:
rundll32 printui.dll,PrintUIEntry /if /b “Test Printer” /r “lpt1:” /m “Brother DCP-128C”

Add per machine printer connection (propagated to the user upon logon):
rundll32 printui.dll,PrintUIEntry /ga /c\\machine /n\\machine\printer /j”LanMan Print Services”

Delete per machine printer connection (the connection will be deleted upon user logon):
rundll32 printui.dll,PrintUIEntry /gd /c\\machine /n\\machine\printer

Enumerate per machine printer connections:
rundll32 printui.dll,PrintUIEntry /ge /c\\machine

Add printer driver using inf:
rundll32 printui.dll,PrintUIEntry /ia /c\\machine /m “Brother DCP-128C” /h “x86” /v “Type 3 – User Mode” /f c:\infpath\infFile.inf

Add printer driver using inf:
rundll32 printui.dll,PrintUIEntry /ia /K /c\\machine /m “Brother DCP-128C” /h “x86” /v 3

Add inbox printer driver:
rundll32 printui.dll,PrintUIEntry /ia /c\\machine /m “Brother DCP-128C” /h “Intel” /v “Type 3 – Kernel Mode”

Remove printer driver:
rundll32 printui.dll,PrintUIEntry /dd /c\\machine /m “Brother DCP-128C” /h “x86” /v “Type 3 – User Mode”

Remove printer driver:
rundll32 printui.dll,PrintUIEntry /dd /K /c\\machine /m “Brother DCP-128C” /h “x86” /v 3

Set printer as default:
rundll32 printui.dll,PrintUIEntry /y /n “printer”

Set printer comment:
rundll32 printui.dll,PrintUIEntry /Xs /n “printer” comment “My Cool Printer”

Get printer settings:
rundll32 printui.dll,PrintUIEntry /Xg /n “printer”

Get printer settings saving results in a file:
rundll32 printui.dll,PrintUIEntry /f “results.txt” /Xg /n “printer”

Set printer settings command usage:
rundll32 printui.dll,PrintUIEntry /Xs /n “printer” ?

Store all printer settings into a file:
rundll32 printui.dll,PrintUIEntry /Ss /n “printer” /a “file.dat”

Restore all printer settings from a file:
rundll32 printui.dll,PrintUIEntry /Sr /n “printer” /a “file.dat”

Store printer information on level 2 into a file:
rundll32 printui.dll,PrintUIEntry /Ss /n “printer” /a “file.dat” 2

Restore from a file printer security descriptor:
rundll32 printui.dll,PrintUIEntry /Sr /n “printer” /a “file.dat” s

Restore from a file printer global devmode and printer data:
rundll32 printui.dll,PrintUIEntry /Sr /n “printer” /a “file.dat” g d

Restore from a file minimum settings and resolve port name:
rundll32 printui.dll,PrintUIEntry /Sr /n “printer” /a “file.dat” m p

Enable Client Side Rendering for a printer:
rundll32 printui.dll,PrintUIEntry /Xs /n “printer” ClientSideRender enabled

Disable Client Side Rendering for a printer:
rundll32 printui.dll,PrintUIEntry /Xs /n “printer” ClientSideRender disabled


tags: MrNetTek

VBScript Text Files: Read, Write, Append

email me

To Write
Set objFileToWrite = CreateObject(“Scripting.FileSystemObject”).OpenTextFile(“C:\file.txt”,2,true)
objFileToWrite.WriteLine(data)
objFileToWrite.Close
Set objFileToWrite = Nothing

To Read the entire file
Set objFileToRead = CreateObject(“Scripting.FileSystemObject”).OpenTextFile(“C:\file.txt”,1)
strFileText = objFileToRead.ReadAll()
objFileToRead.Close
Set objFileToRead = Nothing

To Read line by line
Set objFileToRead = CreateObject(“Scripting.FileSystemObject”).OpenTextFile(“C:\file.txt”,1)
Dim strLine
do while not objFileToRead.AtEndOfStream
strLine = objFileToRead.ReadLine()
‘Do something with the line
loop
objFileToRead.Close
Set objFileToRead = Nothing


Notes

OpenTextFile parameters:
IOMode
1=Read
2=write
8=Append

Create (true,false)
Format (-2=System Default,-1=Unicode,0=ASCII)

Add Counter into Registry

email me

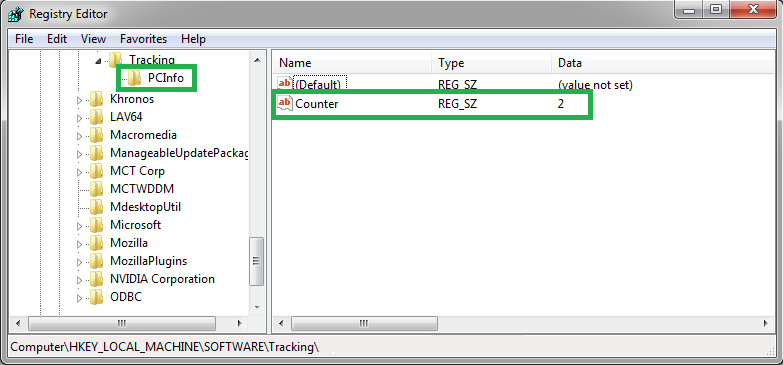
I’m using this as a tracking method for how often an app is opened. Wrap this up with
app, and you can count how many times certain apps are opened.

@echo off
set RegKey=”HKLM\SOFTWARE\Tracking\AppName” /v “Counter”

set rValue=
setlocal enabledelayedexpansion

REG QUERY %RegKey%
if %ERRORLEVEL% EQU 0 goto :Main
if %ERRORLEVEL% EQU 1 goto :Add

:Add
cls
echo Key not found…Adding Key
REG ADD %RegKey% /d 0 /reg:64
ping -n 4 127.0.0.1>nul

:Main
cls
echo Retrieving Counter…
FOR /f “tokens=1,2,3” %%a In (‘REG QUERY %RegKey% /reg:64’) do (
set rValue=%%c
set /a rValue+=1 && REG ADD %RegKey% /d !rValue! /reg:64 /f
ping -n 4 127.0.0.1>nul
)

set RegKey=
set rValue=

Screenshot


Notes

Now, if you want an easy way to read the counter—in other scripting languages—you can just add echo !rValue!>c:\counter.tmp to the file above, at the end of :Main

Then, in your language of choice, just read the contents of counter.tmp.

Example in VBScript

on error resume next
Set objFileToRead = CreateObject("Scripting.FileSystemObject").OpenTextFile("C:\counter.tmp",1)
<strong>strCounter</strong> = objFileToRead.ReadAll()
objFileToRead.Close
Set objFileToRead = Nothing

Bash Scripting on the Mac – Installing Flash

email me

This can be used to install the Flash Player. You will need the Flash pkg file located in the DMG.

#!/bin/sh

mytitle="Flash Setup"
echo -e "\033]2;$mytitle\007"

# Start
clear
MSG1="Mac User!"
echo "Hello, $MSG1"
sleep 5 # "sleep" for 5 seconds

clear
MSG2="This is the setup for Flash."
echo "$MSG2"
sleep 5 # "sleep" for 5 seconds

## clear
## MSG3="Mounting DMG..."
## echo "$MSG3"
## sleep 5 # "sleep" for 5 seconds

# # Change directory to desktop
cd ~/Desktop
pwd
sleep 5 # "sleep" for 5 seconds
## hdiutil mount flash.dmg

clear
MSG4="Installing Flash..."
echo "$MSG4"
sleep 5 # "sleep" for 5 seconds
## sudo -i installer -pkg "flash.pkg" -target "/"
echo "Pa55W0rd" | sudo -S -k installer -pkg "/Users/UserName/Desktop/flash.pkg" -target "/"

clear
MSG5="Flash was successfully installed!"
echo "$MSG5"
sleep 5

clear
MSG6="Unmounting DMG..."
echo "$MSG6"
sleep 5 # "sleep" for 5 seconds
cd ~
hdiutil unmount "/Volumes/Flash/"

osascript -e 'tell application "Terminal" to close (every window whose name contains "Flash")' &amp;amp; exit


Notes

Turn your script into an executable script

chmod +x YourScript


The below will safely pipe your password to the sudo command, without retaining a history of your password.

echo “your_password” | sudo -S -k

“-S”, means to use stdin for the password,

“-k” means to ignore cached credentials to force sudo to always ask. This is for consistent behavior.


This method does work on older and new versions sudo:

$ echo “your_password” | sudo -S -v


Turn your scripts into .app files using Platypus: http://eddiejackson.net/wp/?p=8493

There are several ways to convert shell scripts into applications. Platypus offers the most customization and options in a GUI, Appify is the quickest way to create one from the command line, and SetFile is a good solution for your own personal use (not intending to distribute). Now, if you plan on deploying packages using desktop management software, I recommend looking into Iceberg or using Apple’s Packages app.


tags: executable, run script, bash command, .command, .sh, MrNetTek

Mac – Platypus – Packaging Apps

email me

About Platypus

Platypus is a Mac OS X developer tool that creates application wrappers around scripts. This means that your interpreted scripts can be launched from the Mac OS X window environment — e.g. the Finder or the Dock — without requiring use of the command line interface. They effectively become regular Mac OS X applications.

Platypus was first conceived in 2003 and implemented using the Carbon APIs. It has since gone through over two dozen major updates, and is now entirely written in Objective C for the Cocoa APIs.

Platypus is free, open-source software distributed under the terms and conditions of the Free Software Foundation’s GNU General Public License. This means the source code is freely available and you are free to modify and distribute it as you see fit, as long as it remains open.

Reference: http://www.sveinbjorn.org/files/manpages/PlatypusDocumentation.html#71

GitHub

Platypus 5.0   site


Notes

There are several ways to convert shell scripts into applications. Platypus offers the most customization and options in a GUI, Appify is the quickest way to create one from the command line, and SetFile is a good solution for your own personal use (not intending to distribute).

When using Platypus, you don’t need sudo.

For example, 

sudo installer -pkg “install.pkg” -target “/”

becomes

installer -pkg “install.pkg” -target “/”

or…if you have issues, try ./install.pkg -target /

Guidelines for Mac software packaging

Common Keyboard Shortcuts for the Mac

email me

Command-Q
Quit any program

Command-W
Close whatever active window you are using,

Option-Command-W
Close all the windows in the currently active app

Command-T
Open new tab

Command-Tab
Switch Apps

Command-X, Command-C, Command-V
Cut, Copy, and Paste

Command-F
Search

Command-Shift-3, Command-Shift-4
Snapshots

Command-Shift-A, Command-Shift-U, Command-Shift-D, Command-Shift-H
Navigation in Finder

Command-Option-Esc
Force Quit

Command-H, Command-Option-H
Quickly Hide Windows

PSExec Black Windows – PAExec

email me

Have you noticed psexec is now launching black windows on remote computers? These “black” windows will render your remote scripts/apps useless. Well, I have a solution.

Steps

Step 1 – Stop using psexec; use paexec instead: source.
Step 2 – Run using: 
PAExec \\MachineName -s -i cmd.exe
or
PAExec \\MachineName -s -i -w c:\windows\system32 c:\windows\system32\app.exe
or
PAExec \\MachineName -u USERNAME -p PASSWORD -s -i -w c:\windows\system32 c:\windows\system32\app.exe

  • In this case, the system32 is SysWOW64 on my remote computer
    So, if you want to remotely install apps, copy app.exe to SysWOW64 on the remote computer, launch app.exe via paexec
  • psexec use — in an older script (replace with paexec): here  2


Features

It’s similar to Microsoft’s PsExec utility with a few extra features:

  • Command line parameters (username/passwords) are scrambled instead of sent in clear text
  • It can be redistributed by anyone
  • Has some extra often-requested features like logging, and not deleting a file that is copied to the server


Everything Else

PAExec – Redistributable PsExec

PAExec is a freely-redistributable re-implementation of 
SysInternal/Microsoft's popular PsExec program.  PAExec aims to be a drop 
in replacement for PsExec, so the command-line usage is identical, with 
additional options also supported.  This work was originally inspired by 
Talha Tariq's RemCom.

Usage: PAExec [\\computer[,computer2[,...]] | @file]
[-u user [-p psswd]|[-p@ file [-p@d]]] 
[-n s] [-l][-s|-e][-x][-i [session]][-c [-f|-v] [-csrc path]]
[-lo path][-rlo path][-ods][-w directory][-d][-][-a n,n,...]
[-dfr][-noname][-to seconds] cmd [arguments]

Standard PAExec\PsExec command line options:

     -a         Separate processors on which the application can run with
                commas where 1 is the lowest numbered CPU. For example,
                to run the application on CPU 2 and CPU 4, enter:
                -a 2,4
                
     -c         Copy the specified program to the remote system for
                execution. If you omit this option the application
                must be in the system path on the remote system.
				
     -d         Don't wait for process to terminate (non-interactive).
                This option is not compatible with -to
				
     -e         Does not load the specified account's profile.
	 
     -f         Copy the specified program even if the file already
                exists on the remote system.  Requires -c
				
     -i         Run the program so that it interacts with the desktop of the
                specified session on the specified system. If no session is
                specified the process runs in the console session. 
				
     -h         If the target system is Vista or higher, has the process 
                run with the account's elevated token, if available. 
				
     -l         [EXPERIMENTAL] Run process as limited user (strips the 
                Administrators group and allows only privileges assigned to
                the Users group). On Windows Vista the process runs with Low 
                Integrity.
				
     -n         Specifies timeout in seconds connecting to remote computers.
	 
     -p         Specifies optional password for user name. If you omit this
                you will be prompted to enter a hidden password.  Also see
                -p@ and -p@d below.
     
     -s         Run the process in the System account.
	 
     -u         Specifies optional user name for login to remote
                computer.
				
     -v         Copy the specified file only if it has a higher version number
                or is newer than the one on the remote system.  Requires -c
				
     -w         Set the working directory of the process (relative to
                remote computer).
				
     -x         Display the UI on the Winlogon secure desktop (Local System 
                only).  
				
     - Specify -low, -belownormal, -abovenormal, -high or
                -realtime to run the process at a different priority. Use
                -background to run at low memory and I/O priority on Vista.
				
     computer   Direct PAExec to run the application on the remote
                computer or computers specified. If you omit the computer
                name PAExec runs the application on the local system,
                and if you specify a wildcard (\\*), PAExec runs the
                command on all computers in the current domain.
				
     @file      PAExec will execute the command on each of the computers 
                listed in the file.
				
     program    Name of application to execute.
	 
     arguments  Arguments to pass (note that file paths must be absolute 
                paths on the target system).

Additional options only available in PAExec:
    
     -cnodel   If a file is copied to the server with -c, it is normally 
               deleted (unless -d is specified).  -cnodel indicates the file 
               should not be deleted.
               
     -clist    When using -c (copy), -clist allows you to specify a text 
               file that contains a list of files to copy to the target.  
               The text file should just list file names, and the files 
               should be in the same folder as the text file.
               Example: -c -clist "C:\test path\filelist.txt"
               
               filelist.txt might contain:
               myapp.exe
               mydata.dat
               
               Myapp.exe and mydata.dat would need to be in C:\test path 
               in the example above.  
               
               IMPORTANT: The first file listed is assumed to be the one that 
               will be executed.
               
               -clist and -csrc cannot be used together.
     -csrc     When using -c (copy), -csrc allows you to specify an 
               alternate path to copy the program from.  
               Example: -c -csrc "C:\test path\file.exe"
               
     -dbg      Output to DebugView (OutputDebugString)
	 
     -dfr      Disable WOW64 File Redirection for the new process
	 
     -lo       Log Output to file.  Ex: -lo C:\Temp\PAExec.log
               The file will be UTF-8 with a Byte Order Mark at the start.  
			   
     -p@        Will read the first line of the given file and use that as the 
                password.  File should be saved as UTF-8 with or without
                Byte Order Mark.
           
     -p@d       Deletes the file specified by -p@ as soon as the password is 
                read.     
				
     -rlo      Remote Log Output: Log from remote service to file (on remote 
               server).  
               Ex: -rlo C:\Temp\PAExec.log
               The file will be UTF-8 with a Byte Order Mark at the start.  
               
     -to       Timeout in seconds.  The launched process must exit within this 
               number of seconds or it will be terminated.  If it is terminated, 
               the exit code will be -10
               This option is not compatible with -d
               Ex: -to 15    
               Terminate the launched process after 15 seconds if it doesn't shut down first
               
     -noname   In order to robustly handle multiple simultaneous connections to a server,
               the source server's name is added to the remote service name and remote PAExec
               executable file.  If you do NOT want this behavior, use -noname
               
The application name, copy source, working directory and log file
entries can be quoted if the path contains a space.  For example:

PAExec \\test-server -w "C:\path with space" "C:\program files\app.exe"

Like PsExec, input is sent to the remote system when Enter is pressed,
and Ctrl-C stops the remote process and stops PAExec.

Make sure to use PsExec v2.1 or newer -- all communication to the remote system is 
encrypted, while older versions sent the data in plain text.

PAExec will return the error code it receives from the application that was 
launched remotely.  If PAExec itself has an error, the return code will be 
one of:

   -1 = internal error
   -2 = command line error
   -3 = failed to launch app (locally)
   -4 = failed to copy PAExec to remote (connection to ADMIN$ might have 
        failed)
   -5 = connection to server taking too long (timeout)
   -6 = PAExec service could not be installed/started on remote server
   -7 = could not communicate with remote PAExec service   
   -8 = failed to copy app to remote server
   -9 = failed to launch app (remotely)
  -10 = app was terminated after timeout expired
  -11 = forcibly stopped with Ctrl-C / Ctrl-Break