Join Machine to Domain HTA – with Object Verification

email me

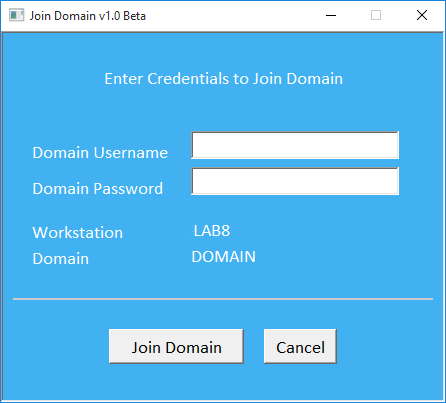
This allows you to display a join domain GUI/pop-up to your techs. Just fill in the appropriate domain information and you should be good to go.

Screenshot of the HTA
<script language="vbscript">
on error resume next
Window.ReSizeTo 0,0
Window.MoveTo -100,-100
</script>

<HTML>
<HEAD>
<TITLE>Join Domain v1.0 Beta</title>
<HTA:APPLICATION
ApplicationName="JoinDomain"
ID = "JoinDomain"
SingleInstance="Yes"
WindowsState="Normal"
Scroll="No"
Navigable="Yes"
MaximizeButton="No"
SysMenu="Yes"
Caption="Yes"
>
<style type="text/css">
.auto-style1 {	
	color: #000000;
	font-size: medium;
	font-family: Calibri;
}
.auto-style2 {
	color: #FFFFFF;
	font-family: Calibri;
	font-size: medium;
}
.auto-style3 {
	color: #FFFFFF;
	font-family: Calibri;
	font-size: medium;
}
</style>
</HEAD>

<script language="vbscript"> 

on error resume next
Dim strComputerName

Sub Window_OnLoad
   self.focus()
   mykey
Set objWMISvc = GetObject( "winmgmts:\\.\root\cimv2" )
Set colItems = objWMISvc.ExecQuery( "Select * from Win32_ComputerSystem", , 48 )
For Each objItem in colItems
    strComputerName = objItem.Name
    'WScript.Echo "Computer Name: " & strComputerName
Next

DataArea.InnerHTML = strComputerName

    w = 460
    h = 410
   Return = ResizeWindow(w, h)
   Return = CenterWindow(w, h)
   self.focus()
End Sub
  
Function ResizeWindow(w, h)
    width = w
    height = h
    window.resizeTo width, height
       self.focus()
End Function

Function CenterWindow(w, h)
    x = (screen.width-w)/2
    y = (screen.height-h)/2
    window.moveTo x, y
End Function

 
'''''''''''''''''''''' ROUTINE
Sub strJoinDomain
On Error Resume Next
strUserName = UserName.value
strPassWord = PasswordArea.value

Const JOIN_DOMAIN = 1
Const ACCT_CREATE = 2

Dim strUser, strDomain, strPW, iErrCount, sReturn, oCmp
strUser = "DOMAIN\" & strUserName
strDomain = "DOMAIN.com"
strPw = strPassWord

intAnswer = Msgbox("Join " & strComputerName & " to " & strDomain & "?", vbYesNo, "Join Domain")
  If intAnswer = vbYes Then

    Set WshShell = CreateObject("WScript.Shell")
	iErrCount = 0

	Set oWMI = GetObject("winmgmts:\\.\root\cimv2")
	For Each oCmp in oWMI.InstancesOf("Win32_ComputerSystem")
		while iErrCount < 4
	 		sReturn = oCmp.JoinDomainOrWorkgroup(strDomain, strPW, strUser, NULL, JOIN_DOMAIN+ACCT_CREATE)
	    		If sReturn <> 0 Then
					iErrCount = iErrCount +1
	     		Else
					iErrCount = 5	
	    		End If
		wend
	Next


Set objComputer = GetObject("WinNT://" & strDomain & "/" & strComputerName & ",computer")
If (Err.Number = 0) Then
On Error GoTo 0
	msgbox "   " & strComputerName & " has been joined to " & strDomain & "!",,"Success"
Else
	On Error GoTo 0
	msgbox "   " & strComputerName & " did NOT join " & strDomain & "!",,"Failed"
End If

Self.Close()
  
Else
	PopUp = Msgbox("Cancelled",9, "Join Domain")
End If
End Sub

Sub CancelScript
	Self.Close()
End Sub

</SCRIPT>

<body style="background-color: #41B1F2">
<CENTER>
<br>
<span class="auto-style3">Enter Credentials to Join Domain</span>
<br>
<br style="height: 149px">

<div class="auto-style2">
<table border="0" cellpadding="0" cellspacing="0" style="width: 382px; height: 142px;">

<tr>
<td height="15px" class="auto-style2" style="width: 148px" valign="bottom">
<p align="left" class="auto-style2">Domain Username</p>
</td>
<td height="15px" class="auto-style2" style="width: 183px">
<input type="text" name="UserName" size="20" class="auto-style1" align="top">
</td>
</tr>

<tr>
<td height="15px" class="auto-style2" style="width: 148px" valign="bottom">
<p align="left" class="auto-style2">Domain Password</p>
</td>
<td height="15px" class="auto-style2" style="width: 183px">
<input type="password" name="PasswordArea" size="20" class="auto-style1" align="top">
</td>
</tr>

<tr>
<td height="15px" class="auto-style2" style="width: 148px" valign="bottom">
</td>
<td height="15px" class="auto-style2" style="width: 183px">
</td>
</tr>

<tr>
<td height="15px" class="auto-style2" style="width: 148px" valign="bottom">
<p align="left" class="auto-style2">Workstation </p>
</td>
<td height="15px" class="auto-style2" style="width: 183px">
<span id = "DataArea"></span>
</td>
</tr>
	
	
<tr>
<td height="15px" class="auto-style2" style="width: 148px" valign="bottom">
<p align="left" class="auto-style2">Domain</p>
</td>

<td height="15px" class="auto-style2" style="width: 183px">
<span class="auto-style2">DOMAIN</span>
</td>

</tr>
 
</table>
</dive>

<BR>
<HR color="#cccccc">
<br>
<Input id=runbutton class="auto-style1" type="button" value="Join Domain" name="run_button" onClick="strJoinDomain()" style="height: 35px">
    
<Input id=runbutton class="auto-style1" type="button" value="Cancel" name="cancel_button" onClick="CancelScript" style="height: 35px">


<script type="text/javascript">
var i = 0
function FadeFunction() {
if (i < 250) {
i=i+1
}
var d = document.body.style
d.filter = "alpha(Opacity="+i+")"
d.opacity = i/250
var num = document.all ? 5 : 250
setTimeout("FadeFunction()",num)
}
</script>

<script type="text/javascript">
function mykey(){document.onkeydown=function(e){
e=(window.event)? event:e;
var k=e.keyCode;
if(k==13) { 
strJoinDomain()
}
}
}
</script>
</CENTER>
</BODY>
</HTML>

Verify if Computer Object Exists

email me

This allows you to check to see if a computer object exists in Active Directory or not. I’m using it to verify a machine has been added to the domain during post setup.

On Error Resume Next

strComputer = "COMPUTERNAME"
strDomain = "DOMAIN"

Set objComputer = GetObject("WinNT://" & strDomain & "/" & strComputer & ",computer")
If (Err.Number = 0) Then
   On Error GoTo 0
   Wscript.Echo "Computer object exists in AD."
Else
   On Error GoTo 0
   Wscript.Echo "Computer object does not exist in AD."
End If

Add Dynamic Data to AD Description Field

This shows you how to add [BITLOCKER timestamp machine model] to the computer object’s description field. Quite useful for populating more useful information into Active Directory. I’m using this as a post setup script to verify Bitlocker is installed, and when it was installed.

on error resume next

Set objWMI = GetObject(“winmgmts:”)
Set colSettings = objWMI.ExecQuery(“Select * from Win32_ComputerSystem”)

For Each objComputer in colSettings
on error resume next
LaptopModel = Trim(objComputer.Model)
Next

if strModel = “” then
on error resume next
‘msgbox “no model was detected”
myLength = Len(LaptopModel)

For i = 1 To myLength
on error resume next
If Asc(Mid(LaptopModel, i, 1)) <> 32 Then
If Asc(Mid(LaptopModel, i, 1)) >= 48 And Asc(Mid(LaptopModel, i, 1)) <= 57 Then myNumber = myNumber & Mid(LaptopModel, i, 1) End If Else 'msgbox("no numeric") End If Next 'msgbox(myNumber) strModel = myNumber end if 'msgbox strModel Dim strSearchString, strSearchFor Set objSysInfo = CreateObject("ADSystemInfo") Set objComputer = GetObject("LDAP://" & objSysInfo.ComputerName) strSearchString = objComputer.Description strSearchFor = "Bitlocker" If InStr(1, strSearchString, strSearchFor) > 0 then
‘if bitlocker is not found
strMessage = “BITLOCKER” & ” * ” & Now & ” * ” & strModel & ” * ” & objComputer.Description
Else
‘if bitlocker is found
strMessage = “BITLOCKER” & ” * ” & Now & ” * ” & strModel’ & ” ” & objComputer.Description
End If

objComputer.Description = strMessage
objComputer.SetInfo

email me

Disable Firewall

This is how you disable the firewall.  Just add it to one of your scripts, and this can be deployed to disable firewall, or change the option to enable, and you can enable the firewall.

C:\Windows\System32\netsh firewall set opmode mode=disable

NetSh Advfirewall set allprofiles state off

email me

Add IP Address to Zone

This will allow you to scriptomatically add an IP Address to an Internet Security Zone

on error resume next

Set objShell = CreateObject(“Wscript.Shell”)
Set objFSO = CreateObject(“Scripting.FileSystemObject”)

Const HKEY_LOCAL_MACHINE = &H80000002
Const OverwriteExisting = TRUE

‘SETS CURRENT DIRECTORY TO VARIABLE
strCurrentDirectory = objShell.CurrentDirectory

strComputer = “.”

Set objWMIService = GetObject(“winmgmts:\\” & strComputer & “\root\cimv2”)
Set objRegistry=GetObject(“winmgmts:\\” & strComputer & “\root\default:StdRegProv”)
strKeyPath = “SOFTWARE\Microsoft\Windows NT\CurrentVersion\ProfileList”
objRegistry.EnumKey HKEY_LOCAL_MACHINE, strKeyPath, arrSubkeys
For Each objSubkey In arrSubkeys
on error resume next
strValueName = “ProfileImagePath”
strSubPath = strKeyPath & “\” & objSubkey
objRegistry.GetExpandedStringValue HKEY_LOCAL_MACHINE,strSubPath,strValueName,strValue
Const POPUP_TITLE = “User To SID Conversion”
Set objWMIService = GetObject(“winmgmts:\\” & strComputer & “\root\cimv2”)
Set objAccount = objWMIService.Get(“Win32_SID.SID='” & objSubkey & “‘”)
strUser = objAccount.AccountName
‘strDomain = objAccount.ReferencedDomainName’returns referenced domain

‘DISPLAY PROFILE NAME & SID
objSubkey = trim(objSubkey)’trims whitespace
strUser = trim(strUser)’trims whitespace
‘msgbox “objSubkey: ” & objSubkey’returns SID
‘msgbox strUser’returns username

‘LOGIC TO DETERMINE IF REGISTRY ACCOUNT IS TO BE LOADED
if strUser = “SYSTEM” then strUser=””
if strUser = “LOCAL SERVICE” then strUser=””
if strUser = “NETWORK SERVICE” then strUser=””
if strUser = “ADMINISTRATOR” then strUser=””

if strUser <> “” then
on error resume next
‘ADD TO ZONE
objShell.Run “%comspec% /c reg.exe add “&chr(34)&”HKEY_USERS\” & objSubkey & “\Software\Microsoft\Windows\CurrentVersion\Internet Settings\ZoneMap\Ranges\Range1″&chr(34),0,true
objShell.Run “%comspec% /c reg.exe add “&chr(34)&”HKEY_USERS\” & objSubkey & “\Software\Microsoft\Windows\CurrentVersion\Internet Settings\ZoneMap\Ranges\Range1″&chr(34)&” /t REG_DWORD /v * /d 00000002 /f”,0,true
objShell.Run “%comspec% /c reg.exe add “&chr(34)&”HKEY_USERS\” & objSubkey & “\Software\Microsoft\Windows\CurrentVersion\Internet Settings”&chr(34)&” /t REG_SZ /v :Range /d 127.0.0.1 /f”,0,true
end if

Next

email me

Cannot Logon onto Computer “because the logon method is not allowed”

Symptom: When trying to logon a computer using non administrator ID, you may receive this message: “You cannot log on because the logon method you are using is not allowed on this computer. Please see you network administrator for more details.”

Case 1: Group Policy’ “Allow log on locally” was not setup to allow users or domain users. To setup allow users or domain users to logon the computer or domain, you need to add the users or domain users to the “Allow log on locally”. Please follow these steps to add the users.


1. Run gpedit.msc. 2. Expand Computer Configuration\Windows Settings\Security Settings\Local Policies 3. Click on User Rights Assignment 4. Ensure that “Allow log on locally” includes Administrators, Backup Operators, Domain Users or Users.


Case 2: Group Policy’ “Deny log on locally”  was setup to deny users or domain users. To setup allow users or domain users to logon the computer or domain locally, “Deny log on locally” should be empty or no users or domain users in the list. Please follow these steps to remove the users or domain users from the “Deny log on locally”.


1. Run gpedit.msc. 2. Expand Windows Settings\Security Settings\Local Policies 3. Click on User Rights Assignment 4. Ensure that “Deny log on locally” is empty.


Case 3: The local group policy allow user to logon. However, domain group policy which overrides local policy doesn’t allow users to logon locally. The resolution is modify the domain policy to allow users to logon locally.


Case 4:  The domain policy allows domain users to logon locally, but the local policy doesn’t and the domain policy doesn’t apply to the computer. The fix is running gpupdate to force to update the domain policy.

Case 5: Norton Firewall blocks the communication between the client and domain controller. The solution is disabling Norton firewall or re-configuring it to allow to access the domain controller.

email me

Add an ACE to write TPM recovery information to AD DS

A client computer can back up BitLocker recovery information under the computer object’s default permission. However, a client computer cannot back up TPM owner information unless this additional ACE is added.

‘=============================================================================

‘ This script demonstrates the addition of an Access Control Entry (ACE)
‘ to allow computers to write Trusted Platform Module (TPM)
‘ recovery information to Active Directory.

‘ This script creates a SELF ACE on the top-level domain object, and
‘ assumes that inheritance of ACL’s from the top-level domain object to
‘ down-level computer objects are enabled.


‘ Last Updated: 07/01/2006
‘ Last Reviewed: 09/19/2009
‘ Microsoft Corporation

‘ Disclaimer

‘ The sample scripts are not supported under any Microsoft standard support program
‘ or service. The sample scripts are provided AS IS without warranty of any kind.
‘ Microsoft further disclaims all implied warranties including, without limitation,
‘ any implied warranties of merchantability or of fitness for a particular purpose.
‘ The entire risk arising out of the use or performance of the sample scripts and
‘ documentation remains with you. In no event shall Microsoft, its authors, or
‘ anyone else involved in the creation, production, or delivery of the scripts be
‘ liable for any damages whatsoever (including, without limitation, damages for loss
‘ of business profits, business interruption, loss of business information, or
‘ other pecuniary loss) arising out of the use of or inability to use the sample
‘ scripts or documentation, even if Microsoft has been advised of the possibility
‘ of such damages.

‘ Version 1.0.1 – Tested and re-released for Windows 7 and Windows Server 2008 R2


‘=============================================================================

‘ ——————————————————————————–
‘ Access Control Entry (ACE) constants
‘ ——————————————————————————–

‘- From the ADS_ACETYPE_ENUM enumeration
Const ADS_ACETYPE_ACCESS_ALLOWED_OBJECT = &H5 ‘Allows an object to do something

‘- From the ADS_ACEFLAG_ENUM enumeration
Const ADS_ACEFLAG_INHERIT_ACE = &H2 ‘ACE can be inherited to child objects
Const ADS_ACEFLAG_INHERIT_ONLY_ACE = &H8 ‘ACE does NOT apply to target (parent) object

‘- From the ADS_RIGHTS_ENUM enumeration
Const ADS_RIGHT_DS_WRITE_PROP = &H20 ‘The right to write object properties
Const ADS_RIGHT_DS_CREATE_CHILD = &H1 ‘The right to create child objects

‘- From the ADS_FLAGTYPE_ENUM enumeration
Const ADS_FLAG_OBJECT_TYPE_PRESENT = &H1 ‘Target object type is present in the ACE
Const ADS_FLAG_INHERITED_OBJECT_TYPE_PRESENT = &H2 ‘Target inherited object type is present in the ACE

‘ ——————————————————————————–
‘ TPM and FVE schema object GUID’s
‘ ——————————————————————————–

‘- ms-TPM-OwnerInformation attribute
SCHEMA_GUID_MS_TPM_OWNERINFORMATION = “{AA4E1A6D-550D-4E05-8C35-4AFCB917A9FE}”

‘- ms-FVE-RecoveryInformation object
SCHEMA_GUID_MS_FVE_RECOVERYINFORMATION = “{EA715D30-8F53-40D0-BD1E-6109186D782C}”

‘- Computer object
SCHEMA_GUID_COMPUTER = “{BF967A86-0DE6-11D0-A285-00AA003049E2}”

‘Reference: “Platform SDK: Active Directory Schema”

‘ ——————————————————————————–
‘ Set up the ACE to allow write of TPM owner information
‘ ——————————————————————————–

Set objAce1 = createObject(“AccessControlEntry”)

objAce1.AceFlags = ADS_ACEFLAG_INHERIT_ACE + ADS_ACEFLAG_INHERIT_ONLY_ACE
objAce1.AceType = ADS_ACETYPE_ACCESS_ALLOWED_OBJECT
objAce1.Flags = ADS_FLAG_OBJECT_TYPE_PRESENT + ADS_FLAG_INHERITED_OBJECT_TYPE_PRESENT

objAce1.Trustee = “SELF”
objAce1.AccessMask = ADS_RIGHT_DS_WRITE_PROP
objAce1.ObjectType = SCHEMA_GUID_MS_TPM_OWNERINFORMATION
objAce1.InheritedObjectType = SCHEMA_GUID_COMPUTER

‘ ——————————————————————————–
‘ NOTE: BY default, the “SELF” computer account can create
‘ BitLocker recovery information objects and write BitLocker recovery properties

‘ No additional ACE’s are needed.
‘ ——————————————————————————–

‘ ——————————————————————————–
‘ Connect to Discretional ACL (DACL) for domain object
‘ ——————————————————————————–

Set objRootLDAP = GetObject(“LDAP://rootDSE”)
strPathToDomain = “LDAP://” & objRootLDAP.Get(“defaultNamingContext”) ‘ e.g. string dc=fabrikam,dc=com

Set objDomain = GetObject(strPathToDomain)

WScript.Echo “Accessing object: ” + objDomain.Get(“distinguishedName”)

Set objDescriptor = objDomain.Get(“ntSecurityDescriptor”)
Set objDacl = objDescriptor.DiscretionaryAcl

‘ ——————————————————————————–
‘ Add the ACEs to the Discretionary ACL (DACL) and set the DACL
‘ ——————————————————————————–

objDacl.AddAce objAce1

objDescriptor.DiscretionaryAcl = objDacl
objDomain.Put “ntSecurityDescriptor”, Array(objDescriptor)
objDomain.SetInfo

WScript.Echo “SUCCESS!”

————————————————————————————————————————————– Reference: http://technet.microsoft.com/en-us/library/cc771778(WS.10).aspx#BKMK_AppendixA

email me

VBScript – Enabling BitLocker in a Script – Automated

How to automate the enabling of BitLocker.  This can be added to your post imaging setup steps.

VBScript File – download
– enableBitLocker.vbs  |  mirror

Batch File – add this into a batch file or other script
– C:\bitlockertemp\enableBitLocker.vbs /on:tpm /l:C:\bitlockertemp\log.txt

Call to batch file post-imaging

————————————————————————————————————————————–
Reference: http://technet.microsoft.com/en-us/library/cc771778(WS.10).aspx#BKMK_AppendixA

email me

Batch – Import BitLocker Info into Active Directory

email me

This is a script I wrote to automatically return the numerical password and import the BitLocker information into Active Directory.

This is especially useful if you implement BitLocker on the clients before you set up Active Directory. Caveat, the script will need to run as a user that has been delegated access to AD. The System Account will not work for this. So, the script can either be run locally…or using a service account, a service account that can be specified on the LANDesk package in the LANDesk Console under Accounts.

The commands

manage-bde -protectors -get c:
manage-bde -protectors -adbackup c: -id PUT_ID_HERE
Script

* remove the pause if added to LANDesk

@echo off
setlocal ENABLEDELAYEDEXPANSION
set MyVar=

REM DISPLAY CURRENT BITLOCKER RECOVERY INFORMATION
manage-bde -protectors -get c:

REM PRIMARY EXTRACTION METHOD
for /f “skip=4 tokens=2 delims=:” %%g in (‘”manage-bde -protectors -get c:”‘) do set MyVar=%%g
echo %MyVar%

REM IMPORT BITLOCKER INFO INTO AD
manage-bde -protectors -adbackup c: -id%MyVar%
pause

REM EXIT
set MyVar=
exit /b 0

rem NOT NEEDED AT THIS TIME
rem secondary extraction method
rem return protector id
for /f “skip=4 tokens=2 delims=:” %%g in (‘”manage-bde -protectors -get c:”‘) do (
set /a X+=1
set MyVar!X!=%%g
)

rem import protector id into ad
echo %MyVar2%
manage-bde -protectors -adbackup c: -id%MyVar2%

pause


Reference

http://technet.microsoft.com/en-us/library/cc771778(WS.10).aspx#BKMK_AppendixA

LANDesk, Active Directory, Bitlocker

Access Denied Error 0x80070005 message when initializing TPM for BitLocker

email me

How to initialize TPM successfully when you enable BitLocker in Windows 7.

A common problem we have seen since the release of Windows 7 has been to initialize TPM successfully so that you can successfully turn ON BitLocker. This is most likely due to incorrect permissions for the SELF account in AD for ms-TPMOwnerInformation attribute.

When you try to turn on Bitlocker on Windows 7 Operating System Drive, you may get the Access Denied Error message while initializing TPM.

Additionally, when you open the TPM Management Console and you try to initialize TPM you get error message 0x80070005.

NOTE: If you are using SCCM to build Windows 7 machines and using Bitlocker Task Sequencer you may see the following error message(s) logged in smsts.log for OSDbitlocker.

pTpm->TakeOwnership( sOwnerAuth ), HRESULT=80070005 e:\nts_sms_fre\sms\client\osdeployment\bitlocker\bitlocker.cpp,480)OSDBitLocker 3032 (0x0BD8)
Failed to take ownership of TPM. Ensure that Active Directory permissions are properly configured.
Access is denied. (Error: 80070005; Source: Windows) OSDBitLocker 3032 (0x0BD8)

Resolution:

To set correct permissions, follow the instruction below:

1. Open Active Directory Users and Computers.

2. Select the OU where you have all computers which will have Bitlocker turned ON.

3. Right Click on the OU and click Delegate Control.

4. Click Next and then click Add.

5. Type SELF as the Object Name.

6. Select create a custom task to delegate.

7. From the object in the folder, select Computer Objects.

8. Under show these permissions, select all 3 checkbox.

9. Scroll down in permissions and select the attribute Write msTPM-OwnerInformation.

10. Click Finish.

After you have done the above steps, you should be able to initialize TPM successfully.

More Information:

http://technet.microsoft.com/en-us/library/dd875529(WS.10).aspx

http://technet.microsoft.com/en-us/library/cc771778(WS.10).aspx#BKMK_AppendixA

Load BitLocker Recovery Keys to AD Manually

This is how you load the BitLocker recovery into active directory manually.

STEP 1: Get the ID for the numerical password protector of the volume, in the example below we are using the C: drive:

manage-bde -protectors -get c:

Example:

Bitlocker Drive Encryption: Configuration Tool version 6.1.7600
Copyright (C) Microsoft Corporation. All rights reserved.
Volume C: [Old Win7]
All Key Protectors
External Key:
ID: {F12ADB2E-22D5-4420-980C-851407E9EB30}
External Key File Name:
F12ADB2E-22D5-4420-980C-851407E9EB30.BEK

Numerical Password:
ID: {DFB478E6-8B3F-4DCA-9576-C1905B49C71E}
Password:
224631-534171-438834-445973-130867-430507-680922-709896

TPM And PIN:
ID: {EBAFC4D6-D044-4AFB-84E3-26E435067AA5}

In the above result, you would find an ID and Password for Numerical Password protector.

STEP 2: Use the numerical password protector’s ID from STEP 1 to backup recovery information to AD

In the below command, replace the GUID after the -id with the ID of Numerical Password protector.

manage-bde -protectors -adbackup c: -id {DFB478E6-8B3F-4DCA-9576-C1905B49C71E}

Bitlocker Drive Encryption: Configuration Tool version 6.1.7600
Copyright (C) Microsoft Corporation. All rights reserved.
Recovery information was successfully backed up to Active Directory.

You should now be able to view the recovery information for the volume in the active directory.

————————————————————————————————————————————– Reference: http://technet.microsoft.com/en-us/library/cc771778(WS.10).aspx#BKMK_AppendixA

email me

Stop and Start the Sql Server Browser

To start the SQL Server Browser service from the command prompt


On the Start menu, click Run.

  1. In the Run dialog box, type cmd.
  2. From the command prompt, type net start sqlbrowser.


To stop the SQL Server Browser service from the command prompt


On the Start menu, click Run.

  1. In the Run dialog box, type cmd.
  2. From the command prompt, type net stop sqlbrowser.

email me