JavaScript – Key Codes

email me

The keyCode property returns the Unicode character code of the key that triggered the onkeypress event, or the Unicode key code of the key that triggered the onkeydown or onkeyup event.

Key codes represent an actual key on the keyboard.

An example of key codes in action


function mykey() { document.onkeydown = function(){
switch (event.keyCode){
// KILL ALT F4
case 18 :
event.returnValue = false;
event.keyCode = 0;
return false;
case 115 :
event.returnValue = false;
event.keyCode = 0;
return false;

//F5 button
case 116 :
event.returnValue = false;
event.keyCode = 0;
return false;

//ESC button
case 27 :
event.returnValue = false;
event.keyCode = 0;
return false;

//r
case 82 :
if (event.ctrlKey){
event.returnValue = false;
event.keyCode = 0;
return false;
}
}
}
}


Key Codes

 Key  Code
backspace 8
tab 9
enter 13
shift 16
ctrl 17
alt 18
pause/break 19
caps lock 20
escape 27
page up 33
page down 34
end 35
home 36
left arrow 37
up arrow 38
right arrow 39
down arrow 40
insert 45
delete 46
0 48
1 49
2 50
3 51
4 52
5 53
6 54
7 55
8 56
9 57
a 65
b 66
c 67
d 68
 Key  Code
e 69
f 70
g 71
h 72
i 73
j 74
k 75
l 76
m 77
n 78
o 79
p 80
q 81
r 82
s 83
t 84
u 85
v 86
w 87
x 88
y 89
z 90
left window key 91
right window key 92
select key 93
numpad 0 96
numpad 1 97
numpad 2 98
numpad 3 99
numpad 4 100
numpad 5 101
numpad 6 102
numpad 7 103
 Key  Code
numpad 8 104
numpad 9 105
multiply 106
add 107
subtract 109
decimal point 110
divide 111
f1 112
f2 113
f3 114
f4 115
f5 116
f6 117
f7 118
f8 119
f9 120
f10 121
f11 122
f12 123
num lock 144
scroll lock 145
semi-colon 186
equal sign 187
comma 188
dash 189
period 190
forward slash 191
grave accent 192
open bracket 219
back slash 220
close braket 221
single quote 222

Assembly – Even or Odd Number

email me

< back

Return whether a number is even or odd.

Tested in emu8086 emulator.  Learning: 1  2  3  4  5  6  book

.DATA
 MSG1 DB 10,13,'Enter number: 


Screenshot


 MSG2 DB 10,13,'Result: Even


Screenshot


 MSG3 DB 10,13,'Result: Odd


Screenshot


DATA ENDS
DISPLAY MACRO MSG
 MOV AH,9
 LEA DX,MSG
 INT 21H
ENDM

.CODE
 ASSUME CS:CODE,DS:DATA
 START:
  MOV AX,DATA
  MOV DS,AX
  DISPLAY MSG1
  MOV AH,1
  INT 21H
  MOV AH,0
 CHECK: 
  MOV DL,2
  DIV DL
  CMP AH,0
  JNE ODD
 EVEN:
  DISPLAY MSG2
  JMP DONE
 ODD:
  DISPLAY MSG3
 DONE:
  MOV AH,4CH
  INT 21H
CODE ENDS
END START


Screenshot

Assembly – Multiplication

email me

< back

Perform multiplication of two numbers.

Tested in emu8086 emulator.

See addition and subtraction.  Learning: 1  2  3  4  5  6  book

.MODEL SMALL
.STACK 200H
.DATA
 NUM1 DB ?
 NUM2 DB ?
 RESULT DB ?
 MSG1 DB 10,13,"Enter NUM1: $"
 MSG2 DB 10,13,"Enter NUM2: $"
 MSG3 DB 10,13,"Result: $"
ENDS

.CODE
ASSUME DS:DATA CS:CODE
START:
 MOV AX, @DATA
 MOV DS, AX
 LEA DX, MSG1
 MOV AH, 9
 INT 21H
 MOV AH, 1
 INT 21H
 SUB AL, 30H
 MOV NUM1, AL
 LEA DX, MSG2
 MOV AH, 9
 INT 21H
 MOV AH, 1
 INT 21H
 SUB AL, 30H
 MOV NUM2, AL
 MUL NUM1
 MOV RESULT, AL
 AAM
 ADD AH, 30H
 ADD AL, 30H
 MOV BX, AX
 LEA DX, MSG3
 MOV AH, 9
 INT 21H
 MOV AH, 2
 MOV DL, BH
 INT 21H
 MOV AH, 2
 MOV DL, BL
 INT 21H
 MOV AH, 4CH
 INT 21H
ENDS
END START


Screenshot

Windows 10 – Unpacking and Packing AppX

email me

These are some of my notes for working with AppX files.

You will need to install the SDK to use MakeAppx.exe, and make sure Developer Mode is enabled.


Developer Mode

reg add “HKEY_LOCAL_MACHINE\SOFTWARE\Microsoft\Windows\CurrentVersion\AppModelUnlock” /v “AllowDevelopmentWithoutDevLicense” /t REG_DWORD /d “1” /f /reg:64

reg.exe add “HKEY_LOCAL_MACHINE\SOFTWARE\Microsoft\Windows\CurrentVersion\AppModelUnlock” /v AllowAllTrustedApps /t REG_DWORD /d 1 /f /reg:64

reg.exe add “HKEY_LOCAL_MACHINE\Software\Policies\Microsoft\Windows\Appx” /v AllowDevelopmentWithoutDevLicense /t REG_DWORD /d 1 /f /reg:64

reg.exe add “HKEY_LOCAL_MACHINE\Software\Policies\Microsoft\Windows\Appx” /v AllowAllTrustedApps /t REG_DWORD /d 1 /f /reg:64


Example SDK folder (location of tools)

C:\Program Files (x86)\Windows Kits\10\bin\10.0.16299.0\x64


Unbundle

MakeAppx.exe unbundle /p C:\example\AppleInc.iTunes_12090.167.37085.0_neutral_~_nzyj5cx40ttqa.AppxBundle /d C:\example\unbundle


Unpack

MakeAppx.exe unpack /p C:\example\unbundle\AppleInc.iTunes_12090.167.37085.0_x64.appx /d C:\example\unpack


Pack

MakeAppx pack /d C:\example\pack /p C:\example\sample1.appx


If you receive errors

Get-Appxlog | Out-GridView


Notes

Examples

MakeAppx pack /v /h SHA256 /d “C:\My Files” /p MyPackage.appx
MakeAppx pack /v /o /f MyMapping.txt /p MyPackage.appx
MakeAppx pack /m “MyApp\AppxManifest.xml” /f MyMapping.txt /p AppPackage.appx
MakeAppx pack /r /m “MyApp\AppxManifest.xml” /f MyMapping.txt /p ResourcePackage.appx
MakeAppx pack /v /h SHA256 /d “C:\My Files” /ep MyPackage.eappx /kf MyKeyFile.txt
MakeAppx pack /v /h SHA256 /d “C:\My Files” /ep MyPackage.eappx /kt
MakeAppx pack /v /h SHA256 /d “C:\My Files” /ep MyPackage.eappx /kt /np
MakeAppx pack /v /h SHA256 /d “C:\My Files” /p MyPackage.appx /ml 1073741824


Manually install unpacked AppX file

Add-AppxPackage -Path C:\example\AppxManifest.xml -Register


Signing your packages

makecert.exe -r -h 0 -n “CN=Publisher” -eku 1.3.6.1.5.5.7.3.3 -pe -sv C:\example\PackageCert.pvk C:\example\PackageCert.cer

pvk2pfx.exe -pvk C:\example\PackageCert.pvk -spc C:\example\PackageCert.cer -pfx C:\example\PackageCert.pfx

SignTool.exe sign /a /v /fd SHA256 /f C:\example\PackageCert.pfx C:\example\MyApp.appx


Manually add AppX file

Add-AppxPackage C:\Path\to\application.appx


All About AppX

What is an AppX?

The AppX is the file format used to distribute and install apps on the Universal Windows Platform. The AppX is an .ZIP-based container file.

What does an AppX package contain?

Each Windows Runtime app package contains the app’s payload files plus info needed to validate, deploy, manage, and update the app.

In an AppX package you will find:

  • App payload which is the Application files
  • XML configuration files which are:
    • App manifest which is the app manifest file (AppxManifest.xml)
    • App block map which is the app package’s block map file (AppxBlockMap.xml)
  • App signature

What is the installation type of a UWP app?

The UWP app is installed per-user. Users don’t have any knowledge of what was installed for any other user.

Where the UWP apps get installed?

In UWP apps we have app isolation mechanism, which means they only impact the account of the user who installed them. The app binaries are stored on the drive (%ProgramFiles%\WindowsApps). Only the Operating System can write in that location. The application cannot write in that location; the application is running in a sandbox.

What is a UWP package?

The UWP packages are Win32 apps converted to AppX. Are also called full trusted apps.

How to install an AppX package from other sources that you trust, outside of the Windows Store?

A requirement is to have “Sideload apps” option enabled on your target machine from “Settings” -> “Update and security” -> “For developers”.

There are two ways to sideload apps after Windows 10 Anniversary Update:

  • Full trust apps: double-click the AppX file from Windows Explorer and follow the graphical installer
  • Untrusted apps:
    • import the security certificate used to sign the AppX into the system store
    • run PowerShell cmdlet as admin
    • run following command pointing to the AppX file on the target system:
Add-AppxPackage -Path "C:\Path\Your.AppX"

Why do I receive the “External tool not found: MakePri.exe” error during the UwpAppX build?

For creating UwpAppX packages with Advanced Installer, the build machine must have the latest Windows SDK installed.

Why do I receive the “Error: SignerSign() failed. (-2147024885/0x8007000b)” error during the UwpAppX build?

This error may occur if the ID field from the Package Information view does not match with the publisher subject information of the certificate used to sign the package.

I have just converted a classic desktop application to an AppX package, why do I receive the “Failed due to unknown reasons” when I try to install it?

This error may occur if you have not included in your Advanced Installer Project all the images in Visual Assets and Package Information for all the required resolutions and tile sizes.

Matteo Pagani’s blog post offers a solution for the same issue if you used Microsoft’s Desktop App Converter for the conversion.

Can I configure the default app launched at the end of the deployment of an AppX bundle?

When you install a multi-app package from the Windows Store, there is no [ Launch ] button. Instead, you are directed to the app list to choose what app you want to start, meaning you cannot have a default app for an AppX bundle.

How do I access the AppX installation log?

First, you have to launch the Event Viewer by going to Start > Event Viewer (Local).

Once in the Event Viewer go to Applications and Services Logs > Microsoft > Windows > AppxPackagingOM > Microsoft-Windows-AppxPackaging/Operational.

Why do I get the “Invalid package identity name” error?

The package identity name must be composed of the publisher/company name and the app name (i.e., YourCompanyName.YourAppName).

Microsoft automatically detects your company name from your Windows Developer account.

Why do I get the “Invalid package family name” error?

The package family name is generated by the OS (not Advanced Installer) starting from the package identity name. The OS appends a hash at the end of the name, which is generated from the package and publisher identify information.

You cannot directly set this name. As long as you set the package identity name (as Microsoft requires) and the CN, the package family name will be set correctly.

Why do I get the “Invalid package publisher name” error?

When you publish an app in the store you no longer need to sign it with your certificate; the Microsoft Store will do it instead. Digital signing is only required when you test the app on your local machine or if you plan to distribute it outside the Microsoft Store.

When you publish the app in the store, you need to disable digital signing in Advanced Installer and set the publisher ID in the project to the value from your Microsoft Developer account, i.e., CN=82A13EFD-FE37-4EFC-8BA4-1C3E9EFE5F23

Why do I get the “This package’s manifest uses a display name that you have not reserved” error?

You must log in to your Windows Developer account (sign up if you don’t have one) and reserve your application name. For more details about registering a Windows Developer account see Microsoft’s documentation.


Notes

reg Query “HKLM\Hardware\Description\System\CentralProcessor\0” | find /i “x86” > NUL && set OS=32BIT || set OS=64BIT

if %OS%==32BIT goto 32Bit
if %OS%==64BIT goto 64Bit


DISM – OS Uninstall Options

email me

Windows gives a user the ability to uninstall and roll back to a previous version of Windows. You can use DISM to:

  • Find out how many days after an upgrade that an OS can be uninstalled
  • Initiate an uninstall
  • Remove the ability for a user to uninstall a Windows upgrade
  • Set the number of days that a user has to uninstall a Windows upgrade


/Get-OSUninstallWindow

Run this command against an online image to see how many days after an upgrade that an uninstall can be initiated.

DISM /Online /Get-OSUninstallWindow


/Initiate-OSUninstall

Run this command against an online image to revert a PC to a previous Windows installation.

DISM /Online /Initiate-OSUninstall


/Remove-OSUninstall

Run this command against an online image to remove the ability to roll back a PC to a previous installation of Windows.

DISM /Online /Remove-OSUninstall


/Set-OSUninstallWindow

Run this command against an online image to set the number of days after an upgrade that an uninstall can be initiated.

DISM /Online /Set-OSUninstallWindow /Value:30


Assembly – Addition and Subtraction

email me

< back

Tested using JDoodle.

See multiplication. Learning: 1  2  3  4  5  6  book

;SINGLE DIGIT ADDITION
;test here: https://www.jdoodle.com/compile-assembler-nasm-online

section	.text
   global _start        
	
_start:	                ;entry point
   mov	eax, '4'
   sub  eax, '0'
	
   mov 	ebx, '5'
   sub  ebx, '0'
   add 	eax, ebx
   add	eax, '0'
	
   mov 	[sum], eax
   mov	ecx, msg	
   mov	edx, len
   mov	ebx, 1	         ;file descriptor (stdout)
   mov	eax, 4	         ;system call number (sys_write)
   int	0x80	         ;call kernel
	
   mov	ecx,sum
   mov	edx, 1
   mov	ebx, 1	         ;ile descriptor (stdout)
   mov	eax, 4	         ;system call number (sys_write)
   int	0x80	         ;call kernel
	
   mov	eax, 1	         ;system call number (sys_exit)
   int	0x80	         ;call kernel
	
section .data
msg db "The sum is:", 0xA, 0xD 
len equ $ - msg   
segment .bss
sum resb 1

;;;;output: 9
;DOUBLE DIGIT ADDITION
;test here: https://www.jdoodle.com/compile-assembler-nasm-online

section .text
global _start

_start: ;entry point

mov esi, 1         ;right digit minus 1 placement. Example: 23 would be 2.
mov ecx, 2         ;total digits. Example 48 would be 2.
clc
add_loop:
mov al, [num1 + esi]
adc al, [num2 + esi]
aaa
pushf
or al, 30h
popf

mov [sum + esi], al
dec esi
loop add_loop

mov edx, len       ;message length
mov ecx, msg       ;message to write
mov ebx, 1         ;file descriptor (stdout)
mov eax, 4         ;system call number (sys_write)
int 0x80           ;call kernel

mov edx, 5         ;message length
mov ecx, sum       ;message to write
mov ebx, 1         ;file descriptor (stdout)
mov eax, 4         ;system call number (sys_write)
int 0x80           ;call kernel

mov eax, 1         ;system call number (sys_exit)
int 0x80           ;call kernel

section .data
msg db 'The Sum is:', 0xa
len equ $ - msg
num1 db '12'
num2 db '23'
sum db ' '

;;;;output: 35
;SINGLE DIGIT ADDITION - ACCEPT USER INPUT
;test here: https://www.jdoodle.com/compile-assembler-nasm-online

SYS_EXIT  equ 1
SYS_READ  equ 3
SYS_WRITE equ 4
STDIN     equ 0
STDOUT    equ 1

segment .data 

   msg1 db "Enter a digit ", 0xA, 0xD 
   len1 equ $- msg1 

   msg2 db "Please enter a second digit", 0xA, 0xD 
   len2 equ $- msg2 

   msg3 db "The sum is: "
   len3 equ $- msg3

segment .bss

   num1 resb 2 
   num2 resb 2 
   res resb 1    

section	.text
   global _start    
	
_start:             ;entry point
   mov eax, SYS_WRITE         
   mov ebx, STDOUT         
   mov ecx, msg1         
   mov edx, len1 
   int 0x80                

   mov eax, SYS_READ 
   mov ebx, STDIN  
   mov ecx, num1 
   mov edx, 2
   int 0x80            

   mov eax, SYS_WRITE        
   mov ebx, STDOUT         
   mov ecx, msg2          
   mov edx, len2         
   int 0x80

   mov eax, SYS_READ  
   mov ebx, STDIN  
   mov ecx, num2 
   mov edx, 2
   int 0x80        

   mov eax, SYS_WRITE         
   mov ebx, STDOUT         
   mov ecx, msg3          
   mov edx, len3         
   int 0x80

   ; moving the first number to eax register and second number to ebx
   ; and subtracting ascii '0' to convert it into a decimal number
	
   mov eax, [num1]
   sub eax, '0'
	
   mov ebx, [num2]
   sub ebx, '0'

   ; add eax and ebx
   add eax, ebx
   ; add '0' to to convert the sum from decimal to ASCII
   add eax, '0'

   ; storing the sum in memory location res
   mov [res], eax

   ; print the sum 
   mov eax, SYS_WRITE        
   mov ebx, STDOUT
   mov ecx, res         
   mov edx, 1        
   int 0x80

exit:    
   
   mov eax, SYS_EXIT   
   xor ebx, ebx 
   int 0x80
;SUBTRACTION
;test here: https://www.jdoodle.com/compile-assembler-nasm-online

section .text
global _start 

_start:           ;entry point
sub ah, ah
mov al, '5'
sub al, '2'
aas
or al, 30h
mov [res], ax

mov edx, len       ;message length
mov ecx, msg       ;message to write
mov ebx, 1         ;file descriptor (stdout)
mov eax, 4         ;system call number (sys_write)
int 0x80           ;call kernel

mov edx, 1         ;message length
mov ecx, res       ;message to write
mov ebx, 1         ;file descriptor (stdout)
mov eax, 4         ;system call number (sys_write)
int 0x80           ;call kernel

mov eax, 1         ;system call number (sys_exit)
int 0x80           ;call kernel

section .data
msg db 'The Result is:', 0xa
len equ $ - msg
section .bss
res resb 1

;;;output: 3


Screenshot


Notes

If you need an app to test your code, try emu8086

Addition, ran in emu8086

.MODEL SMALL
.STACK 200H
.DATA
NUM1 DB 12 ; number 1 to be added
NUM2 DB 10 ; number 2 to be added
VAL DW ?
MSG3 DB "Result: "
DECIMAL DB "00000$"

.CODE
BEGIN PROC
MOV AX, @DATA
MOV DS, AX

XOR AX, AX
MOV AL, NUM1
ADD AL, NUM2
ADC AH, 0
MOV VAL, AX

MOV AX, VAL
CALL AX_to_DEC

LEA DX, MSG3
MOV AH, 9
INT 21H

MOV AX, 4C00H
INT 21H
BEGIN ENDP

AX_to_DEC PROC
mov bx, 10 ; divisor
xor cx, cx ; CX=0 (number of digits)

First_Loop:
xor dx, dx ; Attention: DIV applies also DX!
div bx ; DX:AX / BX = AX remainder: DX
push dx ; LIFO
inc cx ; increment number of digits
test ax, ax ; AX = 0?
jnz First_Loop ; no: once more

mov di, OFFSET DECIMAL ; target string DECIMAL
Second_Loop:
pop ax ; get back pushed digit
or ax, 00110000b ; to ASCII
mov byte ptr [di], al ; save AL
inc di ; DI points to next character in string DECIMAL
loop Second_Loop ; until there are no digits left

mov byte ptr [di], '


Information

DB – Define Byte (Size – 1 Byte)

DW – Define Word (Size – 2 Byte)

DD – Define Double word (Size - 4 Bytes)

DQ – Define Quad word (Size – 8 Bytes)

DT – Define Ten Bytes (Size – 10 Bytes)

https://pinetools.com/syntax-highlighter
 ; End-of-string delimiter for INT 21 / FN 09h
ret
AX_to_DEC ENDP

END BEGIN


Information

DB – Define Byte (Size – 1 Byte)

DW – Define Word (Size – 2 Byte)

DD – Define Double word (Size – 4 Bytes)

DQ – Define Quad word (Size – 8 Bytes)

DT – Define Ten Bytes (Size – 10 Bytes)

https://pinetools.com/syntax-highlighter

Citrix – Moves from Receiver to Workspace

email me

Citrix Workspace app for Windows

Citrix Workspace app for Windows is an easy-to-install software that provides access to your applications and desktops using XenApp and XenDesktop from a remote client device. Citrix Workspace app provides access from your desktop, Start menu, Citrix Workspace user interface, or web browsers.

You can use Citrix Workspace app on domain and non-domain joined PCs, tablets, and thin clients. Using Citrix StoreFront in conjunction with Citrix Workspace app allows your organization to provide you with self-service access to your applications and desktops – all with a common user interface, regardless of the endpoint device hardware, operating system (32-bit and 64-bit editions), or form factor.


Silent Command

citrix.exe” /rcu /silent STORE0=”Store;https://mycitrix.umc.edu/Citrix/ummcWeb/discovery;Store”


Downloads

CitrixWorkspace_ADMX_Files.zip
CitrixWorkspace_Installation_Scripts.zip
CitrixCtxReceiverCmdLineHelper.zip


more…

About Citrix Workspace app

When powered by Citrix Workspace services, the new Citrix Workspace app gives users instant access to all their SaaS and web apps, their files and mobile apps, and their virtual apps and desktops from an easy-to-use, all-in-one interface. Citrix Workspace app is a single point of entry to all workspace services for users. Users get seamless and secure access to all the apps they need to stay productive, including features such as embedded browsing and single sign-on.

Citrix Workspace app aggregates and incorporates the full capabilities of Citrix Receiver as well as other Citrix client technologies – including HDX, the NetScaler plug-ins, and Citrix Endpoint Management Secure Hub. Citrix Workspace app also has full integration of Citrix Content Collaboration (formerly ShareFile) in the new Files tab. With this integration, all your data is accessible within Citrix Workspace app. The ability to upload and download files and even open files within Citrix Workspace app are now integrated into one application. Citrix Workspace app is also enhanced to deliver additional capabilities regarding data loss prevention, secure access to SaaS apps, secure internet browsing capabilities, advanced search, and more.

Workspace configuration

Citrix Workspace app for Windows supports configuring Workspaces for subscribers, who might be using one or more services available from Citrix Cloud.

Citrix Workspace app will intelligently display only the specific workspace resources to which users are entitled. All your digital workspace resources available in Citrix Workspace app are powered by the Citrix Cloud Workspace experience service.

A workspace is part of a digital workspace solution that enables IT to securely deliver access to apps from any device. This screenshot is an example of what the workspace experience looks like to your subscribers. This interface is evolving and may look different to what your subscribers are working with today. For example, it might say “StoreFront” at the top of the page instead of “Workspace”.


Scripts for Deploying Citrix Workspace app for Windows

This ZIP file contains sample scripts to deploy and configure Citrix Workspace app. It is an optional download, provided on an as-is basis by Citrix to serve as an example. Before use, IT administrators must customize the scripts to suit their environment. The uninstall and install scripts may be used as noted in the upgrade guide for Citrix Workspace app for Windows (CTX135933). Version: 18.9.0.19526 (1809)


Citrix ADMX/ ADML Templates for Group Policy Editor

This ZIP file contains ADMX and ADML files to deploy and configure Citrix Workspace app using group policy object editor. It is an optional download, to be used by IT administrators, and not meant for use by end-users. The administrative templates (ADMX and ADML files) may be used as noted in the upgrade guide for Citrix Workspace app for Windows (CTX135933). Version: 18.9.0.19526 (1809)


Citrix Receiver CmdLine Tool 1.0

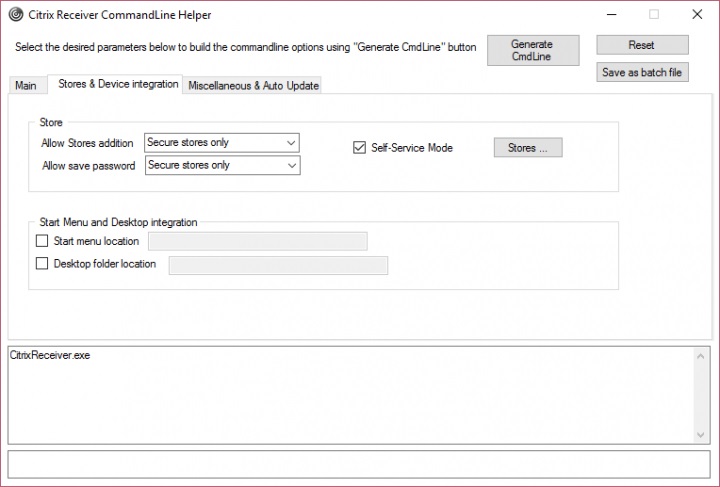
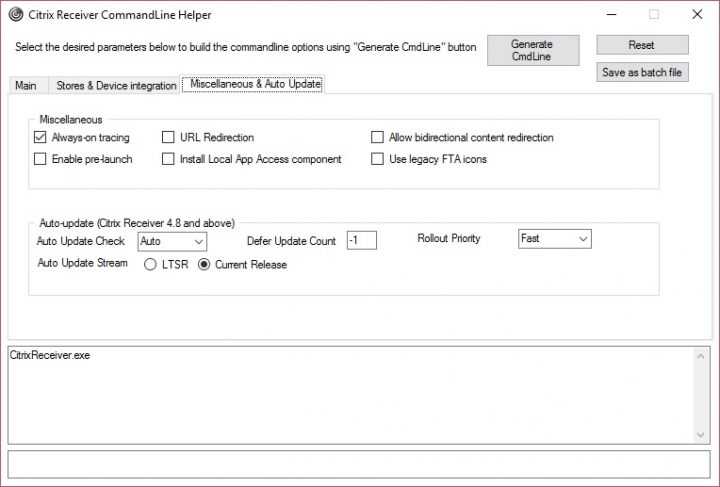
Select the options in the GUI, click on “Generate CmdLine” and the tool will display the full commandline in the tool, as well as copying it to the clipboard.

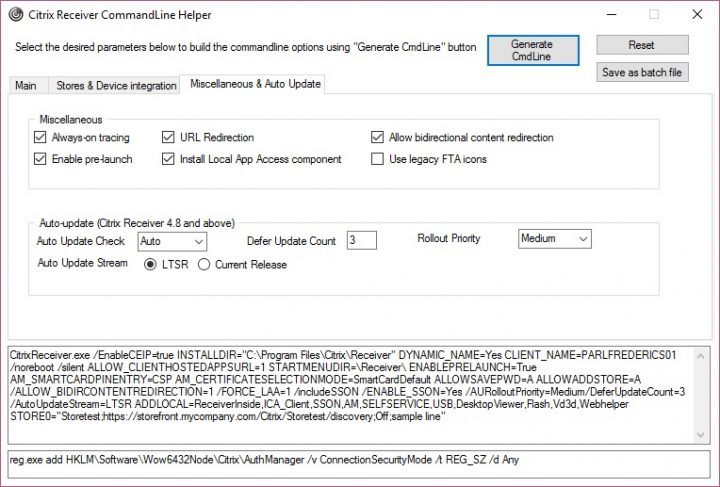
When clicking on “Save as batch file,” the tool will generate a batch file ready to use (including the registry entry if needed)


Notes

Configure and install using command-line parameters

Customize Citrix Receiver for Windows installer by specifying command line options. The installer package self-extracts to the user’s temp directory before launching the setup program. The space requirement includes program files, user data, and temp directories after launching several applications.

For more information about system requirements, see System requirements.

To install Citrix Receiver for Windows from a command prompt, use the syntax:

CitrixReceiver.exe [Options]

Receiver Updates

Option /AutoUpdateCheck = auto/manual/disabled
Description Indicates that Citrix Receiver for Windows detects when an update is available. Auto – You are notified when an update is available (default).; Manual –You are not notified when updates are available. Check for updates manually.; Disabled – Disable auto-update
Sample usage CitrixReceiver.exe /AutoUpdateCheck = auto ; CitrixReceiver.exe /AutoUpdateCheck = manual ; CitrixReceiver.exe /AutoUpdateCheck = disabled
Option /AutoUpdateStream= LTSR/Current
Description Indicates the release of Citrix Receiver for Windows. LTSR – indicates that the release is a Long Term Service Release ; Current – indicates that the release is the latest version of Citrix Receiver for Windows
Sample usage CitrixReceiver.exe /AutoUpdateStream= LTSR ; CitrixReceiver.exe /AutoUpdateStream= Current
Option /DeferUpdateCount
Description Indicates the release of Citrix Receiver for Windows. -1 – indicates that you can defer the notifications any number of times (default value=-1) ; 0 – indicates that the Remind me later option is not displayed. Any other number – indicates that the Remind me later option is displayed in that count. For example, if you set the value to 10, the Remind me later option is displayed 10 times.
Sample usage CitrixReceiver.exe /DeferUpdateCount=-1 ; CitrixReceiver.exe /DeferUpdateCount=-0 ; CitrixReceiver.exe /DeferUpdateCount=any other number
Option /AURolloutPriority
Description Indicates the period when you can stage the rollout. Fast – Update rollout happens at the beginning of the delivery period. Medium – Update rollout happens at the mid-delivery period. Slow – Update rollout happens at the end of the delivery period.
Sample usage CitrixReceiver.exe /AURolloutPriority=Fast ; CitrixReceiver.exe /AURolloutPriority=Medium ; CitrixReceiver.exe /AURolloutPriority=Slow

Enable bidirectional content redirection

Note

By default, Citrix Receiver for Windows does not install the bidirectional content redirection components if they are already installed on the server. If you are using XenDesktop as a client machine, you must install Citrix Receiver for Windows by using the /FORCE_LAA switch to install the bidirectional content redirection components. The feature, however, must be configured both on the server and the client.

Option ALLOW_BIDIRCONTENTREDIRECTION=1
Description Indicates that the bidirectional content redirection between client to host and host to the client is Enabled.
Sample usage CitrixReceiver.exe /ALLOW_BIDIRCONTENTREDIRECTION=1

Hide Settings Option

Option /DisableSetting
Description Suppresses Settings Option to be displayed in the Advanced Preferences dialog.
Sample usage CitrixReceiver.exe /DisableSetting=3
If you want both Application Display and Reconnect Options to be displayed in the Settings Option.. Enter CitrixReceiver.exe /DisableSetting=0
If you want Settings Option to be hidden in the Advanced Preferences dialog Enter CitrixReceiver.exe /DisableSetting=3
If you want Settings Option to display only Application Display Enter CitrixReceiver.exe /DisableSetting=2
If you want Settings Option to display only Reconnect Options Enter CitrixReceiver.exe /DisableSetting=1

Enable Local App Access

Option FORCE_LAA=1
Description By default, Citrix Receiver for Windows does not install the client side Local App Access components if the components are already installed on the server. To force the client side Local App Access components on the Citrix Receiver, use FORCE_LAA command line switch. Administrator-level privileges are required to perform these steps. For more information on Local App Access, see Local App Access in XenApp and XenDesktop documentation.
Sample usage CitrixReceiver.exe /FORCE_LAA =1

Display usage information

Option /? or /help
Description Indicates usage information
Sample usage CitrixReceiver.exe /? ; CitrixReceiver.exe /help

Suppress reboot during UI installation

Option /noreboot
Description Suppresses reboot during UI installations. This option is not necessary for silent installs. If you suppress reboot prompts, the USB devices that are in suspended state when Citrix Receiver for Windows installs is not recognized by Citrix Receiver for Windows until after the user device is restarted.
Sample usage CitrixReceiver.exe /noreboot

Silent installation

Option /silent
Description SDisables the error and progress dialogs to run a completely silent installation.
Sample usage CitrixReceiver.exe /silent

Enable single sign on authentication

Option /includeSSON
Description Indicates that the Citrix Receiver for Windows will be installed with the single sign-on component. The related option, ENABLE_SSON, is enabled when /includeSSON is on the command line. If you use ADDLOCAL= to specify features and you want to install the single sign on, you must also specify the value SSON. To enable pass-through authentication for a user device, you must install Citrix Receiver for Windows with local administrator rights from a command line that has the option /includeSSON. For more information, see How to Manually Install and Configure Citrix Receiver for Pass-Through Authentication. Note: Smart card, Kerberos and Local user name and password policies are inter-dependent. The order of configuration is important. We recommend to first disable unwanted policies, and then enable the policies you require. Carefully validate the result.
Sample usage CitrixReceiver.exe /includeSSON

Enable single sign on when /includeSSON is specified

Option ENABLE_SSON={Yes, No}
Description Enable Single sign-on when /includeSSON is specified. The default value is Yes. This property is required for smart card Single sign-on. Users must log off and log in to their devices after installing with Single sign-on authentication enabled. Requires administrator rights.
Sample usage CitrixReceiver.exe ENABLE_SSON=Yes

Always-on tracing

Option /EnableTracing={true, false}
Description By default, this feature is set to true. Use this property to enable or disable the always-on tracing feature. Always-on tracing helps to collect critical logs around the connection time. These logs can prove useful when troubleshooting intermittent connectivity issues. The Always On tracing policy overrides this setting.
Sample usage CitrixReceiver.exe /EnableTracing=true

Using the Citrix Customer Experience Improvement Program (CEIP)

Option EnableCEIP={true , false }
Description When you enable participation in the Citrix Customer Experience Improvement Program (CEIP), anonymous statistics and usage information are sent to Citrix to help Citrix improve the quality and performance of its products.
Sample usage CitrixReceiver.exe EnableCEIP=true

Specify the installation directory

Option INSTALLDIR=Installation Directory
Description Specifies the installation path where most of the Citrix Receiver software is installed. The default value is C:\Program Files\Citrix\Receiver. The following Receiver components are installed in the C:\Program Files\Citrix path: Authentication Manager ; Citrix Receiver ; Self-Service plug-in. If you use this option and specify an Installation directory, you must install RIInstaller.msi file in the \Receiver directory and the other .msi files in the installation directory.
Sample usage CitrixReceiver.exe INSTALLDIR=c:\Citrix\Test

Identify a user device

Option CLIENT_NAME=ClientName
Description Specifies the client name, where ClientName is the name used to identify the user device to the server. The default value is %COMPUTERNAME%
Sample usage CitrixReceiver.exe CLIENT_NAME=%COMPUTERNAME%.

Dynamic client name

Option ENABLE_CLIENT_NAME=Yes, No
Description The dynamic client name feature allows the client name to be the same as the computer name. When users change their computer name, the client name changes to match. Defaults to Yes. To disable dynamic client name support, set this property to No and specify a value for the CLIENT_NAME property.
Sample usage CitrixReceiver.exe ENABLE_DYNAMIC_CLIENT_NAME =Yes

Install specified components

Option ADDLOCAL=<feature… ,>
Description Installs set of local features specified in ADDLOCAL.
Sample usage CitrixReceiver.exe ADDLOCAL=ReceiverInside,ICA_Client,AM,SELFSERVICE,DesktopViewer,Flash,Vd3d,usb,WebHelper

Configure Citrix Receiver for Windows to manually add Stores

Option ENABLE_CLIENT_NAME=Yes, No
Description The dynamic client name feature allows the client name to be the same as the computer name. When users change their computer name, the client name changes to match. Defaults to Yes. To disable dynamic client name support, set this property to No and specify a value for the CLIENT_NAME property.
Sample usage CitrixReceiver.exe ENABLE_DYNAMIC_CLIENT_NAME =Yes

Save credentials for stores locally using PNAgent protocol

Option ALLOWSAVEPWD={N, S, A}
Description 
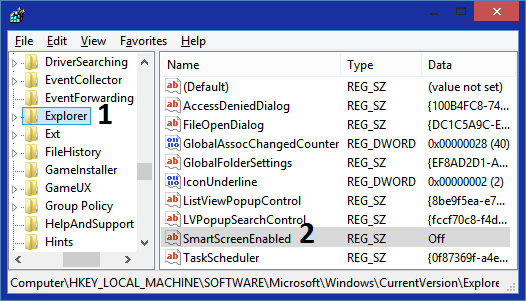
The default is the value specified by the PNAgent server at runtime. Specifies whether users can save the credentials for stores locally on their computers and apply only to stores using the PNAgent protocol. Defaults to S. Options include: N – Never allow users to save their passwords. S – Allow users to save passwords for both secure stores (HTTPS) and non-secure stores (HTTPS) and non-secure stores (HTTP). You can also control this feature by updating the registry key HKLM\Software[Wow6432Node]\Citrix\Dazzle\AllowSavePwd. Note: The following registry key must be added manually if AllowSavePwd does not work: 1 Key for 32 bit OS client: HKLM\Software\Citrix\AuthManager 2 Key for 64 bit OS client: HKLM\Software\wow6432node\Citrix\AuthManager 3 Type: REG_SZ 4 Value: never – never allow users to save their passwords. secureonly – allow users to save passwords for secure stores only (configured with HTTPS). always – allow users to save passwords for both secure stores (HTTPS) and non-secure stores (HTTP).
Sample usage CitrixReceiver.exe ALLOWADDSTORE=N

Select certificate

Option AM_CERTIFICATESELECTIONMODE={Prompt, SmartCardDefault, LatestExpriry }
Description Use this option to select a certificate. The default value is Prompt, which prompts the user to choose a certificate from a list. Change this property to choose the default certificate (per the smart card provider) or the certificate with the latest expiry date. If there are no valid logon certificates, the user is notified, and given the option to use an alternate logon method if available.You can also control this feature by updating the registry key HKCU or HKLM\Software[Wow6432Node]Citrix\AuthManager:CertificateSelectionMode={ Prompt SmartCardDefault LatestExpiry }. Values defined in HKCU take precedence over values in HKLM to best assist the user in selecting a certificate.
Sample usage CitrixReceiver.exe AM_CERTIFICATESELECTIONMODE=Prompt

Use CSP components to manage Smart Card PIN entry

Option AM_SMARTCARDPINENTRY=CSP
Description Use CSP components to manage Smart Card PIN entry. By default, the PIN prompts presented to users are provided by Citrix Receiver rather than the smart card Cryptographic Service Provider (CSP). Receiver prompts users to type a PIN when required and then passes the PIN to the smart card CSP. Specify this property to use the CSP components to manage the PIN entry, including the prompt for a PIN.
Sample usage CitrixReceiver.exe AM_SMARTCARDPINENTRY=CSP

Using Kerberos

Option ENABLE_KERBEROS={Yes , No}
Description The default value is No. Specifies whether the HDX engine should use Kerberos authentication and applies only when single sign-on (pass-through) authentication is enabled. For more information, see Configure domain pass-through authentication with Kerberos.
Sample usage CitrixReceiver.exe ENABLE_KERBEROS=No

Displaying legacy FTA icons

Option LEGACYFTAICONS={False, True}
Description Use this option to display Legacy FTA icons. The default value is False. Specifies whether or not application icons are displayed for documents that have file type associations with subscribed applications. When the argument is set to false, Windows generates icons for documents that do not have a specific icon assigned to them. The icons generated by Windows consist of a generic document icon overlaid with a smaller version of the application icon. Citrix recommends enabling this option if you plan to deliver Microsoft Office applications to users running Windows 7.
Sample usage CitrixReceiver.exe LEGACYFTAICONS=False

Enabling pre-launch

Option ENABLEPRELAUNCH={False, True}
Description The default value is False. For information about session pre-launch, see Reduce application launch time.
Sample usage CitrixReceiver.exe ENABLEPRELAUNCH=False

Specifying the directory for Start Menu shortcuts

Option STARTMENUDIR={Directory Name}
Description By default, applications appear under Start > All Programs. You can specify the relative path of the shortcuts in the programs folder. For example, to place shortcuts under Start > All Programs > Receiver, specify STARTMENUDIR=\Receiver. You can change or move the folder at any time.You can also control this feature using a registry key: Create the entry REG_SZ for StartMenuDir and give it the value “\RelativePath” Location: HKEY_LOCAL_MACHINE\Software[Wow6432Node]Citrix\Dazzle , HKEY_CURRENT_USER\Software\Citrix\Dazzle. For applications published through XenApp with a Client applications folder (also referred to as a Program Neighborhood folder) specified, you can specify that the client applications folder is to be appended to the shortcuts path as follows: Create the entry REG_SZ for UseCategoryAsStartMenuPath and give it the value “true.” Use the same registry locations as noted above.Note: Windows 8/8.1 does not allow you to create nested folders within the Start menu. Applications are displayed individually or inside the root folder and not within defined Category sub folders. Examples: 1 If client application folder is \office, UseCategoryAsStartMenuPath is true, and no StartMenuDiris specified, shortcuts are placed under Start > All Programs > Office. 2 If Client applications folder is \Office, UseCategoryAsStartMenuPath is true, and StartMenuDir is \Receiver, shortcuts are placed under Start > All Programs > Receiver > Office. Changes made to these settings have no impact on shortcuts that are already created. To move shortcuts, you must uninstall and reinstall the applications
Sample usage CitrixReceiver.exe STARTMENUDIR=\Office

Specifying the Store Name

Option STOREx=”storename;http[s]://servername.domain/IISLocation/discovery;[On, Off] ; [storedescription] “[STOREy=”–”]
Description Use this option to specify the Store name. Specifies up to 10 stores to use with Citrix Receiver. Values: x and y – Integers 0 through 9.; storename – Defaults to store. This must match the name configured on the StoreFront Server.; servername.domain – The fully qualified domain name of the server hosting the store. ; IISLocation – the path to the store within IIS. The store URL must match the URL in StoreFront provisioning files. The store URLs are of the form “/Citrix/store/discovery.” To obtain the URL, export a provisioning file from StoreFront, open it in notepad and copy the URL from the Address element.; On, Off – The optional Off configuration setting enables you to deliver disabled stores, giving users the choice of whether or not they access them. When the store status is not specified, the default setting is On. storedescription – An optional description of the store, such as HR App Store.Note: In this release, it is important to include “/discovery” in the store URL for successful pass-through authentication.
Sample usage CitrixReceiver.exe STORE0=”Store;https://test.xx.com/Citrix/Store/Discovery

Enabling URL Redirection on user devices

Option ALLOW_CLIENTHOSTEDAPPSURL=1
Description Enables the URL redirection feature on user devices. Requires administrator rights. Requires that Citrix Receiver is installed for All Users. For information about URL redirection, see Local App Access and its subtopics in the XenDesktop 7 documentation.
Sample usage CitrixReceiver.exe ALLOW_CLIENTHOSTEDAPPSURL=1

Enabling self-service mode

Option SELFSERVICEMODE={False , True}
Description The default value is True. When the administrator sets the SelfServiceMode flag to false, the user no longer has access to the self-service Citrix Receiver user interface. Instead, they can access subscribed apps from the Start menu and via desktop shortcuts – known as “shortcut-only mode”.
Sample usage CitrixReceiver.exe SELFSERVICEMODE=False

Specifying the directory for Desktop Shortcuts

Option DESKTOPDIR=Directory Name
Description Brings all shortcuts into a single folder. Category Path is supported for desktop shortcuts. Note: When using the DESKTOPDIR option, set the PutShortcutsOnDesktop key to True.
Sample usage CitrixReceiver.exe DESKTOPDIR=\Office

Upgrading from an unsupported Citrix Receiver version

Note

When you upgrade Citrix Receiver Version 13.x Enterprise or 12.x to Citrix Receiver for Windows Version 4.4 and later using the graphical user interface, the installer runs the Receiver cleanup utility by default.

However, the utility does not run by default when you upgrade from the command line. To upgrade from the command line, run the following command:

CitrixReceiver.exe /rcu /silent

When you upgrade Citrix Receiver for Windows from 13.x (non-Enterprise) or 4.1 to Version 4.2 or later, the /rcu switch is unnecessary and ignored.

Option /rcu
Description Allows you to upgrade from an unsupported version to the latest version of Citrix Receiver.
Sample usage CitrixReceiver.exe /rcu

Troubleshooting the installation

If there is a problem with the installation, search in the user’s %TEMP%/CTXReceiverInstallLogs directory for the logs with the prefix CtxInstall- or TrolleyExpress- . For example:

CtxInstall-ICAWebWrapper-20141114-134516.log

TrolleyExpress-20090807-123456.log

Examples of a command line installation

To specify the NetScaler Gateway store URL:

CitrixReceiver.exe STORE0=”<StoreFriendlyName>;testserver <StoreName>;<On/Off>;<StoreDescription>”]

Note: The NetScaler Gateway store URL must be the first entry in the list of configured store URLs.

To install all components silently and specify two application stores:

alt_text

To specify single sign-on (pass-through authentication) and add a store that points to a XenApp Services URL:

alt_text

C# – Arrays

email me

Compiled in Visual Studio 2017.

using System;
using System.Linq;

class Program
{
static ref int FirstElement(int[] array)
{
return ref array[0];
}

static void Main()
{
int[] array1 = { 1, 4, 2, 7, 6, 4, 4, 5, 3, 7 };
int[] array2 = new int[10];
int maxValue = array1.Max();
int indexElement = Array.IndexOf(array1, maxValue);

// display elements in array1
Console.Write("Original Array1: ");
for (int i = 0; i < array1.Length; i++)
{
Console.Write(array1[i]);
Console.Write(' ');
}

// max value
Console.Write("\n\nMax value in array: {0}", maxValue);
// index of max value
Console.Write("\n\nIndex of max value in array: {0}", indexElement);
Console.Write("\n\n");

// sort ascending
Console.Write("Array1 sorted ascending: ");
Array.Sort(array1);
for (int i = 0; i < array1.Length; i++)
{
Console.Write(array1[i]);
Console.Write(' ');
}
Console.Write("\n\n");

// sort descending
Console.Write("Array1 sorted descending: ");
Array.Reverse(array1);
for (int i = 0; i < array1.Length; i++)
{
Console.Write(array1[i]);
Console.Write(' ');
}
Console.Write("\n\n");

// make a change to array1, index 0
FirstElement(array1) = 9;

// display elements with a change in array1
Console.Write("Array1 with changed element: ");
for (int i = 0; i < array1.Length; i++)
{
Console.Write(array1[i]);
Console.Write(' ');
}
Console.Write("\n\n");

// copy all elements from array1 to array2
int[] array1OriginalData1 = { 1, 4, 2, 7, 6, 4, 4, 5, 3, 7 };
Array.Copy(array1OriginalData1, 0, array2, 0, 10);

int[] array1OriginalData2 = { 1, 4, 2, 7, 6, 4, 4, 5, 3, 7 };

// display elements in array2
Console.Write("Array2 copied from Array1: ");
for (int i = 0; i < array2.Length; i++)
{
Console.Write(array2[i]);
Console.Write(' ');
}
Console.Write("\n\n");

// Array.Copy
// p1 = source array
// p2 = start index in source array
// p3 = destination array
// p4 = start index in destination array
// p5 = elements to copy

// array1 with index
Console.Write("Array1 sorted with Index:\n");
for (int i = 0; i < array1OriginalData1.Length; i++)
{
int indexVal = Array.IndexOf(array1OriginalData1, array1OriginalData1[i]);
Console.Write(array1OriginalData1[i] + "(" + indexVal.ToString() + ")");
Console.Write(' ');
}
Console.Write("\n\n");

// sort array1 into array2 by max value

Console.Write("Array2 sorted by max value from Array1: ");
// sort descending
Array.Reverse(array1OriginalData1);

// move by index value to array2
for (int i = 0; i < array1.Length; i++)
{
Array.Copy(array1OriginalData1, i, array2, i, 1);
Console.Write(array2[i]);
Console.Write(' ');
}
Console.Write("\n\n");

Console.Write("\n\nCleared array 1\n");
Array.Clear(array1, 0, array1.Length);
for (int i = 0; i < array1.Length; i++)
{
Console.Write(array1[i]);
Console.Write(' ');
}
Console.Write("\n");

Console.Write("\n\nCleared array 2\n");
Array.Clear(array2, 0, array2.Length);
for (int i = 0; i < array2.Length; i++)
{
Console.Write(array2[i]);
Console.Write(' ');
}
Console.Write("\n");

Console.ReadKey();
}
}

C# – Check Email Address Formatting

email me

Uses EmailAddressAttribute (uses RegEx) — see Notes.

Compiled in Visual Studio 2017.

using System;
using System.ComponentModel.DataAnnotations;

class CheckEmails
{
static void Main(string[] args)
{
var objEmail = new EmailAddressAttribute();
bool testEmailAddress;
testEmailAddress = objEmail.IsValid("eddie@aol.com");
Console.Write("eddie@aol.com: " + testEmailAddress);

testEmailAddress = objEmail.IsValid("eddie@aol.org");
Console.Write("\n\neddie@aol.org: " + testEmailAddress);

testEmailAddress = objEmail.IsValid("eddie+isme@aol.net");
Console.Write("\n\neddie+isme@aol.net: " + testEmailAddress);

testEmailAddress = objEmail.IsValid("edward@aol.yooo");
Console.Write("\n\nedward@aol.yooo: " + testEmailAddress);

testEmailAddress = objEmail.IsValid("test");
Console.Write("\n\ntest: " + testEmailAddress);

testEmailAddress = objEmail.IsValid("test@");
Console.Write("\n\ntest@: " + testEmailAddress);

testEmailAddress = objEmail.IsValid("test@abcd");
Console.Write("\n\ntest@abcd: " + testEmailAddress);

testEmailAddress = objEmail.IsValid("test@abcd.");
Console.Write("\n\ntest@abcd.: " + testEmailAddress);

// using an if statement
if (new EmailAddressAttribute().IsValid("\n\neddie@aol.com"))
testEmailAddress = true;
Console.Write("\n\neddie@aol.com: " + testEmailAddress);

// wait
Console.ReadKey();
}
}


Notes

EmailAddressAttribute

namespace System.ComponentModel.DataAnnotations {
using System;
using System.ComponentModel.DataAnnotations.Resources;
using System.Text.RegularExpressions;

[AttributeUsage(AttributeTargets.Property | AttributeTargets.Field | AttributeTargets.Parameter, AllowMultiple = false)]
public sealed class EmailAddressAttribute : DataTypeAttribute {

// This attribute provides server-side email validation equivalent to jquery validate,
// and therefore shares the same regular expression.  See unit tests for examples.
private static Regex _regex = CreateRegEx();

public EmailAddressAttribute()
: base(DataType.EmailAddress) {

// DevDiv 468241: set DefaultErrorMessage not ErrorMessage, allowing user to set
// ErrorMessageResourceType and ErrorMessageResourceName to use localized messages.
DefaultErrorMessage = DataAnnotationsResources.EmailAddressAttribute_Invalid;
}

public override bool IsValid(object value) {
if (value == null) {
return true;
}

string valueAsString = value as string;

// Use RegEx implementation if it has been created, otherwise use a non RegEx version.
if (_regex != null) {
return valueAsString != null &amp;&amp; _regex.Match(valueAsString).Length &gt; 0;
}
else {
int atCount = 0;

foreach (char c in valueAsString) {
if (c == '@') {
atCount++;
}
}

return (valueAsString != null
&amp;&amp; atCount == 1
&amp;&amp; valueAsString[0] != '@'
&amp;&amp; valueAsString[valueAsString.Length - 1] != '@');
}
}

private static Regex CreateRegEx() {
// We only need to create the RegEx if this switch is enabled.
if (AppSettings.DisableRegEx) {
return null;
}

const string pattern = @"^((([a-z]|\d|[!#\$%&amp;'\*\+\-\/=\?\^_`{\|}~]|[\u00A0-\uD7FF\uF900-\uFDCF\uFDF0-\uFFEF])+(\.([a-z]|\d|[!#\$%&amp;'\*\+\-\/=\?\^_`{\|}~]|[\u00A0-\uD7FF\uF900-\uFDCF\uFDF0-\uFFEF])+)*)|((\x22)((((\x20|\x09)*(\x0d\x0a))?(\x20|\x09)+)?(([\x01-\x08\x0b\x0c\x0e-\x1f\x7f]|\x21|[\x23-\x5b]|[\x5d-\x7e]|[\u00A0-\uD7FF\uF900-\uFDCF\uFDF0-\uFFEF])|(\\([\x01-\x09\x0b\x0c\x0d-\x7f]|[\u00A0-\uD7FF\uF900-\uFDCF\uFDF0-\uFFEF]))))*(((\x20|\x09)*(\x0d\x0a))?(\x20|\x09)+)?(\x22)))@((([a-z]|\d|[\u00A0-\uD7FF\uF900-\uFDCF\uFDF0-\uFFEF])|(([a-z]|\d|[\u00A0-\uD7FF\uF900-\uFDCF\uFDF0-\uFFEF])([a-z]|\d|-|\.|_|~|[\u00A0-\uD7FF\uF900-\uFDCF\uFDF0-\uFFEF])*([a-z]|\d|[\u00A0-\uD7FF\uF900-\uFDCF\uFDF0-\uFFEF])))\.)+(([a-z]|[\u00A0-\uD7FF\uF900-\uFDCF\uFDF0-\uFFEF])|(([a-z]|[\u00A0-\uD7FF\uF900-\uFDCF\uFDF0-\uFFEF])([a-z]|\d|-|\.|_|~|[\u00A0-\uD7FF\uF900-\uFDCF\uFDF0-\uFFEF])*([a-z]|[\u00A0-\uD7FF\uF900-\uFDCF\uFDF0-\uFFEF])))\.?$";
const RegexOptions options = RegexOptions.Compiled | RegexOptions.IgnoreCase | RegexOptions.ExplicitCapture;

// Set explicit regex match timeout, sufficient enough for email parsing
// Unless the global REGEX_DEFAULT_MATCH_TIMEOUT is already set
TimeSpan matchTimeout = TimeSpan.FromSeconds(2);

try {
if (AppDomain.CurrentDomain.GetData("REGEX_DEFAULT_MATCH_TIMEOUT") == null) {
return new Regex(pattern, options, matchTimeout);
}
}
catch {
// Fallback on error
}

// Legacy fallback (without explicit match timeout)
return new Regex(pattern, options);
}
}
}