![]()
Download
New Chrome browser is available here:
https://enterprise.google.com/intl/en_version/chrome/chrome-browser/ mirror
Size
55 MB
Product Code
{7846BE0D-4594-30DC-9822-FE08C0042106}
Silent Install
setup.msi /quiet /norestart
Notes
Lab Core | The Lab of MrNetTek
A blog about IT, technical solutions, and code.
![]()
Download
New Chrome browser is available here:
https://enterprise.google.com/intl/en_version/chrome/chrome-browser/ mirror
Size
55 MB
Product Code
{7846BE0D-4594-30DC-9822-FE08C0042106}
Silent Install
setup.msi /quiet /norestart
Notes
![]()
If creating a policy package for SCCM: Compile to EXE, add the EXE you just created to SCCM as a package: Create Package > Environment > Program can run: Only when user is logged on > Run with administrator rights.
Registry
HKLM\Software\Microsoft\Windows\CurrentVersion\Policies\System
type: dword
value: NoDispScrSavPage
data: 1
![]()
If creating a policy package for SCCM: Compile to EXE, add the EXE you just created to SCCM as a package: Create Package > Environment > Program can run: Only when user is logged on > Run with user rights.
Registry
REG ADD “HKCU\Software\Policies\Microsoft\Windows\Control Panel\Desktop” /v ScreenSaveActive /d 1 /f
REG ADD “HKCU\Software\Policies\Microsoft\Windows\Control Panel\Desktop” /v ScreenSaveTimeOut /d 60 /f
REG ADD “HKCU\Software\Policies\Microsoft\Windows\Control Panel\Desktop” /v SCRNSAVE.EXE /d “C:\Windows\System32\Mystify.scr” /f
Notes
If creating a policy package for SCCM: Compile to EXE, add the EXE you just created to SCCM as a package: Create Package > Environment > Program can run: Only when user is logged on > Run with administrator rights.
on error resume next

Set objShell = CreateObject("WScript.Shell")

Set objFSO = CreateObject("Scripting.FileSystemObject")

Const HKEY_LOCAL_MACHINE = &H80000002
Const OverwriteExisting = TRUE
Const POPUP_TITLE = "User To SID Conversion"

strComputer = "."

objShell.Run "cmd /c copy /y TheScreensaver.scr \\%computername%\c$\Windows\system32\TheScreensaver.scr",0,true

Set objWMIService = GetObject("winmgmts:\\" & strComputer & "\root\cimv2")
Set objRegistry=GetObject("winmgmts:\\" & strComputer & "\root\default:StdRegProv")
strKeyPath = "SOFTWARE\Wow6432Node\Microsoft\Windows NT\CurrentVersion\ProfileList"
objRegistry.EnumKey HKEY_LOCAL_MACHINE, strKeyPath, arrSubkeys

For Each objSubkey In arrSubkeys
on error resume next
strValueName = "ProfileImagePath"
strSubPath = strKeyPath & "\" & objSubkey
objRegistry.GetExpandedStringValue HKEY_LOCAL_MACHINE,strSubPath,strValueName,strValue

Set objWMIService = GetObject("winmgmts:\\" & strComputer & "\root\cimv2")
Set objAccount = objWMIService.Get("Win32_SID.SID='" & objSubkey & "'")
strUser = objAccount.AccountName

objSubkey = trim(objSubkey)'trims whitespace
strUser = trim(strUser)'trims whitespace

if strUser = "Administrator" then strUser=""
if strUser = "Media" then strUser=""
if strUser = "Default" then strUser=""

if strUser <> "" then

on error resume next

objShell.Run "REG ADD " & chr(34) & "HKEY_Users\" & objSubkey & "\Software\Policies\Microsoft\Windows\Control Panel\Desktop" & chr(34) & " /v ScreenSaveActive /d 1 /f",0,false

objShell.Run "REG ADD " & chr(34) & "HKEY_Users\" & objSubkey & "\Software\Policies\Microsoft\Windows\Control Panel\Desktop"" /v ScreenSaveTimeOut /d 120 /f",0,false

objShell.Run "REG ADD " & chr(34) & "HKEY_Users\" & objSubkey & "\Software\Policies\Microsoft\Windows\Control Panel\Desktop"" /v SCRNSAVE.EXE /d ""C:\Windows\System32\TheScreensaver.scr"" /f ",0,false

end if

Next
![]()
If creating a policy package for SCCM: Compile to EXE, add the EXE you just created to SCCM as a package: Create Package > Environment > Program can run: Only when user is logged on > Run with administrator rights.
REG ADD “HKLM\SOFTWARE\Policies\Microsoft\PassportForWork” /v Enabled /t REG_DWORD /d 0 /f /reg:64
REG ADD “HKLM\SOFTWARE\Microsoft\PolicyManager\default\Settings\AllowSignInOptions” /v value /t REG_DWORD /d 0 /f /reg:64
Rename folder to something else (using SYSTEM account; if not using SYSTEM account, take ownership, first)
ren C:\Windows\ServiceProfiles\LocalService\AppData\Local\Microsoft\NGC NGC_
Notes
REG ADD “HKLM\SOFTWARE\Policies\Microsoft\Windows\System” /v AllowDomainPINLogon /t REG_DWORD /d 0 /f
REG ADD “HKLM\SOFTWARE\Policies\Microsoft\PassportForWork” /v DisablePostLogonProvisioning /t REG_DWORD /d 1 /f
![]()
How to return the serial number of a certificate, so it can be used by certutil.
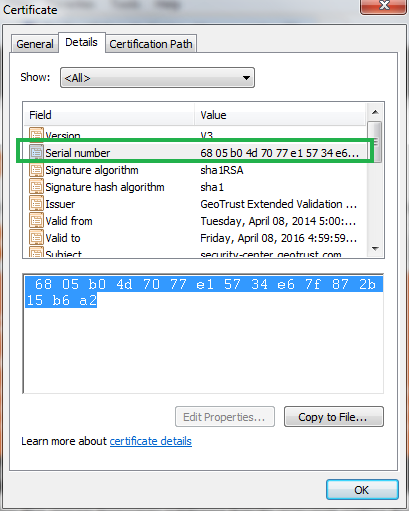
Code
setlocal enabledelayedexpansion
set count=1
set var=

for /f "tokens=* delims=:" %%a in ('certutil c:\YourCert.cer') do (
if !count!==3 set var=%%a
set /a count+=1
)

for /f "tokens=2 delims=:" %%b in ("%var%") do set serial=%%b
)

set serial=%serial: =%

certutil -exportPFX -p "YourPassword" my %serial% c:\YourCert.pfx
Notes
certutil -p YourPassword -exportPFX %computername% C:\YourCert.pfx
![]()
This is how you change file names with European date formatting, to American date formatting.
Coded and tested in Spyder.
# Europe dd/mm/yyyy
# to
# America mm/dd/yyyy

import shutil, os, re

# regex for European date
datePattern = re.compile(r"""^(.*?) # pretext
((0|1|2|3)?\d)- # day
((0|1)?\d)- # month
((19|20)\d\d) # year
(.*?)$ # post test
""", re.VERBOSE)

for europeanDate in os.listdir('.'):
detectPattern = datePattern.search(europeanDate)

# not detected
if detectPattern == None:
continue

# detected
preDate = detectPattern.group(1)
day    = detectPattern.group(2)
month  = detectPattern.group(4)
year   = detectPattern.group(6)
postDate  = detectPattern.group(8)

# American date
americanDate = preDate + month + '-' + day + '-' + year + postDate

# Paths
workingPath = os.path.abspath('.')
americanDate = os.path.join(workingPath, americanDate)
europeanDate = os.path.join(workingPath, europeanDate)

# Rename files
# shutil.move(europeanDate,americanDate)
# for testing
print('\nRenaming "%s" to "%s"...\n' % (europeanDate,americanDate))
Input
file-18-11-2017-datastamp.txt
file-22-7-2018-datestamp.txt
file-22-8-2018-datestamp.txt
file-26-10-2016-datestamp.txt
file-27-12-2018-datestamp.txt
Output
runfile(‘C:/Users/Homelab/.spyder-py3/_DATES/dates.py’, wdir=’C:/Users/Homelab/.spyder-py3/_DATES’)
Renaming “C:\Users\Homelab\.spyder-py3\_DATES\file-18-11-2017-datastamp.txt” to “C:\Users\Homelab\.spyder-py3\_DATES\file-11-18-2017-datastamp.txt”…
Renaming “C:\Users\Homelab\.spyder-py3\_DATES\file-22-7-2018-datestamp.txt” to “C:\Users\Homelab\.spyder-py3\_DATES\file-7-22-2018-datestamp.txt”…
Renaming “C:\Users\Homelab\.spyder-py3\_DATES\file-22-8-2018-datestamp.txt” to “C:\Users\Homelab\.spyder-py3\_DATES\file-8-22-2018-datestamp.txt”…
Renaming “C:\Users\Homelab\.spyder-py3\_DATES\file-26-10-2016-datestamp.txt” to “C:\Users\Homelab\.spyder-py3\_DATES\file-10-26-2016-datestamp.txt”…
Renaming “C:\Users\Homelab\.spyder-py3\_DATES\file-27-12-2018-datestamp.txt” to “C:\Users\Homelab\.spyder-py3\_DATES\file-12-27-2018-datestamp.txt”…
![]()
If you’re using Mac OS High Sierra, you are required to use Xcode 10.1 for compatibility.
Here is the direct link to Xcode 10.1 (requires Apple login):
https://download.developer.apple.com/Developer_Tools/Xcode_10/Xcode_10.xip or here
Additional tools (requires Apple login):
Command-line dev tools
sudo xcode-select --install
Notes
https://developer.apple.com/download/more/ (requires Apple login)
https://en.wikipedia.org/wiki/Xcode
![]()
Download
New Skype for Desktop (Windows) is available here:
https://go.skype.com/windows.desktop.download mirror
Silent Install
setup.exe /VERYSILENT /SP- /NOCANCEL /NORESTART /SUPPRESSMSGBOXES /NOLAUNCH -ms
Uninstall
Reg Keys
“HKEY_LOCAL_MACHINE\SOFTWARE\WOW6432Node\Microsoft\Windows\CurrentVersion\Uninstall\Skype_is1”
Command
“C:\Program Files (x86)\Microsoft\Skype for Desktop\unins000.exe” /SILENT
Notes
![]()
Download
New FireFox is available here:
https://ftp.mozilla.org/pub/firefox/releases/66.0/win64/en-US/
Size
43.8 MB
Silent install
setup.exe -ms
![]()
Download
New iTunes app is available from here:
https://www.apple.com/itunes/download/win64
Contents of iTunes64Setup.exe (using 7zip)
Size
262 MB
Command
iTunes64.msi /qn /norestart IAcceptLicense=Yes ALLUSERS=1 DESKTOP_SHORTCUTS=1 INSTALL_ASUW=0 NO_ASUW=1 SCHEDULE_ASUW=0
Notes
C:\WINDOWS\system32\WindowsPowerShell\v1.0\powershell -ExecutionPolicy Bypass -Command “Get-AppxPackage *AppleInc.iTunes* | Remove-AppxPackage”
msiexec /x “{56DDDFB8-7F79-4480-89D5-25E1F52AB28F}” /qn
msiexec /x “{5A659BE5-849B-484E-A83B-DCB78407F3A4}” /qn
msiexec /x “{F8060941-C0AB-4BCE-88AC-F2FDA2E9F286}” /qn
msiexec /x “{A30EA700-5515-48F0-88B0-9E99DC356B88}” /qn
msiexec /x “{5FA8C4BE-8C74-4B9C-9B49-EBF759230189}” /qn
msiexec /x “{D9D08A8F-5A03-486A-AD4D-3A438D521F8B}” /qn
![]()
Download
New Chrome browser is available here:
https://enterprise.google.com/intl/en_version/chrome/chrome-browser/ mirror
Size
55 MB
Product Code
{B2F94B3E-055E-3E7A-B2C3-3C63FC1B1C90}
Silent Install
setup.msi /quiet /norestart
Notes
![]()
I noticed while creating a package on a Mac, which would eventually be added to SCCM, Microsoft’s instructions on the entire process were pretty vague in places. Here are my own notes on packaging and CMMACs.
On Dev Mac
Create your YourApp.py (I used pycharm) > use pyinstaller to create APP file > add APP file + any scripts to Packages > use Packages to create PKG > use CMAppUtil to create CMMAC > add to SCCM
CMAppUtil command (used to create the SCCM CMMAC file):
sudo ./CMAppUtil -c PackageName.pkg -o ./
sudo ./CMAppUtil -c PackageName.dmg -o ./
You can browse, add, or remove files by using 7zip (something no one tells you)
CMMACPackage
—-Metadata
——-Detection.xml
—-contents
——-script.sh (SCCM command. I use a script because I can add complexity to installation)
———-/usr/sbin/installer -pkg “YourApp.pkg” -target “/” -verboseR
——-YourApp.pkg (created using Packages app)
———-YourApp.app (main app created using pyinstaller, update plist with version)
———-script.command (set up for the daemon launch agent + other commands)
———-com.YourApp.plist (launch agent instructions)
Step 1 – Add package to SCCM using CMMAC file (select defaults)
a – Create APP using pyinstaller
b – Create PKG using Packages. Copy from build folder, to CMAppUtil folder
c – Create CMMAC using CMAppUtil
d – Copy CMMAC to SCCM server/Distribution Point
e – Start Application setup in SCCM using Applications Node
Step 2 – Deployment Type
Verify/Update Deployment Type > Programs with SH, APP, or PKG command line
/bin/sh “script.sh”
/usr/sbin/installer -pkg “Package.pkg” -target “/” -verboseR
Step 3 – Distribute Content
a – Wait for content to be fully synced
b – Wait 5 minutes after content has been synced
Step 4 – Set up Deployment (select defaults)
a – Wait 5 minutes for deployment to sync
Step 5 – Force refresh on client machine (use Connect To on Config Manager app)
a – Monitor Library > Caches > Microsoft > CCM > Content folder
b – CMMAC should download, extract, and run
YourApp.app: Info.plist
Make sure your Info.plist in the APP looks something like this before creating the PKG file
<?xml version=”1.0″ encoding=”UTF-8″?>
<!DOCTYPE plist PUBLIC “-//Apple//DTD PLIST 1.0//EN” “http://www.apple.com/DTDs/PropertyList-1.0.dtd”>
<plist version=”1.0″>
<dict>
<key>CFBundleDisplayName</key>
<string>YourApp</string>
<key>CFBundleExecutable</key>
<string>MacOS/YourApp</string>
<key>CFBundleIconFile</key>
<string>icon-windowed.icns</string>
<key>CFBundleIdentifier</key>
<string>com.domain.app.YourApp</string>
<key>CFBundleInfoDictionaryVersion</key>
<string>6.0</string>
<key>CFBundleName</key>
<string>YourApp</string>
<key>CFBundleVersion</key>
<string>1.0.1</string>
<key>CFBundleShortVersionString</key>
<string>1.0.1</string>
<key>CFBundleGetInfoString</key>
<string>1.0.1</string>
<key>CFBundleSupportedPlatforms</key>
<array>
<string>MacOSX</string>
</array>
<key>YourAppVersionString</key>
<string>1.0.1</string>
</dict>
</plist>
YourApp.app: version.plist
<?xml version=”1.0″ encoding=”UTF-8″?>
<!DOCTYPE plist PUBLIC “-//Apple//DTD PLIST 1.0//EN” “http://www.apple.com/DTDs/PropertyList-1.0.dtd”>
<plist version=”1.0″>
<dict>
<key>BuildAliasOf</key>
<string>YourApp</string>
<key>BuildVersion</key>
<string>1.0.1</string>
<key>CFBundleShortVersionString</key>
<string>1.0.1</string>
<key>CFBundleVersion</key>
<string>1.0.1</string>
<key>ProjectName</key>
<string>YourApp</string>
<key>SourceVersion</key>
<string>10100</string>
</dict>
</plist>
CMMAC: Detection.xml
The Detection file is what SCCM uses to import package settings into the details of the SCCM Application, which are in turn used to identify if the PKG has been deployed to the Mac. If this isn’t working properly, the PKG will continually be deployed to the Mac—you don’t want that.
<?xml version=”1.0″ encoding=”UTF-8″?>
<CMAppUtil Version=”5.00.8466.1000″ TimeStamp=”2019-03-28 20:49:41 +0000″ MacOSX=”10.13.4″ xmlns=”http://schemas.microsoft.com/SystemCenterConfigurationManager/2011/10/25/CMMAC”>
<Package PackageName=”YourApp.pkg” PackageType=”pkg”>
<DetectionAction Type=”Basic”>
<Property Identifier=”com.domain.app.YourApp” Version=”1.0.1″ Type=”AppBundle”/>
</DetectionAction>
<OptionalPackages>
</OptionalPackages>
<InstallerParams VolumeInfo=”/” RestartAction=”None”/>
</Package>
</CMAppUtil>
Notes
also see: Mac – Bash – Package-Repackage
tags: CMMAC, CMMAC design, SCCM CMMAC scripting, SCCM Development, MrNetTek