AI – C# – Chatbot with Random Responses

This is a chatbot I created to demonstrate two main concepts: Scanning inputs, and returning random responses. With this, you can help the chatbot build its intelligence by adding a variety of acceptable inputs and relative responses. The program will randomly choose from those responses. Written and tested in Visual Studio 2017.

The dialog form is where you will converse with Jarvis. The top field is an input textbox. The Jarvis responses are in a form label that gets updated. The full project: VS_Project.zip

Form1.cs

using System;
using System.Linq;
using System.Windows.Forms;  // Win Form

namespace WindowsFormsApp2
{
public partial class Form1 : Form
{
public Form1()
{
InitializeComponent();
}

String s;

int i;

Random r = new Random();

private void textBox1_TextChanged(object sender, KeyEventArgs e)
{

if (e.KeyCode == Keys.Enter) {

s = textBox1.Text.ToLower();

// input cleanup
s = s.Replace("'", "");
s = s.Replace(".", "");
s = s.Replace(",", "");
s = s.Replace("?", "");

Logic();

}

if (e.KeyCode == Keys.RShiftKey) textBox1.Text = null;

}

public void Logic()
{

// greetings
bool user_1 = new[] { "hello", "hi", "yo", "greetings", "hello jarvis", "hi jarvis" }.Any(c => s.Equals(c));
String[] pc_Response1 = { "Hello. How are you?" };

// greeting responses
bool user_2 = new[] { "im good", "good", "im great", "i am good", "im doing fine", "im okay" }.Any(c => s.Contains(c));
String[] pc_Response2 = { "That's great. What's going on?", "Good. What's happening?", "Okay, that's great. What's happening?" };

// leaving
bool user_3 = new[] { "leaving", "i gotta go", "im leaving", "got to go", "bye" }.Any(c => s.Contains(c));
String[] pc_Response3 = { "Okay, nice meeting.", "Later, my friend", "Okay, good bye" };

// check true for output
if (user_1) { OutputMessage(pc_Response1); }
else if (user_2) { OutputMessage(pc_Response2); }
else if (user_3) { OutputMessage(pc_Response3); }
else { NoAnswer(); }

// session
user_1 = false;
user_2 = false;
user_3 = false;
}

public void OutputMessage(String[] msg)
{
i = r.Next(msg.Length);
this.output.Text = msg[i]; textBox1.Text = "";

}

public void NoAnswer()
{
String[] output = { "I do not understand.", "Can you rephrase the question?", "My responses are limited. Ask something else." };
this.output.Text = output[i];
textBox1.Text = "";
}
}
}

Form1.Designers.cs

namespace WindowsFormsApp2
{
partial class Form1
{

//

<summary>
// Required designer variable.
// </summary>private System.ComponentModel.IContainer components = null;

//

<summary>
// Clean up any resources being used.
// </summary>// <param name="disposing">true if managed resources should be disposed; otherwise, false.
protected override void Dispose(bool disposing)
{
if (disposing &amp;&amp; (components != null))
{
components.Dispose();
}
base.Dispose(disposing);
}

#region Windows Form Designer generated code

//

<summary>
// Required method for Designer support - do not modify
// the contents of this method with the code editor.
// </summary>private void InitializeComponent()
{
this.textBox1 = new System.Windows.Forms.TextBox();
this.label1 = new System.Windows.Forms.Label();
this.output = new System.Windows.Forms.Label();
this.SuspendLayout();
//
// textBox1
//
this.textBox1.Font = new System.Drawing.Font("Microsoft Sans Serif", 12F, System.Drawing.FontStyle.Regular, System.Drawing.GraphicsUnit.Point, ((byte)(0)));
this.textBox1.Location = new System.Drawing.Point(12, 12);
this.textBox1.Name = "textBox1";
this.textBox1.Size = new System.Drawing.Size(511, 26);
this.textBox1.TabIndex = 0;
this.textBox1.KeyUp += new System.Windows.Forms.KeyEventHandler(this.textBox1_TextChanged);
//
// label1
//
this.label1.AutoSize = true;
this.label1.Font = new System.Drawing.Font("Microsoft Sans Serif", 12F, System.Drawing.FontStyle.Bold, System.Drawing.GraphicsUnit.Point, ((byte)(0)));
this.label1.Location = new System.Drawing.Point(8, 67);
this.label1.Name = "label1";
this.label1.Size = new System.Drawing.Size(60, 20);
this.label1.TabIndex = 1;
this.label1.Text = "Jarvis:";
//
// output
//
this.output.AutoSize = true;
this.output.Font = new System.Drawing.Font("Microsoft Sans Serif", 12F, System.Drawing.FontStyle.Regular, System.Drawing.GraphicsUnit.Point, ((byte)(0)));
this.output.Location = new System.Drawing.Point(62, 67);
this.output.Name = "output";
this.output.Size = new System.Drawing.Size(29, 20);
this.output.TabIndex = 2;
this.output.Text = ".....";
//
// Form1
//
this.AutoScaleDimensions = new System.Drawing.SizeF(6F, 13F);
this.AutoScaleMode = System.Windows.Forms.AutoScaleMode.Font;
this.ClientSize = new System.Drawing.Size(535, 162);
this.Controls.Add(this.output);
this.Controls.Add(this.label1);
this.Controls.Add(this.textBox1);
this.Name = "Form1";
this.Text = "Jarvis AI";
this.ResumeLayout(false);
this.PerformLayout();

}

#endregion

private System.Windows.Forms.TextBox textBox1;
private System.Windows.Forms.Label label1;
private System.Windows.Forms.Label output;
}
}
Office 2019 & O365 – New Download Method and Setup

email me

Microsoft has a new method for downloading Office, Visio, and Project from VLSC. To configure and perform deployments of volume licensed versions of Office 2019, and newer, including Project and Visio, you use the Office Deployment Tool (ODT). The standalone Office Customization Tool (OCT) that you previously used for Windows Installer (MSI) is no longer used.

  • Download ODT from here – which contains setup.exe and 3 XML files.
  • Or, use the online tool, OCT, from here.

Modify XML accordingly. If you want Project or Visio, it must be changed to reflect that product.

Run setup with /Download parameter to acquire the source files for a standalone, offline installation.

Downloading

For example, if I wanted to download Visio Pro 2019

Step 1 – Modify Configuration.xml

<configuration>
<add sourcepath="C:\Visio_2019" officeclientedition="64" channel="PerpetualVL2019" allowcdnfallback="True">
<product id="VisioPro2019Volume" pidkey="#-#-#-#-#">
<language id="en-us">
</language>   </product>
</add></configuration>

<display level="Full" accepteula="TRUE">
</display>

Step 2 – Run Command

setup /download Configuration.xml


….files will download

Run Only – If you already have the downloaded files, and just want to install

setup /configure Configuration.xml

….Office suite or Office app will install
 

All Options

setup.exe ?

Office Deployment Tool

SETUP [mode] [path]

SETUP /download [path to configuration file]
SETUP /configure [path to configuration file]
SETUP /packager [path to configuration file] [output path]
SETUP /customize [path to configuration file]
SETUP /help

/download Downloads files to create an Office installation source
/configure Adds, removes, or configures an Office installation
/packager Produces an Office App-V package from an Office installation source
/customize Applies settings for Office applications
/help Displays this message
 

Previous Office Installation

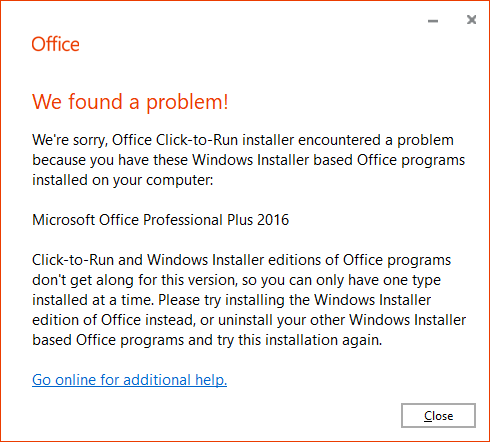
Caveat: I had to remove Office 2016 (or Office 2019) before installation would begin.

See Office Scrubbers | Microsoft Office Uninstall Tool


Example of an Office 365 Configuration.xml

<configuration id="df57d894-28a5-495b-9f22-67c13cfba45a">
<info description="MyCorp Description">
<add officeclientedition="64" channel="Current">
<product id="O365ProPlusRetail">
<language id="MatchOS">
<excludeapp id="Groove">
<excludeapp id="Outlook">
<excludeapp id="Bing">
<excludeapp id="Teams">
</excludeapp></excludeapp></excludeapp></excludeapp></language></product>
</add>
<property name="SharedComputerLicensing" value="0">
<property name="SCLCacheOverride" value="0">
<property name="AUTOACTIVATE" value="0">
<property name="FORCEAPPSHUTDOWN" value="FALSE">
<property name="DeviceBasedLicensing" value="0">
<updates enabled="TRUE">
<removemsi>
<appsettings>
<setup name="Company" value="MyCorp">
</setup></appsettings>
</removemsi></updates></property></property></property></property></property></info></configuration>


Notes

Office scrubbers to remove old Office versions

Deploy Office 2019 (for IT Pros)

Deploy Microsoft 365 Apps


Disable an App

Allowed values:

ID=”Access”
ID=”Excel”
ID=”Groove”
ID=”Lync”
ID=”OneDrive”
ID=”OneNote”
ID=”Outlook”
ID=”PowerPoint”
ID=”Publisher”
ID=”Teams”
ID=”Word”

more…
 

Other

In addition to Click-to-Run, the following are some other changes that you need to be aware of:

  • Office 2019/O365 is supported on Windows 10, but isn’t supported on Windows 7 or Windows 8.1. For more information, review the system requirements.
  • Instead of downloading the installation files from the Volume Licensing Service Center (VLSC), you use the Office Deployment Tool to download the installation files directly from the Office Content Delivery Network (CDN) on the internet.
  • When you install Office 2019/O365, all apps are installed by default. But, you can configure the Office Deployment Tool to exclude certain apps from being installed.
  • Office 2019/O365 is installed on the system drive, which is usually the C:\ drive. The installation location can’t be changed.
  • Updates to Office 2019/O365, such as security updates and bug fixes, can be configured to be automatically downloaded and installed from the Office CDN. Individual downloads for each security update or bug fix aren’t available.


SKUs
– O365ProPlusRetail
– ProPlus2021Volume
– Standard2021Volume
– ProjectPro2021Volume
– ProjectStd2021Volume
– VisioPro2021Volume
– VisioStd2021Volume
– ProPlus2019Volume
– Standard2019Volume
– ProjectPro2019Volume
– ProjectStd2019Volume
– VisioPro2019Volume
– VisioStd2019Volume

C# – Show or Hide Process

email me

This is how you create a form with two buttons that will either Show a process, or Hide a process.

Tested in Visual Studio 2017.

Form1.cs

using System;
using System.Diagnostics; // Process
using System.Runtime.InteropServices; // DllImport
using System.Windows.Forms; // Windows Form

namespace WindowsFormsApp8
{
public partial class Form1 : Form
{
int hWnd = 0;

private const int SW_HIDE = 0;
private const int SW_SHOW = 5;
[DllImport("User32")]
private static extern int ShowWindow(int hwnd, int nCmdShow);
private void button1_Click(object sender, EventArgs e)
{

MessageBox.Show("Hide Process");

Process[] processRunning = Process.GetProcesses();
foreach (Process pr in processRunning)
{
if (pr.ProcessName == "notepad")
{
hWnd = pr.MainWindowHandle.ToInt32();
ShowWindow(hWnd, SW_HIDE);
}
}

}

private void button2_Click(object sender, EventArgs e)
{
MessageBox.Show("Show Process");

if (hWnd != 0)
{
ShowWindow(hWnd, SW_SHOW);
hWnd = 0;
}

}

public Form1()
{
InitializeComponent();
}

}

}


Form1.Designer.cs

namespace WindowsFormsApp8
{
partial class Form1
{
///

<summary>
/// Required designer variable.
/// </summary>private System.ComponentModel.IContainer components = null;

///

<summary>
/// Clean up any resources being used.
/// </summary>/// <param name="disposing">true if managed resources should be disposed; otherwise, false.
protected override void Dispose(bool disposing)
{
if (disposing (components != null))
{
components.Dispose();
}
base.Dispose(disposing);
}

#region Windows Form Designer generated code

///

<summary>
/// Required method for Designer support - do not modify
/// the contents of this method with the code editor.
/// </summary>private void InitializeComponent()
{
this.button2 = new System.Windows.Forms.Button();
this.button1 = new System.Windows.Forms.Button();
this.SuspendLayout();
//
// button2
//
this.button2.Location = new System.Drawing.Point(48, 35);
this.button2.Name = "button2";
this.button2.Size = new System.Drawing.Size(75, 23);
this.button2.TabIndex = 1;
this.button2.Text = "Show";
this.button2.UseVisualStyleBackColor = true;
this.button2.Click += new System.EventHandler(this.button2_Click);
//
// button1
//
this.button1.Location = new System.Drawing.Point(48, 89);
this.button1.Name = "button1";
this.button1.Size = new System.Drawing.Size(75, 23);
this.button1.TabIndex = 2;
this.button1.Text = "Hide";
this.button1.UseVisualStyleBackColor = true;
this.button1.Click += new System.EventHandler(this.button1_Click);
//
// Form1
//
this.ClientSize = new System.Drawing.Size(169, 162);
this.Controls.Add(this.button1);
this.Controls.Add(this.button2);
this.Name = "Form1";
this.ResumeLayout(false);

}

#endregion

private System.Windows.Forms.Button button1;
private System.Windows.Forms.Button button2;

}
}

C# – Console ShowWindow

This shows you what you need to control how the console window is opened in C#.

using System;
using System.Runtime.InteropServices; // DllImport

namespace ConsoleWindow
{
    class Program
    {

        [DllImport("kernel32.dll", ExactSpelling = true)]
        private static extern IntPtr GetConsoleWindow();
        private static IntPtr ThisConsole = GetConsoleWindow();

        [DllImport("user32.dll", CharSet = CharSet.Auto, SetLastError = true)]

        private static extern bool ShowWindow(IntPtr hWnd, int nCmdShow);
        private const int HIDE = 0;
        private const int MAXIMIZE = 3;
        private const int MINIMIZE = 6;
        private const int RESTORE = 9;


        static void Main()
        {            
            ShowWindow(ThisConsole, MAXIMIZE);

            Console.Write("Hello ");
            Console.WriteLine("World!");
            Console.Write("Enter your name: ");
            String name = Console.ReadLine();
            Console.Write("Good day, ");
            Console.Write(name);
            Console.WriteLine("!");
            Console.ReadKey();

        }        
        
    }
}


Notes

ShowWindow function

Assembly – Search for Number in Array

email me

< back

Search for a specific number in an array and return its position (if it exists). I’ve added looping, messaging, and concatenation (MSG1 + RES1), just to demonstrate some assembly functionality.

MSG is the relative message. The $ at the end of MSGs means terminate message. 10,13 is a carriage return.

TRY is the loop.

ABOV is checking whether the first operand is above or equal to second operand.

GOOD means it found the specified number in the array.

NOPE means it did not find the specified number in the array.

DONE is the terminating message.

Tested in emu8086 emulator.

See addition and subtraction & multiplication. Learning: 1  2  3  4  5  6  book

DATA SEGMENT
     ARR DW 0000,0001,0002,0003,0004,0005,0006,0007,0008,0009
     LEN DW ($-ARR)/2
     KEY EQU 0006
     MSG1 DB "0006 at Position:",0     
     RES1 DB " ",10,13,10,13,"Great Success!$"               
     MSG2 DB '0006 not found!',10,13,10,13,"Bad Luck!$"
     MSG3 DB 10,13,10,13,"- terminate program -$" 
     
DATA ENDS

CODE SEGMENT 
    ASSUME DS:DATA CS:CODE

START:
       MOV AX, DATA
       MOV DS, AX    
       MOV BX, 00
       MOV DX, LEN
       MOV CX, KEY

TRY:
       CMP BX, DX
       JA NOPE
       MOV AX, BX
       ADD AX, DX
       SHR AX, 1
       MOV SI, AX
       ADD SI, SI
       CMP CX, ARR[SI]
       JAE ABOV
       DEC AX
       MOV DX, AX
       JMP TRY

ABOV:
       JE GOOD
       INC AX
       MOV BX, AX
       JMP TRY

GOOD:
       ADD AL, 01
       ADD AL, '0'
       MOV RES1, AL
       LEA DX, MSG1
       MOV AH, 09H
       INT 21H
       JMP DONE     

NOPE:
       LEA DX, MSG2
       MOV AH, 09H
       INT 21H
       JMP DONE

DONE:
       LEA DX, MSG3
       MOV AH, 09H
       INT 21H     
       MOV AH, 4CH
       INT 21H
           
CODE ENDS
END START


Screenshot

PowerShell – Working with JSON

email me

If you haven’t already done so, you’re eventually going to come across JSON files. JSON, or JavaScript Object Notation, is one of the most common file types for working with web APIs. On first glance, a JSON file can sometimes look like a mess, especially when dealing with large files (talking about you, Google preference file)—but, there is order to the chaos. In PowerShell, there are built-in cmdlets to handle the formatting. You can convert to and convert from JSON quite easily.

Here’s an example

$normalizedData = ""
$jsonData = ""
$data = ""

# data - this could be read from a text file
$data = [PSCustomObject] @{
FirstName = "Eddie";
LastName = "Jackson";
Zip = "12345";
Mobile = "111-222-3333";
}

# this will convert to json format
$jsonData = ConvertTo-Json $data


clear-host

Write-Host "[ Show Json Data ]`n"
$jsonData
Write-Host "`n`n"

# this will convert json format to powershell format
Write-Host "`n[ Show Normalized Data ]"
$normalizedData = ConvertFrom-Json $jsonData # | ft -HideTableHeaders
$normalizedData

$normalizedData = ""
$jsonData = ""
$data = ""

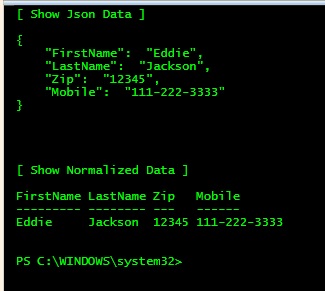
Output


Notes

ConvertTo-Json   ConvertFrom-Json  Invoke-WebRequest  Invoke-RestMethod 

Editing JSON with Visual Studio Code

Highlighter (Tomorrow Night Blue)


AI – VBScript – Finding Indexes – Pattern Recognition

email me

The following VBScript finds all occurrences of a word, or a pattern using a regular expression. A regular expression specifies what kind of pattern to match, and can be any string of characters and/or numbers. In my example, “\w+” will look for one word at a time using spaces (whitespace, specifically). The whitespace acts as a delimiter between words, thus…I can determine how many words there are, and where each word begins, which is commonly called an index. An index value can be useful in managing elements in arrays and lists.

But, more importantly, I could easily search for a specific word or words, a pattern of special characters, or even more complex text, like programming code in a web page. Based upon what is being scanned and returned by the regular expression, I could then perform a function on the data.  It’s very powerful, to say the least.


The Code

 1
 2
 3
 4
 5
 6
 7
 8
 9
10
11
12
13
14
15
16
17
18
19
20
21
22
23
24
25
26
27
28
29
30
31
32
33
34
35
36
37
38
39
40
41
42
43
44
Option Explicit

Dim txtSource, thePattern, objMatchPattern, Match, Matches, count

txtSource = "The man in the moon is very far away"
thePattern = "\w+" ' you can change this part
count = 0

'Create the regular expression.
Set objMatchPattern = New RegExp
objMatchPattern.Pattern = thePattern
objMatchPattern.IgnoreCase = False
objMatchPattern.Global = True

'Perform the search.
Set Matches = objMatchPattern.Execute(txtSource)

'Iterate through the Matches collection.
For Each Match in Matches
   msgbox Match.FirstIndex & " " & Match.Value
   count = count + 1
Next

msgbox "total count: " & count


'clear session
set txtSource = Nothing
set thePattern = Nothing
set objMatchPattern = Nothing
set Match = Nothing
set Matches = Nothing

'The Index and Word Output:
' 0 The
' 4 man
' 8 in
' 11 the
' 15 moon
' 20 is
' 23 very
' 28 far
' 32 away
' total count: 9


Notes

https://www.tutorialspoint.com/vbscript/vbscript_reg_expressions.htm

AI – Batch – Chatbot

email me

I created this simple batch file to demonstrate a learning bot. You will help build its knowledge base data in the file named speech.txt. Just copy the below code into a script like AI.cmd, and run it.

 1
 2
 3
 4
 5
 6
 7
 8
 9
10
11
12
13
14
15
16
17
18
19
20
21
22
23
24
25
26
27
28
29
30
31
32
33
34
35
36
37
38
39
40
41
42
43
44
45
46
47
48
@echo off
set BotName=Chatty

title AI %BotName% 1.0 - Learner Bot
color 0b

rem Create the speech file if not exist
if not exist speech.txt echo.>speech.txt

Echo Start up a conversation with %BotName%
echo.

:START
set /p text="You: "

:: DYNAMIC QUESTIONS THAT PULL REALTIME INFORMATION
if /i "%text%"=="What time is it?" goto :TIME
if /i "%text%"=="What is the time?" goto :TIME
if /i "%text%"=="What is the date?" goto :DATE

:: OUR SPEECH FILE
for /f "tokens=1,* delims={" %%a in (speech.txt) do (

if /i "%text%"=="%%a" (
echo.
echo %BotName%: %%b
echo.
goto :START
)
)
echo.
echo %BotName%: I don't know what that means.
set /p answer=%BotName%: How should this be answered '%text%'?
echo %text%{%answer%>>speech.txt
echo %BotName%: Thanks!
echo.
goto :START
:TIME
echo.
echo %BotName%: The time is %TIME%
echo.
goto :START

:DATE
echo.
echo %BotName%: The date is %DATE%
echo.
goto :START

Skype for Desktop – 8.33.0.41

email me

New Skype for Desktop (Windows) is available here:

https://go.skype.com/windows.desktop.download  mirror


Silent Install

setup.exe /VERYSILENT /SP- /NOCANCEL /NORESTART /SUPPRESSMSGBOXES /NOLAUNCH -ms


Uninstall

Reg Keys

“HKEY_LOCAL_MACHINE\SOFTWARE\WOW6432Node\Microsoft\Windows\CurrentVersion\Uninstall\Skype_is1”

Command

“C:\Program Files (x86)\Microsoft\Skype for Desktop\unins000.exe” /SILENT


Notes

Disable Skype auto updates

AI – C# – Neural Net

email me

This is a simple neural net written in C#. I’ve documented it for ease of understanding. But, it basically shows you the before training output and after training output (using an internal dataset). The point of this example is to demonstrate how neural nets fundamentally work, which is by neurons forming connections during training. These connections influence output. Something to note, normally these datasets have to be huge for the output to be accurate. When I say huge, I mean 100s of gigabytes or even terabytes of data.

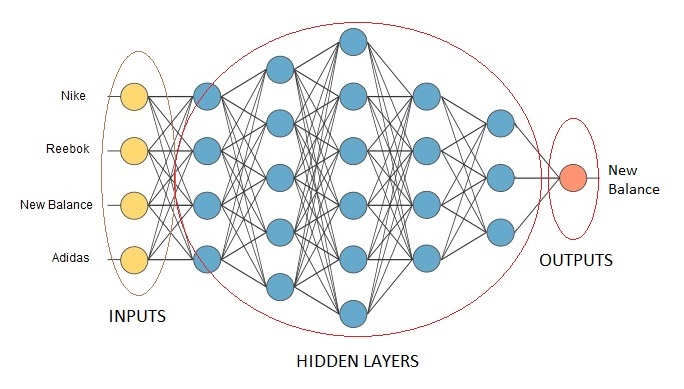
In large-scale neural nets, you have inputs (the question, or what you’re looking for), many hidden layers (the trained dataset), and then the output (the answer).

In the below example, the question is, Which shoe is best? The dataset is based upon quality, price, availability, and customer ratings, and the output is the answer.


An example of a simple neural network

now, on to the C# example…

Screenshot

You can see that the weighted values in the output change after training. This is because new connections have formed, and the deep learning aspect of neural nets has altered the output. 

C# Code

using System;
using System.Collections.Generic; // list
using System.Data;                // table data
using System.Linq;
using System.Diagnostics;         // stopwatch
using ConsoleTableExt;            // console table

/// <notes>
/// run this package import https://www.nuget.org/packages/ConsoleTableExt/2.0.1
/// </notes>

namespace NeuralNet1
{
class NeuralNetSample1

{
static void Main()
{
Stopwatch stopwatch = new Stopwatch();

NetworkModel model = new NetworkModel();
model.Layers.Add(new NeuralLayer(2, 0.1, "INPUT"));
model.Layers.Add(new NeuralLayer(1, 0.1, "OUTPUT"));

// show before model
model.Build();

Console.WriteLine("{{ BEFORE TRAINING }}");
model.Print();

Console.WriteLine();

// available datasets
Dataset data1 = new Dataset(4);
data1.Add(0, 0);
data1.Add(0, 1);
data1.Add(1, 0);
data1.Add(1, 1);

Dataset data2 = new Dataset(4);
data2.Add(0);
data2.Add(0);
data2.Add(0);
data2.Add(1);

// perform training
// start the clock
stopwatch.Start();
model.Train(data1, data2, iterations: 10, learningRate: 0.1);
// stop the clock
stopwatch.Stop();
Console.WriteLine();

// show after model
Console.WriteLine("\n{{ AFTER TRAINING }}");
model.Print();

// elapsed time
Console.WriteLine("\nTime elapsed: {0}", stopwatch.Elapsed);

// wait for any key
Console.ReadKey();
}
}

class Pulse
{
public double Value { get; set; }
}

class Dendrite
{
public Dendrite()
{
InputPulse = new Pulse();
}

public Pulse InputPulse { get; set; }

public double SynapticWeight { get; set; }

public bool Learnable { get; set; } = true;
}

class Neuron
{
public List<Dendrite> Dendrites { get; set; }

public Pulse OutputPulse { get; set; }

public Neuron()
{
Dendrites = new List<Dendrite>();
OutputPulse = new Pulse();
}

public void Fire()
{
OutputPulse.Value = Sum();

OutputPulse.Value = Activation(OutputPulse.Value);
}

public void UpdateWeights(double new_weights)
{
foreach (var terminal in Dendrites)
{
terminal.SynapticWeight = new_weights;
}
}

private double Sum()
{
double computeValue = 0.0f;
foreach (var d in Dendrites)
{
computeValue += d.InputPulse.Value * d.SynapticWeight;
}

return computeValue;
}

private double Activation(double input)
{
double threshold = 1;
return input <= threshold ? 0 : threshold;
}
}

class NeuralLayer
{
public List<Neuron> Neurons { get; set; }

public string Name { get; set; }

public double Weight { get; set; }

public NeuralLayer(int count, double initialWeight, string name = "")
{
Neurons = new List<Neuron>();
for (int i = 0; i < count; i++)
{
Neurons.Add(new Neuron());
}

Weight = initialWeight;

Name = name;
}

public void Optimize(double learningRate, double delta)
{
Weight += learningRate * delta;
foreach (var neuron in Neurons)
{
neuron.UpdateWeights(Weight);
}
}

public void Forward()
{
foreach (var neuron in Neurons)
{
neuron.Fire();
}
}

public void Log()
{
Console.WriteLine("{0}, Weight: {1}", Name, Weight);
}
}

class NetworkModel
{
public List<NeuralLayer> Layers { get; set; }

public NetworkModel()
{
Layers = new List<NeuralLayer>();
}

public void AddLayer(NeuralLayer layer)
{
int dendriteCount = 1;

if (Layers.Count > 0)
{
dendriteCount = Layers.Last().Neurons.Count;
}

foreach (var element in layer.Neurons)
{
for (int i = 0; i < dendriteCount; i++) { element.Dendrites.Add(new Dendrite()); } } } public void Build() { int i = 0; foreach (var layer in Layers) { if (i >= Layers.Count - 1)
{
break;
}

var nextLayer = Layers[i + 1];
CreateNetwork(layer, nextLayer);

i++;
}
}

public void Train(Dataset data1, Dataset data2, int iterations, double learningRate = 0.1)
{
int epoch = 1;

while (iterations >= epoch)
{
// get input
var inputLayer = Layers[0];
List<double> outputs = new List<double>();

// loop through input
for (int i = 0; i < data1.Data.Length; i++)
{
// layer 1
for (int j = 0; j < data1.Data[i].Length; j++) { inputLayer.Neurons[j].OutputPulse.Value = data1.Data[i][j]; } // fire neurons and collect output ComputeOutput(); outputs.Add(Layers.Last().Neurons.First().OutputPulse.Value); } // Check the accuracy score against data2 with output double accuracySum = 0; int y_counter = 0; outputs.ForEach((x) => {
if (x == data2.Data[y_counter].First())
{
accuracySum++;
}

y_counter++;
});

// optimize weights
OptimizeWeights(accuracySum / y_counter);
// output accuracy data
Console.WriteLine("Epoch: {0}, Accuracy: {1} %", epoch, (accuracySum / y_counter) * 100);
epoch++;
}
}

public void Print()
{
DataTable dt = new DataTable();
dt.Columns.Add("Name");
dt.Columns.Add("Neurons");
dt.Columns.Add("Weight");

foreach (var element in Layers)
{
DataRow row = dt.NewRow();
row[0] = element.Name;
row[1] = element.Neurons.Count;
row[2] = element.Weight;

dt.Rows.Add(row);
}

ConsoleTableBuilder builder = ConsoleTableBuilder.From(dt);
builder.ExportAndWrite();
}

private void ComputeOutput()
{
bool first = true;
foreach (var layer in Layers)
{
// do not use Input Layer
if (first)
{
first = false;
continue;
}

layer.Forward();
}
}

private void OptimizeWeights(double accuracy)
{
float lr = 0.1f;
//if 100%, skip
if (accuracy == 1)
{
return;
}

if (accuracy > 1)
{
lr = -lr;
}

// weights are updated
foreach (var layer in Layers)
{
layer.Optimize(lr, 1);
}
}

private void CreateNetwork(NeuralLayer connectingFrom, NeuralLayer connectingTo)
{
foreach (var from in connectingFrom.Neurons)
{
from.Dendrites = new List<Dendrite>();
from.Dendrites.Add(new Dendrite());
}

foreach (var to in connectingTo.Neurons)
{
to.Dendrites = new List<Dendrite>();
foreach (var from in connectingFrom.Neurons)
{
to.Dendrites.Add(new Dendrite() { InputPulse = from.OutputPulse, SynapticWeight = connectingTo.Weight });
}
}
}
}

class Dataset
{
public double[][] Data { get; set; }

int counter = 0;

public Dataset(int rows)
{
Data = new double[rows][];
}

public void Add(params double[] rec)
{
Data[counter] = rec;
counter++;
}
}
}