![]()
In the previous post, I discussed some of the general framework for storing BitLocker passwords in SCCM, such as expanding the SCCM DB using MOFs, editing MOFs, and importing your very own _Custom MOF class. Well, the main issue was that the ‘passwords’ had to be stored in the registry, not exactly best practice, but it got the job done.
In this post, I’ll discuss an even better approach to managing the BitLocker data…on the front end. Unfortunately, the back end is still expanding the DB and editing MOFs—there’s no escaping that. BUT…let’s talk about the front end. Rather than running a script which creates registry keys with stored BitLocker passwords, why not create a custom class with all the BitLocker details, and store the BitLocker properties in the SMS namespace? Sound fun? Well, let’s get started.
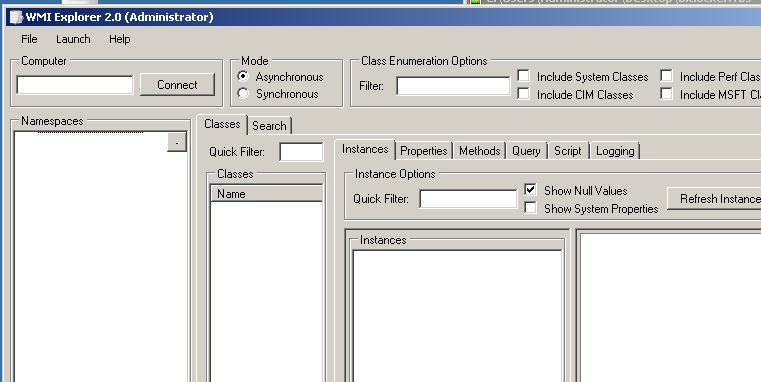
The first question is, how do you view things like classes and their details? I like to use WMI Explorer. WMI Explorer is a utility intended to provide the ability to browse and view namespaces, classes, instances, and properties in a single pane of view. I would normally use the tool to see what’s available…what kind of classes, methods, and properties I can use in scripting or programming. It’s not an everyday occurrence for me to create my own class, and then use that class in something like SCCM. But…it was fun. Let’s see some screenshots.
Here we have the WMI Explorer tool. It can explore cim, wmi, root, and other classes and namespaces.
Here is the tool with my SMS_SCCM_BitLocker class, sitting in the cimv2\sms namespace. It does use the infrastructure of WMI—but being specific—I always include the namespace, which is important in the world of SCCM.

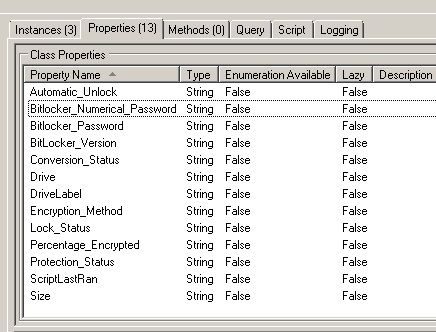
Notice how you can see the populated properties, including BitLocker passwords. YAY! I scripted each of the properties to come from manage-bde (you could also use C# instead of a script to accomplish this). The two routines: One was for the general properties, and one was to return the passwords. You can add plenty of other properties as well.
These are the properties of my class.
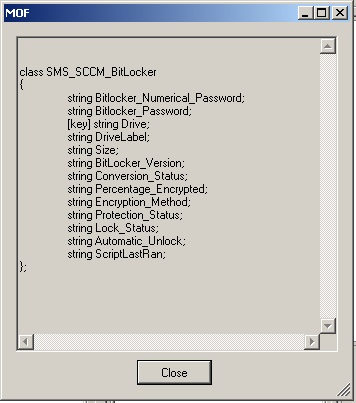
If you’re going to be adding the BitLocker details to SCCM, here is the MOF output. I’ve also included it in the script below…so you can copy/paste. Just uncomment the MOF portion before saving the file.
Okay, here is the script, which I will come back to explain the finer points. But, basically, I use manage-bde to return the property details, vbscript to delete and create a new class in the SMS_ namespace, and vbscript to populate the details. Once I have everything completed in SCCM, I’ll create a new post detailing the final updates, where I expand the SCCM site DB, create the MOFs, and add the class to the Hardware Inventory in SCCM.
Script
on error resume next Const wbemString = 8 Dim objArray(26,12) strDrive = "" strDriveName = "" Set WshShell = CreateObject("Wscript.Shell") Set objWshShell=CreateObject("WScript.Shell") Set objFSO = CreateObject("Scripting.FileSystemObject") Set objWBEMLocation = CreateObject("WbemScripting.SWbemLocator") Set oExec = WshShell.Exec("cscript //Nologo c:\windows\system32\manage-bde.wsf -status") x = 0 Do While Not oExec.StdOut.AtEndOfStream strLine = oExec.StdOut.Readline() if ucase(left(strLine,6)) = "VOLUME" then if strDrive & <> "" then targetmif.writeline(" End Group") end if x = x + 1 strDrive = mid(strLine,8,2) strLine = oExec.StdOut.Readline() strDriveName = strLine strLine = "" objArray(x,0) = strDrive objArray(x,1) = strDriveName objArray(x,10) = Now end if if strDrive & <> "" and trim(strLine) & <> "" then objItem = split(strLine,":") Select Case replace(trim(objItem(0))," ","_") Case "Size" objArray(x,2) = trim(objItem(1)) Case "BitLocker_Version" objArray(x,3) = trim(objItem(1)) Case "Conversion_Status" objArray(x,4) = trim(objItem(1)) Case "Percentage_Encrypted" objArray(x,5) = trim(objItem(1)) Case "Encryption_Method" objArray(x,6) = trim(objItem(1)) Case "Protection_Status" objArray(x,7) = trim(objItem(1)) Case "Lock_Status" objArray(x,8) = trim(objItem(1)) Case "Automatic_Unlock" objArray(x,9) = trim(objItem(1)) end select end if loop 'REMOVE OLD CLASSES Set objCIMV2 = objWBEMLocation.ConnectServer(, "root\cimv2") set objDetail = objCIMV2.Get("SMS_SCCM_BitLocker") objDetail.Delete_ Set objCIMV2 = objWBEMLocation.ConnectServer(, "root\cimv2\SMS") set objDetail = objCIMV2.Get("SMS_SCCM_BitLocker") objDetail.Delete_ 'CREATE NEW CLASS Set objCIMV2 = objWBEMLocation.ConnectServer(, "root\cimv2\SMS") Set objNew = objCIMV2.Get objNew.Path_.Class = "SMS_SCCM_BitLocker" objNew.Properties_.add "BitLocker_Numerical_Password", wbemString objNew.Properties_.add "BitLocker_Password", wbemString objNew.Properties_.add "Drive", wbemString objNew.Properties_.add "DriveLabel", wbemString objNew.Properties_.add "Size", wbemString objNew.Properties_.add "BitLocker_Version", wbemString objNew.Properties_.add "Conversion_Status", wbemString objNew.Properties_.add "Percentage_Encrypted", wbemString objNew.Properties_.add "Encryption_Method", wbemString objNew.Properties_.add "Protection_Status", wbemString objNew.Properties_.add "Lock_Status", wbemString objNew.Properties_.add "Automatic_Unlock", wbemString objNew.Properties_.add "ScriptLastRan", wbemString objNew.Properties_("Drive").Qualifiers_.add "key", True objNew.Put_ strLine = "" ' COLLECT DETAILS FOR EACH INSTANCE Set objCIMV2 = objWBEMLocation.ConnectServer(, "root\cimv2\SMS") For y = 1 To x Set objDetail = objCIMV2.Get("SMS_SCCM_BitLocker").SpawnInstance_ objDetail.Drive = objArray(y,0) objDetail.DriveLabel = objArray(y,1) objDetail.Size = objArray(y,2) objDetail.BitLocker_Version = objArray(y,3) objDetail.Conversion_Status = objArray(y,4) objDetail.Percentage_Encrypted = objArray(y,5) objDetail.Encryption_Method = objArray(y,6) objDetail.Protection_Status = objArray(y,7) objDetail.Lock_Status = objArray(y,8) objDetail.Automatic_Unlock = objArray(y,9) objDetail.ScriptLastRan = objArray(y,10) 'SET DRIVE OUTPUT FOR SPECIFIC DRIVE LETTER objWshShell.Run "%comspec% /C manage-bde.exe -protectors -get " & objDetail.Drive & " & temp.log",0,true strPassword = "" strNumerical = "" 'RETURN BITLOCKER PASSWORD 'open file for reading Set outputManageBde = objFSO.OpenTextFile("temp.log") Do While Not outputManageBde.AtEndOfStream strLine = outputManageBde.ReadLine If InStr(strLine,"Password") & <> 0 Then strPassword = outputManageBde.ReadLine If InStr(strPassword, "ID:") Then strPassword = Trim(strPassword) strPassword = Right(strPassword, Len(strPassword)-4) end if End If Loop 'close file outputManageBde.Close 'RETURN NUMERICAL PASSWORD 'open file for reading Set outputManageBde = objFSO.OpenTextFile("temp.log") Do While Not outputManageBde.AtEndOfStream strLine = outputManageBde.ReadLine If InStr(strLine,"Password") & <> 0 Then strNumerical = outputManageBde.ReadLine If InStr(strNumerical, "ID:") Then strNumerical = Trim(strNumerical) strNumerical = Right(strNumerical, Len(strNumerical)-4) end if Exit Do End If Loop 'close file outputManageBde.Close objWshShell.Run "%comspec% /C del /q temp.log",0,false WScript.Sleep 250 objDetail.BitLocker_Numerical_Password = Trim(strNumerical) objDetail.BitLocker_Password = Trim(strPassword) ' WRITE DETAILS objDetail.Put_ Next WScript.Quit(0) ' FROM WMI EXPLORER ' MOF 'class SMS_SCCM_BitLocker '{ 'string BitLocker_Numerical_Password; 'string BitLocker_Password; '[key] string Drive; 'string DriveLabel; 'string Size; 'string BitLocker_Version; 'string Conversion_Status; 'string Percentage_Encrypted; 'string Encryption_Method; 'string Protection_Status; 'string Lock_Status; 'string Automatic_Unlock; 'string ScriptLastRan; '}; ' SCRIPT TO RETURN PROPERTIES 'On Error Resume Next 'Const wbemFlagReturnImmediately = &h10 'Const wbemFlagForwardOnly = &h20 'Set wshNetwork = WScript.CreateObject("WScript.Network") 'strComputer = wshNetwork.ComputerName 'strQuery = "SELECT * FROM SMS_SCCM_BitLocker" 'Set objWMIService = GetObject("winmgmts:\\" & strComputer & "\ROOT\cimv2\SMS") 'Set colItems = objWMIService.ExecQuery(strQuery, "WQL", wbemFlagReturnImmediately + wbemFlagForwardOnly) 'For Each objItem in colItems 'WScript.StdOut.WriteLine "Automatic_Unlock: " & objItem.Automatic_Unlock 'WScript.StdOut.WriteLine "BitLocker_Numerical_Password: " & objItem.Bitlocker_Numerical_Password 'WScript.StdOut.WriteLine "BitLocker_Password: " & objItem.BitLocker_Password 'WScript.StdOut.WriteLine "BitLocker_Version: " & objItem.BitLocker_Version 'WScript.StdOut.WriteLine "Conversion_Status: " & objItem.Conversion_Status 'WScript.StdOut.WriteLine "Drive: " & objItem.Drive 'WScript.StdOut.WriteLine "DriveLabel: " & objItem.DriveLabel 'WScript.StdOut.WriteLine "Encryption_Method: " & objItem.Encryption_Method 'WScript.StdOut.WriteLine "Lock_Status: " & objItem.Lock_Status 'WScript.StdOut.WriteLine "Percentage_Encrypted: " & objItem.Percentage_Encrypted 'WScript.StdOut.WriteLine "Protection_Status: " & objItem.Protection_Status 'WScript.StdOut.WriteLine "ScriptLastRan: " & objItem.ScriptLastRan 'WScript.StdOut.WriteLine "Size: " & objItem.Size 'WScript.StdOut.WriteLine "" 'NextNotes
PowerShell command to list the namespaces
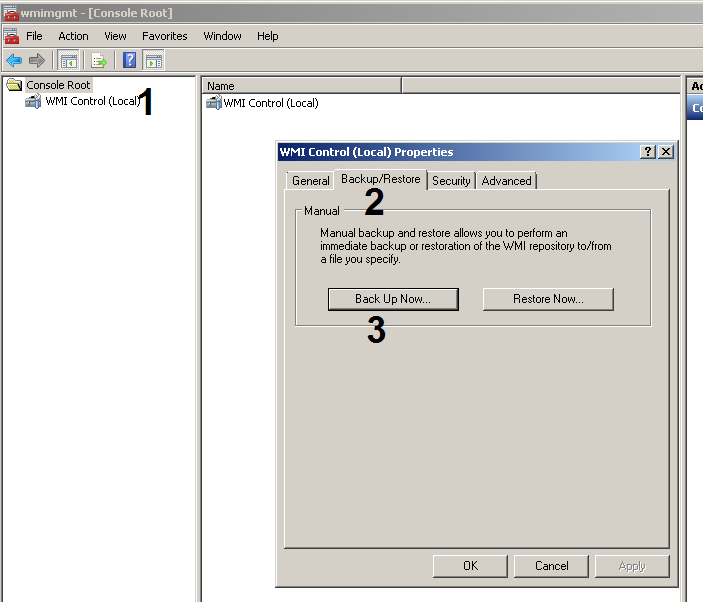
Get-WmiObject -Namespace Root -Class __Namespace | Select-Object -Property NameBack up WMI – before – making any changes
WMI Security
To set the WMI user access permissions
- Select Start > Run.
- On the Run dialog, type wmimgmt.msc in the Open field.
- Click OK to display the Windows Management Infrastructure (WMI) Control Panel.
- In the left pane of the WMI Control Panel, highlight the WMI Control (local) entry, right-click, and select the Properties menu option. This displays the WMI Control (Local) Properties dialog box.
- Select the Security tab in the WMI Control (Local) Properties dialog box.
- In the namespace tree within the Security tab, expand the Root folder. This action lists the available WMI name spaces.
- Click the CIMV2 namespace to highlight it.
- Click Security to display the Security for ROOT\CIMV2 dialog box.
- Click Add in the Security for ROOT\CIMV2 dialog box to display the Select Users or Groups dialog box.
- Add the domain user account that will be used as your proxy data collection user account. This should be a domain account (not a local computer account), but it does not need to be an account with administrative access.
- Click OK to close the Select Users or Groups dialog box and return to the Security for ROOT\CIMV2 dialog box. The user account you selected should now be listed in the Name list at the top of the dialog box.
- Select the newly added user (if it is not already selected) and enable the following permissions:
- Enable Account
- Remote Enable
Enable the permissions by clicking the Allow box, if it is not already checked for that permission. The Enable Account permission should already be selected, but the Remote Enable permission will need to be selected.- Click OK to close the Security for ROOT\CIMV2 dialog box.
The permissions should now be properly set for the proxy data collection user account.