< Exam AZ-103: Microsoft Azure Administrator
Pages: 01 02
Install Azure Mobile App to monitor Azure
– Stay connected to the cloud
– Check status and critical metrics anytime
– Diagnose and fix issues quickly
– Run commands to manage your Azure resources
Check for Azure PowerShell Modules
– C:\Program Files\WindowsPowerShell\Modules
– Look for Az names
– If not there, run Install-Module Az -AllowClobber
Subscription
– There will be cost associated with a subscription
– A logical boundary in which you deploy resources
– PowerShell: Get-AzSubscription
Create a Resource Group in PowerShell
– New-AzResourceGroup -Name MyRG -Location EastUS
– You can then check the Portal > Resource groups > and see MyRG
Remove a Resource Group using PowerShell
– Remove-AzResourceGroup -Name MyRG
Azure CLI [activity]
– Cross-platform command-line program
– Runs on Linux, MacOS, and Windows
– Can be used interactively or through scripts
– Commands are structured in _groups_ and _subgroups_
– Use find to locate commands
– Use ________ for more detailed info
--help
– Azure CLI provides interactive environment, but not an integrated env. like PS
– Cannot use local files, like files from C drive; PS can
– Azure CLI interacts with your storage file shares
Log into Azure CLI
– az login
Create a Resource Group using Azure CLI
az group create --name MyRG --location EastUS
Remove a Resource Group using Azure CLI
az group delete --name MyRG
Resource Manager
– Provides a consistent management layer
– Enables you to work with the resources in your solution as a group
– Deploy, update, or delete in a single, coordinated operation
– Provides security, auditing, and tagging features
– Choose the tools and APIs that work best for you
Resource Group
– Logical grouping of Azure resources
– Example: Create a dev environment, with dev-related resources
– Example: You want to separate business units into separate resource groups
Terminology
– A resource is simply a single service instance in Azure
– An Azure resource manager template is a JSON file that allows you to describe a set a resources
– A declarative syntax is what a template uses to state what you intend to create
– A resource provider is a service that supplies the resources you can deploy and manage through Resource Manager
– A service is the functionality you use to create an instance of a resource
Resource Groups and Deployments
– Resources can only exist in one resource group
– Groups cannot be renamed
– Groups can have resources of many different types (services)
– Groups can have resources from many different regions
– Deployments are incremental
– By scoping permissions to a resource group, you can add, remove, and modify resources easily
Resource Manager Locks
– Associate the lock with a subscription, resource group, or resource
– Locks are inherited by child resources
– Read-only locks prevent any changes to the resources
– Delete locks prevent deletion
Moving Resources
– When moving resources, both the source group and the target group are locked during the operation
– Services that cannot be moved: AD Domain Services, ExpressRoute, and Site Recovery
– A VM can moved from one resource group, to another resource group
Tip: Practice creating and removing resource groups through PowerShell.
Set Lock on Resource Group using PowerShell
– New-AzResourceLock -LockName MyLock -LockLevel CannotDelete -ResourceGroupName MyRG
Return Resource Lock Names using PowerShell
– Get-AzResourceLock
Remove Lock on Resource Group using PowerShell
– Remove-AzResourceLock -LockName MyLock
Azure Resource Manager (ARM) Templates
– Improves consistency
– Express complex deployments
– Reduce manual, error prone tasks
– Express requirements through code
– Promotes reuse
– Modular and can be linked
– Simplifies orchestration
Template Schema
– Defines all the Resource Manager resources in a deployment
– Written in JSON
– A collection of key-value pairs
– Each key is a string
– Each value can be a string, number, Boolean expression, list of values, object
Example template schema
{
"$schema":
"http://schema.management.azure.com/schemas/2015-01-01/deploymentTemplate.json#"
,
    "contentVersion": "",
    "parameters": {  },
    "variables": {  },
    "functions": [  ],
    "resources": [  ]
    "outputs": {  }
}
Create Custom Templates
– Connect to your subscription
– Create the resource group
– Deploy the template into the resource group
—— In Azure Portal > search > Deploy a custom template > Build your own template in the editor
—— Add resource
—— You can also just load your load template, if you have a file
– Verify the template deployed
—— In Azure Portal > click Resource groups > click Deployments
Deploy a template using PowerShell
$resourceGroupName = Read-Host -Prompt "Enter the Resource Group name"
$location = Read-Host -Prompt "Enter the location (i.e. centralus, eastus)"

New-AzResourceGroup -Name $resourceGroupName -Location $location
New-AzResourceGroupDeployment -ResourceGroupName $resourceGroupName `
-TemplateFile c:\MyTemplates\azuredeploy.json
New-AzResourceGroup
New-AzResourceGroupDeployment
QuickStart Templates
– Resource Manager templates provided by the Azure community
– Provides everything you need to deploy your solution or serves as a starting point for your template
– QuickStart Templates: https://azure.microsoft.com/en-us/resources/templates/
– Deploy a simple VM: https://azure.microsoft.com/en-us/resources/templates/101-vm-simple-windows/
– Browser on github; make sure you also select the Visualize button, to see what is being created: https://github.com/Azure/azure-quickstart-templates/tree/master/101-vm-simple-windows/
– Example of full template: https://github.com/Azure/azure-quickstart-templates/blob/master/101-vm-simple-windows/azuredeploy.json
Tip: Study and know the structure of JSON templates.
URI: Unique Resource Identifier
Virtual Machine Planning Overview
– IasS Cloud Services
– Planning Checklist
– Location and Pricing
– Virtual Machine Sizing
– Virtual Machine Disks
– Storage Options
– Supported Operating Systems
IaaS Cloud Services
– Test and development
– Website hosting
– Storage, backup, and recovery
– Web apps
– High-performance computing
– Big data analysis
– Extended data center
Virtual Machine Sizing
– General Purpose – testing and development, small to medium databases, and low to medium traffic web servers
– Computer Optimized – Medium traffic web servers, network appliances, batch processes, and application servers
– Memory Optimized – Relational database servers, medium to large caches, and in-memory analytics
– Storage Optimized – Ideal for VMs running databases
– GPU – Ideal for model training and inference with deep learning
– High Performance Computer – Fastest and most powerful CPU virtual machines with optional high throughput network interfaces
Virtual Machine Disks
– Operating System Disks are SATA drives, labeled as C:
– Temporary Disks provide short-term storage
– Data Disks are SCSI drives and depend on your virtual machine type
Storage Options
– Premium storage offers high-performance, low-latency SSD disk support
– Use premium storage for VMs with input/output (I/O) intensive workloads
– Two types of disks: Unmanaged and Managed
—— Unmanaged disks require you to manage the storage accounts and VHDs
—— Managed disks are maintained by Azure (recommended)
Supported Operating Systems
– Windows Server includes many common products, requires a license, doesn’t support OS upgrades
– Linux distributions are supported, upgrade of the OS is supported
Creating Virtual Machines in the Portal
– Basic (required) – Project details, Administrator account, inbound port rules
– Disks – OS disk type, data disks
– Networking – Virtual networks, load balancing
– Management – Monitoring, Auto-shutdown, Backup
– Guest config – Add additional configuration, agents, scripts or applications
Windows Virtual Machines
– Unique hybrid capabilities
– Advanced multi-layer security
– Faster innovation for applications
– Unprecedented hyper-converged infrastructure
Windows VM Connections
– Remote Desktop Protocol (RDP) creates a GUI session and accepts inbound traffic on TCP port 3389
– WinRM creates a command-line session so you can run scripts
Create a VM Using PowerShell
# 0 Before starting VM, create a Resource Group (if you don't have one)
New-AzResourceGroup -Name myRG1 -Location EastUS

# 1 Set the admin username and password
$cred = Get-Credential

# 2 Create the initial config
$vm = New-AzVMConfig -VMName myVM1 -VMSize Standard_D1

# 3 Add the OS Info
$vm = Set-AzVMOperatingSystem `
-VM $vm `
-Windows `
-ComputerName myVM1 `
-Credentials $cred `
-ProvisionVMAgent `
-EnableAutoUpdate

# 4 Add the image info
$vm = Set-AzVMSourceImage -VM $vm -PublisherName MicrosoftWindowsServer -Offer WindowsServer -Skus 2016-Datacenter

# 5 Add OS settings
$vm = Set-AzVMOSDisk -VM $vm -Name myOsDisk -DiskSizeInGB 128 -CreatOption FromImage -Caching ReadWrite

# 6 Add the NIC
$vm = Add-AzVMNetworkInterface -VM $vm -Id $nic.Id

# 7 Create the VM
New-AzVM -ResourceGroupName myRGVM -Location EastUS -VM $vm
New-AzResourceGroup
New-AzVMConfig
Set-AzVMOperatingSystem
Set-AzVMSourceImage
Set-AzVMOSDisk
Add-AzVMNetworkInterface
New-AzVM
Tip: Practicing creating VMs in the Portal and in PowerShell
Linux Virtual Machines
– Hundreds of community-built images in the Azure Marketplace
– Linux has the same deployment options as for Windows VMs
– Manage Linux VMs with many popular open-source DevOps tools
Linux VM Connections
– Authenticate with a SSH public key or password
– SSH is an encrypted connection protocol that allows secure logins over unsecured connections.
– There are public and private keys
Tip: Be able to create the SSH keys, create a Linux VM, and assign the public SSH key
Virtual Machine Highly Available
– Maintenance and Downtime
– Availability Sets
– Update and Fault Domains
– Scale Sets
– Implementing Scale Sets
– Autoscale
– Implementing Autoscale
Maintenance vs Downtime
– When the platform predicts a failure (hardware is about to fail), it will issue an unplanned hardware maintenance event. Action: Live migration
– Unexpected Downtime is a when a virtual machine fails unexpectedly. Action: Automatically migrate (heal)
– Planned Maintenance events are periodic updates made to the Azure platform. Action: No action.
Availability Sets
– Two or more instances in two or more availability zones = 99.99% uptime
– Configure multiple virtual machines in an Availability Set
– Configure each application tier into separate Availability Sets
– Combine a Load Balancer with Availability Sets
– Use managed disks with the virtual machines
Update and Fault Domains
– Update domains lets Azure perform incremental or rolling upgrades across a deployment. During planned maintenance, only one update domain is rebooted at a time.
– Fault Domains are a group of virtual machines that share a common set of hardware, switches, that share a single point of failure. VMs in an availability set are placed in at least two fault domains.
Scale Sets
– Scale sets deploy a set identical VMs
– No pre-provisioning of VMs is required
– As demand goes up VMs are added
– As demand goes down VMs are removed
– The process can be manual, automated, or a combination of both
– FAQs
Implementing Scale Sets
– Instance count. Number of VMs in the scale set (0 to 1000)
– Instance size. The size of each virtual machine in the scale set
– Deploy as low priority. Can save up to 80%
– Use managed disks
– Enable scaling beyond 100 instances
Autoscale
– Define rules to automatically adjust capacity
– Scale out (increase) the number of VMs in the set
– Scale in (reduce) the number of VMs in the set
– Schedule events to increase or decrease at a fixed time
– Reduces monitoring and optimizes performance
Implementing Autoscale
– Define a minimum, maximum, and default number of VM instances
– Create more advanced scale sets with scale out and scale in parameters
Virtual Machine Extensions
-Extensions are small applications that provide post-deployment VM configuration and automation tasks
– Managed with Azure CLI, PowerShell, Azure Resource Manager templates, and the Azure Portal.
– Bundled with a new VM deployment or run against any existing system
– Different for Windows and Linux machines
Custom Script Extensions
– Extension scripts can be simple or complex
– Extensions have 90 minutes to run
– Double check dependencies to ensure availability
– Account for any errors that might occur
– Protect/encrypt sensitive information
– Set-AzVmCustomScriptExtension
Desired State Configuration
– Configuration blocks have a name
– Node blocks define the computers or VMs that you are configuring
– Resource blocks configure the resource and its properties
– There are many built-in configuration resources
Deploy and Manage Virtual Machines
Exercise 1: Deploy Azure VMs by using Azure Portal, Azure PowerShell, and Azure Resource Manager templates.
Exercise 2: Configure networking settings on Azure VMs running Windows and Linux operating systems.
Exercise 3: Deploy and configure Azure VM Scale sets
Virtual Machines and Scale Sets
Exercise 1: Deploy Azure VMs and Azure VM scale sets by using ARM templates
Exercise 2: Configure compute and storage resources of Azure VMs
Exercise 3: Configure compute and storage resources of Azure VM scale sets
Virtual Machine Scale Sets
– Supports only stateless, auto-scaling workloads (big data, big compute, containers)
– Up to 1000 when using Marketplace image and managed disks
—— Requires setting singlePlacementGroup to False
– Up to 300 when using custom image and managed disks
—— Requires setting singlePlacementGroup to False
– Up to 100 when using Marketplace image and unmanaged disks
– Up to 20 when using custom image and unmanaged disks
—— You can increase this number to 40 if you disable overprovisioning
– Deploy into a single subset and an availability set
– Integrates with Azure load balancers
—— Basic Azure Load Balancer – layer 4, up to 100 VMs
—— Standard Azure Load Balancer – layer 4, up to 1000 VMs
—— Azure Application Gateway – layer 7, up to 1000 VMs
– Supports manual and automatic horizontal scaling
Virtual Machine and Virtual Machine Scale Set Availability and Scalability
Azure VMs in an availability zone
– 99.99% availability SLA
– Logical grouping of two or more standalone Azure VMs, Azure VMs in availability sets, or Azure
VM scale sets in the same virtual network
– Must be assigned during Azure VM or Azure VM scale set deployment
– Supports Standard Azure Load Balancer or Web Application Gateway
Azure VMs in an availability set
– 99.5% availability SLA
– Logical grouping of two or more Azure VMs in the same subnet
– Must be assigned during Azure VM deployment
– Up to 3 fault domains and up to 20 update domains
Supports Azure Load Balancer (Standard and Basic) and Web Application Gateway
Standalone VMs
– 99.9% availability SLA if using Premium storage disks
To Check Firewall Rules
– Open Portal > Click Virtual machines > Select VM > Click Networking
– View Inbound and Outbound Port Rules
VM Scale Set Availability and Scalability
– One or more placement group with up to 100 VMs each
– Up to 5 fault domains and up to 5 update domains
– Supports Scaling:
—— On-demand
—— Scheduled
—— Automatic (performance base)
———— Based on host metrics
———— Based on guest OS metrics (requires VM diagnostic extension)
VMs and VMs Scale Set Storage
When a virtual machine is created, it has:
– C: Drive (OS disk)
– D: drive (temp disk, contents can be lost)
– F: data disks, which go to a storage account
Unmanaged and Managed Disks
Unmanaged Disks:
– Up to 250 storage accounts per subscription
– Up to 40 disks per Standard storage account
– Storage accounts for VMs in the same availability set might be in the same storage stamp
– A custom image must be in the same storage account as VM disks
Managed Disks:
– Up to 10,000 disks per region per disk type
– Storage account performance limits not relevant
– Disks of VMs in the same availability set in different stamps
– A custom image must be in the same region as VM disks
Deploying Virtual Machine and Virtual Machine Scale Sets
– Determining the Virtual Machine and Virtual Machine Scale Set Deployment Method
– Using the Azure Portal to create Virtual Machines and Virtual Machine Scale Sets
– Using Azure PowerShell to create Virtual Machines and Virtual Machine Scale Sets
– Using Azure CLI to create a Virtual Machine and Virtual Machine Scale Set
– Creating VMs and VM Scale Sets by using Azure Resource Manager templates
– Create Azure VMs and Azure VM Scale Sets from:
—— Azure Marketplace images
—— Custom images
——— Managed
——— Unmanaged
Use Azure Portal to Create Virtual Machines
– VM Name
– VM Disk Type (HDD or SSD)
– Username and password or SSH public key (SSH)
– Subscription
– Resource Group
– Location
– VM size
– High availability (availability zone or availability set)
– Storage (managed or unmanaged)
– Virtual network and subnet
– Public IP address
– Network security group (allow TCP 3389 or 22 for Linux)
– Extensions
– Monitoring (boot and OS diagnostics)
– Auto-shutdown and Backup
Use Azure Portal to Create Virtual Machine Scale Sets
– Virtual machine scale set name
– Operating system disk image (Windows or Linux)
– Subscription
– Resource Group
– Location
– Availability zone
– Username and password or SSH public key (Linux)
– Instance count
– Instance size
– Enable scaling beyond 100 instances
– Use managed disks
– Public IP address name, allocation method, and domain name label
– Autoscale
Virtual Machine Marketplace Image-based Deployment
– Authenticate and select the target subscription
– Create a resource group
– Create a virtual network and a subnet
– Create a public IP address
– Create a network adapter
– Create a NSG and associate it with a subnet
– Set admin credentials for the OS
– Assign the OS to the VM configuration
– Assign the image to the VM configuration
– Add the OS settings to the VM configuration
– Add the network adapter to the VM configuration
– Create the VM
Virtual Machine Custom Image-based Deployment
add notes here
Virtual Machine Scale Set Marketplace Image-based Deployment
– Authenticate and select the target subscription
– Create a resource group
– Create a virtual network and a subnet
– Create a public IP address
– Create and configure and Azure load balancer
– Define the IP configuration of the virtual machine scale set
– Create the virtual machine scale set:
—— New-AzureRmVmssConfig
—— New-AzureRmVmssStorageProfile
—— Set-AzureRmVmssOsProfile
—— New-AzureRmVmssNetworkInterfaceConfiguration
Use Azure CLI to create Virtual Machines and Virtual Machine Scale Sets
Prerequisites
– Make sure that your Azure Stack operator added the Windows Server 2016 image to the Azure Stack marketplace.
– Azure Stack requires a specific version of Azure CLI to create and manage the resources.
az login
az account set -subscription "mySubscription1"
az group create --name "myRG1" --location eastus
az vm create \
  --resource-group "myRG1" \
  --name "myVM1" \
  --image "Win2016Datacenter" \
  --admin-username "AzureUsername" \
  --admin-password "AzurePassword" \
  --location local
# az group delete --name "myRG1"
Create Virtual Machines by Deployment Templates
{
    "apiVersion": "2017-12-01",
    "type": "Microsoft.Compute/virtualMachines",
    "name": "myVM1",
    "location": "[resourceGroup().location]",
    "properties": {
      "hardwareProfile": {
    },
      "osProfile": {
    },
      "storageProfile": {
    },
      "networkProfile": {
    },
}
Create Virtual Machine Scale Sets by Deployment Templates
{
    "apiVersion": "2017-12-01",
    "type": "Microsoft.Compute/virtualMachinesScaleSets",
    "name": "myVMScaleSet1",
    "location": "[resourceGroup().location]",
    "properties": {
       "virtualMachineProfile": {
          "storageProfile": {
          },
     },
      "osProfile": {
    },
    "networkProfile": {
    },
}
Deploying Virtual Machines Lab Exercises (do these)
-Exercise 1: Create Virtual Machines by using the Azure Portal, Azure PowerShell, and Azure CLI
-Exercise 2: Validating Virtual Machine Deployment
-Exercise 3: Using Visual Studio and an Azure Resource Manager template to deploy VMs
-Exercise 4: Using Azure PowerShell and an Azure Resource Manager template to deploy VMs
-Exercise 5: Using Azure CLI and an Azure Resource Manager template to deploy VMs
Virtual Machine Hierarchy in a Diagram
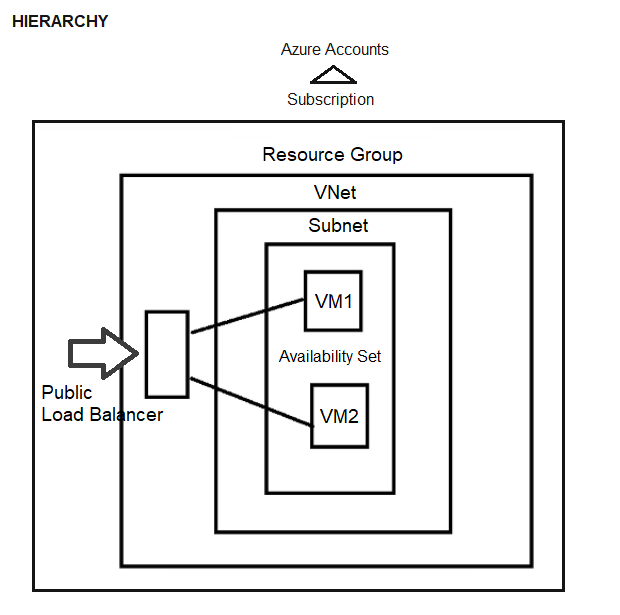
Basic VM Process
Step 1 – Create a Virtual Network
Step 2 – Create a Subnet
Step 3 – Deploy Virtual Machines in Subnet
Step 4 – Make VMs a part of an Availability Set
———– Different Fault and Update Domains
Step 5 – Create a Load Balancer; traffic hits the load balancer
Create a Virtual Network (Portal)
On the upper-left side of the screen, select Create a resource > Networking > Virtual network.
In Create virtual network, enter or select this information:
- On the upper-left side of the screen, select Create a resource > Networking > Virtual network.
- In Create virtual network, enter or select this information:
Setting Value Name Enter myVNet1 Address space Enter 10.1.0.0/16 Subscription Select appropriate Subscription Resource group Select Create new (unless you have a RG), enter myRG1, then select OK Location Select East US Subnet – Name Enter myVSub1 Subnet – Address range Enter 10.1.0.0/24 - Leave the rest as default and select Create.
Create Virtual Machine (Portal)
- Choose + Create a resource in the upper left-hand corner of the Azure portal.
- In the New page, under Popular, select Windows Server 2016 Datacenter.
- In the Basics tab, under Project details, make sure the correct Subscription is selected.
- Choose to Create new resource group, unless you already have a resource group. Type myRG1 for the name.
- Under Instance details, type myVM1 for the Virtual machine name
- Choose East US for your Location. Leave the other defaults, Image=Windows Server 2016 Datacenter, Size=Standard DS1 v2
- Under Administrator account, provide a username and password.
- Under Inbound port rules, choose Allow selected ports and then select RDP (3389) and HTTP from the drop-down.
- Leave the remaining defaults and then select the Review + create button at the bottom of the page.
Pages: 01 02
tags: Azure, Azure training, AZ-103, MrNetTek